Roar: Modulation
Roar: Modulation
Modulation Matrix
Add a Roar to a Bass and select the suitable BassCrunch preset. This does exactly what it says on the tin and will be a great way to demo Roar’s superb modulation setup.

Open Roar’s Modulation Matrix. You’ll see that it only has four sources going from top left to right (LFO 1 and 2 plus Envelope and Noise). However, these can be applied to pretty much every Roar control
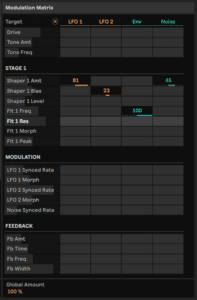

Expand Roar to its maximum window size so you can see everything that is going on. With this particular preset, two of its engines are running in series. We’re going to use LFO 1 to modulate, so set its speed value to a relatively low 1 as shown in red.
Envelope follower and noise
The Envelope follower creates an envelope based on the incoming signal.

In the Modulation Matrix, reset both the Drive and Tone amounts to zero by double-clicking each. Now push the Envelope modulation up to 100. You now can hear the Drive rise and fall with the Envelope!
Raising the Attack smooths out the effect while raising the Release prolongs it. Keeping the Threshold low and Gain high (above 10dB) and you accentuate the effect. Again, it’s very dirty.
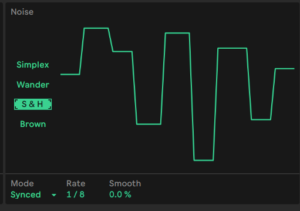
Using Noise as modulator
With this modulation source we can add randomness and noisy texture to the modulated destination.
While Noise is fully random…
S&H holds the signal for a moment at a certain value and we can also sync this to notes for rhythmic effects.
Envelope Input Listen
Enable the blue headphone switch to solo the input signal that triggers the Envelope Follower.
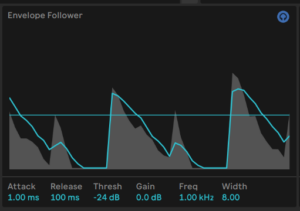
This is a diagnostic tool that can be temporarily enabled to make it easier to set the Envelope Follower parameters!
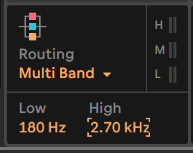
Multiband processing

Roar’s Multiband processing gives us all three saturation stages running in parallel.
It also gives us the opportunity to work within each frequency band that the three stages are focussing on. You can easily switch each stage in and out by clicking the Low, Mid and High boxes. The Bias, Amount and Frequency dials can be modulated too.
Setting the crossover frequencies
One of the first things to do is to give each band the best frequency range for the task at hand.
We do that by setting the crossover frequencies. Mid range band in the example below goes from 180Hz to 2.70kHz!
Routing>Feedback

Separate stages for direct and feedback
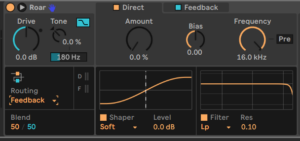
Use Blend to set balance between Direct and Feedback
Feedback Routing Modulation Options