Sound Design with Macro Variations in Live 11
By Heinrich Zwahlen
The ability to store the state of Macro Controls as preset variations in Racks has drastically increased the functionality of these already powerful compositional tools that have been a centerpiece for sound design and composition in Ableton Live for many years. This new feature makes it possible to create complex sound changes on the fly involving up to16 macro mapped parameters and is a great addition to using hands-on control or automation.
Macro Controls are useful for performance and production, facilitating a set of relevant goto controls for one or several interacting parameters.
With Live 11 we now get up to 16 Macro Controls and we can store and recall specific configurations of settings of instruments or audio and midi effects grouped in Racks as variations of the preset…
Adding more Macro Controls increases the potential of the variations exponentially.
This opens up endless possibilities for sound design not only with individual devices but for combinations of several devices inside simple or nested Racks.
For performance, variation changes can be controlled with Key or Midi Remote.
For studio use, I see this in the first place as an additional layer to presets, whereby they could be defined by the planned use of a preset e.g. bass vs pad or lead part for variations of the preset that fine-tune it for a certain sonic compositional environment or mix.
Even though having 16 Macro Controls greatly increases the possibility of more detailed transformative changes, it’s certainly still not enough to control all mappable parameters.
A good starting point would be to know all the mappable parameters of a device and from there make a choice to only map those effective for the sound changes envisioned.
As before with Macro Controls in general, macro mapping parameters carefully with a plan in mind can go along way to make tweaking the sound easier, creating useful results faster, and it’s of course equally important for using randomization in a meaningful way. We should also consider editing the the settings in the Macro Browser so the knobs control the parameters within a sonically useful range for the task at hand.
Using Macros for Instruments
Know your instrument well and make a plan.
The more you’re familiar with a certain synthesis method and the layout of the specific instrument at hand, the more useful your mappings will be.
Understanding what each parameter does to the sound by itself but also in combination with related parameters is key to good and expedient synth programming in general.
If you can’t walk you can’t run but once you’re set up well with smart macros, randomization might even do the running for you.
Macro Variations as Preset Variations and as Starting Points for New Presets
When it comes to mapping it really all depends on what you want to do with the sound.
We only have 16 knobs, so informed planning decisions have to be made:
Depending on your goal, there could be basic mappings for a default/init sound that allows for a maximum range of different sound characters or mappings that are more geared towards creating useful variations within a certain sound type/category.
The former is great for wild experimentation especially with randomization, while the latter would be more useful to create variations for a specific compositional use.
Adding Macros
After you stored a variation with New and decide to add a new macro, an asterisk * appears next to the stored variation, indicating that not all settings have been stored as part of the existing variation. When adding new Macro Controls, the current parameter settings will be copied to the new Macro Controls and it’s good practice to re-save all the existing variations first using the Overwrite Macro Variation button in order not to lose those settings.
Rolling the Dice using Randomization
This is the fun part! The creative potential of randomization as well as the probability and chance functions found in Live are one of the exciting aspects of Life 11 and previously were most prominently found in the Follow Actions menu.
Sometimes randomization can lead to interesting unexpected new sounds that totally go beyond the original character of the preset and then it might be a good idea to also save the current settings as a new preset to the Library.
On the other hand, using randomization could require excluding selected Macro
Controls from being randomly changed and we should also define the control ranges for Macro Controls more carefully in the Mapping Browser to set boundaries to the changes, especially if the goal is to stay within the preset’s sound type.
Excluding Macros from Randomization
Before we roll the dice, we want to make sure whether or not every mapped parameter should change. This option can be selected by right clicking on a Macro Control. This is a very important function in addition to defining ranges in the Mapping Browser when we want to use randomization in a more planned way.
Excluding Macros from Variations
This option can also be selected in the context menu of the Macro Controls.
When switching between variations we might want to prevent certain Macro Controls from changing. Those are parameters we might also want to control manually on the fly e.g. volume or transposition. That’s where the Exclude command comes in handy and greatly expands the practicality of the variations.
Note that Excluding from Variations will not exclude from Randomization, so you sometimes might even want to exclude both!
Sound Variation Examples with Wavetable and Drum Rack
I like using Wavetable here for its resizable GUI and its very versatile sound engine.
I focus primarily on what’s controlling the oscillators since much of the sound character originates here with this synthesis method:
Wavetable positions, Oscillator Effects and balancing volume btw Osc 1 and 2.
I will add some LFO controls for cyclical movement and quantized rhythmic modulation
as well as Macro Controls for some of the filter’s parameters.
If need be, Frequency and Resonance could even be mapped on one Macro Control, maybe also with inverted ranges in the Mapping Browser.
Alternately, with Operator (FM Synthesis), controlling operator ratios, levels and their envelopes would be key for creating the harmonics, while filters were not even part of the original design of FM instruments. However, with a subtractive synth like Analog, it would be all about the use of filters along with modulators.
Key and Midi Remote Control

For performance or automation recording, we can have hands-on Midi or Key Remote Control
Use launch, navigate up/down, or use a rotary encoder (1) to dial in a variation directly.
Deepa Bass
Starting out with a classic FM bass, I decided to map Wavetable’s oscillator effects to create different Fm amounts and ratios (Tune) followed by wavetable position control.
With these mappings alone, you could achieve many different timbres for an FM bass, and the added modulation Envelope 3 is used to shape those FM harmonics over time.
Having the option to change the sine towards a square wave with the Position control allows for much harder sounds combined with raising the FM Amt. (Video clip below)
I also mapped LFO 1 for some wobble action and the filter here is more like the icing on the cake to darken the sound a bit and to use the drive for some added saturation.
Lastly, Unison is used to add stereo spread and richness to the sound.
The variations marked with R were created using randomization with the red Macro Controls being setup to exclude them from that.
Spectral
The Spectral wavetables are a great starting point for some eerie or illbient sci-fi sounds
with the position control letting us transition between many riveting waveforms.
Position is therefore a great destination for LFO modulation with this sound.
I used 6 macros just for the various LFO controls and could have added even more but I already liked the results I got out of it. As with other things, less can be more also with sound design.
The oscillator effects serve to add more grit and unexpected harmonics and take the position sweeps sonically somewhere else in a dramatic way. Randomization gave me some additional ideas that I then tweaked a bit to get the final variations. I excluded the Out Gains of the oscillators (red) from the randomization process because the sound variations only worked with a steady volume balance.Lastly the morphing filter simply emphasizes the sweeping movements created the LFO. (Video clip below)
Morphing between Variations with Smooth Automator
Switching between variations on the fly can be tricky and create glitches. We can record with Key Remote or Midi Remote Control to Session or Arrangement view, but it’s hard to get it precise enough without quantization. While the Variations got me excited right away, one of my first requests when seeing the beta was having a way to morph between variations. Fortunately that option already exists with a M4L device.
Sound Design with Macro Variations in Live 11
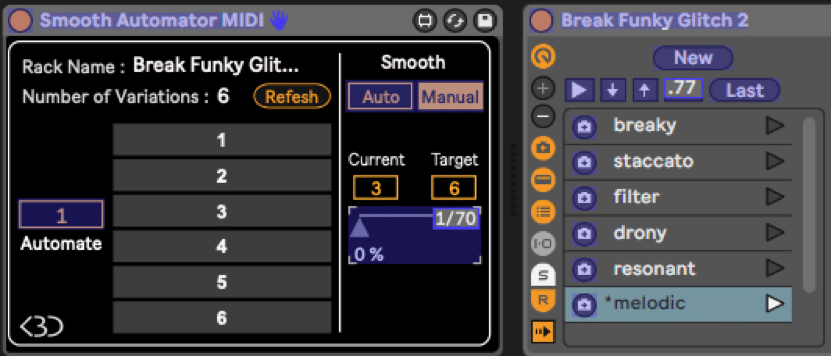
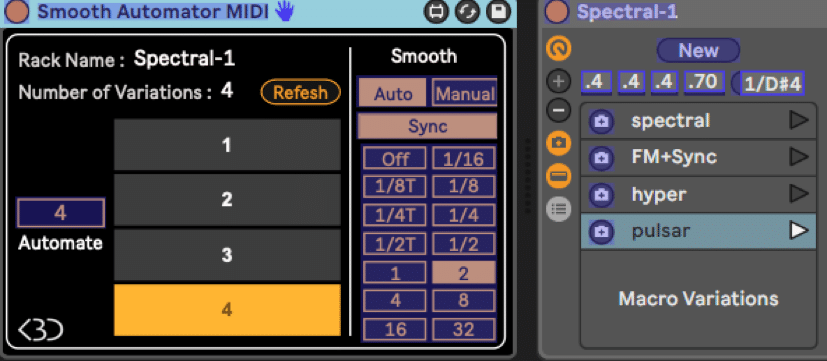
The M4L device by KBdevices lets us morph between variations of Instrument, Midi and Audio Effect Rack presets. It automatically creates timed crossfades between variations which serves to smoothen the transitions but with long crossfades can also lead to totally new and unexpected timbres. This device really takes the usefulness of Variations to another level.
See: https://gumroad.com/kblivesolutions#lGDVv
I used the Automator Midi Effect with the Spectral sound from before with a 2 bar automated crossfade. With long crossfade times you get some very gradual transitions to the next variation with the in-between settings revealing some new transitional variations that you would miss out on with the switching. Many of the controls are also mappable including the variation numbers. Then, the changes can also get recorded with automation.
MarBel
This sound is mostly defined by the specific wavetables with the Oscillator Effects creating a cross between a marimba and a bell. The Marimba wavetable already greatly defines the direction with its wooden acoustic timbre. I used FM with the sinusoidal Osc1 to match the wooden character of the Marimba and add some fullness. From there, raising the FM amount will inevitably lead to a harder sound and with some table position changes it gets buzzy and distorted. Adding FM to the Marimba will also make it more metallic and bell-like. The Macro Controls also cover some key envelope functions for volume and timbre over time while the filter frequency gets some LFO modulation.
I’m also using Smooth Automator here in the clip below, as it makes it easier to record glitch free switching between variations by setting up short fade times. The Automator below shows a 1/4 note transition that sound like the fades usually done in Arrangement clips.
(Video clip below)
Creating Manual Fades in Smooth Automator

In the second half of the clip below, I’m switching to manual crossfading and that opens up endless possibilities to improvise with Variations. Note that the fader can be midi mapped and also recorded. When controlling the fades manually, we can create some great sounding transitions in a playful way.
DrumFades
I started out by slicing a break beat to midi using a built-in preset and then adding some of my own Macro Controls for filter and LFO control, also mapping them to all the siblings.
The unique looping implementation in Simpler makes it the perfect instrument for creating glitchy and resonant sounds on the fly, and randomization is a great way to get inspired with some cool settings you might not even have thought about in the first place.
Since the Loop length is a percentage of the playable Length, I can compress or lengthen the loop with the Length control alone while moving it forward or backward in the sample.
When turning off the Snap to zero crossings function, you can create super short resonant loops that can be pitched differently depending on the length using the Loop Length and loop Compress Macro Controls. This resonating effect is similar to what we find in flangers or comb filters or now also in Live 11’s Spectral Resonator.
The variations are a perfect tool to capture and switch or morph between the best sounding settings that are otherwise sometimes tricky to reproduce. (Video clip below)
GlitchyBeats with Automation
Actions executed in the Automator are recorded along with the Macro Control automation.
I recorded some MarBel and Drum Rack variation changes to the Arrangement.
I then did some editing of the playback order for the variations. Both sounds keep changing at 1/4 quantization during this clip. I also use the randomly created ‘heavy’ variation from the Deepa Bass. It comes in handy for this style. (Video clip below)
Using Variations with Midi and Audio Effect Racks
Everything we’ve seen so far with Instrument racks can also be applied to Midi and Audio Effect Racks.
With Smooth Automator, variations of the Instrument and the Audio Effect Rack can all be controlled from a set of master Macro Controls in a nested Rack. I use different Automator devices for the Wavetable Instrument Rack and the Audio Effects Rack containing Echo i.e. Smooth Automator Midi and Smooth Automator Audio found under Audio Effects.
In the clip below, I’m using the Chord Midi Effect with a pad followed by the Echo effect.
The Chord effect is adding some tensions (intervals 7/9/11/13/) to a basic minor triad for more complex, jazzy chords. I control the sound variations from there as well, along with choosing different variations for Echo device.
This is only possible because Automator lets me macro map the variation number to the Macro Controls. The remote controls in the Rack itself can’t be macro mapped!
Sound Design with Macro Variations in Live 11
The green Macro Controls in this example are excluded from the variations. I use them to switch variations for Wavetable and Echo via the Smooth Automator.
Because these Macro Controls are excluded, the variations are now marked with an asterisk; meaning the settings of the those controls are not stored in the variations.
With the sound Macro Control I can manually dial in pad variations on the fly and I use style to switch between Echo preset variations. Note how sound switching happens with a 2 bar fade which works particularly well with pads. The wet knob controls the Echo amount.
(Video clip below)
Pad with Chord and Echo
The criteria for choosing the Macro Controls would be very different for midi and audio effects than for instruments.
Midi effects are designed with certain instruments or sounds in mind while audio effects only work as expected within a certain sonic context. For instance we usually design different reverb effects for drums, pads or vocals.
Instruments however, are ‘standalone’ devices and do not necessarily require to fulfill that kind of functionality as they are the source of sound. I focused on Instrument and Drum Racks in this article but that’s not to say that we could not do equally compelling things with Midi or Audio Effects Racks.
I could think of Midi Effect Racks with Arpeggiator with variations either designed for melodic arpeggios with leads or note repeat variations for drums.
Audio Effect Racks could combine different spacial, distortion or wave shaping devices. Even the wave shaping in Saturator alone could offer many interesting options. Corpus could be an interesting candidate as well to add variations of resonant bodies to sounds.
Signal processor Racks could be designed for specific sounds while mixing and with the ability to also add 3rd party plugins to any of these Racks the possibilities would be endless..


