Mapping Key and Velocity Zones in Sampler, Looping
Mapping Key Zones
Mapping key zones in Sampler allows you to assign specific sections of your MIDI keyboard to trigger specific samples or sounds. This typically used to create multisampled instruments, where different pitches of a single sound are mapped across the keyboard and it’s important to maintain optimal sound quality for all notes as the sonic quality deteriorates the further away we go from the sampled root note.
To map key zones in Sampler in Ableton Live:

- Drag and drop your samples into the Sampler device. Make sure they are all in the same folder and labeled correctly for easy organization.
- Click on the “Zone” tab in the Sampler window. Here you will see a visual representation of the keyboard and the different zones that you can map your samples to
- In the case of tuned instruments (piano, guitar etc) you first want to make that the Root note of the sample is placed on the corresponding note on the keyboard. You can do so by holding the option key and dragging the dot in each zone zone to the right note on the keyboard.
- Then spread out the zone ranges equally around their root notes using the command from the drop down context menu (shown in the image above)
- To add an additional key zone, click on the “Add” button and select the range of keys you want to assign your samples to. You can adjust the start and end points of each key zone by dragging the markers on the keyboard.
- Once you have defined your key zones, you can also overlap the start and ending of each zone and create a crossfade to avoid abrupt transitions and gradually go from one sample to next by dragging the white line on the top of each zone so they have equal fade out and fade in times.

- You can adjust the volume, pitch, loop points and other parameters for each sample in the “Sample” tab.

- Save your instrument as a preset for future use.


By mapping key zones in Sampler, you can create realistic multisampled instruments or layered instruments that combine different sounds and samples across your keyboard.
Creating Velocity Zones
Mapping velocity zones in Sampler allows you to create different sample variations that are triggered depending on the velocity of the incoming MIDI notes. This can be useful for creating more realistic and expressive instrument sounds, as well as providing a wider range of tonal possibilities.
Here are the steps to map velocity zones in Sampler:
- Open Sampler and load a sample into a new instrument by dragging it onto the Sampler interface.
- Click on the “Zone” tab in Sampler’s lower section.
- Click on the “Velocity” button to open the Velocity Editor.
- By default, Sampler will play the samples layers across all velocities ranging from 1-127.

- Make sure the softest articulation is placed at the tope of the zone editor.To separate the by velocity we can choose the equal distribution command from the context menu.

- Adjust the range of each zone by dragging its velocity range sliders.
- To assign a different sample to a velocity zone, drag a new sample onto the zone. This will replace the previous sample in that zone.
- You can adjust the level, tuning, and other parameters of each sample variation in the “Zone” tab.


By mapping velocity zones, you can create instruments that respond dynamically to your touch, with different sample variations triggered by soft or harder playing. This can be particularly useful for creating expressive acoustic instrument sounds like pianos, drums, and strings.
Looping
In the example below we can see the sample playback start, the sustain loop and a release loop.

 No Sustain Loop — Playback proceeds linearly until either the Sample End is reached or the volume envelope completes its release stage.
 Sustain Loop Enabled — Playback proceeds linearly until Loop End is reached, when it jumps immediately to Loop Start and continues looping. If Release Mode is OFF, looping will continue inside the Sustain Loop until the volume envelope has completed its release stage.
 Back-and-Forth Sustain Loop Enabled — Playback proceeds to Loop End, then reverses until it reaches Loop Start, then proceeds again towards Loop End. If Release Mode is OFF, this pattern continues until the volume envelope has completed its release stage.
Link — Enabling the Link switch sets Sample Start equal to Loop Start. Note that the Sample Start parameter box doesn’t lose its original value — it simply becomes disabled so that it can be recalled with a single click.
Loop Start — The Sustain Loop’s start point, measured in samples.
Loop End — The Sustain Loop’s end point, measured in samples.
Release Mode — Whenever the Sustain Loop is active, Release Mode can also be enabled.
 — The volume envelope’s release stage is active, but will occur within the Sustain Loop, with playback never proceeding beyond Loop End.
Release Enabled — When the volume envelope reaches its release stage, playback will proceed linearly towards Sample End.
Release Loop Enabled — When the volume envelope reaches its release stage, playback will proceed linearly until reaching Sample End, where it jumps immediately to Release Loop and continues looping until the volume envelope has completed its release stage.
Back-and-Forth Release Loop Enabled — When the volume envelope reaches its release stage, playback will proceed linearly until reaching Sample End, then reverses until it reaches Release Loop, then proceeds again towards Sample End. This pattern continues until the volume envelope has completed its release stage.
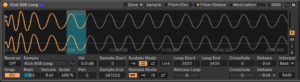
Adding sustain to a short sample
Turn an 808 kick into sustained bass sound: in the case of periodic waveform we can just loop on cycle. Turn on Snap to eliminate clicks !
Looping non-periodic samples looping can become a bit trickier but if we can’t get rid of clicks or glitches we can always use the crossfade function to smoothen the transitions.