Mixing Desk Basics
Now we have an environment that isn’t coloring what we hear we can start to look at how we can improve the mix itself.
Start from zero
Before you build a mix, put everything back to a known state. In Logic: faders at 0 dB, pans centred, sends down, EQ and plug-ins bypassed or removed, nothing routed anywhere unusual. Save that as a template and you only ever do it once.
This is not about tidiness. Every mystery noise in a mix comes from something you did not know was on - a send feeding a reverb you forgot about, an EQ still boosting 4 kHz from the last project. Start from a known state and there is nothing to hunt for.
Some engineers go further: every fader down, every track muted, then bring parts in one at a time. Worth doing at least once, because it forces you to decide what each part is for instead of mixing whatever happens to be loudest.
(If you are a dinosaur or nostalgic and still mix on an analogue console, it is the same job with more knobs: input gains at minimum, polarity and high-pass switches off, EQ flat and out of circuit, auxiliaries down, group routing deselected. On an assignable digital desk, store it as a default memory - tracking down one stray assignment on one of those can cost you an afternoon.)
Subgrouping
When you have finished recording all your parts and are ready to start mixing, it is a good idea to subgroup sections of your mix, such as the drum kit or the horn parts, so that you can control all of them from a single fader or stereo pair of faders. Logic gives you several ways to do that, depending on what you want out of the group.
Logic's busses work exactly the way a hardware console's do: route several tracks to one FX plug-in, be it compression, EQ or reverb. Grouping tracks this way does not only make mixing less complicated, it also saves processing power - one reverb doing the work of twelve.
In Logic you use the send to route to a separate auxiliary track, and put the effect there. Leave the bus or aux fader at 0 dB, then start balancing the individual tracks.
The other way to group tracks is Logic's group selector. You have 32 groups, and assigning tracks to one links them, so moving one fader moves the rest by the same amount. It links more than faders - mute, edit and others are all options in the Group Settings. The catch is that a group of this kind carries no audio, so you cannot put a plug-in across it.
On the other hand, if you use the other method and route to an aux track, you need to be aware that if you turn down the faders the tracks signal will still be being sent to the FX unit and you will still be able to hear the track playing. Just so you know! You can fix this problem, however, by assigning the effects themselves, to the same group. The only downside here is that when you mute the track the FX will cut dead too, which is not always what you want, particularly with a reverb or delay effect.
Although there is no hard and fast rule, many engineers like to start with the rhythm section and build the bass and guitars or keys on from there. In some instances however, if working on a particularly vocal driven track it can be a good idea to start with the lead vocal and bring in the other important elements around that. As I said, there is no hard and fast rule. For dance music and other beat-driven forms, it is probably sensible to start with the kick and bass relationship and then work the other components in from there.
Should you be working on a track that you have not heard before then it would be advisable to familiarise yourself with the individual parts before attempting the mix. This should help you get a feel for the type of sound for the genre you are working with and which elements are going to take precedence. Having done this, it is important to listen to the track as a whole, since the musical choices that you make now, whilst subjective, should help you mould the mix into a cohesive whole greater than the sum of its parts. Once you are comfortable with the direction that you want to take, now would be a good idea to listen to other recordings of a similar type to use as reference for your final mix.
Referencing
When starting the mixing process it can be very easy to lose sight of what you are trying to achieve. You may be drawn into creating a balance of a few instruments only to find that this balance is destroyed when you begin to add more and more other components. Of course you have to start somewhere, but remember that the piece has to work as a whole and this might mean that automation will probably have to be employed at some point. Try to consider the entire timbre also, and how it stands up to other commercial pieces of the same genre.
(to check reference tracks)
As discussed, one way to do this is to place a reference track within the arrange page and refer back to that periodically. By playing good quality productions on your monitoring system, you will be able to tell pretty quickly what your strengths and weaknesses are and tweak accordingly. Good critical reference listening will also help you outside of the mixing sphere and give you some good creative musical and production ideas. I have listed a few guidelines below to help get you started.
Reference material is great for figuring out the sound of your studio. It is also helpful when you are starting to learn how to mix. It gives you a base sound from which you can make decisions. However, be careful that you don’t rely too heavily on using reference material when you are mixing. Think about the following:
Using a reference cut when you’re mixing is a common thing to do, but do this in moderation. If you get into the habit of constantly comparing your mix to a reference CD whilst you are mixing, it becomes a kind of crutch that you cannot live without. In the long run, this can prevent you from learning how to make decisions with confidence, based solely on what you hear in your own work. So try to avoid doing this too much.
If you keep going back and forth between something you are mixing and a reference cut, you may wind up trying to duplicate that reference mix in your own work. This is a mistake since there are far too many variables between your project and the reference cut. In the end you will drive yourself crazy trying to recreate someone else’s mix, and you will miss all of the creative possibilities in the project you are working on. These are reference mixes, not mixes to be copied.
A further problem that is easy to encounter is that of an ever-increasing monitor level. I have often been tempted to keep pushing the levels louder and louder because of the way that the frequencies begin to interact on your body – you begin to listen with your muscles as well as your mind; increased volume can often seem to add to the excitement. But unfortunately, when mixing, the louder your monitoring becomes, the less accurate your balance will become, simply because it becomes easier to hear the quieter elements that are usually lost at the normal levels when the volume is pumped. Turn the monitoring down to a level that is generally going to be used (maybe a little louder) and you will be able to achieve far more transferable results without suffering from ear-fatigue or jarring the neighbours.
The same desk, in Logic
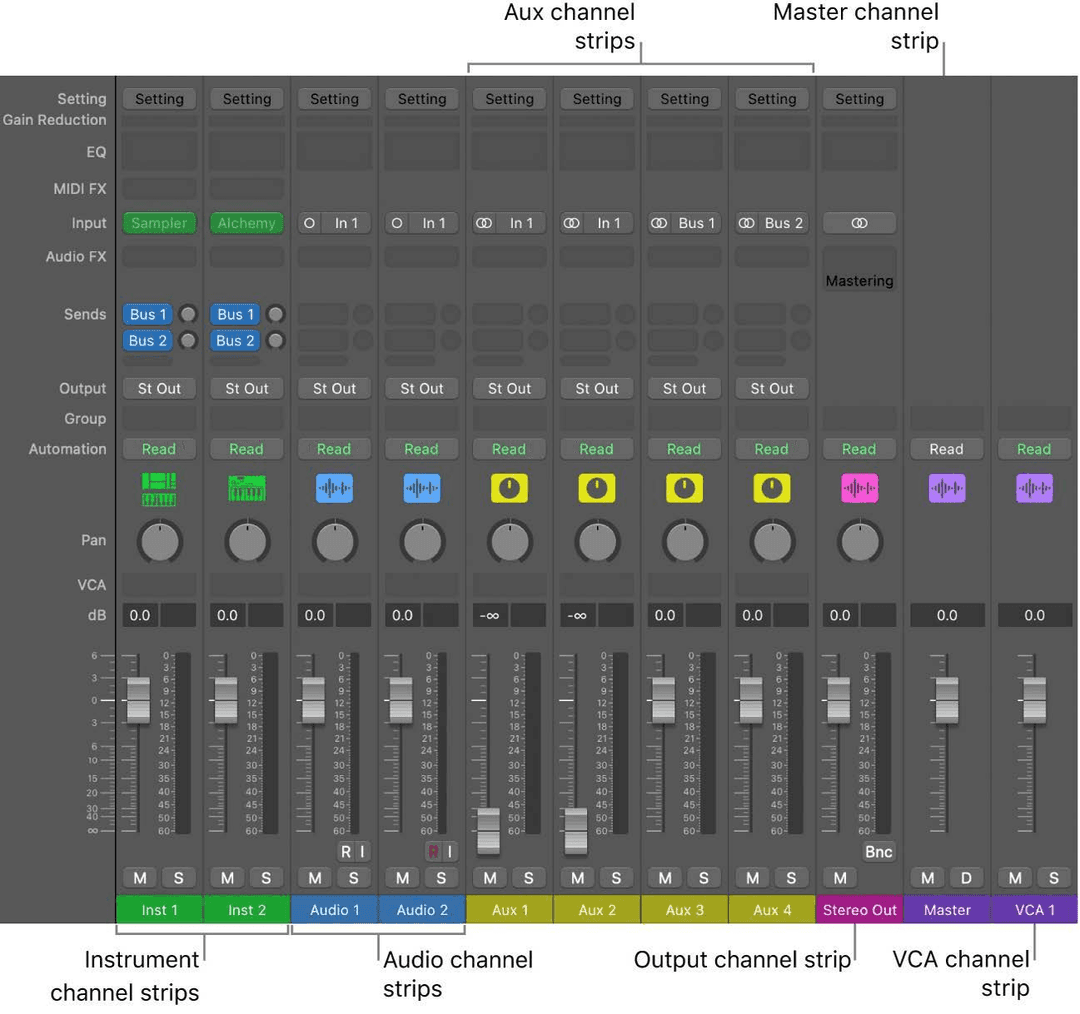
The controls this chapter describes are all in Logic's Mixer, and the channel strip types are worth being able to tell apart at a glance.
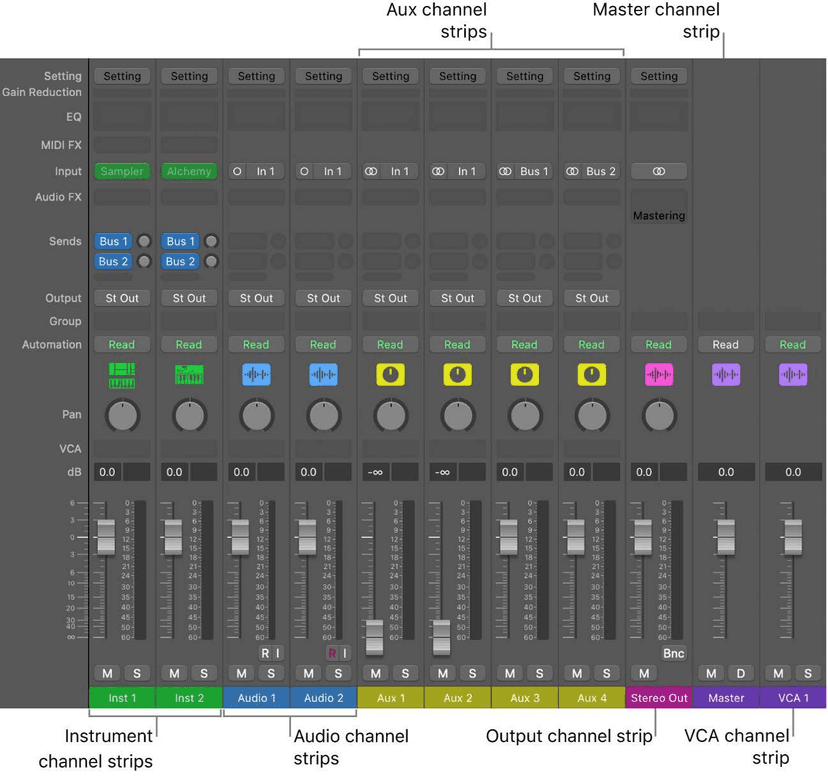
- Audio - a recorded or imported audio track.
- Software instrument - an instrument plug-in and everything after it.
- Aux - where a bus arrives. Effects returns and subgroups both land here.
- Output - the signal leaving Logic for an interface output.
- Master - one overall level control after the outputs.
The distinction that matters for this chapter is aux: it is the strip that makes both send effects and subgrouping possible, and it is the one with no track of its own in the arrangement.
Subgrouping, and Logic's two ways of doing it
This chapter's subgrouping section describes routing several channels to one fader. Logic gives you two routes to that, and they are not the same thing:
- Bus to an aux - the console method. Set several channels' outputs to a bus, and that bus arrives on an aux strip whose fader now controls all of them, with a place to put processing across the group.
- A summing track stack - the same routing, created for you and folded into a single track in the arrangement. Easier to manage; identical underneath.
Use a bus and aux when you want the group in the Mixer; use a summing stack when you want it tidy in the Tracks area too.
Mixer groups are a different thing again
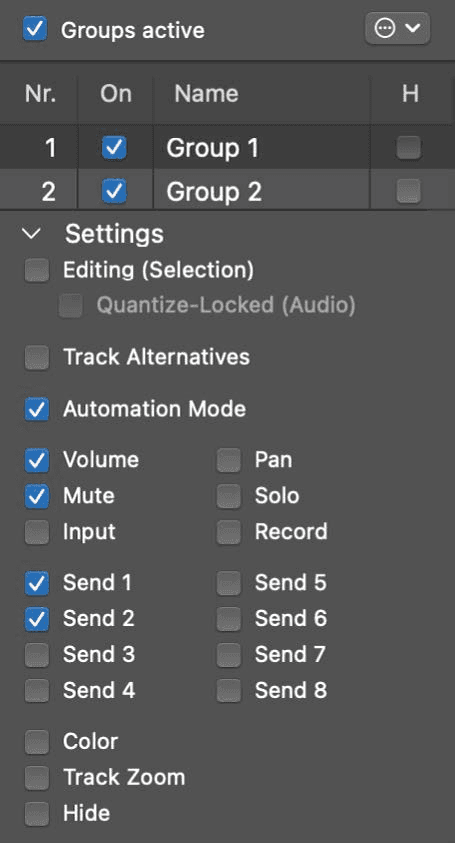
A Mixer group does not route audio at all. It links controls, so moving one fader moves the others - and the Group Settings window lets you choose exactly which controls are linked: volume, pan, mute, solo, sends, and more.
So: a subgroup sums signals through one fader and can be processed as a whole. A group links several faders that still run separately. Reach for a subgroup when you want to compress the drums together, and a group when you just want the drum faders to move together.
Hold Option while moving a grouped control to override the link for that one move - the standard escape hatch, and the thing to remember when a fader will not move on its own.
Do this now
- Zero the mix. Every fader down, every plug-in bypassed.
- Bring up the kick to a sensible level and leave it there as your reference point.
- Add each other element one at a time, balancing only with faders.
- Set up your reference track on a channel you can solo instantly, gain-matched to your mix.
If the balance is not working with faders alone, no plug-in is going to fix it.