The premaster is the final stereo mix you send for mastering - to an engineer, or to your own mastering session. How you prepare it has a big impact on the final result. The less a mastering engineer has to repair, the better the master can sound.
Visual metering
Two meters matter most here: peak meters and RMS meters.
Peak meters show the highest instantaneous level. They help you avoid a signal that is too hot - which leaves no room to master - or too low. Mastering makes the signal louder, but it cannot improve the premaster's signal-to-noise ratio, so do not leave a mix very quiet either.
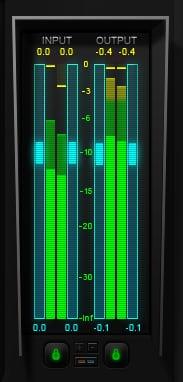
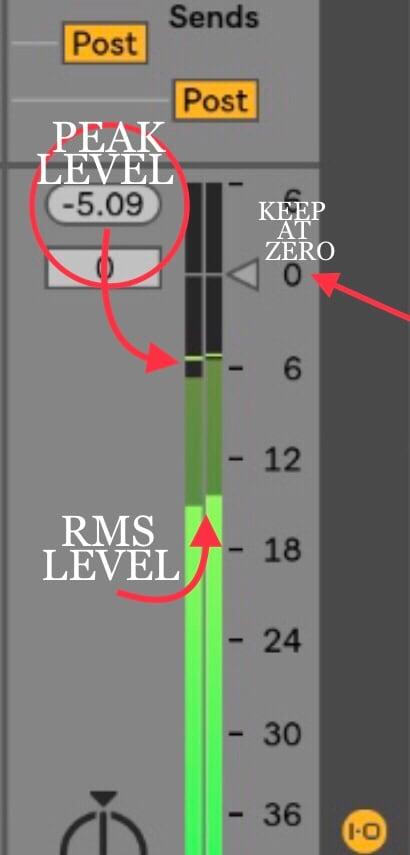
- A common target: the highest peak of the premaster somewhere around -6 to -3 dBFS. This leaves the most options for mastering. Engineers vary; ask yours.
RMS meters show the average level - the "power" of a track - and help keep levels consistent across several tracks. A VU meter is a good tool for this.
- In typical modern music, premaster RMS levels often sit somewhere around -18 to -9 dB RMS, depending on the genre and purpose.
Listening checks
Meters are a reminder; your ears decide whether a mix is finished.
Multiple systems
Before rendering, test the mix on several systems - nearfield monitors, headphones, consumer speakers - and compare it with professional reference tracks, turned down to match your mix's level. Plug-ins can simulate systems, but always check in real life.
Frequency ranges against references
- Highs - cymbals, leads, effects and risers. At matched volume, does the top end compare with your references?
- Mids - vocal level especially. Matching the vocal's relationship to the track with your references makes sure it will sit right alongside other songs on a playlist or in a DJ set.
- Lows - aim for a consistent low-end level, listen for distortion, and listen for conflict between the low elements. Balance your sub-bass notes: if some are much louder than others, mastering will exaggerate the problem.
Monitoring at different levels
- Soft monitoring. Turn the speakers all the way down, then raise them slowly until you can hear just a few elements. What you hear first is what is loudest - a fast way to check levels. (Not reliable for low end, which needs volume to judge.)
- Club monitoring. Turn it up and make sure it bumps. If you are a DJ - or know one - test it in a real room.
Rules for rendering the premaster
- Never normalise. Normalising pushes the file as loud as it can go, removing the headroom the mastering engineer needs.
- Never dither the premaster. Dither adds low-level noise to mask errors when reducing bit depth. You should not be reducing bit depth at this stage, so you do not need it.
- Never send an MP3. Lossy formats discard information and can add artefacts, including in the stereo low end. Start mastering from 100% of your mix.
- Make sure it is stereo - and that you have not left a mono check engaged on the master bus. A good stereo mix loses nothing significant in mono, but it should not be mono.
- Remove master-bus limiting that you used only for loudness while mixing - or ask your engineer what they prefer. Gentle, intentional bus processing that is part of the sound can stay.
- Render at 24-bit, at the session's sample rate - 44.1 or 48 kHz are standard. 32-bit float is fine if your engineer accepts it.
Premaster quick guide
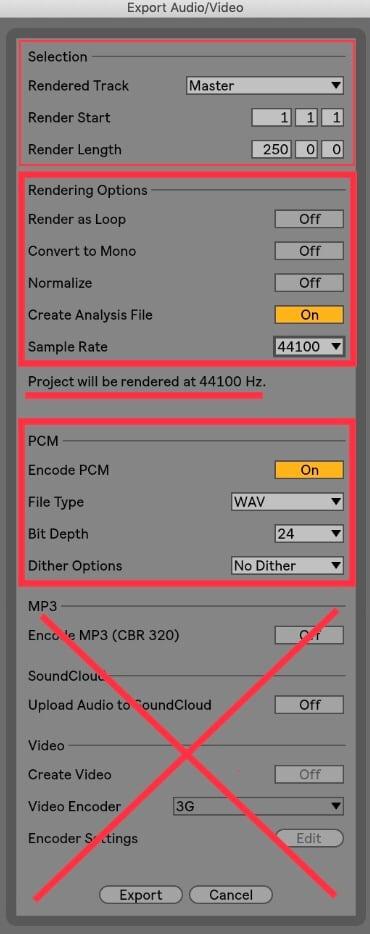
- Peaks around -6 to -3 dBFS
- RMS around -18 to -9 dB
- Crest factor roughly +6 to +12 dB (see the crest factor chapter)
- 44.1 or 48 kHz, 24-bit WAV or AIFF
- No normalising, no dither, no limiter for loudness
Do this now
- Meter your mix: note the highest peak and the average RMS level.
- Do the soft monitoring test and write down which elements you hear first.
- Render a premaster that meets every point on the quick guide.
Adapted, with thanks, from the lesson notes of J.M. Brooklyn Audio Mastering.