Sampling in Logic Pro X
As of version 10.5.1, Logic have revamped their long standing flagship sampler EXS24 to bring a variety of requested and overdue features that make many Logic users (including myself) VERY happy!
You now have 2 options to sample in Logic, depending entirely on your workflow and what you're trying to achieve.
Quick Sampler
This brand new feature makes it easy to capture audio and to create a sampler instrument using a single audio file. You can record directly to Quick Sampler or drag an audio file to use as the starting point for an instrument. Quick Sampler analyzes the audio and can intelligently create slices, find loop points, and adjust sample length and pitch independently. You can make adjustments in the waveform display to fine-tune the results, and add synthesizer-type processing using filters, envelopes, and other controls.
Sampler
Sampler is a full-featured software sampler in a modern design that provides synthesis, mapping, and zone editing areas in a single window interface. You can show and hide different sets of controls to easily switch between synthesizer processing and sampler instrument editing. The zone editor offers detailed control over start, end, and loop points, while the mapping editor enables fast and flexible assignment of samples across the keyboard. Sampler supports all existing EXS24 mkII instruments.
There is of course, the super simple, OLD SCHOOL, way of doing things with your audio files in your arrange window too!
If you choose to go this route- there's a few things you should know how to do. You can of course, mix and match and use any combination of these techniques!
Sampling with Audio Regions
One of the first things you're going to want to establish is, based on the sample you're using, are you going to use that sample at the same tempo it was originally recorded, or do you want to bring a slower or faster sample in to your session and match the session tempo? We'll look at the workflows and tools we can use to get us whichever results we desire!
Time stretching
When you resize Audio regions, the tempo of the regions does not change. You can however time stretch regions to change the tempo of the region. Expanding regions increases the the amount of time between events in the regions, while compressing regions decreases the distance. For example, you can make a region play in half time by stretching it to twice its original length, or play in double time by shortening it to half its original length.
To time stretch or compress audio regions, Option-drag the right edge of one or more audio regions.
This action stretches or compresses the audio by the amount that the region is altered in length, and replaces the original region with a new PCM audio file (in the original file format, or AIFF, if the original was not PCM).
Time stretching is limited to the value of the current Tracks area grid setting (in the Snap pop-up menu).
Note: You can also time stretch MIDI regions!
By choosing the audio time stretching algorithm, you can select the most appropriate one for the material you are processing, with the least 'artifacts'- which is a word describing how much breaking up of the region will be audible. The less, the better! Always try a few out, to see which gives you the results you desire.
- Choose Edit > Time Stretch > Time Stretching Algorithm, then choose an algorithm from the submenu.
- Universal (default): This high-quality algorithm is able to handle any kind of audio material and is generally recommended for most time-stretching tasks. The following two algorithms can, however, deliver better results in cases where the audio material exactly matches the outlined specifications.
- Complex: Choose this algorithm to obtain natural-sounding results when time-stretching complex musical material—orchestral music or final mixes.
- Percussive: Perfectly maintains the timing of rhythmic material, making it a good choice for drum loops and percussive, nonharmonic signals. In comparison to the Beats Only algorithm, the Percussive algorithm is better suited for percussive material that has been processed through a reverb (or contains a long tail). This may also apply to percussive playing styles, such as staccato electric piano or clavinet parts. Beats Only may be the better alternative for dry drum recordings.
- Version 5 (Legacy): Inherited from Logic 5, this algorithm can be used on most types of audio material. It imparts a particular color on processed audio, which may be a useful creative option.
- Any Material (Legacy): Can handle most types of audio material.
- Monophonic (Legacy): A specialized algorithm for monophonic material—an individual voice, or brass or woodwind instrument, for example.
- Pads (Legacy): Use on polyphonic material with harmonic content—choirs or string sections are good examples.
- Rhythmic Material (Legacy): Use on rhythmic material—can be drums and percussion, but less obviously rhythm guitar, clavinet, and piano comp parts.
- Beats Only (Legacy): Perfectly maintains the timing of percussive material. This algorithm should be your first choice for all kinds of dry drum loops.
Time stretching is all well and good, but it doesn't help us when we're working and we do not know the tempo of the material we are working with. In previous versions of Logic, it used to be a bit tricky to find the tempo of audio regions, but ever since the introduction on the Smart Tempo feature it has become less of a headache to figure out the tempo of an audio region and work with it on the grid. Smart Tempo is also something we will look at later, as it's a helpful tool for us to work with when we're recording without a metronome, but for now, let's explore how we can work with it when using audio regions that have been pre-recorded.
Working in the Smart Tempo Editor
In the Smart Tempo Editor, you can view and edit Smart Tempo analysis results, including beat markers and other tempo information. After you record an audio or MIDI region or import a file using Smart Tempo, you can refine the tempo analysis and correct any tempo detection errors to define the musical intent more accurately. When working in Adapt mode, tempo and time signature changes are transferred to the project tempo and time signature tracks.
When you open the Smart Tempo Editor, the audio file or MIDI region is displayed along with the tempo analysis results. The entire audio file or MIDI region is shown in the overview, with the visible area of the file highlighted by a colored rectangle. The main display shows the visible part of the file, with the detected beats indicated by orange beat markers. Beat markers for downbeats are displayed more prominently than for other beats.
You can preview the file or region; make quick tempo, beat, and timing adjustments; or make more complex edits to the tempo information for a single beat, a selection, or the entire file or region. The tempo analysis, and any edits you make in the Smart Tempo Editor, are stored in the audio file, so you can still access them if you copy the file or use it in another project. For MIDI regions, the analysis and edits are stored with the project.
You can make adjustments in two different ways: by playing the file or selection and tapping the D and T keys on your computer keyboard to indicate downbeats (D) and beats (T), or by editing beat markers in the main display. When tapping in a selection, only the downbeats or beats in the selected area are changed.
Each beat marker has several handles, each with a different function. Holding the pointer over a handle displays a tag showing the handle’s function. You can make a selection before clicking a handle; if there is no selection, Logic Pro makes a default selection of the beats affected by the edit. Depending on the selection, not all editing functions may be available.
You can view any of the audio files in a Smart Tempo multitrack set, including the downmix, in the Smart Tempo Editor. Edits to the Smart Tempo analysis results of the downmix are applied to all audio files in the multitrack set.
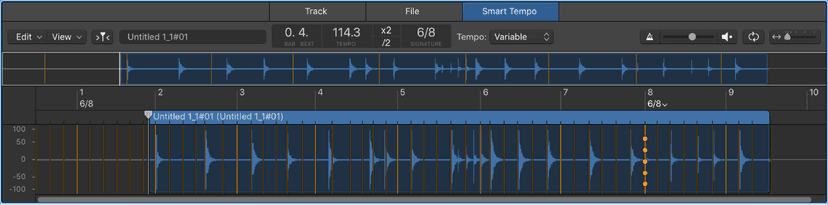
The Smart Tempo Editor includes the following controls and working areas:
- Edit pop-up menu: Choose tempo actions including adapting the project tempo to a region, maintaining the relative position of all regions, reanalyzing the file or region, and removing tempo edits made to the file. When an audio file used in a Smart Tempo multitrack set is selected, you can also open the Smart Tempo Multitrack window.
- View pop-up menu: Choose view options, including scroll in play and showing an overlay of the tempo curve. When an audio file used in a Smart Tempo multitrack set is selected, you can also choose to view the downmix waveform.
- Catch button: Turn on Catch mode, so that the visible part of the display follows the playhead during playback.
- Filename display: Shows the name of the file or region displayed in the Smart Tempo Editor. When an audio file that is part of a Smart Tempo multitrack set is selected, the Filename display becomes a pop-up menu where you can select any file used in the set, including the downmix file.
- Bar and Beat display: Shows the current playhead position in bars and beats.
- Tempo display: Shows the detected file tempo; if multiple tempi are detected, shows as Variable. You can select the tempo and enter a new file tempo.
- Double Tempo and Half Tempo buttons: Use to double or halve the tempo of the audio file, or of the current selection.
- Signature display: Shows the detected time signature at the playhead position. To change the time signature, click the display and choose a new time signature from the pop-up menu. Editing the signature changes the time signature for the complete file, removing any signature changes.
- Tempo pop-up menu: Shows whether the file has a constant or variable tempo. By choosing the alternative option, you can trigger a new analysis of the audio file.
- Metronome button: Turn the metronome on or off.
- Volume slider: Adjust the relative volume between the metronome and the audio file.
- Preview button: Start or stop playback of the audio file.
- Cycle button: Turn Cycle mode on or off. If a selection exists, the Cycle region matches the selection. If no selection exists, Cycle mode extends the length of the audio file.
- Horizontal Zoom slider: Drag left or right to show a smaller part of the file or region in more detail, or show a larger part of the file or region in less detail. Click left or right on the arrows to change the zoom level.
- Overview: Shows the entire audio file or MIDI region. The visible area of the file appears highlighted in a colored rectangle.
- Main display: Shows the visible area of the audio file or MIDI region, with markers showing the detected beats and downbeats.
Note: Edits you make in the Smart Tempo Editor do not alter the audio data in the source audio file, but only the tempo information Logic Pro uses to conform (flex) the file to the project tempo.
To open the Smart Tempo Editor, do one of the following:
- Control-click a region in the Tracks area, then choose Tempo > Show/Hide Smart Tempo Editor from the shortcut menu.
- Select a region in the Tracks area, then choose Window > Open Smart Tempo Editor.
- Use the Show/Hide Smart Tempo Editor key command.
Start or stop file or region playback by clicking the Preview button (with the speaker icon).
Scroll and zoom in the Smart Tempo Editor
In Logic Pro, do any of the following:
- Press the Left Arrow to scroll left.
- Press the Right Arrow to scroll right.
- Press the Up Arrow to zoom out so that the entire audio file or MIDI region is visible.
- Press the Down Arrow to zoom in incrementally until the pointer is centered in the main display.
You can manually set downbeats and beats, if you like. Start playback of the file or region, or of the current selection. While the file is playing, press the D key on your computer keyboard to indicate downbeats, and press the T key to indicate beats.
If your region is in a different time signature, change the time signature by doing one of the following:
- To change the time signature of the audio file or selection: Click the Signature display, then choose a new signature from the pop-up menu.
- To add a time signature change at a downbeat: Place the pointer next to a downbeat in the main display, then choose a new signature from the Signature pop-up menu that appears next to the downbeat.
Changing the signature replaces any signature stored in the audio file.
Double or halve the file or region tempo if you need to. You can change the tempo of the audio file (if there is no selection) or the current selection:
- To double the tempo: Click the X2 button in the Tempo display.
- To halve the tempo: Click the /2 button in the Tempo display.
When you place the pointer over a beat marker, a set of circular handles appears along the length of the beat marker. Dragging the pointer vertically over each handle shows a tag describing the function of that handle. Press and hold the Command key while dragging a beat marker to have it snap to significant analysis points.
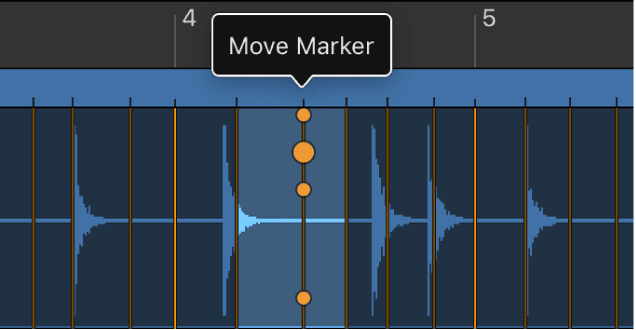
- To set a beat as the downbeat: Place the pointer over the beat marker and click the Set Downbeat handle.Setting a beat as the downbeat also moves the region, unless the project tempo is set to Keep and Flex & Follow is set to Off. This handle is not available for beat markers already on a downbeat.
- To move an individual beat: Click and hold the Move Marker handle and drag the beat marker to a new position.
- To scale beat markers in a selection: Make a selection, click and hold the Scale Selection handle for a beat marker in the selection, then drag to scale the selected beat markers.If you drag a Scale Selection handle when there is no selection, Logic Pro automatically selects the bar in which the beat marker is located. If the beat marker is a downbeat, the preceding and following bars are selected.
- To scale preceding beat markers and move following beat markers: Make a selection, click and hold the Scale Left, Move Right handle for a beat marker, then drag the beat marker. The selected area is scaled, and beats to the right of the selected area are moved. If you click and hold the handle on a downbeat, the preceding bar and the following part of the file are selected. This is useful for correcting tempo detection where the music temporarily slows down or speeds up.
- To scale all beat markers in the file or region (or in a selection): Click and hold the Scale All handle for a beat marker, then drag the beat marker.
- To move all beat markers in the file or region (or in a selection) by the same amount: Click and hold the Move All handle for a beat marker, then drag the beat marker left or right.
Applying tempo actions to the file or region
This is a crucial stage of working in the Smart Tempo to understand, and where the region will conform to your project tempo or your project tempo will conform to the region tempo. Nine times out of ten, we're going to want this to happen one way round or the other- so make sure you have a good understanding of what happens at this stage!
You can choose the following tempo actions from the Edit menu in the Smart Tempo Editor control bar:
- Apply Region Tempo to Project Tempo: Applies the tempo of the selected region to the project tempo. In the Apply Region Tempo to Project Tempo dialog you can select additional options:
- Align downbeat to nearest project downbeat: Aligns the region downbeat to the nearest downbeat in the project, regardless of Project Tempo mode.
- Maintain relative positions of all other regions: When selected, maintains the temporal relationship between regions in the project when applying the region tempo to the project tempo. This can be particularly useful in Adapt mode.
- Apply Project Tempo to Region and Downbeat: Keeps the project tempo, adapts the region tempo to the project tempo, and aligns the region downbeat with the project.
- Maintain Time Position of All Regions: When selected, maintains the temporal relationship between regions in the project when making edits in the Smart Tempo Editor. This can be particularly useful in Adapt mode.
- Revert Changes: Discard all edits in the current Smart Tempo Editor session (the initial tempo analysis is preserved).
- Analyze Again: Perform a new tempo analysis of the file or region or the current selection.If no musical tempo reference is present, the tempo, downbeat, and beat positions are reanalyzed. If a musical tempo reference is present, only beat positions are analyzed, not the tempo or downbeat.For MIDI regions, this command reanalyzes the region based on the original positions of MIDI note events when the file was first recorded, first analyzed, or for projects created in earlier versions of LP, the first time you open the region in the Smart Tempo Editor.
- Remove Original Recording Tempo and Analyze Again: Delete the existing tempo and perform a new tempo analysis.Use this feature with caution. In most cases it is best to keep the original file tempo. The primary use of this feature is to remove original recorded tempo data that you know is invalid–for example, for a recording without a metronome in Keep mode.For MIDI regions, this command reanalyzes the region based on the current positions of MIDI note events, replacing the original positions of MIDI note events when the region was first recorded, first analyzed, or for projects created in earlier versions of LP, the first time you open the region in the Smart Tempo Editor.
- Revert to Original Recording Tempo: Delete the tempo analysis, preserving the tempo of the original recording.
- Edit Smart Tempo Multitrack Set: Opens the Smart Tempo Multitrack Set window showing the current multitrack set.
- Set Average Tempo for Selection: Sets a single average tempo for the selected area of the file or region.
- Set Average Tempo within each Bar: Sets an average tempo within each bar of the selected area of the file or region.
- Extend First Tempo in Selection to Beginning: Sets the part of the region preceding the selection to use the first (leftmost) tempo in the selection.
- Extend Last Tempo in Selection to End: Sets the part of the region following the selection to use the last (rightmost) tempo in the selection.
- Scroll in Play: After the playhead reaches the center of the display, it stays centered, while the display scrolls as the file or region plays.
Smart Tempo is a simple, great tool for working with audio samples where the tempo is not pre determined- like old drum breaks. Smart Tempo also goes one step further in being helpful if you want to adjust and manipulate tempos of these regions, once you have determined them in the ways outlined above, for which it works hand in hand with one of Logic's other great features- Flex Time. We'll take a deeper dive into Flex Time later, but for now, understand that if you have determined the tempo of your sample at 99 BPM and you want to move it up to 110 BPM, you can use the Flex & Follow setting to help you out.
Flex & Follow
On Flex enabled audio tracks, the Flex & Follow pop-up menu replaces the Flex checkbox for audio regions in the Region inspector. You use the Flex & Follow setting to enable Flex Time for a region, to set whether it follows the project tempo, and to set whether it additionally uses Smart Tempo beat markers at the bar or beat level.
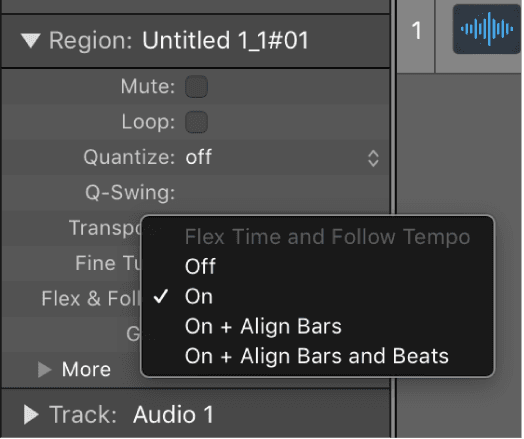
You can edit Smart Tempo beat markers in the Smart Tempo Editor. If the Flex & Follow pop-up menu is set to Bars or Beats, edits in the Smart Tempo Editor immediately update in the region displayed in the Tracks area (similar to how transient markers update when an audio region is quantized).
When you open a project created in an earlier version of Logic Pro, audio regions in projects for which the Flex checkbox was selected (turned on) have their Flex & Follow parameter set to On. Audio regions for which the Flex checkbox is unselected (turned off) have their Flex & Follow parameter set to Off.
To choose the Flex & Follow setting for an audio region
- Select the audio region.
- In the Region inspector, select one of the following from the Flex & Follow pop-up menu:
- Off: The region does not follow changes to the project tempo, and is not Flex enabled.
- On: The region is Flex enabled, so it follows any manual Flex edits. It also follows any changes to the project tempo.
- Bars (On + Align Bars): The region is Flex enabled, and Smart Tempo beat markers are used to conform the region to the project tempo at every downbeat (bar).Because the region is conformed to each bar, the 1/1 setting is not available in the Quantize menu.
- Beats (On + Align Bars and Beats): The region is Flex enabled, and Smart Tempo beat markers are used to conform the region to the project tempo at every beat.Because the region is conformed to each (1/4-note) beat, the 1/1, 1/2, 1/4 settings are not available in the Quantize menu.
You can set the default Flex & Follow settings for audio recordings and imported audio files in the Smart Tempo project settings.
Do this now
- Drag an audio region straight onto a Quick Sampler and play it chromatically.
- Switch between Classic, One Shot and Slice and hear what each does to the same sample.
- Then load the same file into Sampler and map it across two zones.
Quick Sampler for speed, Sampler when you need control. Knowing which is which saves a lot of time.