Recording Software Instruments
Recording Software Instruments
Before you can begin recording software instruments in Logic Pro, you should connect a music keyboard to your computer to play and record the built in software instruments.
If your keyboard is a USB music keyboard, connect the USB cable from the keyboard to your computer. These keyboards are the ones you will find most people using- as USB offers easy connectivity to your computer.
If your keyboard happens to be a standard MIDI keyboard, you must first connect the keyboard to a MIDI interface using standard MIDI cables, then connect the MIDI interface to your computer.
If your keyboard is a Bluetooth or Wifi music keyboard, consult its documentation for instructions on how to pair it to your computer. It's usually farily simple to setup, and you can get going with these easy, quickly and without wires!
Be sure to follow the instructions that came with the keyboard, which may include installing the correct driver on your computer, though the vast majority of them are now 'Plug & Play'. Always check the manufacturer’s website for the latest driver software. If you’re using a MIDI interface, be sure to follow the instructions that came with the interface.
If your computer has a Touch Bar, you can play the software instrument on the selected software instrument track using the Keyboard screen and play drum kits and percussion instruments on the selected Drummer track using the Drum Pads screen. To access this function, tap the 'Mode' button on the left side of the Touch Bar, then tap the Keyboard button. Tap the keys on the Touch Bar keyboard to play notes. To adjust the size of the Touch Bar keyboard, tap one of the Keyboard Size buttons to the left of the Touch Bar keyboard. To limit notes to a musical scale: Tap the Scale button, then tap to select the root note and the mode.
Musical Typing Keyboard
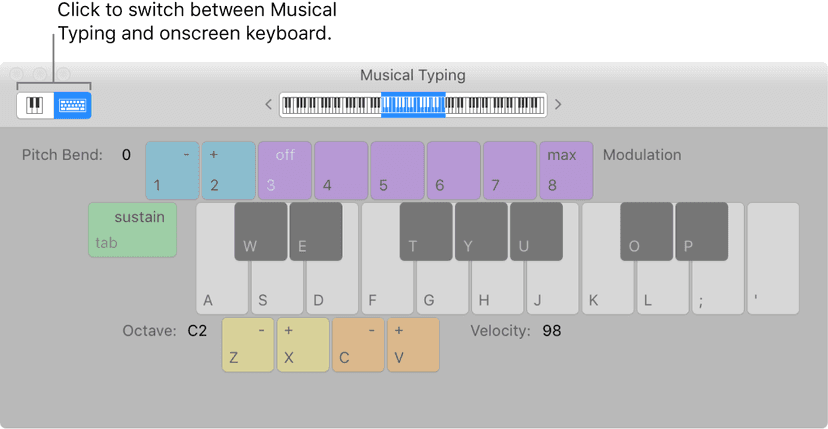
If you use the key command Command+K, you'll be presented with a very handy Musical Typing Keyboard. This allows you to play software instruments in Logic without the need to have an external device connected. It's super handy for if you have a laptop and don't happen to have your keyboard to hand, and you want to input some MIDI information, like drum sounds for a beat or chords on your synth pads. You can also get to the Musical Typing Keyboard by going to Window > Show Musical Typing.
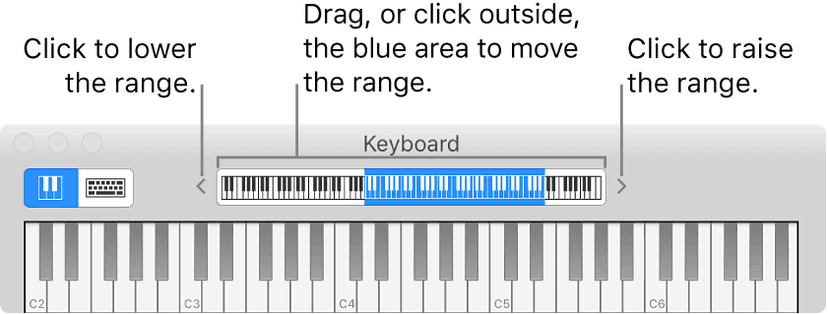
Once the Musical Typing window appears, you'll see this:
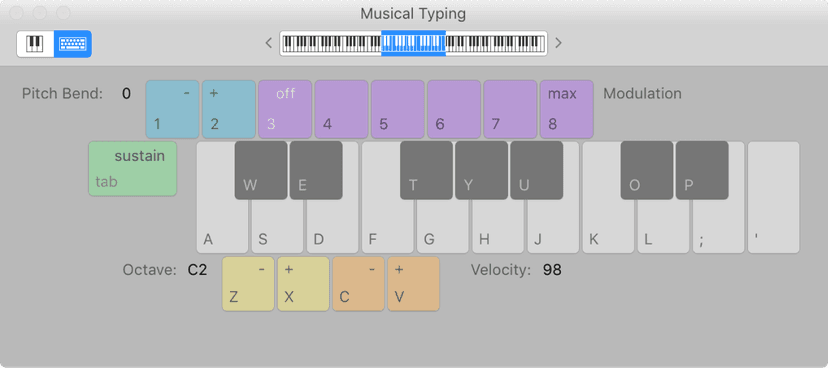
You can play the software instrument using the keys on your computer keyboard. Use the other keys shown in the window to perform the following actions:
- Press Z or X to move down or up by octaves.
- Press C or V to lower or raise the velocity.
- Press 4 through 8 to change the modulation (mod wheel) value, or 3 to turn off modulation.
- Press 1 or 2 to bend the pitch down or up. The pitch is bent for as long as you press the key.
- Press Tab to turn sustain on or off (similar to using a sustain pedal).
As you play, the notes you play are highlighted in the Musical Typing window.
In order to add a software instrument track and choose a patch:
Choose Track > New Instrument Track. (If you use this method, you can skip steps 2 and 3.)
Choose Track > New Tracks.
Click the Add Tracks button above the track headers.
In the New Tracks dialog, select Software Instrument & MIDI, and make sure that an Instrument Plug-in is chosen as the input source from the Input pop-up menu.
You may also choose a software instrument from the Instrument pop-up menu. In the New Tracks dialog, click the Software Instrument button. You may also choose a software instrument from the Instrument pop-up menu. Click Create. In the Library, select a patch category from the list on the left, then select the patch you want to use from the list on the right. If you’ve already chosen a software instrument for the track, the software instrument may change depending on the patch you select.
Recording a software instrument
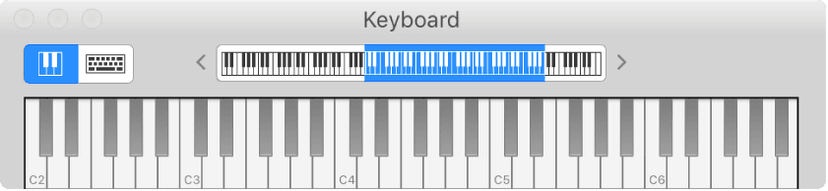
In Logic Pro, select the software instrument track you want to record to. Move the playhead to the point in the ruler where you want to start recording. Set the metronome for recording, if desired. Click the Record button in the control bar (or press R) to start recording. Use your MIDI keyboard, Musical Typing window, or onscreen keyboard to play some notes. The recording appears as a new MIDI region on the track as you record. Click the Stop button in the control bar (or press the Space bar) to stop recording.
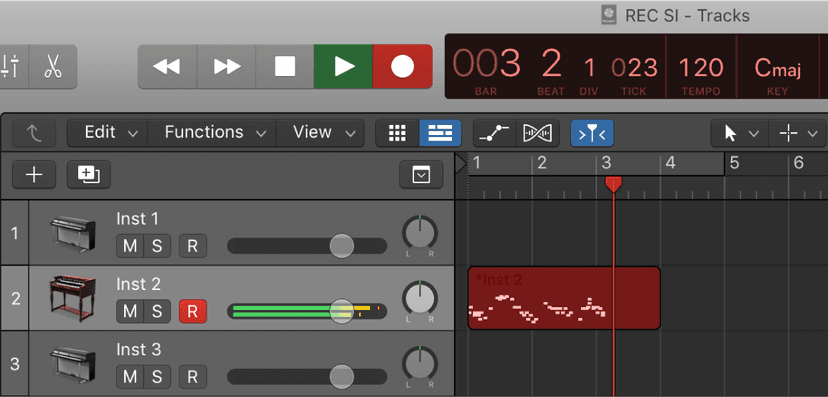
You can record multiple versions, or takes, in quick succession. This is a common technique, and then later, you can preview the take recordings and choose which one you want to use in the project.
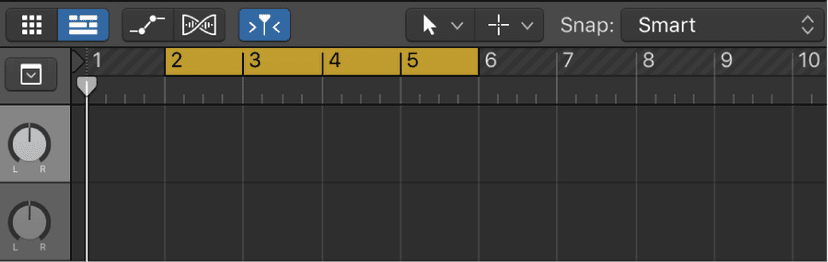
To ensure you can record multiple MIDI takes, go to Logic Pro X > Preferences > Recording, then choose Create Take Folder from the Overlapping MIDI Recordings pop-up menu. Drag left or right in the top part of the ruler to bring up the cycle area. When you begin recording (press R), use your MIDI keyboard, Musical Typing window, or onscreen keyboard to play some notes. Record as many cycle passes as you wish.
Note: Each previously recorded take is automatically muted during recording.
When you stop recording (press the Space bar), the selected track will contain a closed take folder with multiple take regions inside. Open the take folder by clicking the disclosure triangle in the upper-left corner of the take folder or by double-clicking the take folder. You can also open it by selecting the take folder and press Control-F.
Overdubbing software instrument recordings
Overdubbing is the process of recording a performance on top of an existing performance, merging them into a single region. You can use this process to add a supplementary recorded sound to a previously recorded performance, for example, adding additional notes to part you have already played in. An easy way to do this is to set the cycle over the part you would like to overdub and begin recording. Add your notes via your MIDI input device and record as many cycles as you wish. The end result is a single MIDI region that contains the merged performances from each cycle pass, however do note that you can also overdub a MIDI recording when not in Cycle mode.
Recording multiple software instrument tracks
You can record to multiple software instrument tracks simultaneously. To do this you must click the Record Enable button in the track header of each track you want to record to. Each clicked Record Enable button blinks red to indicate that the track is ready for recording.
A MIDI region is recorded to the selected track i.e your piano track you had selected. Aliases of the MIDI region on the selected track are recorded to the other record-enabled tracks. Any subsequent edits to the “parent” MIDI region affect all aliases. This is known as layer recording. We'll cover this in more detail and perhaps find an easier way to do this when we discuss Track Stacks.
If you prefer to record to multiple software instrument tracks successively, that's also no problem. Follow the instructions below:
- To continue hearing previous tracks while recording, do one of the following:
- Choose Record > Overlapping MIDI Recordings > Cycle Mode On > Create Tracks.
- Choose File > Project Settings > Recording, then choose Cycle > Create Tracks from the Overlapping MIDI Recordings pop-up menu.
- Control-click the Record button in the control bar, choose Recording Settings from the shortcut menu, then choose Cycle > Create Tracks from the Overlapping MIDI Recordings pop-up menu.
- To mute all previous tracks while recording, do one of the following:
- Choose Record > Overlapping MIDI Recordings > Cycle Mode On > Create Tracks and Mute.
- Choose File > Project Settings > Recording, then choose Cycle > Create Tracks and Mute from the Overlapping MIDI Recordings pop-up menu.
- Control-click the Record button in the control bar, choose Recording Settings from the shortcut menu, then choose Cycle > Create Tracks and Mute from the Overlapping MIDI Recordings pop-up menu.
- Replacing software instrument recordings in Logic Pro
When you’re recording, you can replace all or part of a previous performance while recording a new one. You do this by recording in Replace mode. You can choose one of the following Replace mode behaviors from the Replace pop-up menu:
- Region Erase: Erases MIDI regions from the Tracks area from the start of recording until the end of recording, even if nothing is played.
- Region Punch: Erases MIDI regions only where MIDI events have been recorded.
- Content Erase: Does not erase MIDI regions but the MIDI content inside of them, from the start of recording until the end of recording, even if nothing is played.
- Content Punch: Does not erase MIDI regions but the MIDI content inside of them, only where MIDI events have been recorded.
- You can access the Replace pop-up menu by long-clicking (or right-clicking) on the Replace button in the control bar or in the Recording preferences window.
Record software instruments and audio simultaneously in Logic Pro
You can record software instruments using MIDI input devices and audio using microphones, electric, electronic, and acoustic instruments simultaneously. You can choose to record a single music keyboard to a software instrument track while simultaneously recording audio tracks, or you can record multiple MIDI input devices to separate software instrument tracks while simultaneously recording audio tracks.
Capture Recording
Arguably a lifesaving feature, in Logic it’s possible to capture your most recent MIDI performance, even if you forgot to press record, using the Capture Recording feature. You can use Capture Recording whether in playback mode or stopped.
If the Capture Recording button is not visible in the control bar you will need to customize the control bar to add it. It looks like this:
To Capture your almost lost preformance, simply click on the button. PHEW!
When Cycle mode is off, Capture Recording creates a region containing all the MIDI events received during playback. In Cycle mode, you can use Capture Recording to create a new Take region for each new cycle during which MIDI events are received when you have the Overlapping MIDI Regions preference set to “Create Take Folder.”
When playback is stopped, Capture Recording creates a separate region containing all the MIDI events received since the last playback; however, after a pause of twenty seconds between incoming MIDI events, those initial MIDI events before the pause are discarded. If when playback is stopped you perform some MIDI events and then pause for 1.5 bars or longer, those initial notes are not included in the visible part of your region. If you do want those MIDI events to be included in the created region, you can drag the left region boundary to expose those MIDI events.
In both playback mode and when stopped, Capture Recording captures MIDI notes, MIDI Control Change messages, and if Record Region Automation is active, volume, pan, and plug-in parameter adjustments as well.
Making Beats
Now that we've taken a look at how to record MIDI in to your projects- we can get moving with making beats for you to work with. Before we do though, there is an important conept that we should explore, that can help you to create better parts: Quantizing.
Quantizing
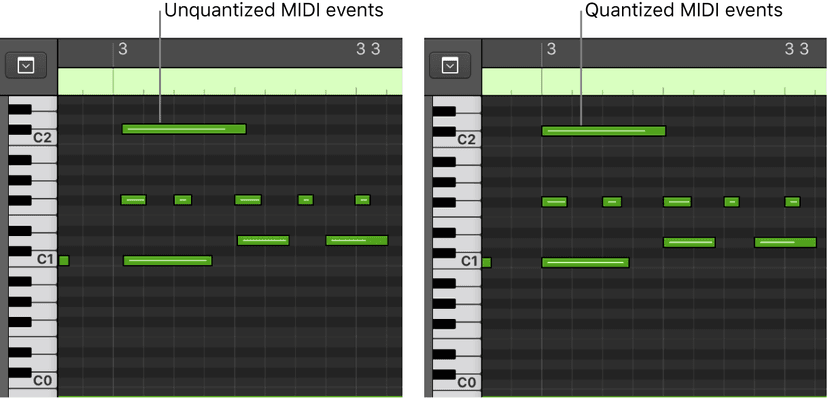
Quantizing involves the rhythmic correction of audio or MIDI regions to a specific time grid. Any notes not played in time are moved to the nearest position on the grid.
You can quantize regions in the Tracks area by using the Quantize parameter in the Region inspector. Several advanced quantization parameters are also available in the Region inspector for greater control over quantization.
The Quantize parameter in the Region inspector applies to whole regions. If you want different parts of a region to have different Quantize values, you can split the region, apply different quantize settings to different segments, and then join them using the Join command or the Glue tool.
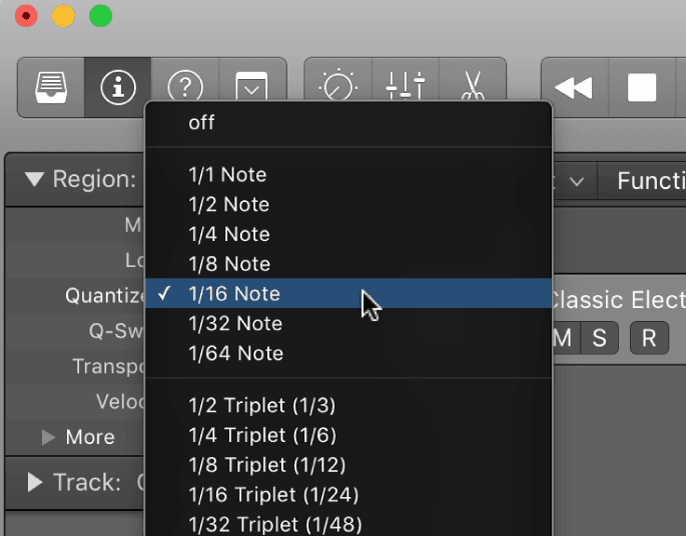
You can quantize selected regions by choosing a value from the Quantize pop-up menu in the Region inspector:
You can also step through the available Quantize values, one at a time, with the Set Quantize Parameter to Next Value and Set Quantize Parameter to Previous Value key commands.
The quantization grid for a MIDI region always begins at the start of the region. If the MIDI region is not aligned with the beginning of a bar, neither is the quantization grid.
Important: For MIDI regions, the chosen Quantize value affects the way notes are displayed in the MIDI editors. So, for example, you can see the effect of the chosen Quantize value by looking at the note positions in the Piano Roll Editor.
If you want to dive in to quantization a little further, to have control over specific MIDI notes only and not all of the ones in the region, you would have to open the Piano Roll (Shortcut: P). Here you can ise the quantize values and sliders on the left, or choose the quantize tool from the tools menu in order to select individual notes. When you do it like we have been doing previously, you'll have no control over individual notes.
An interesting development in quantization is also available from the Piano Roll, which is the ability to quantize the pitch of your MIDI recordings. Say for instace, you know your song is in the key of C Major and you've played some notes that sound "out of key" you can select those notes and using the menus on the left of the Piano Roll, you can correct all your notes to the key your song is in, meaning you'll never play a wrong note ever again!
The Piano Roll Editor
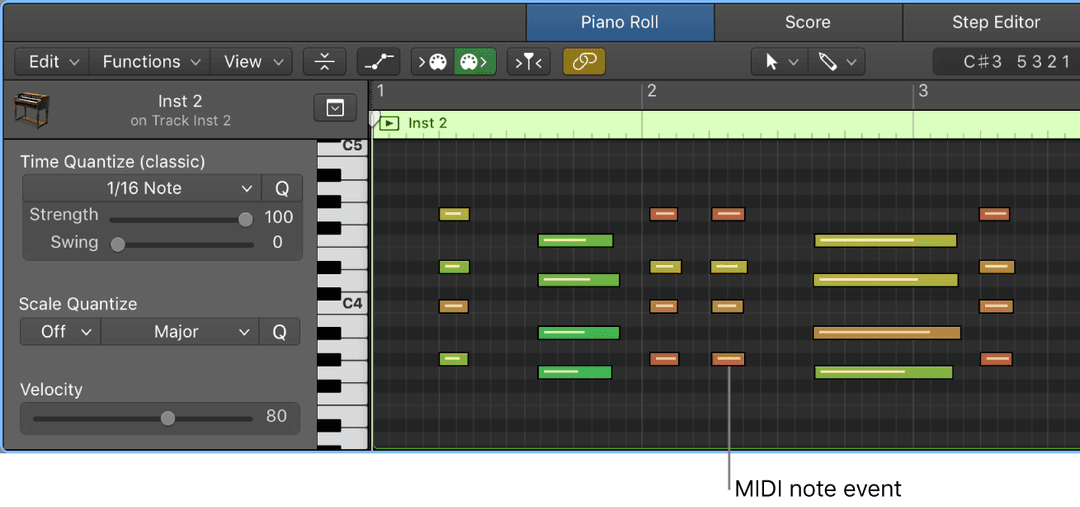
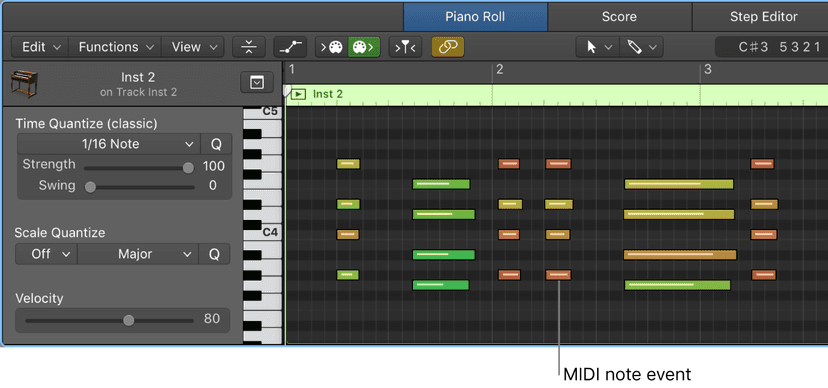
The Piano Roll Editor shows the notes in your MIDI region as colored bars in a time grid. Horizontal lines show the time position, while vertical lines indicate pitch. A keyboard along the left edge of the Piano Roll Editor provides a reference for the pitches of notes. The info display in the Piano Roll Editor menu bar shows the note name and time position under the pointer.
You can switch the keyboard to an adaptive view, which automatically selects the best Piano Roll display based on MIDI region selection. In the case that all displayed MIDI regions are played back by an instrument that provides note names, the keyboard is replaced by a table showing those note names. You can also switch to Collapse Mode view, which only shows those lanes in the Piano Roll Editor that are used by notes in selected MIDI regions.
The Piano Roll Editor can display the MIDI regions on a track, in a folder, or on multiple tracks in the project.
You can open the Piano Roll Editor as a pane in the main window, or as a separate, resizable window.
To open the Piano Roll Editor do one of the following:
- Select a software instrument (or external MIDI instrument) track or a MIDI region, then click the Editors button .
- Select a software instrument (or external MIDI instrument) track or a MIDI region, then choose View > Show Editors.
- Double-click a MIDI region (if Piano Roll is chosen from the Logic Pro > Preferences > General > Editing > Double-Clicking a MIDI Region Opens pop-up menu).The Piano Roll Editor opens below the Tracks area. On the left are controls for quantizing the timing and pitch of MIDI regions, adjusting their pitch, and editing the velocity of MIDI notes. Along the top of the Piano Roll Editor is a ruler showing time divisions, and a menu bar with local menus, tools, and other controls. The header shows the name of the selected region (or the number of regions, if more than one is selected).
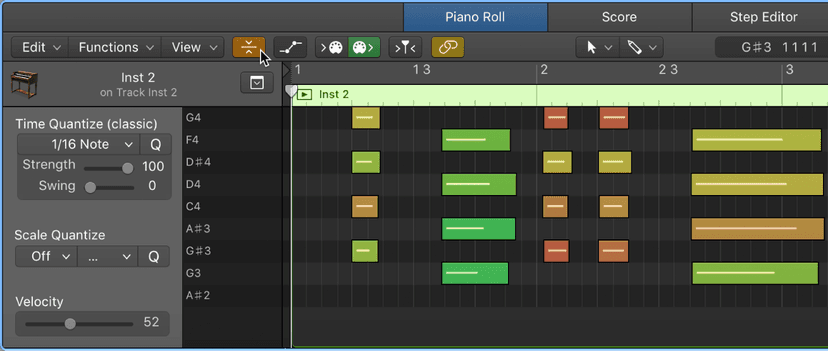
- To switch the Piano Roll Editor to an adaptive view go to View > Drum Names in the Piano Roll Editor menu bar.
To switch the Piano Roll Editor to Collapse Mode view click the Collapse Mode button in the Piano Roll Editor menu bar, as shown below. This will allow you to see only the notes played as opposed to the entire range of the Piano Roll.
Each note in the Piano Roll Editor displays a horizontal line. The length of the line relative to the overall length of the note shows the note’s velocity. Velocity indicates how hard the key was struck when the note was played, which usually corresponds to the note’s loudness (the MIDI velocity range is from 0–127, with 127 being the loudest).
Velocity can also control other synthesizer parameters, such as filter resonance or cutoff, alone or in conjunction with volume level.
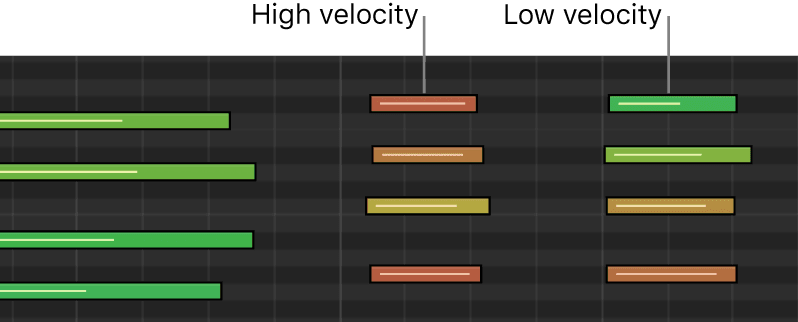
You can also display velocity using different colors, by choosing View > Set Note Color > By Velocity from the Piano Roll Editor menu bar. When this command is chosen, higher velocity notes appear in warmer colors, and lower velocity notes appear in cooler colors.
Color coding makes it easy to see the velocity of individual notes, and to see the overall range of velocities in a MIDI region. As you change the velocity of the notes, their color changes in real time.
To edit the velocity of notes using the pointer, do one of the following:
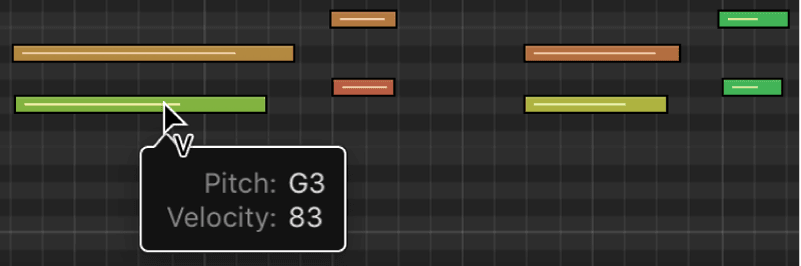
- Select one or more notes, then drag the Velocity slider in the Piano Roll Editor header left or right.
- Drag over a note vertically with the Velocity tool. You can select the Velocity tool from the Tool menu, or you can press Control-Command to temporarily change the Pointer to the Velocity tool.
- A help tag showing the note velocity updates as you drag. The line inside the note also updates to show the velocity change.
If the MIDI Out button in the Piano Roll Editor menu bar is active, the note sounds as you drag.
When you edit the velocity of multiple notes, the relative differences in their velocity values are retained. If the velocity value of any of the selected notes reaches the minimum or maximum value (0 or 127), none of the notes can be adjusted further.
You can override this behavior by pressing and holding Option while dragging. This allows you to continue altering the velocity values until the selected note reaches the minimum or maximum value. By overriding, the velocity relationship of this note to the other notes is altered.
So we know how to basically manipulate our recorded performances in the Piano Roll Editor, but how about other ways to input the data, other than playing it in? Some people really prefer using dome of these tools as maybe their fingers may not move fast enough to enter 16th note hi hat patterns, for instance. Let's take a look at some other ways to work with inputting information...
Brush Tool
The Brush Tool in the Piano Roll Editor is somewhat of a hidden gem when it comes to inputting parts quickly and easily. Essentially, with a click, drag and swipe of your mouse, you can have a set of notes inputted at a fixed velocity for quick creation of a part.
Select the Brush tool, then drag right or left. The repetition rate of added notes is based on the current Time Quantize settings slider, and the pitch based on the current value Scale Quantize settings. If you hold Shift while dragging, this restricts all notes to the same pitch, otherwise you might find yourself creating quite wayward parts! If you hold Control+Shift you can incorporate velocity changes into your part.
If you have entered a part that (with or without the Brush Tool) you like and you would like to enter that part again later by clicking and dragging with your brush tool, you must 'Define' the brush pattern.
Here's how to do that:
- Select the notes of a short musical phrase you want to use as a pattern.
- Select the Brush tool, then Control-click the selected notes with the Brush tool.
- Choose Define Brush Pattern from the shortcut menu.
- After you define a brush pattern, you can “paint” the pattern using the Brush tool. The repetition rate of the pattern is based on the current Time Quantize settings. Adjusting the Scale Quantize settings restricts the pattern to notes of a specified scale.
The brush tool is the simplest way to create quick hi-hats, drum rolls and snare builds!
Note Repeat & Spot Erase
Note repeat is yet another handy function that you would find historically on drum machines, that allows you to hold down one key/pad on your MIDI control and program in information. You can define parameters such as repetition rate, velocity, and gate length, as well as assign MIDI controllers for controlling these parameters.
In order to work with Note Repeat, click the Note Repeat button in the toolbar (or use the corresponding key command). In the initial Note Repeat dialog, you can do the following:
- Choose a repetition rate from the Rate pop-up menu.
- Define a velocity value in the Velocity field or leave it “As played” (default).
- Define a gate length value in the Gate field.
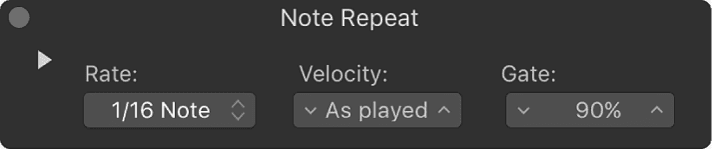
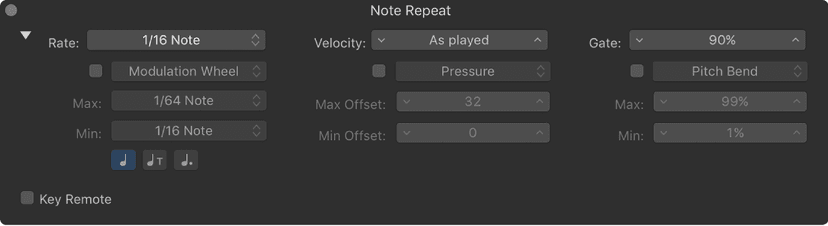
Click the disclosure triangle in the upper-left area of the dialog to reveal additional settings, then you can do the following:
- Select the checkboxes to make the MIDI controller pop-up menus available, then choose a controller for rate, velocity, and gate time.
- Define the maximum and minimum values for rate and gate time.
- Define the maximum and minimum offset values for velocity.
- Select the Key Remote checkbox in the lower-left area of the dialog to display the keyboard, then use the keys to define the rate and gate time settings.
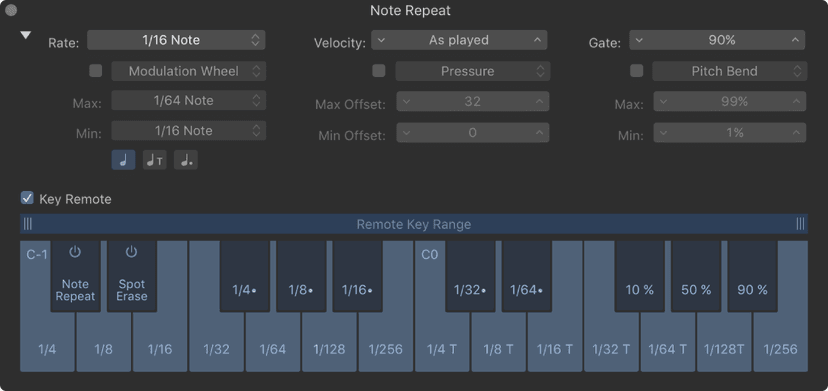
Something that goes hand in hand with Note Repeat is Spot Erase. You can use spot erase to remove any unwanted notes from any recorded performance, no matter how it was played/programmed in.
To launch it, click the Spot Erase button in the toolbar (or use the corresponding key command).Spot Erase is turned on, indicated by a floating window with a red flashing icon.
In playback or recording mode, hold down the note that you want to delete. Each instance of that note is deleted in regions on the selected track as the playhead passes over them.
To turn off Spot Erase, close the Spot Erase floating window or click the Spot Erase button in the toolbar.
The Note Repeat and Spot Erase keys have On/Off buttons, which offer the following functions:
- When turned off (default), Note Repeat or Spot Erase is always active as long as the respective window is open.
- When turned on, Note Repeat or Spot Erase is active only as long as the respective remote key is held down.
Do this now
- Load any software instrument and open Musical Typing (Cmd+K).
- Record four bars with the computer keyboard.
- Turn cycle on and overdub a second part on top without stopping.
You do not need a MIDI controller to start. You need a part.