Projects- The Basics
Projects- The Basics
We can begin to work in Logic Pro by creating a new project, or opening an existing one. A Project is the document that contains all your recordings, the location of media files you add, and all the changes you make. You can have multiple projects open at the same time, and transfer media and other data between them.
Each project has a set of properties, including tempo, key, and time signature, which you define when you create the project, and can change later if you like.
Projects can also contain assets including audio files, a movie file, instruments, and other files. You can save assets with the project or reference them in another location.
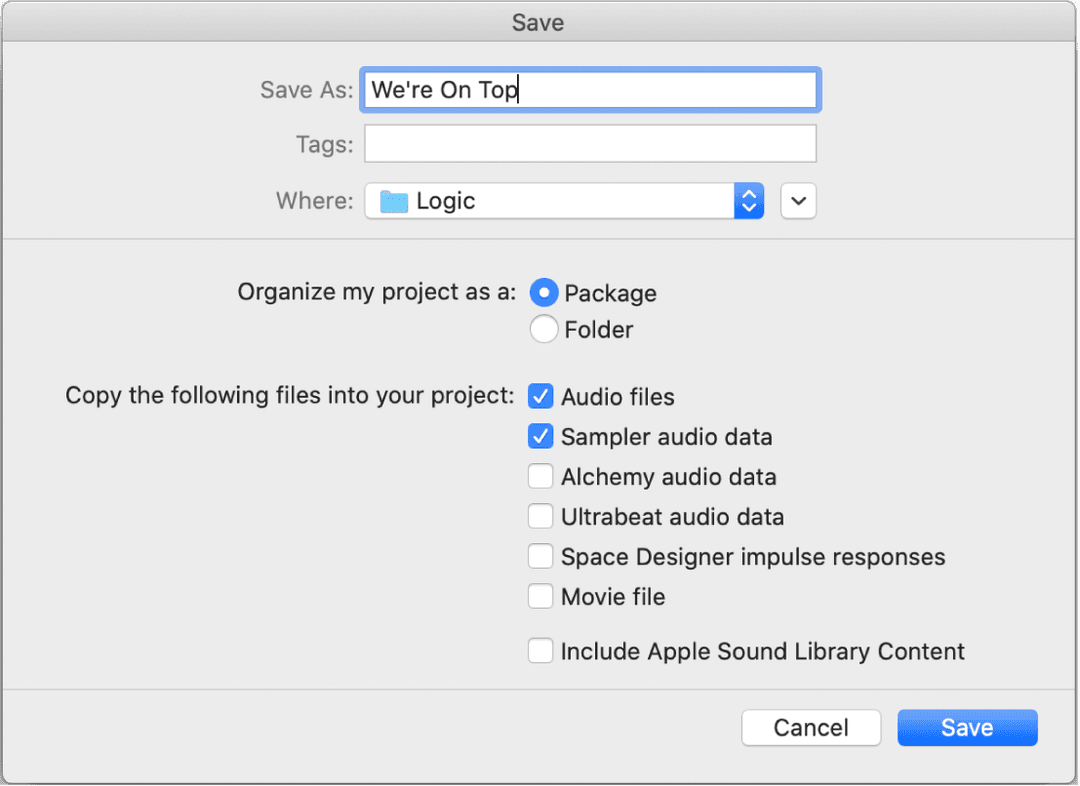
We can save a project as either a single file (package), or as a project folder containing the project file and subfolders for project assets.
For us to work within a project, we must have an understanding of some of the basic terminology used, what we can do and where to find the things we need to access. We've already taken a look at where to find stuff on the whole, so let's take a look at the basic elements of a Logic Pro project. If you need more information on any terminology, remember to look at the glossary
Tracks
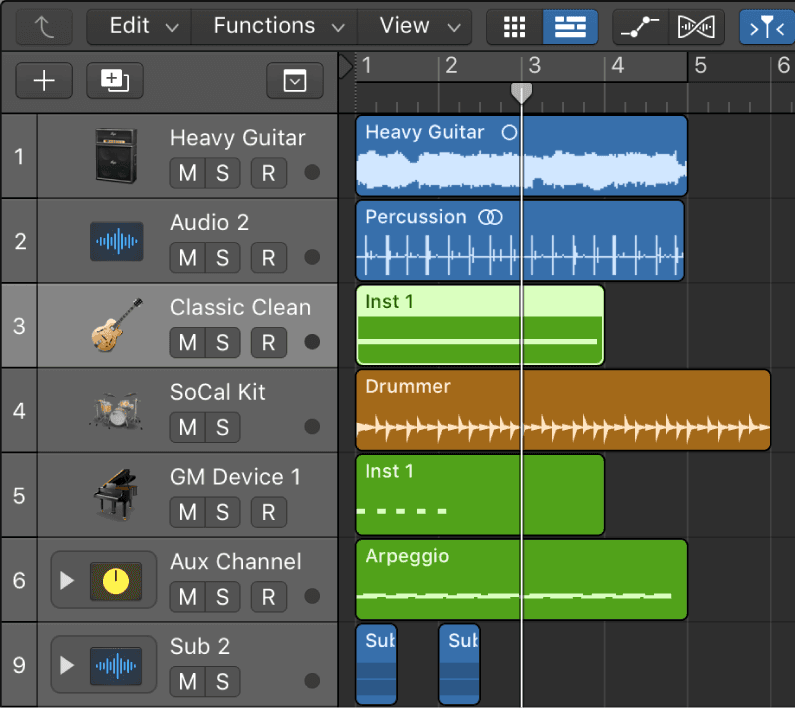
The horizontal rows in the Tracks area are called tracks. Tracks help you organize and control the sound of the recordings, loops, and other material in a project. You record your performances on tracks, and arrange the regions representing the recordings, loops, and other material in a project on tracks. There are several types of tracks you can use in a Logic Pro project:
- Audio tracks: Can contain audio recordings, audio Apple Loops, and imported audio files.
- Software instrument tracks: Can contain software instrument recordings, software instrument Apple Loops, and imported MIDI files.
- Drummer tracks: Can contain Drummer regions. Used in conjunction with the Drum Kit Designer plug-in and Drummer Editor. You can also add MIDI regions to a Drummer track.
- External MIDI tracks: Can contain MIDI recordings that send MIDI data to external MIDI devices, such as synthesizers and sound modules.
- Track Stacks: Track Stacks let you organize and control multiple tracks, and create audio subgroups.
- Folder tracks: Can contain folders, which are containers for other tracks. Folder tracks are not assigned to a channel strip in the Mixer.
There are additional track types that do not contain regions, including:
- Auxiliary (aux) and output tracks, used for routing the output of other tracks
- Global tracks, used to control aspects of the overall project
- Master track, which you can use to control the overall volume level of the project.
Regions
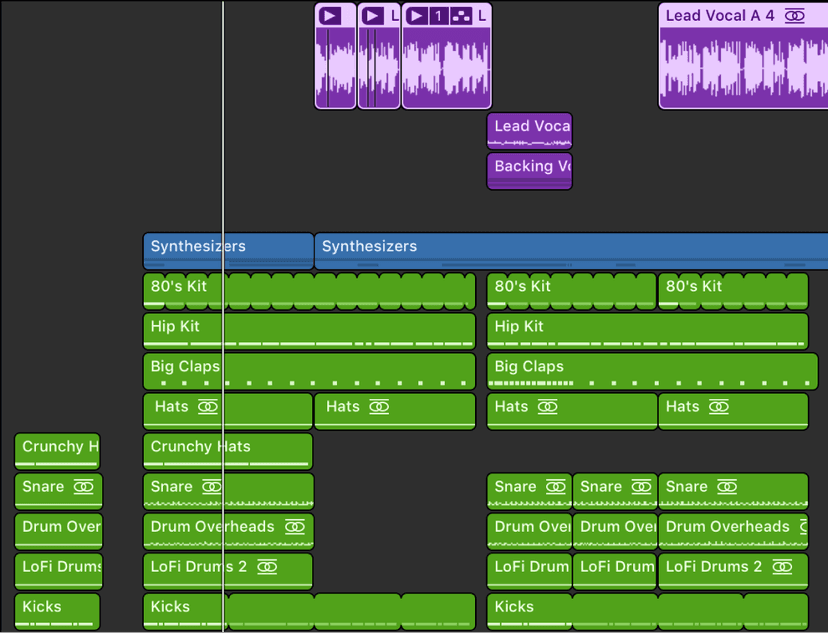
Regions are the building blocks of a project. Each time you make a recording, drag an Apple Loop to the Tracks area, or add a media file to your project, a region representing the recording or file appears in the Tracks area. Different types of regions correspond to different track types and types of material.
- Audio regions refer to (point to) an underlying audio file (a recording made in Logic Pro, an audio Apple Loop, or an imported audio file). An audio region can represent the entire audio file or only a portion of one. When you edit the region in the Tracks area or the Audio Track Editor, the original audio file is not changed.
- MIDI regions contain MIDI data for notes and other MIDI events, such as controller and program change information. They are stored as part of the project, but can also be saved as individual files.
In the Tracks area, you can move, copy, and work with both audio and MIDI regions in a variety of ways to build your arrangement. You can also edit audio regions in the Audio Track Editor, and edit MIDI regions in the Piano Roll Editor (and the Score Editor).
Patches
You can control the sound of the tracks in your project using patches. A patch can contain one or more channel strips, each with its own settings and plug-ins, as well as a set of Smart Controls. Patches can also contain auxiliary channel strips for more complex routing. You can choose a patch for a track in the Library when you create the track, and choose a different patch later while you’re working. Custom patches can be saved in the Library.
Channel strips
Each track in a project is represented and controlled by a channel strip corresponding to the track type. Channel strips contain controls to adjust the volume level and pan position of the track, mute and solo the track, insert plug-ins, route the output signal, and control the track in other ways.
You can view and edit the channel strips for a project in the Mixer. The inspector displays channel strips for the selected track, and also for the primary destination (output) for the selected track’s channel strip.
In addition to track channel strips, projects contain output channel strips and a master channel strip (which controls the overall volume of the project). They can also contain auxiliary channel strips, which are used to route the output from multiple tracks to a single destination.
Plug-ins
Logic Pro includes a collection of professional-quality plug-ins you can use to shape the sound of your recordings and other material. There are several types of plug-ins used in Logic Pro channel strips: MIDI plug-ins, effects plug-ins, and instrument plug-ins.
- MIDI plug-ins are inserted in software instrument channel strips and process or generate MIDI data—played from a MIDI region or a MIDI keyboard—in real time.
- Effects plug-ins can be used in audio, instrument, auxiliary, and output channel strips. In general, they modify the sound (the input signal) of the channel strip.
- Instrument plug-ins can be used on software instrument channel strips. They respond to MIDI note messages and so can be played using a USB music keyboard or another MIDI controller.
Project Properties- Tempo, Time & Key Signatures
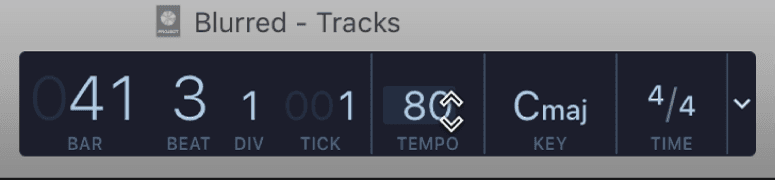
Each project has a set of properties, including tempo, key, and time signature. For new projects, the default project tempo is 120 beats per minute (bpm), the key is C, and the time signature is 4/4. You can change these project properties when you create a project, or later while you’re working.
The project tempo, key, and time signature are displayed in the LCD in the center of the control bar, along with the current playhead position.
Tempo
The project tempo defines the musical speed of the project, expressed as the number of beats per minute (bpm). Changing the tempo can affect the playback speed of audio and software instrument recordings, Drummer regions, and Apple Loops, in the project.
Key
The project key defines the central note (called the tonic), and whether the project uses the major or minor scale. Changing the key affects the playback of Apple Loops in the project, and the display of MIDI notes in the Score Editor.
Time signature
The project time signature defines how musical time is divided into measures and beats. The time signature contains two numbers separated by a slash (/), which looks similar to a fraction. The first number controls the number of beats in each bar, and the second number controls the beat value (the note that counts as one beat). Changing the time signature does not affect playback, but does affect the units displayed in the ruler and the bars in the Score Editor. Changing the time signature does not affect project playback, but does determine the time grid in the Tracks area and MIDI editors.
Setting Properties in the LCD
The simplest way to set your properties is from the LCD. Click and hold the tempo value (above the letters “bpm”) and drag up or down, or enter a value. Click and hold the key, then choose a new key from the pop-up menu. Click and hold the signature, then choose a new signature from the pop-up menu. You can also 'Choose Custom' to add a new time signature.
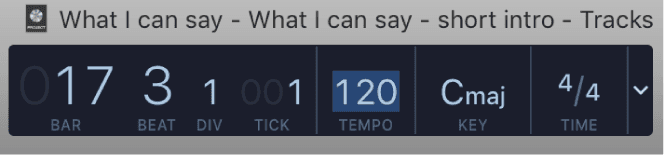
You can also set these properties from the List editors:
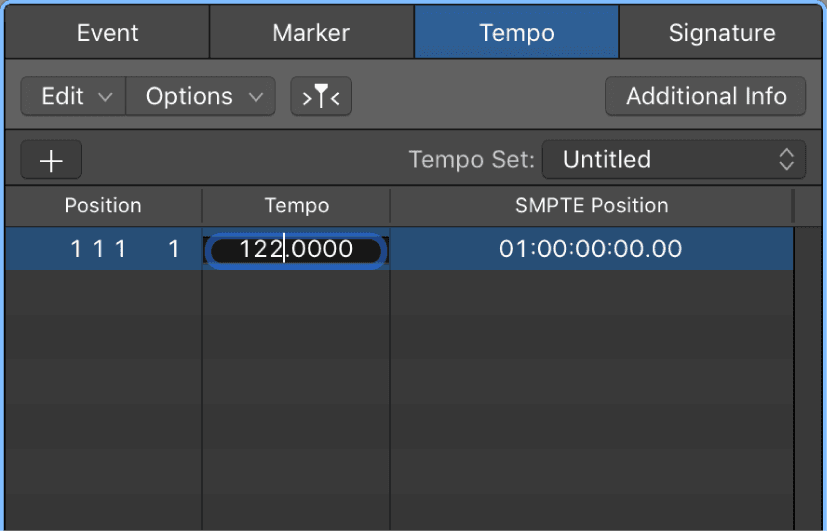
You can also Tap Tempo, if you would prefer to tap in the tempo with a key. You must first assign key command, then use the key command to set the tempo. The first time you tap the tempo, an alert appears, asking if you want to enable Tap Tempo.
You also have a few options to change the key signature:
- In the Score Editor, double-click a staff between the clef and time signature, then choose a key in the Key Signature dialog. You can also drag the key signature from the Part box to the beginning of the project.
- Click the Create Key Signature button in the Signature List.
When you change the project’s scale type from major to minor or vice versa, in some cases the key may change enharmonically (for example, from Db major to C# minor). These changes follow common practice for printed music, and affect only the key as shown in the menu, not the pitch of regions in your project.
Other ways to change the time signature are:
- In the Signature List:
- Click and hold the time signature value, then drag up or down.
- Double-click the time signature value, then enter a new value in the field.
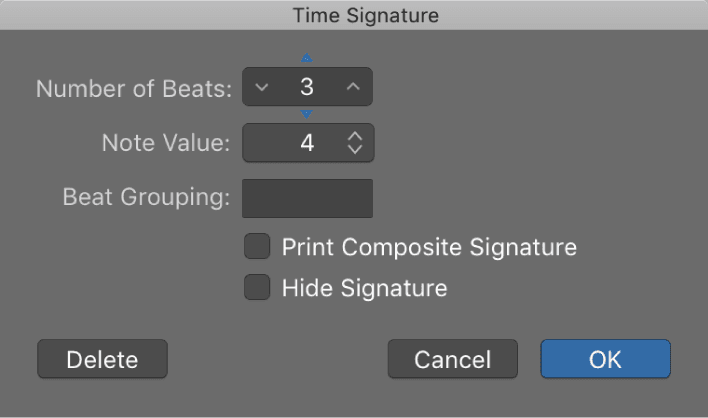
- Open the Signature track, then double-click the value shown. Set the Numerator and Denominator values (and other settings, if you like):
Saving Projects
When you save a project in Logic Pro, your recordings and all the changes you make are saved with the project.
Logic Pro autosaves your work so that you don’t lose important changes if the app quits unexpectedly. Logic Pro shows a dialog when you reopen the project, asking if you want to use the autosaved version. If you choose not to, Logic Pro opens the last manually saved version of the project.
There are two ways to save your projects. Either:
- Project package: Project assets are copied to the project package, or are referenced from another location, depending on which asset types are selected in the Save dialog. By default, the converted project is saved inside the existing project folder, if one exists.
OR:
- Project folder: Project assets are copied to the appropriate subfolders of the project folder, or are referenced from another location, depending on which asset types are selected in the Save dialog. By default, the existing project folder and subfolders are used, if present, and any additional subfolders needed for project assets are created.
With either a project package or folder, you can choose to copy audio files and other assets in the project or reference them in another location. Saving assets in the project ensures that they are still available when you move or copy the project to another location. You can change how assets are saved later by choosing File > Project Settings > Assets.You can also save a project as a template, and use the template to create new projects. Templates make it easier to create projects with frequently used instruments or Mixer configurations, or video or surround projects, for example. Screensets can be customized for each template or copied between templates using the various Import Settings commands.
It's a good idea to save your project as soon as you've set up the properties. You can do this by going to File > Save, File > Save As or using the shortcut Command+S.
The first time you save a new project, the Save dialog appears. In the Save dialog, you can type a name choose the location to save the project.
- Choose File > Save/ File > Save As.
- In the Save As dialog, enter a new name for the project.
- Do one of the following:
- To save the project as a file (package) containing project assets: select the Organize my project as: Package button.
- To save the project as a folder containing subfolders for project assets: select the Organize my project as: Folder button.
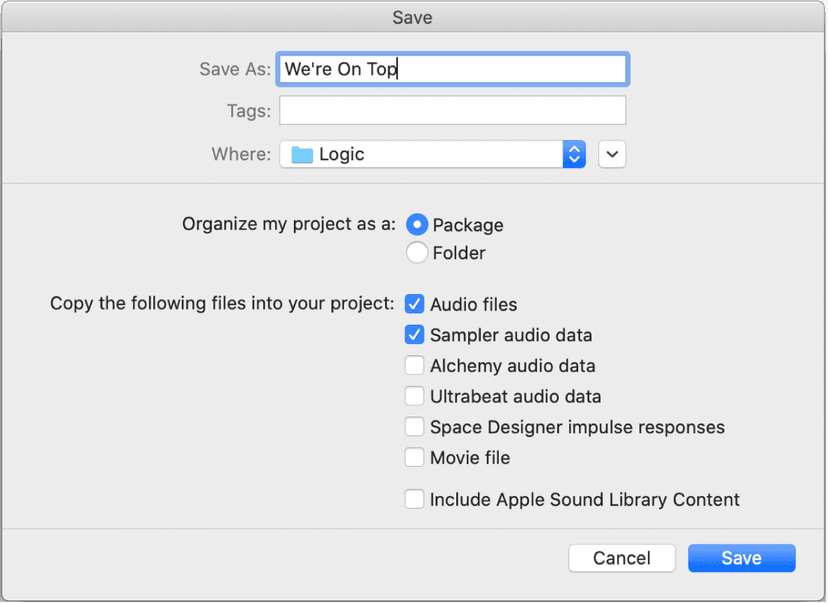
- Select the type of assets to copy to the project, then click Save.
To save another copy of the project, including project assets:
- Choose File > Save a Copy As.
- In the Save As dialog, enter a new name for the project.
- Select the type of assets to copy to the project, then click Save.
When you choose Save a Copy as, copies of all your recordings are saved in the project copy. You can use the Save a Copy As option for archiving and moving data.
Revert to the last saved version of a project:
If you decide you don’t want to keep your latest edits to a project, you can revert to the last saved version of the project.
- Choose File > Revert to (or use the corresponding key command), then choose the last saved version (at the top of the list).
Important: After a project is saved as a Logic Pro X project, it can no longer be opened in earlier versions of Logic Pro.
Templates
Templates are a great way to get you going really quickly. If you find yourself using a similar set of instruments each time, using a template can be a great timesaver. Let's say you're always recording your voice and a guitar along to Drummer track, if you setup your tracks and save your project as a template, you'll have your tracks setup for you the next time you open Logic. Templates are a great way to keep important settings at arms reach for you. It means you can just load that template and be ready to record instantly.
A template remembers everything, your tracks, the way your views have been setup, even how far you've zoomed in!
To save a project as a template File > Save As Template, then enter a name.
When you open Logic next, in the Project Chooser, click My Templates to view and access templates you have created.
You can organize your templates in folders with the Create Folder button in the Save As Template dialog. When all your user templates are placed in subfolders, the subfolder names are shown below the factory collections.
Tip: You can add descriptive text to your templates by adding a comment to the project file in the Finder. The Templates dialog displays the icon assigned to a template file, making it easy to change if you wish. For more information on how to add a comment to a file, or change the icon of a file, see Mac Help.
Project Alternatives
You can create alternative versions of a project, each with a unique name and different settings. Project alternatives let you save “snapshots” of a project in different states, including different cuts or mixes. They’re saved as part of the project and share the same assets. Alternatives for the current project appear in the File > Project Alternatives submenu.
Backups let you go back to earlier saved versions of a project. Each time you save a project using the File > Save menu item (or pressing Command-S), a version of the current project alternative is saved (up to ten backups per alternative). In the Project > Revert to submenu, backups for the current alternative are listed in descending order from newest to oldest.
To create a project alternative go to File > Project Alternatives > New Alternative. Enter a unique name for the alternative, then click Done.
If you need to Edit project alternatives choose File > Project Alternatives > Edit Alternatives.
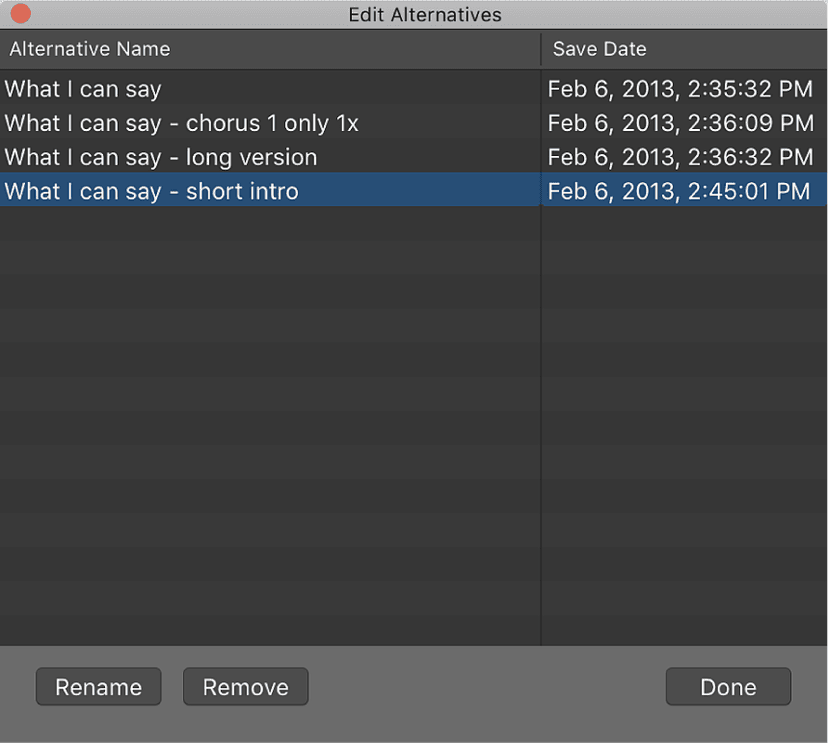
In the Edit Alternatives window, select an alternative from the list, then do either of the following:
To rename the alternative: Click Rename, then enter a new name.
To delete the alternative: Click Remove. You cannot remove the Main alternative.
Click Done to close the Alternatives Menu
To choose a different alternative, go to File > Project Alternatives, and choose a different alternative from the list.
If you have made changes after you last saved the current alternative, a Save dialog appears, so that you can save your changes in the current alternative before switching to a different alternative.
To choose a different backup of the current alternative, go to File > Revert to, and choose a backup from the submenu.In the Revert to Backup dialog, click OK.
Do this now
- Start a new project. Set the tempo, key and time signature before you record anything.
- Add one software instrument track and one audio track.
- Save it as a template.
Do this once and every future project starts in the right key at the right tempo, instead of in C at 120.