Synthesis: Logic Synths
Now we’ve taken a look at what synthesis is and how it works, it’s time to explore the library of Logic Pro X Synths. Logic provides an extensive suite of software instruments that can be used in your productions.
Sample-based instruments include Alchemy, Sampler and Quick Sampler. These enable you to create and play back recordings of acoustic instruments. Alchemy provides extensive sample manipulation and resynthesis options that can result in sounds that bear little resemblance to the source. Also included are sample-based string and horn plug-ins that offer a variety of individual and grouped instruments with multiple articulations.
Specialized percussion synthesizers and instruments include Drum Synth, Ultrabeat, Drum Kit Designer, and Drum Machine Designer. Ultrabeat combines several percussion-oriented synthesis engines and a step sequencer, making it a powerful tool for the creation of new sounds and beats. Drum Machine Designer is a track instrument that directly integrates and interacts with the Logic Pro Mixer and Step Sequencer.
Four vintage instruments emulate the classic B3 organ, Rhodes, Wurlitzer, and Hohner electric pianos, the Hohner Clavinet, and the Mellotron.
When it comes to synthesizers, you have a huge range to choose from. These include simple plug-ins such as ES P, ES M, ES E, and EFM1. More advanced options include Retro Synth, ES1, and ES2, up to the extremely sophisticated Alchemy and Sculpture instruments.
Alchemy provides several synthesis engines that you can use alone or with each other to produce a staggering variety of sounds. It features extensive modulation options, built-in arpeggiation, and sequencing.
Sculpture is a modeling synth that you can use to recreate physical instruments or to create instruments that don’t exist. It has a number of unique modulation facilities and can generate a huge array of sound types.
Rounding out the collection are the External Instrument and Klopfgeist Logic Pro Utility instruments, and the EVOC 20 PolySynth vocoder. This instrument tracks incoming MIDI notes and processes audio signals to create classic robotic voices and choirs that follow played note and chord pitches.
Alchemy
Perhaps what could be considered Logic’s flasghip Synth, Alchemy is a real powerhouse that was acquired by Apple from the Camel Audio company and brought to Logic users in 2015 via the 10.2 version update. Spend some time getting to know this very powerful synth!
In Alchemy, advanced view is used when creating new sounds or manipulating existing presets. This view unlocks all Alchemy synthesis, modulation, and editing capabilities.
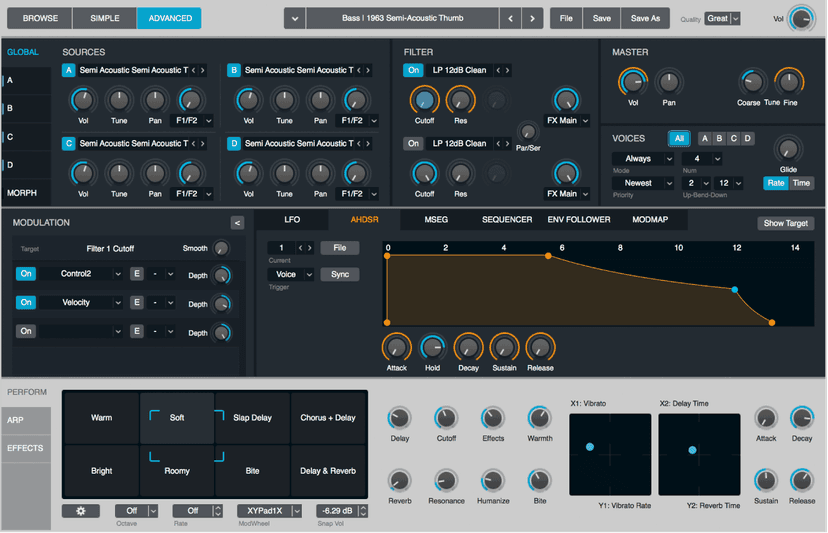
Alchemy is an easy-to-use, yet powerful sample manipulation synthesizer. It offers numerous real-time performance controls and an extensive preset library.
Alchemy features additive, spectral, and granular synthesis and resynthesis, sampling, and virtual analog engines. You can analyze imported samples and can manipulate them using one or more of these synthesis methods. Alchemy provides extensive sample mapping, looping, and grouping facilities that make it easy to create instruments containing hundreds of samples and layers. If you want to create purely synthetic sounds, the additive, spectral, and virtual analog synthesis engines are full-featured, matching or exceeding the power and facilities of many standalone instruments.
An Alchemy preset can contain up to four sources, each using one or more synthesis engines. You can morph or crossfade between these sources. Dozens of modeled analog and digital filters are available, in addition to multiple racks of integrated effect units and an extensive modulation section. Alchemy also features a powerful arpeggiator that can control each source independently and provides flexible pattern modulation options.
Before you can design new sounds with Alchemy you need to understand how its different parts fit together, and how each of them contributes to what you hear.
At first glance Alchemy may seem complex, but its layout is relatively simple:
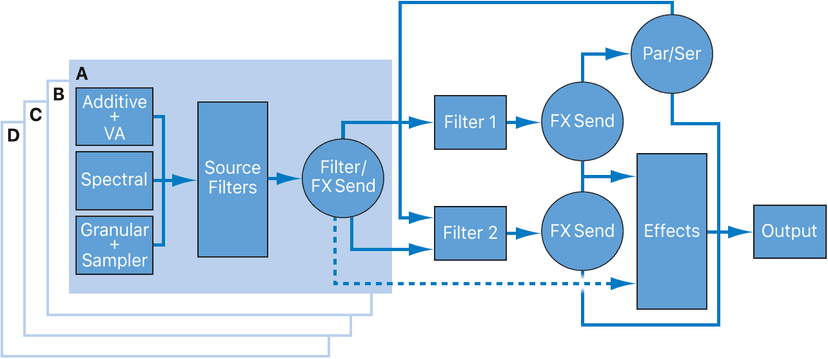
The diagram shows signal flow from left to right through the different sound generating and processing modules.
There are three basic stages:
- Each sound can contain up to four sources: A, B, C, and D. Each source consists of additive, spectral, granular, sampler, and virtual analog elements. Multiple elements can be active in each source. Each source has three independent filters that can operate in parallel or in series. These sources are used to create and shape the basic tone of the sound. All modulation in this section applies per voice.
- There are two main filters that can operate in parallel or in series. The main filters are used to shape or otherwise alter the combined sound from the four sources. All modulation in this section applies per voice.
- After the individual voices are mixed together and filtered, they pass through the effects stage. Any modulation of the effects section is applied to the entire audio signal sent from the main filter section. You can also directly route sources (post source filters, if used) to the effects section, bypassing the main filters altogether.
Given the flexibility and variety of Alchemy synthesis engines, you can take a number of different approaches to sound design.
- If you prefer to tweak existing settings, it may be more suitable to use features that affect the entire instrument. At the simplest level this is achieved with performance controls such as the Transform pad.
- If you prefer to build sounds from scratch—parameter by parameter—you can.
- Alchemy also features advanced morphing capabilities that facilitate cross-synthesis to create new sounds. .
Whatever approach you favor, you can achieve new and interesting results. Experiment and familiarize yourself with each approach. Each has its strengths and weaknesses, and often a combination of methods may strike the best balance for your needs.
When programming a sound from scratch in Alchemy, the best approach is to work on each component of the sound in isolation.
To start, you need a plain vanilla setting. You can revert to this setting by choosing File > Initialize Preset in the Name bar. The default setting is sonically uninteresting but provides a useful starting point for several examples.

Alchemy provides thousands of ready-made presets for you to explore. These are not only a great resource for musical inspiration but can also provide numerous insights into how sound designers have created them. Even if you’re not inclined to program your own sounds from scratch, some small tweaks to existing presets can provide that “perfect” sound for your projects or performances.
Tweak The Presets:
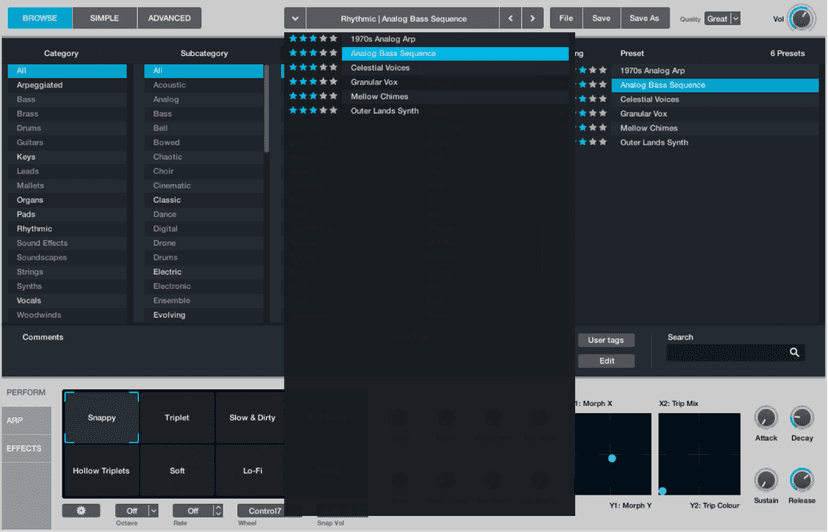
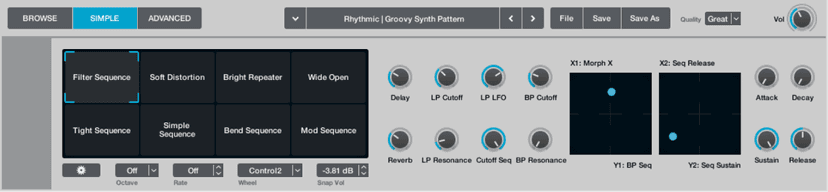

- Click the Preset name field in the Name bar and choose the 12 Strings preset. Make sure the Advanced view button is active.
- Click the Perform button to view the performance controls, then drag the framing bracket in the Transform pad while playing your keyboard.The sound morphs between different sound variations. If you happen across something you like, you can use the Save As button in the Name bar to name and save a new preset.
- Drag the framing bracket to the top left (Pluck + Pad in the preset), then set the Pad Cutoff and Pad Attack knobs to zero. Drag the Cutoff Env knob to the 100% position, and also set the Release knob to around 20%.When you play the keyboard staccato you will hear a less sustained sound with a different harmonic makeup, and the delay effect is more easily heard. Play across a large range of the keyboard, and adjust the Cutoff Env knob to hear how this affects the filter response.
- Click the Effects button to view the effects section, then choose the Slapback preset from the Delay plug-in File menu.Play a few notes to hear the impact this has, then choose the Bandpass Ping Pong preset.
- Return to the performance controls, and adjust the Resonance knob while playing both staccato and held notes.
- Double-click both the Resonance and Cutoff Env knobs to reset them to the center position.
Swap the Sources:
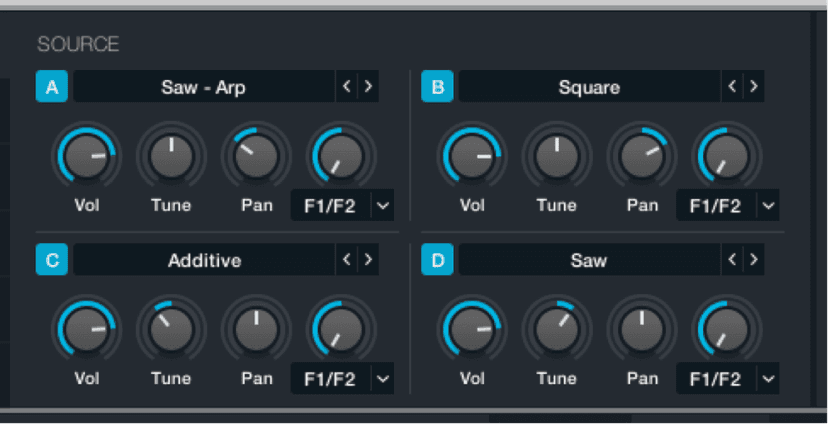
- In Logic Pro X, click the Global button toward the upper left to view sources A to D.You can see that the 12 Strings preset uses three sources: A, B, and C.
- Click the source select field for source A, then choose Load VA > Complex > Eighties Notch.Play your keyboard to hear a more classic synth type sound. Feel free to repeat this step with sources B and C, using different waveforms, or perhaps import a drum loop.
Mute a Source:
- Click the File button in the Name bar and choose Initialize Preset, then choose the 12 Strings preset from the Preset name field. Make sure the Global button is active in advanced view.
- Click the source A button to mute this source. A lit A, B, C, or D button indicates the source is active.Play the keyboard to hear a pad sound. The “pluck” sound has been silenced.Tip: Muting sources in this way is also a good working practice when editing or adjusting source settings because it allows you to focus on the sonic characteristics you are trying to achieve for the source. You can unmute the source and adjust the Volume settings of each to set the balance between them once you’ve made your changes.
Click the Perform button to view the performance controls, then drag the framing bracket in the Transform pad while playing your keyboard.
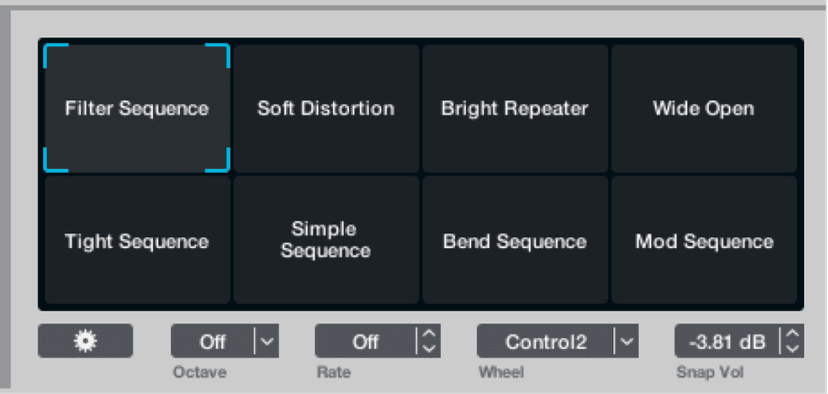
You will hear the sound morphing between different sound variations. If you happen across something you like, you can use the Save As button in the Name bar to name and save a new preset. Return the framing bracket to the Pluck + Pad position when done.
Adjust the tuning of the source and envelopes:
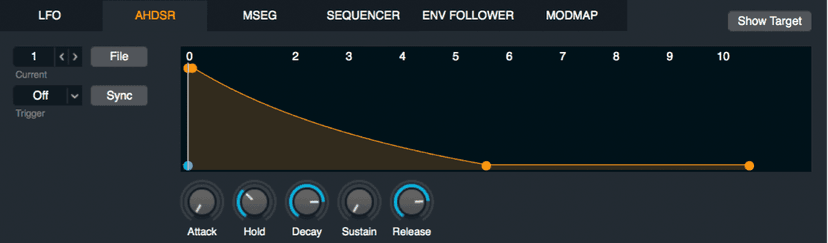
- Drag the source B Tune knob to -24 semis.
- Click the source B Vol knob.The AHDSR envelope updates in the central modulation section.
- Double-click the source B Pan knob to center it.
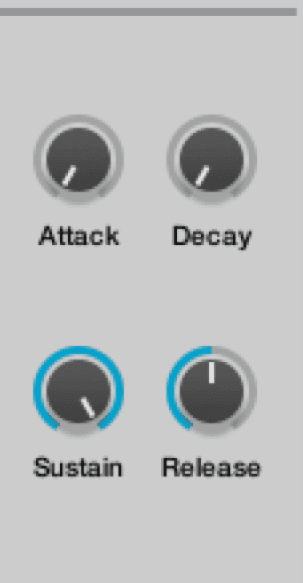
- In the central modulation section, set the Attack, Hold, and Decay knobs to zero, set Sustain to around 75%, and Release to around 0.065. You may also want to adjust the Attack knob in the performance controls section if the attack phase of the sound is too slow or too quiet.Play the keyboard to hear a simple synth bass sound.
Adjust Filters:
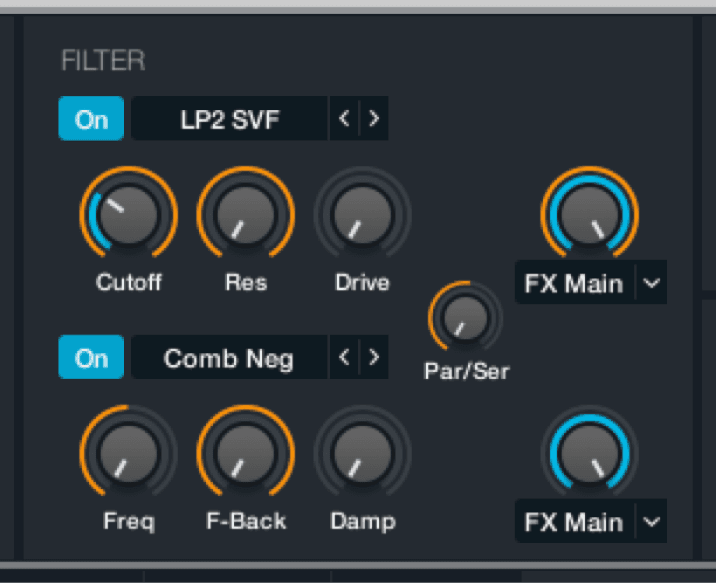
- Change the filter 2 Cutoff and Resonance settings in the main filter section to the right of the sources while playing.
- Click the Filter type menu to experiment with different filters.
- Enable filter 1, and try different settings.
- Adjust the Par/Ser knob to hear how this affects the sound when the filters are used in series or in parallel.Drag the framing bracket in the performance controls to hear variations of your tweaked sound.
Recycle sources and sound settings from other presets in Alchemy
This is less of a tweak and more of a shortcut for sound creation.
- In any loaded preset, click the source name field and choose Save Source from the pop-up menu.
- Give the source a name in the file dialog, and click Save.This source is automatically saved in the Alchemy > Source subfolder.
- In a new instance of Alchemy, click the source name field and choose Load Source from the pop-up menu, then choose the saved source.The source (or sources) from up to four presets can be recycled in this way.
- Steps 1-3 can be repeated for any Alchemy element that provides a File pop-up menu, such as modulation settings, arpeggiator settings, effects settings, and so on.Make use of existing presets as sources of raw material for your own sounds.
Retro Synth
Retro Synth is a flexible 16-voice synthesizer that can produce a wide variety of sounds.
Retro Synth provides four different synthesizer engines—Analog, Sync, Wavetable, and FM. Each engine can generate unique sounds that are difficult or impossible to achieve with other types of synthesizer
Retro Synth is very easy to use, with many identical controls found in each synthesizer engine.
Choose an Engine:
The first step in creating a new sound is to choose a Retro Synth synthesizer engine. Your choice should be guided by the type of sound you want to generate.
Click the name of the synthesizer engine that you want to use:
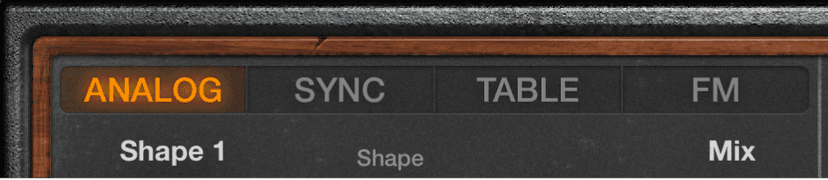
- Analog: Analog synthesizer sounds are typically attributed with having a warm and rich tone. You can create a wide variety of timbres using this synthesis method, notably string and pad sounds, synthetic brass, bass, and percussion.
- Sync: Oscillator sync sounds are typically more aggressive than sounds generated with other synthesis methods, making this engine most suitable for lead and hard bass instruments. The second oscillator is resynchronized with the first oscillator each time a note is triggered or each time the waveform cycle of the first oscillator restarts.
- Table: Wavetable synthesis is useful for creating evolving textures and more clinical sounds. It is well-suited for pad creation, basses, and sound effects. Despite the clean tone, wavetable synthesis can also sound warm when combined with the right filter type. Retro Synth also allows you to create your own custom wavetables.
- FM: At the core of the Retro Synth FM synthesis engine, you’ll find a multiwave modulator oscillator—the (Wave) Shape slider, and a sine wave carrier oscillator—the FM (Amount) slider. The basic sine wave of the carrier oscillator is a pure, characterless tone. To make things more sonically interesting, the modulator oscillator is used to modulate the frequency of the carrier oscillator. This modulation occurs in the audio range (you can actually hear it), and results in a number of new harmonics becoming audible, thus changing the tonal color. The pure sine wave (of the carrier oscillator) is combined with the newly generated harmonics, making the sound much more interesting. You can make fine changes to the tuning ratio of the two oscillators (and therefore the levels of the harmonics) by adjusting the Harmonic and Inharmonic controls.
Your choice of synthesizer engine changes the controls available. Most of these changes are seen in the Oscillator section.
Work the Filter:
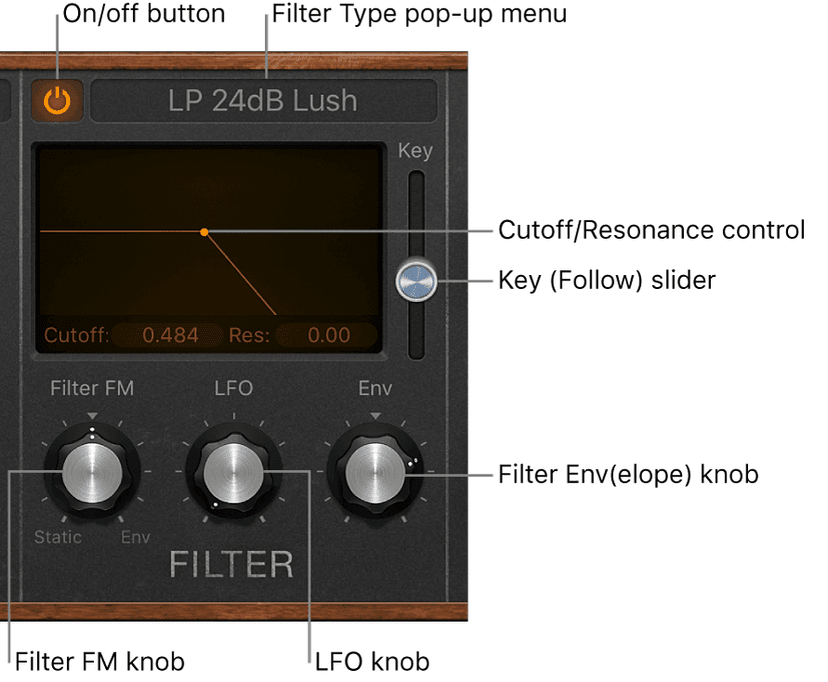
Retro Synth features a flexible filter that can operate as a lowpass, highpass, bandpass, band reject, or peak filter. The filter can subtly, or dramatically, affect the basic tone sent from the oscillators.
Filter use is straightforward. Choose one of the available filter types and adjust the filter cutoff and resonance controls to sculpt the sound. You can also control the filter cutoff and resonance controls while playing—either manually or by using keyboard position, an envelope, or the LFO to modulate these filter controls automatically. Real-time changes to filter cutoff and resonance can make your performance much more dynamic and interesting. You can do this with MIDI keyboard controllers and with modulation section controls.
Modulate:
Retro Synth Glide/Autobend, LFOs, and envelopes are known as modulation generators. These modulation sources are used to control modulation targets, such as oscillator pitch or filter cutoff.
The Volume Envelope is dedicated to control of the sound level over time. The Filter Envelope controls the filter over time.
The LFO is used as a source for multiple modulation targets. The Vibrato modulation source is dedicated to control of oscillator pitch.
Glide—also known as portamento—and Autobend are hardwired to control oscillator pitch.
You can also use your keyboard modulation wheel, aftertouch, and velocity as realtime control sources.
You should make use of all modulation options because they can help you to create expressive performances.
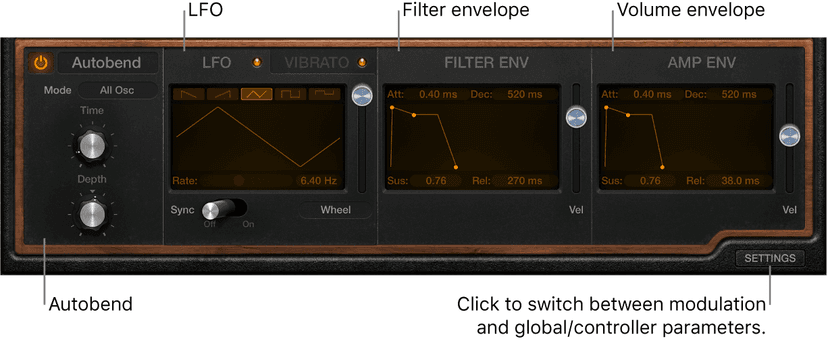
Modulate the Oscillator Waveform:
The Analog, Sync, and Wavetable oscillator waveform shapes can be modulated by following these steps. In the FM synth engine, you can modulate the FM or Harmonic amount (or both).
- Move the control toward LFO or Filter Env. Positions further away from the centered (off) position make waveform modulation more intense.
- Adjust the controls of the LFO (click the LFO tab if the Vibrato pane is visible) and Filter Env sections.
- If you are using the LFO, select a waveform.
- If the (LFO) Sync switch is turned off:
- Adjust the Via Amount slider to the right of the waveform graphic to set the maximum modulation intensity (the highest LFO speed).
- Move your MIDI keyboard modulation wheel to change the LFO speed. If you don’t want to use your keyboard modulation wheel, click the Via pop-up menu to assign a different MIDI controller.
- If you are using the Filter Envelope, drag the handles to set the attack, decay, sustain, and release values. Drag the Velocity slider to set the sensitivity of envelope modulation by velocity.
Use Vibrato to Oscillate the Pitch:
- Rotate the Vibrato knob to set the amount of vibrato (pitch modulation).
- Click the Vibrato tab if the LFO pane is visible.
- Select a vibrato waveform.
- If the Sync switch is turned off, drag the Rate note to set the vibrato speed. If the Sync switch is turned on, vibrato speed is controlled by the Logic Pro X tempo.
- If the (Vibrato) Sync switch is turned off:
- Adjust the Via Amount slider to the right of the waveform graphic to set the maximum modulation intensity (the highest vibrato speed).
- Move your MIDI keyboard modulation wheel to change the vibrato speed. If you don’t want to use your keyboard modulation wheel, click the Via pop-up menu to assign a different MIDI controller.
Amplify and Effect:
Retro Synth amp controls set the overall volume. You can also mix a sine wave directly into the output stage, which thickens the sound. You can make the sound richer with the integrated Chorus effect or can add a sweeping, metallic character with the Flanger effect.
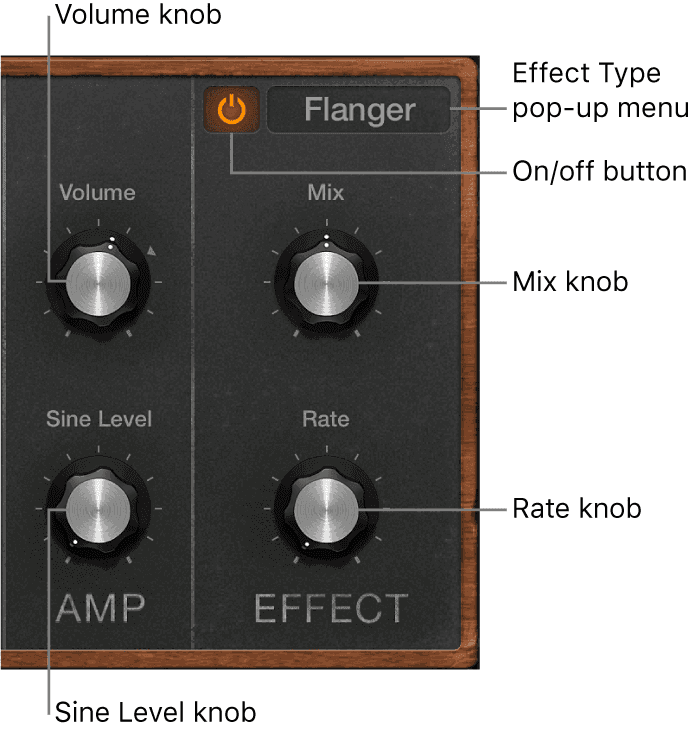
- Volume knob: Set the overall output level.
- Sine Level knob: Mix a sine wave at the frequency of oscillator 1 (Shape 1) directly into the output stage. This sine signal is not processed by the filter.
- On/off button: Turn the effect section on or off.
- Effect Type pop-up menu: Choose either the Chorus or Flanger effect.
- The Chorus effect is based on a delay line, the output of which is mixed with the original, dry signal. The short delay time is modulated periodically, resulting in pitch deviations. The modulated deviations, in conjunction with the original signal pitch, produce the chorus effect.
- The Flanger effect works in a similar fashion to the chorus, but with even shorter delay times. The output signal is fed back into the input of the delay line. This feedback results in the creation of harmonic resonances that cyclically move through the frequency spectrum, resulting in a sweeping, metallic sound.
- Mix knob: Set the balance between the original and effect signals. High values result in stronger effect processing.
- Rate knob: Set the modulation speed of the effect.
Go Global:
Retro Synth global controls are used to set the overall tuning, polyphony, and other aspects of your instrument.
The controller settings let you assign MIDI keyboard features to Retro Synth controls. You can use three MIDI controllers—velocity, modulation wheel, and aftertouch—to change Filter Cutoff, Wave Shape (Pulse Width), or LFO/Vibrato Rate controls. Multiple MIDI controllers can be assigned to the same control, so you could change filter cutoff with both velocity and aftertouch, for example. Alternatively, a single MIDI controller can be assigned to multiple Retro Synth parameters—with aftertouch affecting both filter cutoff and LFO speed, for example.
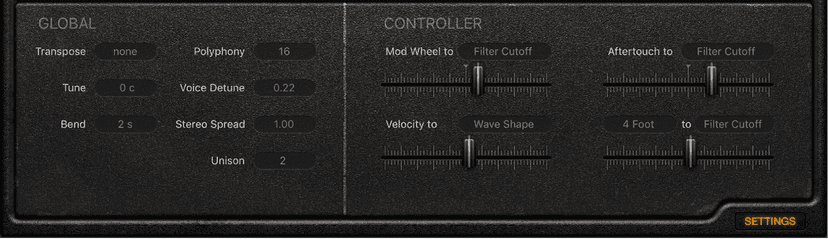
Click the Settings label to switch between the modulation and global/controller controls.
Some of Logic’s other Synths look older (because they are!) but still sound great. You should get to checking some of these out too:
ES1
ES1 emulates the circuits of analog synthesizers in a simple, streamlined interface.
ES1 produces sounds using subtractive synthesis. It provides an oscillator and sub-oscillator that generate harmonically rich waveforms. You subtract (cut, or filter out) portions of these waveforms and reshape them to create new sounds. The ES1 tone-generation system also provides flexible modulation options that make it easy to create punchy basses, atmospheric pads, biting leads, and sharp percussion.
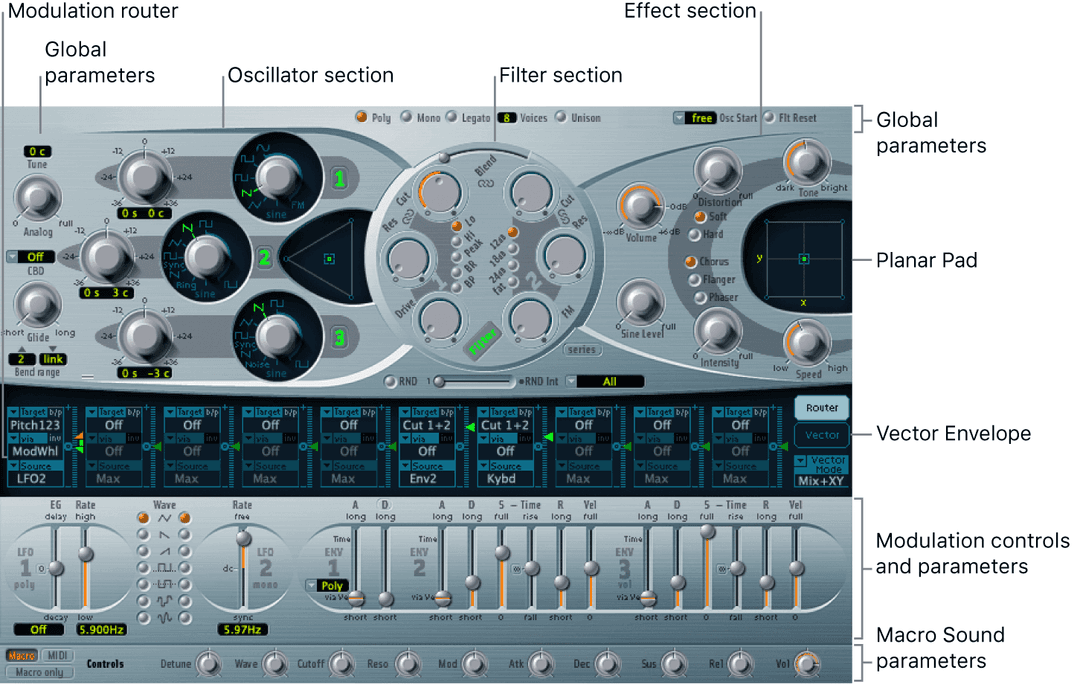
ES1 is divided into six main areas.
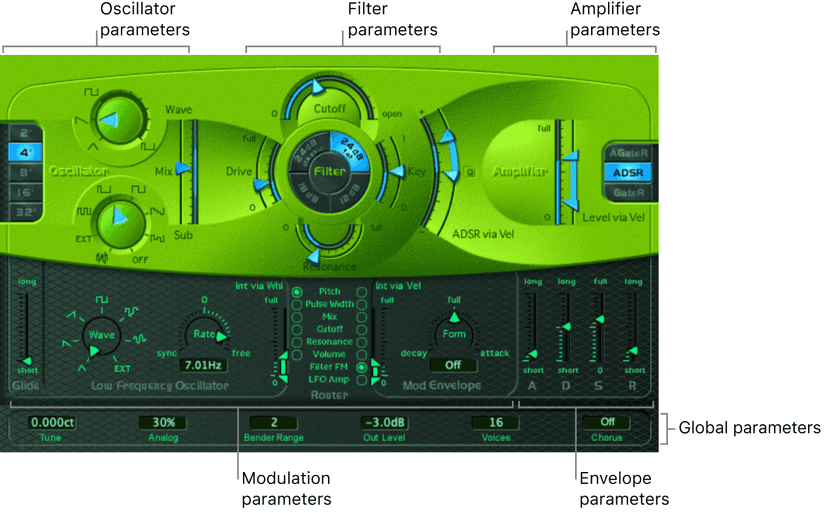
- Oscillator parameters: Located in the upper left, the oscillators generate the basic waveforms that form the basis of your sound.
- Global parameters: Located in the bottom green/gray strip, global sound control parameters are used to assign and adjust global tuning, activate the in-built chorus, and so on. You can use the chorus to color or thicken the sound.
- Filter parameters: Located in the upper-middle section with the circular Filter area as well as the Drive and Key scaling parameters, the filter is used to contour the waveforms sent from the oscillators.
- Amplifier parameters: Located in the upper right, the amplifier parameters allow you to fine-tune sound level behavior.
- Envelope parameters: Located to the right in the dark green/gray area, the ADSR sliders are used to control both filter cutoff and the amplifier level over time.
- Modulation parameters: Located to the left and middle in the dark green/gray area, the modulation sources, modulation router, modulation envelope, and amplitude envelope are used to modulate the sound in a number of ways.
ES2
ES2 combines subtractive synthesis with elements of FM and wavetable synthesis to generate an extraordinary variety of sounds. This makes it the perfect choice for creating powerful pads, evolving textures, rich basses, or synthetic brass.
The ES2 graphical interface is divided into the following main areas.
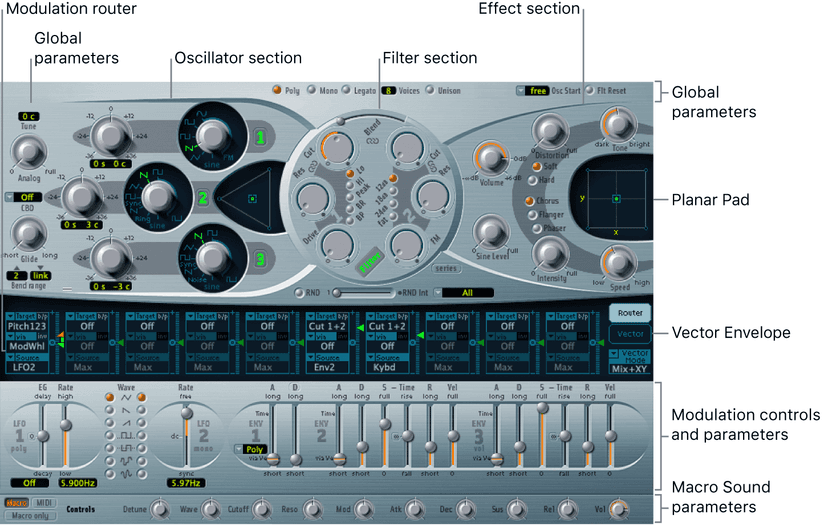
The three oscillators of the ES2 provide classic analog synthesizer waveforms (including noise) and 100 single-cycle waveforms, known as Digiwaves. This raw material forms the basis for sounds that range from fat analog to harsh digital sounds, or hybrids of the two. You can also cross-modulate oscillators, making it easy to create FM-style sounds. Further options include the ability to synchronize and ring-modulate the oscillators or to mix a sine wave directly into the output stage, to thicken the sound.
ES2 features a flexible modulation router that offers up to ten simultaneous (user-defined) modulation routings. Further modulation options include the unique Planar Pad—which provides control of two parameters on a two-dimensional grid. The Planar Pad itself can be controlled by the sophisticated Vector Envelope. This is a multipoint, loop-capable envelope that makes it easy to create complex, evolving sounds.
Lastly, Distortion, Chorus, Phaser, and Flanger effects are built into ES2.
If you want to begin experimenting right away, there are a number of settings to try. One of the strengths of ES2 is the vast modulation possibilities it offers. Take time explore these!
ES P
The eight-voice ES P (ES Poly) emulates classic polyphonic synthesizers of the 1980s.
It is a versatile instrument that is capable of producing a huge variety of useful musical sounds. The creation of classic analog synthesizer brass sounds is just one of its many strengths. ES P produces sounds using subtractive synthesis.
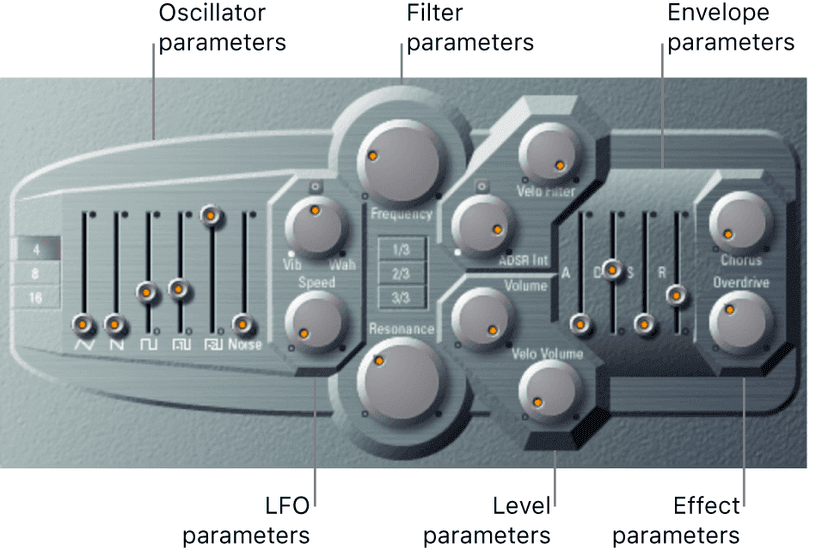
ES P is divided into several areas.
- Oscillator parameters: The oscillator sliders are shown in the area to the left. The octave parameters are also found in this section. The oscillators generate the basic waveforms that form the basis of your sound.
- LFO parameters: The LFO parameters (to the right of the oscillator parameters) are used to modulate the sound.
- Filter parameters: The vertical column in the center includes the (cutoff) Frequency and Resonance knobs and the key follow buttons. The filter is used to contour the waveforms sent from the oscillators.
- Envelope and level parameters: The area to the right of the filter parameters contains the envelope and level parameters, which control the level of the sound over time.
- Effect parameters: The area at the extreme right contains the Chorus and Overdrive parameters. These can be used to color or thicken the sound.
- Extended parameters: Not shown in the image, the extended parameters are accessed by clicking the disclosure triangle at the lower left of the interface. These parameters include bend and tuning functions.
ES M
The monophonic ES M (ES Mono) synthesizer is a good starting point if you’re looking for bass sounds that punch through your mix.
ES M features an automatic fingered portamento mode, making bass slides easy. It also provides an automatic filter compensation circuit that delivers rich, creamy basses, even when you use higher resonance values. ES M produces sounds using subtractive synthesis. It has an oscillator that generates harmonically rich waveforms.
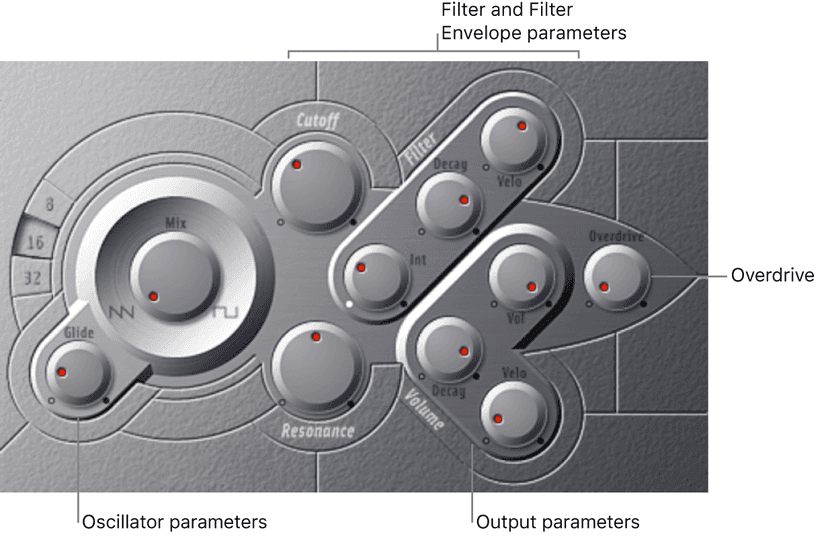
ES M is divided into several areas.
- Oscillator parameters: The oscillator Mix and Octave parameters are shown in the area to the left. The oscillator generates the basic waveforms that form the basis of your sound.
- Filter and filter envelope parameters: The section to the right of the Oscillator parameters includes the Cutoff (frequency) and Resonance knobs. The filter is used to contour the waveforms sent from the oscillators. The filter envelope parameters are found toward the upper right. These control the filter cutoff over time.
- Output parameters: The angle-shaped area to the lower right contains the level envelope and output parameters, which control the level of the sound over time. The Overdrive knob is located near the right edge of the interface, halfway up. The Overdrive can be used to color or add bite to the sound.
- Extended parameters: Not shown in the image, the extended parameters are accessed by clicking the triangle at the lower left of the interface. These parameters include bend and tuning functions.
ES E
The eight-voice ES E (ES Ensemble) synthesizer is ideal for quickly creating warm, rich pad and ensemble sounds. ES E produces sounds using subtractive synthesis. It features an oscillator that generates harmonically rich waveforms.
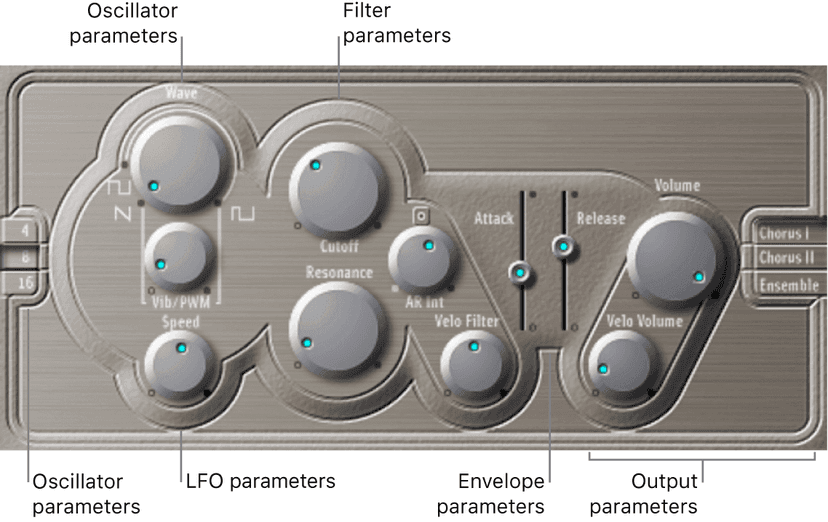
ES E is divided into several areas.
- Oscillator parameters: The oscillator Wave and Octave parameters are shown in the area to the left. The oscillator generates the waveforms that form the basis of your sound.
- LFO parameters: The LFO parameters (below the Wave knob) are used to modulate the sound.
- Filter parameters: The section to the right of the oscillator parameters includes the Cutoff (frequency) and Resonance knobs. You use the filter to contour the waveforms sent from the oscillator.
- Envelope parameters: The area to the right of the filter parameters contains the envelope parameters, which control the level of the sound over time.
- Output parameters: The area at the extreme right houses the switches for the integrated modulation effects and the Volume knob, which is responsible for the main output level. The effects can be used to color or thicken the sound.
- Extended parameters: Not shown in the image, the extended parameters are accessed by clicking the triangle at the lower left of the interface. These parameters include bend and tuning functions.
EFM1
The 16-voice EFM1 is a simple but powerful frequency modulation synthesizer. It can produce the rich bell and digital sounds that frequency modulation (FM) synthesis has become synonymous with.
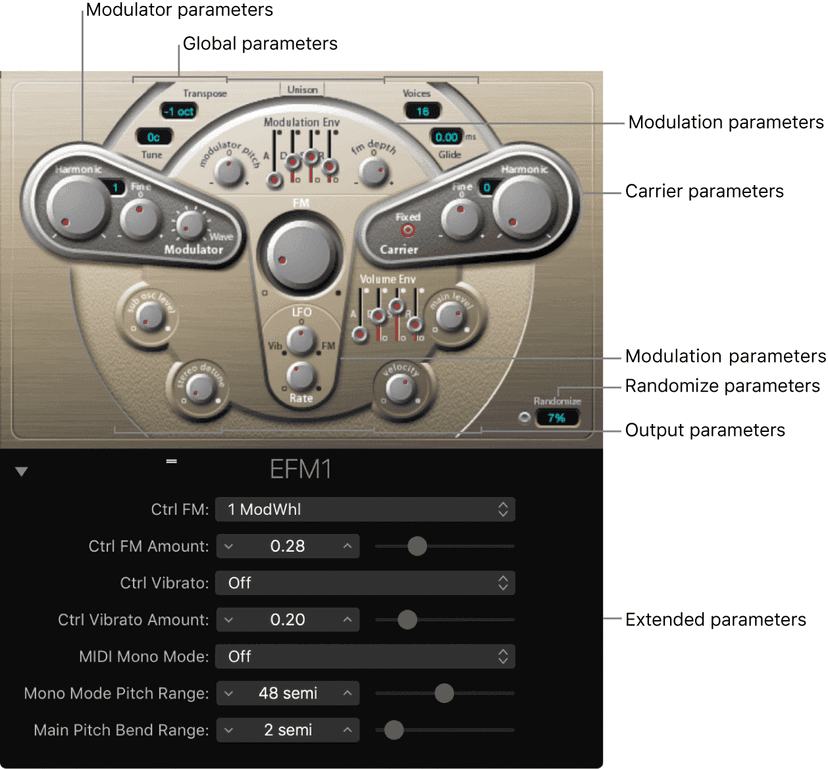
EFM1 is divided into several areas.
- Global parameters: The top section contains parameters that set the overall tuning of EFM1. Further controls enable you to set the Glide (portamento) time, limit the number of voices, and thicken the sound with Unison.
- Modulator and Carrier parameters: The FM engine consists of the modulator and carrier parameters (raised, darker sections), and the FM Intensity knob (in the center). These are the key controls for setting the basic tone of EFM1.
- Modulation parameters: The modulation envelope and LFO at the top and bottom of the mushroom-shaped area in the center respectively are used to animate the sound.
- Output parameters: The bottom section houses the Output section, which includes the Sub Osc Level and Stereo Detune knobs that can be used to thicken the sound. The volume envelope, Main Level, and Velocity controls are used to set the EFM1 level.
- Randomize parameters: The Randomize field and button in the lower-right corner are used to create random variations of the current settings, resulting in new sounds.
- Extended parameters: Accessed by clicking the disclosure triangle at the lower left of the interface, these parameters allow you to assign MIDI controllers to the FM Depth and Vibrato parameters.
EVOC 20 PolySynth
EVOC 20 PolySynth combines a vocoder with a polyphonic synthesizer and can be played in real time. It can create classic vocoder sounds, made famous by groups such as Kraftwerk during the 1970s and 1980s. Vocoding remains popular in current electronic, hip-hop, R & B, and other music styles.
This is arguably Logic’s most fun synth to explore.
The word vocoder is an abbreviation for voice encoder. A vocoder analyzes and transfers the sonic character of the audio signal arriving at its analysis input to synthesizer sound generators. The result of this process is heard at the output of the vocoder.
The classic vocoder sound uses speech as the analysis signal and a synthesizer sound as the synthesis signal. This sound was popularized in the late 1970s and early 1980s. You may be familiar with tracks such as “O Superman” by Laurie Anderson, “Funkytown” by Lipps Inc., and numerous Kraftwerk pieces—such as “Autobahn,” “Europe Endless,” “The Robots,” and “Computer World.”
In addition to these “singing robot” sounds, vocoding has also been used in many films—such as with the Cylons in Battlestar Galactica, and most famously, with the voice of Darth Vader from the Star Wars saga.
Vocoding, as a process, is not strictly limited to vocal performances. You could use a drum loop as the analysis signal to shape a string ensemble sound arriving at the synthesis input.
EVOC 20 PolySynth “listens” to an incoming audio signal—typically of a spoken or sung performance—and imposes the sonic characteristics and level changes of this signal onto the integrated synthesizer.
When you play notes and chords with your MIDI keyboard, the internal synthesizer “sings” at the pitches of incoming MIDI notes, but with the articulations—level changes, vowel and consonant sounds—of the incoming audio signal. This results in the classic “singing robot” or “synthetic voice” sounds that vocoders are mainly known for.
EVOC 20 PolySynth can also be used as a synthesizer, or it can be used for more subtle effects processing—such as the creation of relatively natural-sounding vocal harmonies from a solo voice performance. Not limited to vocal processing, you can also achieve interesting results by processing other audio material, such as drum or instrument loops.
The EVOC 20 PolySynth interface is divided into six main parameter sections.
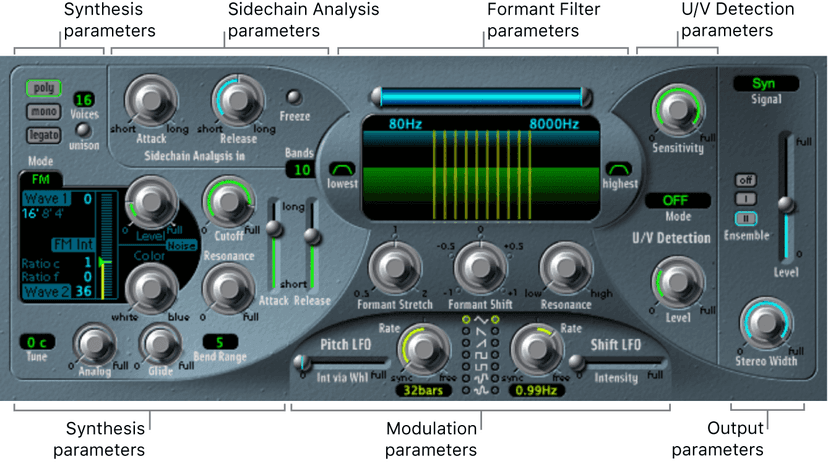
- Sidechain Analysis parameters: Determine how the input signal is analyzed and used by the EVOC 20 PolySynth.
- U/V Detection parameters: Detect the unvoiced portions of the sound in the analysis signal, improving speech intelligibility.
- Synthesis parameters: Control the polyphonic synthesizer of the EVOC 20 PolySynth.
- Formant Filter parameters: Configure the analysis and synthesis filter banks.
- Modulation parameters: Modulate the synthesizer and filter banks—through two LFOs.
- Output parameters: Configure the output signal of the EVOC 20 PolySynth.
To use EVOC 20 PolySynth, you need to insert it into the Instrument slot of an instrument channel strip. You also need to provide an audio signal as the analysis audio source, via a side chain.
Setting up EVOC 20 PolySynth
Insert EVOC 20 PolySynth into the Instrument slot of an instrument channel strip.
Choose an input source from the Side Chain pop-up menu in the plug-in header. This can be an audio track, live input, or bus, depending on the host application.
The EVOC 20 PolySynth is now ready to accept incoming MIDI data and has been assigned to an input, audio track, or bus—via a side chain.
If applicable to your host application and needs, mute the audio track serving as the side chain input, start playback, and play your MIDI keyboard.
Adjust the volume levels of EVOC 20 PolySynth and the side chain source—if not muted—to meet your needs. To further enhance the sound, adjust the knobs, sliders, and other controls, and insert other effect plug-ins.
Sculpture
Sculpture is a synthesizer that generates sounds by simulating the physical properties of a vibrating string. This approach to tone generation is called component modeling. It enables you to create a virtual model of an acoustic instrument, such as a violin or cello. Components such as the length of the neck, the material the instrument is made of—wood or metal, for example—the diameter, tension, and material of the strings—nylon or steel, for example—and the size of the instrument body can be modeled.
In addition to the physical properties of the instrument, you can determine how and where it is played—softly bowed, or plucked, on top of a mountain, or under the sea. Other aspects such as finger noise and vibrato can also be emulated. You can even hit your virtual instrument strings with a stick, or emulate dropping a coin onto the bridge.
Sculpture is not limited to recreating real-world instruments. You are free to combine components in any way, leading to bizarre hybrids such as a six-foot-long guitar with a bronze bell for a body—played with a felt hammer.
You can also create more traditional synthesizer tones in Sculpture. These benefit from the modeling process itself, which tends to add a level of richness and an organic quality to sounds. The end results are lush, warm pads, deep and round synthesizer basses, and powerful lead sounds. If you need to create an endlessly evolving texture for a film soundtrack, or a spaceship takeoff sound, Sculpture is the perfect instrument for the job.
Like a real instrument, Sculpture generates sounds by using an object, such as a fingertip, wind, drumstick, or violin bow, to stimulate another object, such as a guitar string or reed.
Note: For clarity, the stimulated object is always referred to as the string.
As with a real instrument, the sound consists of multiple elements. It’s not only the string that is responsible for the tonal color, but also the objects that stimulate or otherwise affect the string, and therefore the sound.
For example, imagine a steel-stringed guitar that is alternately strummed with your thumb and then picked strongly with your fingers. Changing to nylon strings, or 12 strings, would significantly change the tone. Now imagine the impact of pressing the strings down onto the fretboard, which not only changes the chord but also momentarily bends the strings, and therefore their pitch. Other aspects to consider are the size and material of the guitar body and how they influence the resonant characteristics of your sound. Further elements, such as the size or type of sound hole—round or F-shaped—the finger noise on the strings, and the medium that the guitar is played in, also have roles to play in the overall sound that you produce.
Sculpture enables you to virtually model the physical consistency and behavior of all components involved—hence component modeling synthesis.
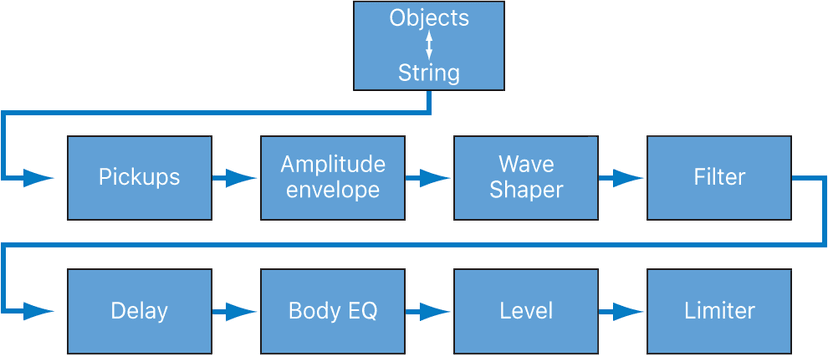
This figure shows the signal flow of the core Sculpture synthesis engine.
Following the stimulation of the string by various objects, the vibration of the string is captured by two movable pickups—you can view these as being similar, in concept and operation, to the electromagnetic pickups found on guitars, electric pianos, or clavinets.
The pickups send the signal to the ADSR-equipped amplitude stage, a Waveshaper module, and a multimode filter. These all serve to sculpt your sound.
Note: All elements described above exist on a per voice basis.
The sum of all voice signals can then be sent to an EQ-like module (the Body EQ), which simulates the spectral shape/body response of your instrument, and then processed by an integrated delay effect. The resulting signal is then fed to a level limiter section.
A vast number of modulation sources are also available, from tempo-synced LFOs to jitter generators and recordable envelopes. These can control the string and object properties, the filter, and other parameters. You can even modulate other modulation sources.
A recordable morph function also allows for smooth or abrupt transitions between up to five morph points. A morph point is essentially a collection of parameter settings at a given moment in time.
Important: The interaction between various sections of the component modeling synthesis engine is more dynamic and more tightly intertwined than that of other synthesis methods. This can lead to some truly unique sounds, but sometimes even a small parameter change can deliver dramatically different, and unexpected, results. Sculpture requires a more measured approach to sound creation than a traditional synthesizer design. Refer to the flowchart while learning the interface and programming.
Sculpture is a performance-oriented synthesizer that benefits from the use of controllers, modulations, and different playing techniques. Take time to experiment with all available controls and parameters when you initially audition some of the supplied sounds, and when you create new ones of your own.
Several tutorial sections will help you learn about creating sounds with Sculpture.
Sculpture is an instrument that requires some investment of your time, but it can reward you with beautifully warm and organic sounds, evolving soundscapes—or a harsh and metallic “Hell’s Bells” patch, if required. Don’t be afraid to experiment; that’s what Sculpture was created to do.
Do this now
- Make the same sound - a simple bass - in ES2, Retro Synth and Alchemy.
- Note which was quickest and which got closest.
- Keep the one you found fastest and learn it properly.
Ten synths you half know are worth less than one you know completely.