Synthesis: Logic Synths pt II
Logic’s Synthesizer collection doesn’t just have the classic “synth” type sounds, there’s much more Synthesis in Logic asides from trying to sound like a Minimoog. Explore some of these synths below:
Drum Synth
Drum Synth provides you with easy access to a powerful electronic drum synthesis engine. Depending on the sound type you’ve chosen, up to eight specially selected controls for pitch, filtering, effect, and envelopes allow you to quickly create the electronic drum sound you need. You can, of course, add further processing plug-ins in the instrument channel strip or busses.
Drum Synth is ideal for adding fills, flourishes, or individual hits to an existing Drummer groove, loops, and live or sequenced parts, and for drum replacement and doubling tasks.
You can use multiple Drum Synth instances, either as individual software instrument tracks or inside Drum Machine Designer, which allows you to build complete electronic drum sets, encompassing everything from vintage drum machine through to modern synthetic percussion sounds.
You can also directly load Drum Synth settings into Ultrabeat to access additional synthesis and processing parameters. Typically, you would replace Drum Synth with Ultrabeat on a channel strip, and the Drum Synth sound is automatically loaded.
Global parameters:
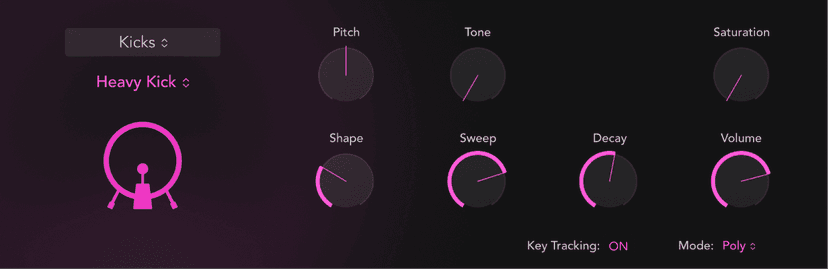
Drum Synth has four global parameters in the plug-in window.
- Group type pop-up menu: Choose a drum or percussion instrument family: Kicks, Snares and Claps, Percussion, Hats and Cymbals.
- Sound type pop-up menu: Choose a drum or percussion sound type from the active instrument group. Back to Default reverts all parameter changes to their initial values.
- Instrument icon: Click to play the sound.
- Key Tracking button: Enable to play the sound chromatically. Disable to play the sound at the root pitch when any key is struck.The “Root Key” label is shown beside the keyboard in the Piano Roll Editor.
- Mode pop-up menu: Choose a playback mode.
- Mono: One voice can be played. If you play another key, the newly played note cuts off the playing note.
- Poly: You can play multiple notes simultaneously.
- Gate: Like ‘Mono’, but the sound is heard only while you hold the key.
The parameters of individual types of drum sound are covered in other sections.
Ultrabeat
Ultrabeat is a synthesizer that is designed to create percussive sounds and polyphonic rhythms. It also incorporates a powerful step sequencer which you can use to create polyphonic rhythmic sequences and patterns. Prior to the new Step Sequencer, this was the original Step Sequencing option in Logic.
Most software synthesizers offer one synthesizer per plug-in instance. Ultrabeat, however, places 25 independent synthesizers at your disposal. These synthesizers—known as drum voices in Ultrabeat—are optimized for the generation of drum and percussion sounds.
You can compare Ultrabeat with a drum machine that features 24 drum pads, plus a built-in multioctave keyboard that can be used for polyphonic accompaniments, or bass or melody lines.
The distribution of drum voices across the MIDI keyboard is as follows: a single drum voice is assigned to each of the first 24 MIDI keys (spanning MIDI notes C1 to B2). The 25th drum voice is assigned to the keys from the 25th MIDI key (C3) and above, enabling you to play this sound chromatically.
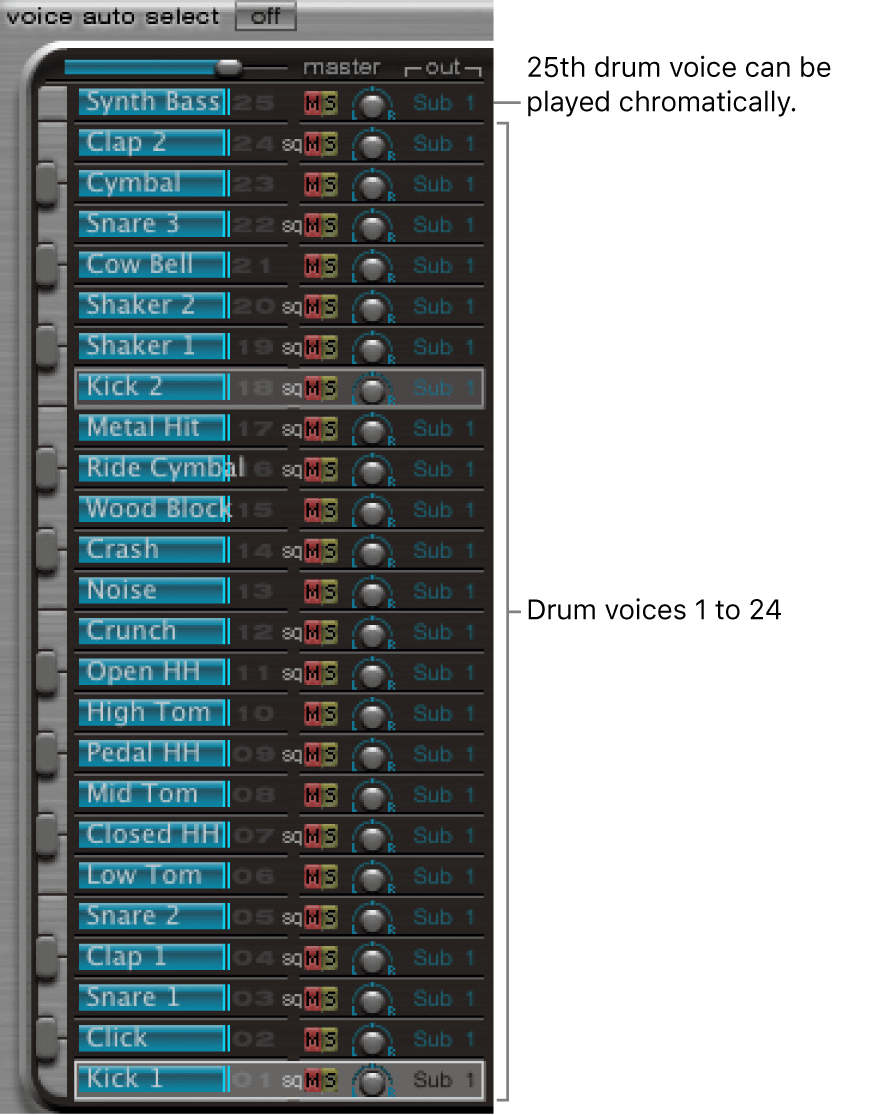
The 24-drum pad assignment is compatible with the widely adopted GM (General MIDI) MIDI Drum note mapping standard. If your MIDI keyboard is limited to two octaves or does not support transposition, use the Transpose options of Logic Pro X to shift incoming MIDI notes up or down one or more octaves.
Note: For clarity, and to maintain the drum machine analogy, this guide refers to the independent synthesizers as drum sounds. A combination of drum sounds forms a drum kit.
Drum Kit Designer
Drum Kit Designer lets you build custom drum kits from a wide selection of drum and percussion sounds. It also provides controls that change sound characteristics and the level of each piece in your kit.
Further settings allow you to use different microphones and rooms to enhance Producer kits. Producer kits are identified in the Library by a “+” at the end of the patch name.
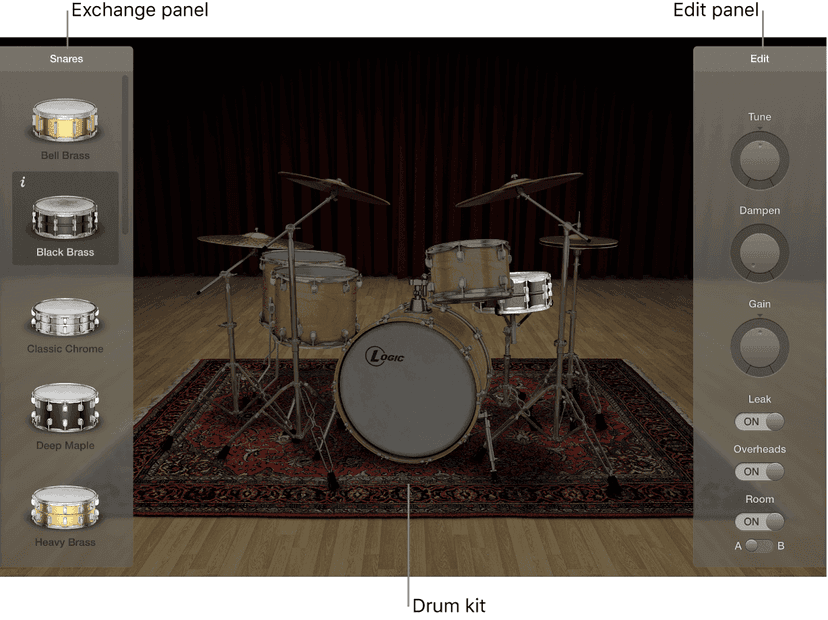
The Drum Kit Designer interface is divided into the following main areas.
- Drum kit: Click a drum kit piece to preview its sound and to open the Edit pane and the Exchange pane (if exchange pieces are available for that drum type).
- Exchange pane: Shows all drums that are available for exchange (you may need to scroll).
- Edit pane: Shows settings that change sound characteristics.
Drum Machine Designer
Drum Machine Designer is the ideal way to create, organize and interact with kits and kit pieces. It is used for Drummer tracks but can also be used on instrument channel strips.
When combined with Step Sequencer it provides an incredibly flexible and inspiring platform for groove production.
Drum Machine Designer structure
Drum Machine Designer is not a plug-in, although it can be inserted into instrument channel strips. It is a track-based meta-instrument using a track stack, which combines a master track and a number of subtracks. Each track has a corresponding channel strip.
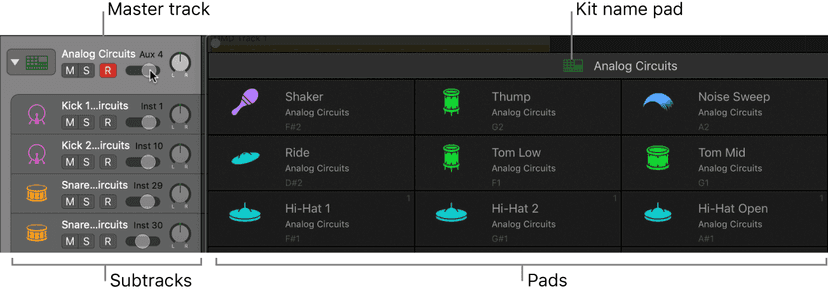
- The master track channel strip is represented by the kit name pad, shown in the kit controls bar at the top of the window.
- Each subtrack channel strip is represented by a corresponding kit piece pad, shown in the grid.
Settings for the master track (kit) and all subtracks (kit pieces) are stored as a kit patch, which can hold multiple channel strips, each with its own instrument, effect plug-ins, and Smart Control settings. Plug-in settings, by comparison, can only hold the plug-in settings of a single plug-in.
A single subtrack with its instrument, effect plug-ins and Smart Control settings is stored as a kit piece patch.
The icon shown on tracks and channel strips always matches the pad icon, and updates when a kit piece is exchanged or replaced.
How Drum Machine Designer handles notes:
MIDI notes received on the master track are distributed to subtracks, in accordance with the input and output notes assigned to the pads. This is true for both notes played by regions on the master track, and for notes played in realtime when the master track is the focused track. For example, if the pad assigned to the first subtrack is set to input note C1 and to output note G2, a C1 played on the master track is converted to a G2. This note value is passed to the first subtrack and plays a G2 on the instrument inserted in the subtrack channel strip.
In contrast, notes played on a subtrack are not altered, and are passed directly to the instrument inserted in the channel strip, enabling you to play a subtrack instrument chromatically and polyphonically.
You can separate the notes in the master track MIDI region by doing one of the following:
- Select the master track MIDI region, then choose the Edit > Separate MIDI Events > By Note Pitch command.
- Control-click the master track MIDI region, then choose the MIDI > Separate by Note Pitch command from the shortcut menu.Individual regions, containing note events, are created on each subtrack and can be handled and edited in the same way as any other MIDI region.
Drum Machine Designer sounds:
You can access Drum Machine Designer kit patches and kit piece patches in the Library. When the Library is open:
- Click the kit name pad to view and select kit patches in the Library.
- Click a kit piece pad icon or pad background to view and select kit piece patches in the Library.
Drum Machine Designer features an extensive collection of premapped kit patches and also a huge number of individual sound (kit piece) patches that you can add or use as replacement elements for pads, to create custom kits.
You can assign sounds to pads with patches from the Library, or drop audio material directly into Drum Machine Designer from the Browser, Loop Browser, or Audio Browser. You can also drop MIDI or audio regions onto Drum Machine Designer pads or to master track or subtrack headers.
Note: You can assign any type of instrument or sound to a pad. Should you choose to assign a Vintage B3 Organ patch to a pad, for example, the Smart Controls pane shows drawbars and other B3 parameters. You may need to download additional content to use all Library patches.
Vintage B3 Organ
Vintage B3 Organ emulates the sound and features of the Hammond B3 organ with two manuals (keyboards) and a pedalboard, each of which can have its own registration (sound setting). You can play all registers with a single-manual master keyboard, or you can use two manuals and a MIDI pedalboard. The Vintage B3 component modeling synthesis engine faithfully replicates the tonewheel generators of an electromechanical Hammond organ, down to the smallest detail. This includes charming flaws, such as the enormous level of crosstalk and the scratchiness of the key contacts. You can adjust the intensity of these characteristics, enabling tones that range from flawlessly clean through to dirty and raucous—or anything in between.
Vintage B3 also simulates various types of Leslie sound cabinets—with rotating speakers, with and without deflectors. A flexible integrated effects section provides tube overdrive, an equalizer, a wah wah, and a reverberation effect.
The interface is divided into two main areas with a third area visible in some windows. The control bar at the top lets you access different controls in windows shown in the central display section. The lower edge gives you direct access to Leslie speed controls when the Main or Rotor Cabinet window is shown.
Click the control bar buttons to update the central display.
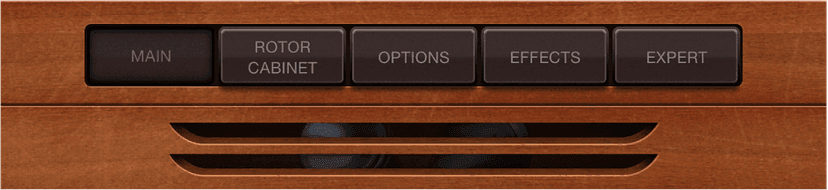
- Main button: Shows the draw bars, which are used to make changes to the basic organ sound in real time. Additional performance and setup controls can be accessed with the Control, Preset, and Split buttons in the lower-right corner.
- Rotor Cabinet button: Shows the Leslie speaker cabinet model and control parameters.
- Options button: Shows several tone controls that provide quick access to various aspects of your sound. Advanced controls for Percussion, Scanner Vibrato, and Morph are also found in the Options window.
- Effects button: Shows controls for the built-in EQ, Wah, Distortion, Chorus, and Reverb effects.
- Expert button: Shows Organ, Pitch, Condition, Sustain, and Miscellaneous controls. These provide precise control over the tone of the organ and over other aspects, such as tuning, draw bar leakage, key click characteristics, and crosstalk levels. You generally access these parameters only when editing or creating an organ sound.
Vintage Electric Piano
Vintage Electric Piano simulates the sound of various Rhodes and Wurlitzer pianos as well as the sound of the Hohner Electra Piano.
The unmistakable tones of Fender Rhodes pianos are some of the best-known keyboard instrument sounds used in the second half of the 20th century. Various Rhodes models have been popularized in a wide range of musical styles, encompassing pop, rock, jazz, and soul, as well as more recent genres such as house and hip-hop. Nearly as popular was the Wurlitzer piano, which enjoyed most of its success in the 1970s.
The Vintage Electric Piano sound engine uses component modeling synthesis techniques to generate ultra-realistic electric piano sounds, with smooth dynamics and scaling over the entire 88-key range. Component modeling has no abrupt changes between samples, sample looping, or filtering effects during the decay phase of notes.
Vintage Electric Piano also simulates the physical characteristics of the original instruments, including the movement of the electric piano reeds, tines, and tone bars in the (electric and magnetic) fields of the pickups. It also emulates the ringing, smacking, and bell-like transients of the attack phase as well as the hammer action and damper noises of the original instruments.
The integrated effects include classic equalizer, overdrive, stereo phaser, stereo tremolo, and stereo chorus effects that are commonly used with electric piano sounds.
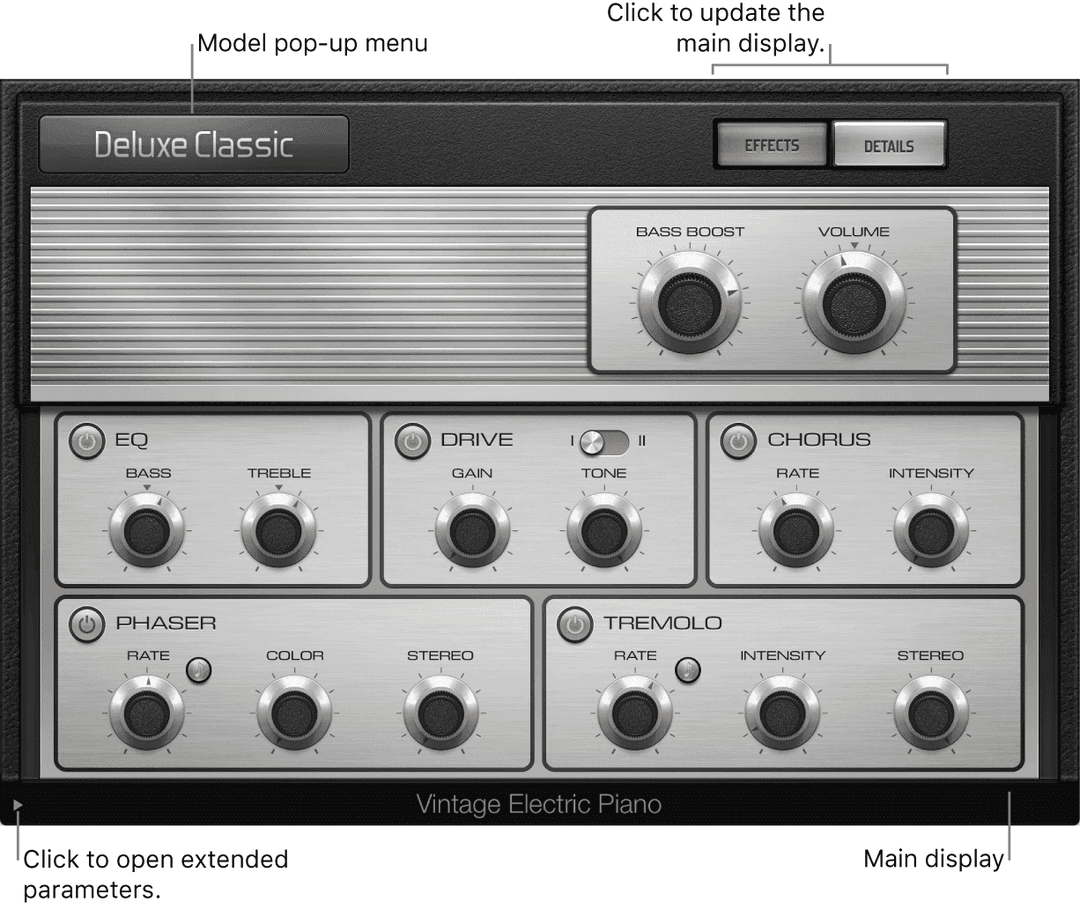
Vintage Electric Piano is divided into four areas. The control bar at the top lets you choose an electric piano model and provides access to further controls shown in the main display. The central area gives you direct access to Bass Boost and Volume controls. Extended parameters are available at the bottom of the interface.
Click the control bar Effects and Details buttons to update the main display.
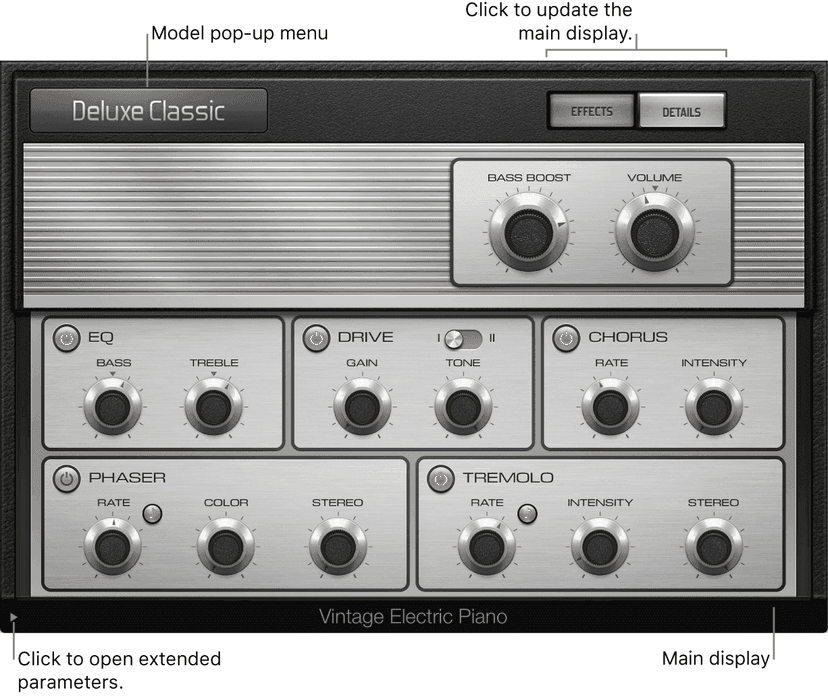
- Model pop-up menu: Choose an electric piano model. Several Rhodes models are available, plus Hohner Electra Piano and Wurlitzer models.Note: When you choose a new model, all currently sounding voices are muted and all parameters are reset to default values.
- Effects button: Click to show the EQ, Drive, Phaser, Tremolo, and Chorus effect parameters in the main display area.
- Details button: Click to show parameters in the main display area that enable you to alter the tone and playing behavior of the selected instrument model.
- Bass Boost knob and field: Enhance the low end of the sound. This parameter emulates the behavior of the control found on the original Rhodes piano.
- Volume knob and field: Set the overall output level of Vintage Electric Piano.
- Extended parameters: Click the disclosure triangle at the lower left to access Logic Pro Vintage Electric Piano extended parameters if needed.
Vintage Clav
Vintage Clav emulates the classic Hohner D6 Clavinet. The sound of the D6 is synonymous with funk, but it was also popularized in the rock, pop, and electric jazz of the 1970s by artists like Stevie Wonder, Herbie Hancock, Keith Emerson, Foreigner, and the Commodores. If you’ve heard “Superstition” or “Higher Ground” by Stevie Wonder, then you know the D6 sound.
Vintage Clav uses a component modeling synthesis engine that not only simulates the basic sounds of the D6 but also the various string buzzes, key clicks, and the tone of the pickups found in the original instrument. Vintage Clav accurately emulates the pluck and bite of the attack phase as well as the sticking of the hammer pads.
The Vintage Clav synthesis engine improves on the Hohner D6 Clavinet with a stereo, rather than mono, output. The 60-key range (F to E) of the original D6 has also been extended across the full MIDI range (127 notes).
Vintage Clav provides extensive sound control options. You can radically alter the tone of the instrument, enabling you to simulate an aging clavinet or to create unique new timbres that have little in common with the sound of a clavinet.
Vintage Clav also incorporates an effects processor that provides classic wah, modulation, and distortion effects—often used with the original instrument. The effects are modeled on vintage effect pedals and adapted for optimized use with Vintage Clav.
Vintage Clav is divided into four areas. The control bar at the top lets you choose a clavinet model and provides access to further controls shown in the central display. The lower area gives you direct access to tone, level, and damper controls. Extended parameters are available at the bottom of the interface.
Use the control bar buttons to update the central display.

- Model pop-up menu: Choose a basic type of tone, or model. Each has a unique tonal characteristic and different harmonic structure, designed to create different sounds.
- Main button: Shows the Pickups, Stereo Spread, Brilliance, and Decay controls in the central display.
- Effects button: Parameters for the integrated effects are shown in the central display.
- Details button: Opens the Details window where you can modify sound parameters and set global parameters such as the tuning of Vintage Clav.
- Extended parameters: Click the disclosure triangle at the lower left to access Logic Pro Vintage Clav extended parameters if needed.
Vintage Mellotron
Vintage Mellotron recreates the features and a number of sounds from this famous keyboard instrument that has featured on dozens of classic rock and pop songs from the 1960s, ‘70s, and beyond.
The Mellotron is considered a precursor to modern sample-playback instruments. It uses a number of magnetic tapes that are drawn across a tape head when a key is pressed. Each key has an individual tape playhead and pressure pads on a spring-loaded mechanism. Rollers for each key are driven by a constantly turning capstan that spans the keyboard range.
Each key has a tape strip with up to three different sounds running in parallel. Sound length is limited to eight seconds, at which point the sound abruptly stops. Tapes return to their start position when the corresponding key is released. By offsetting the playheads with the racks that hold the tapes, a musician can switch the entire keyboard between a string and choir sound, for example. Partial offsets of the tape heads result in a layered blend of two adjacent sounds on each tape strip.
More advanced Mellotron models can use longer tapes, with different sounds allocated at precise positions along their length. This is similar to switching between banks of presets on a modern synth. Even then, a maximum of around 24 sounds is possible. If you require different sounds, the machine needs to be dismantled, and a new tape rack is used to replace one already in place. Not ideal, and certainly tough to accomplish during a live performance.
The original library sounds were recorded note by note, with varied performances and pitch fluctuations. This makes Mellotron instrument mapping somewhat inconsistent across the keyboard range, which is an essential part of its sonic character and charm.
The mechanical complexity of early Mellotrons—tape stretching, head alignment problems, and environmental factors, such as temperature and humidity fluctuations, smoke, dust, and magnetic fields—made them difficult to maintain. Even when new, no two Mellotrons sounded exactly the same because of these variables.
Vintage Mellotron features painstakingly sampled versions of each note from the original Mellotron sound library tapes, capturing the full sound length and performance quirks. Unlike the originals, Vintage Mellotron sounds are looped, enabling you to indefinitely sustain notes. Looping isn’t static, so sounds retain their “organic” flavor and mirror the continuous sonic movement of the original instruments.
Vintage Mellotron also allows you to blend any two sounds together, including combinations that weren’t available in the original tape library. A further bonus is control of the balance between sounds, a feature not found on the original machines.
A tape speed control mimics the tonal fluctuations caused by this feature on the original instruments. Also included are octave transposition and tone controls.
As with other instrument plug-ins, you can fully automate Vintage Mellotron parameters.
Vintage Mellotron is divided into two sections. The upper section is used to choose one or two sounds, set the playback octave for each, and to adjust the mix between them. The lower section houses global controls for the entire instrument.
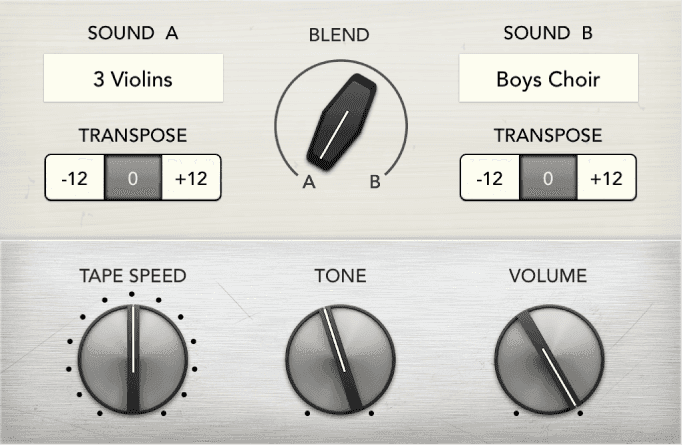
Vintage Mellotron parameters:
- Sound A/B pop-up menus: Choose an A or B instrument sound.
- Sound A/B Transpose buttons: Set an independent playback octave for instrument sound A or B.This mimics the behavior of the half speed or double speed tape switches found on some Mellotron models, but enhances these facilities by enabling independent octave control for each sound.
- Blend A/B knob: Set the level balance between instrument sound A and B. Set to the full left or right position to hear sound A or B in isolation.
- Tape Speed knob: Set the tape speed for all notes. This mimics the tonal fluctuations caused by this control on the original instrument.
- Tone knob: Rotate to the right to reduce bass and to make the sound brighter and more nasal. Rotate to the left to reduce brightness, making the sound warmer and more mellow.
- Volume knob: Set the overall output level of Vintage Mellotron.
Studio Horns
Studio Horns provides a collection of highly expressive single and section brass instruments. It has a simple, clean interface, with all main controls at hand. Additional controls enable you to customize Studio Horns to match your preferences and to work best with your controllers.
Studio Horns instruments feature a large collection of samples that cover different playing styles, such as sustain, staccato, or falls. These playing styles, called articulations, are chosen in the plug-in header. You can also switch articulations remotely with keyswitches.
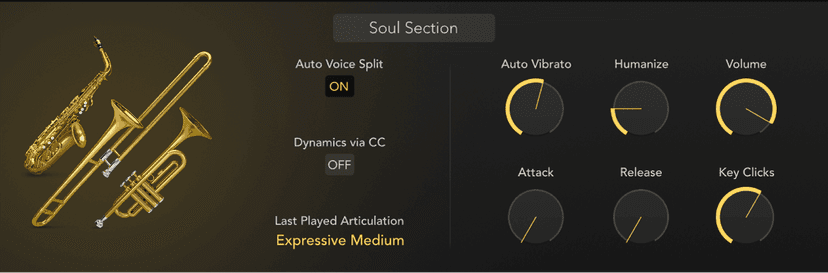
Studio Horns parameters:
- Preset pop-up menu: Choose a solo or section instrument.You can use MIDI channel events to control section instruments. If you want to play specific instruments in a section, you can send MIDI messages on their respective channels, then add a list of channel assignments.
- Monophonic button: Turn on monophonic mode for solo instruments.
- Auto Voice Split button: When on, chords played on the keyboard are automatically assigned to different instruments or instrument groups, or “voices” in the section.Depending on the size and type of section, a voice can consist of one or multiple instruments. This mimics the distribution of notes (voicings) among players, based on what instrument group is best suited to a particular note range, for example.Note: When Auto Voice Split is off, Horn section instruments that share a key range are layered, with all horns assigned to a key range played simultaneously.
- Dynamics via CC button: Turn on to enable control of an instrument’s dynamics (soft-loud) and timbre in real time. Additional dynamic control and mapping functions are available in the extended parameters.
- Last Played Articulation field: Displays the most recently used articulation. This may be different to the articulation shown in the plug-in header.
- Auto Vibrato knob: Set the intensity of vibrato in the chosen sound. Further vibrato control is available in the extended parameters.
- Humanize knob: Set the amount of random variation in the chosen sound. This emulates changes in embouchure by introducing small pitch and level fluctuations.
- Volume knob: Set the output level of the instrument.
- Attack knob: Set the amount of time it takes for the instrument to fade in, following a MIDI note on message.
- Release knob: Set the amount of time it takes for the instrument to fade out, following a MIDI note off message.
- Key Clicks knob: Set the level of key and pad noise for sections that contain saxophones and solo saxophone instruments.Note: The Key Clicks knob isn’t shown for trumpet or trombone instruments.
Studio Strings
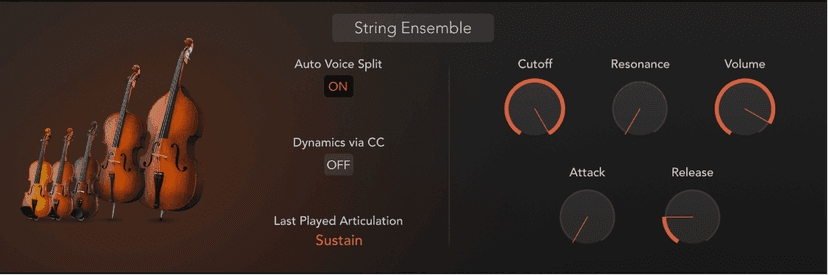
Studio Strings provides a collection of highly expressive single and section stringed instruments. It has a simple, clean interface, with all main controls at hand. Additional controls enable you to customize Studio Strings to match your preferences and to work best with your controllers.
Studio Strings instruments feature a large collection of samples that cover different playing styles, such as sustain, staccato, or falls. These playing styles, called articulations, are chosen in the plug-in header. You can also switch articulations remotely with keyswitches.
Studio Strings parameters:
- Preset pop-up menu: Choose a solo or section instrument.You can use MIDI channel events to control section instruments. If you want to play specific instruments in a section, you can send MIDI messages on their respective channels, then add a list of channel assignments.
- Monophonic button: Turn on monophonic mode for solo instruments.
- Auto Voice Split button: When on, chords played on the keyboard are automatically assigned to different instruments or instrument groups, or “voices” in the section.Depending on the size and type of section, a voice can consist of one or multiple instruments. This mimics the distribution of notes (voicings) among players, based on what instrument group is best suited to a particular note range, for example.Note: When Auto Voice Split is off, String sections are split by key ranges, with each string instrument within the section spanning a specific key range, and no layered instruments.
- Dynamics via CC button: Turn on to enable control of an instrument’s dynamics (soft-loud) and timbre in real time. Additional dynamic control and mapping functions are available in the extended parameters.
- Last Played Articulation field: Displays the most recently used articulation. This may be different to the articulation shown in the plug-in header.
- Cutoff knob: Set the cutoff frequency of the sound.
- Resonance knob: Set the amount of cut or boost of the frequency range surrounding the defined cutoff frequency.
- Volume knob: Set the output level of the instrument.
- Attack knob: Set the amount of time it takes for the instrument to fade in, following a MIDI note on message.
- Release knob: Set the amount of time it takes for the instrument to fade out, following a MIDI note off message.
Do this now
- Build a kit in Drum Synth using no samples at all.
- Rebuild the same kit in Drum Machine Designer from samples.
- Compare how each behaves when you change the pitch of one drum.
Synthesised drums bend in ways sampled drums cannot. That is the whole reason to use them.