Synthesis: Introduction
In an age where processing power of computers is beyond what we could have even imagined and Plug-Ins have become unbelievable at mimimicking previous analog gear, we truly are experiencing a golden age of access to great Synthesizer sounds. It has now become realistic for artists/composers to complete a whole musical composition completely “in the box”. Though they haven’t completely erased hardware Synthesizers, Plug-In versions of ‘old’ gear has come on leaps and bounds and is so good that some people rely on their almost like for like sounds and superior convenience to give them what they sonically desire. One thing that may have been lost in all this though is the art of Synthesis- when you have inifinite presets to scroll through, you may wonder why you’d bother to know what’s going on “under the hood” at all? In days gone by, people sat and tweaked knobs and faders for hours on end to get the sound they were after- and in that process learned how to manipulate and control Synthesizers to their will- not relying on whatever the manufacturer may have programmed in. They were able to create one of a kind sounds, using the same basic building blocks that others had at their disposal. Having an understanding of some of the basics of Synthesis will allow you to explore the scope of a huge world within music production and at worst- tweak the presets to create some more ‘custom’ sounds, and at best- create your own sounds from scratch!
There are many approaches to sound creation with a synthesizer. There are also numerous differences between synthesizer models, but most follow a fundamentally similar architecture and signal flow that is based on subtractive synthesis principles.
According to legend, when Michelangelo was asked how he managed to carve David out of a block of stone, he replied, “I just cut away everything that doesn’t look like David.”
In essence, this is how subtractive synthesis works. You filter, or cut away, parts of the sound that you don’t want to hear. In other words, you subtract parts of the frequency spectrum, consisting of the fundamental tone and associated harmonics.
Subtractive synthesis assumes that an acoustic instrument can be approximated with a simple oscillator that can produce waveforms with different frequency spectrums. The signal is sent from the oscillator to a filter that represents the frequency-dependent losses and resonances in the body of the instrument. The filtered (or unfiltered) signal is shaped over time by the amplifier section of the synthesizer.
Subtractive Synthesis, therefore, at it’s core is essentially a three-stage process:
- TONE GENERATION
- TONE SHAPING
- VOLUME SHAPING
The distinctive timbre, intonation, and volume characteristics of a real instrument can theoretically be recreated by combining these components in a way that resembles the natural behavior of the instrument you are trying to emulate.
In reality, however, subtractive synthesizers aren’t perfect at emulating real-world instruments. No synthesized clarinet is going to be mistaken for a real clarinet—particularly when compared with sample playback instruments like Alchemy or Sampler, which are able to recreate real instruments far more convincingly by using multi-gigabyte sound libraries.
The true strength of subtractive synthesizers is that they offer a unique sound palette of their own.
The front panel of most subtractive synthesizers provides similar signal-generating and processing modules—coupled with a number of modulation and control modules. The signal-generating and processing modules typically run from left to right, mirroring the synthesizer signal flow.
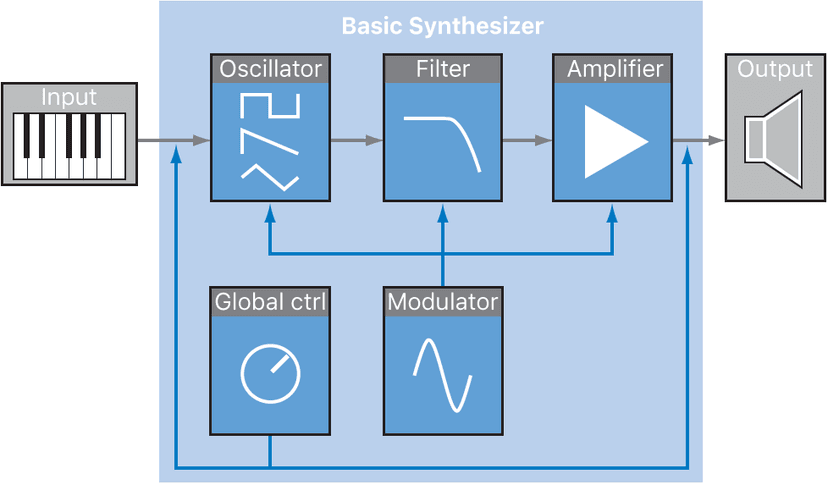
The pitch side of the three elements is created when the sound is played from a keyboard or via a sequencer. In analogue synthesis, raw sounds are generated with an oscillator, tonal shaping is performed by the filter, and volume is controlled by an envelope generator.
Tone Generation
Tone is generated in a Synthesizer via an oscillator. This is essentially a device for generating waveforms. In older analog synths there were regular or cyclic waveforms such as SINE, TRIANGLE, SQUARE and SAW TOOTH, but computer-based oscillators in other forms of synthesis can generate all sorts of weird and wonderful wave shapes.
The Five Wave Shapes are:
- Sine wave is a pure tone with no harmonics; ie whistle
- Triangle wave contains only odd harmonics; ie organ
- Square wave is mostly odd numbered harmonics; ie clarinet
- Sawtooth wave contains both even and odd harmonics; ie saxophone
- Noise waves are random and noisy; ie the sound of a waterfall
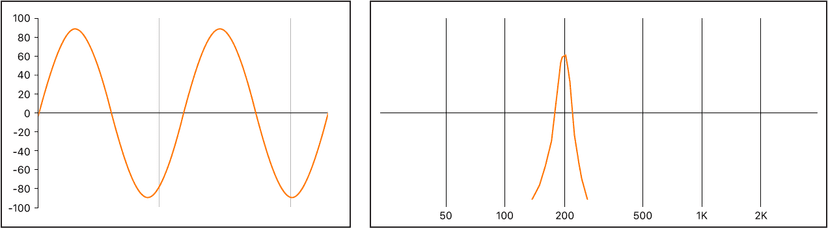
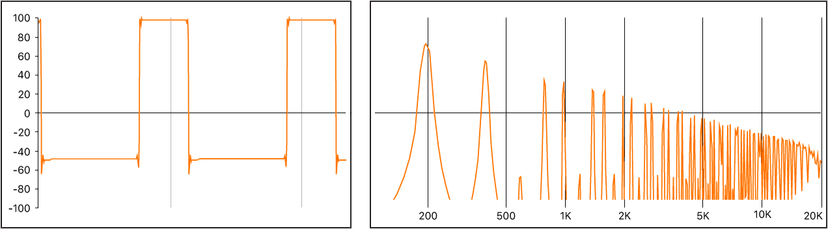
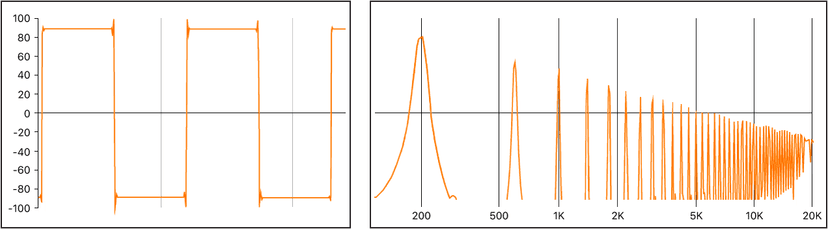
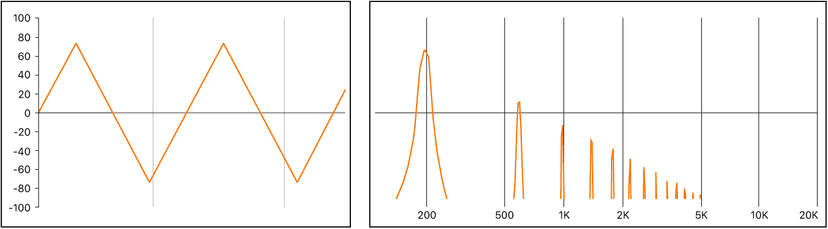
- Sine wave: Clean and clear-sounding, a sine wave contains only the first harmonic; in other words, it is the fundamental tone. The sine wave, used alone, can create “pure” sounds like whistles, the sound of wet fingers on the rim of a glass, tuning forks, and so on.
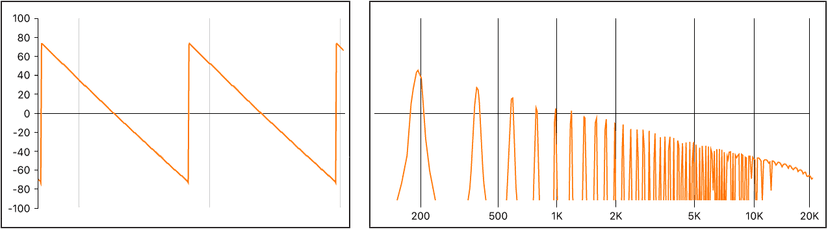
- Sawtooth wave: Clear and bright-sounding, a sawtooth wave contains both odd and even harmonics, as well as the fundamental tone. It is ideal for creating string, pad, bass, and brass sounds.
- Square and pulse waves: Hollow and woody-sounding, a square wave can contain a wide range of odd harmonics, as well as the fundamental tone. It is useful for creating reed instruments, pads, and basses. It can also be used to emulate kick drums, congas, tom-toms, and other percussive instruments—often when blended with another oscillator waveform, such as noise.The square wave can be reshaped to make the waveform cycles, or pulses, more rectangular, by using a pulse width modulation (PWM) control. The more rectangular the wave becomes, the more nasal it sounds. When modulated in this way, the square wave is known as a pulse wave, and contains fewer harmonics. It can be used for reeds, basses, and brass sounds.
- Triangle wave: A triangle wave contains only odd harmonics, as well as the fundamental tone. The higher harmonics of the triangle wave roll off faster than those of a square wave, making the triangle wave sound softer. It is ideal for creating flute sounds, pads, and vocal “oohs.”
- Noise: white, pink and red, blue: Noise is useful for emulating percussive sounds, such as snare drums, or wind and surf sounds. There are more noise wave colors than those listed, but they are rarely found in synthesizers.
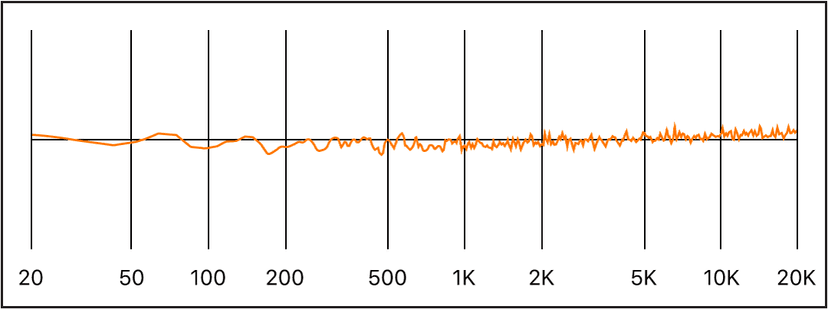
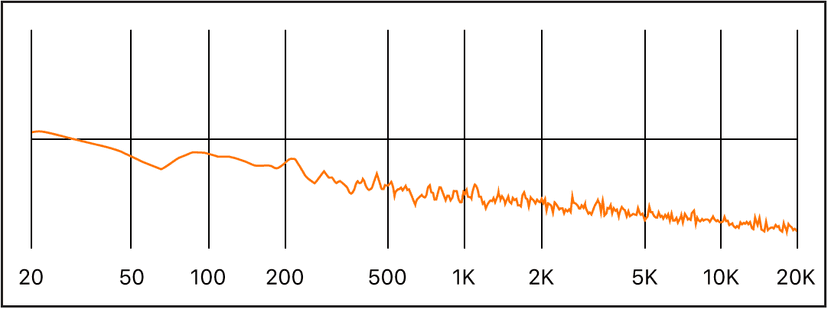
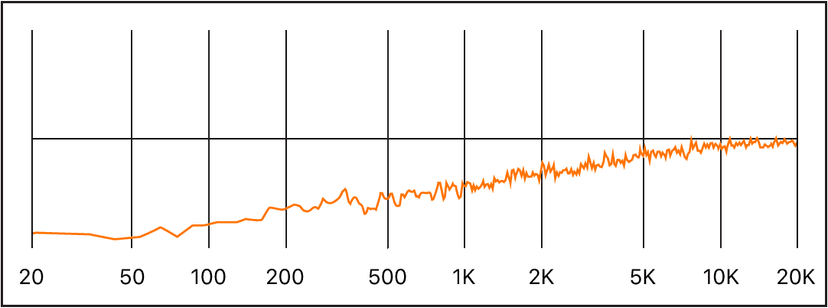
- White noise: The most common noise waveform found on synthesizers. White noise contains all frequencies—at full level—around a center frequency.
- Pink and red noise: These noise colors also contain all frequencies, but they are not at full level across the frequency spectrum. Pink noise decreases the level of higher frequencies by 3 dB per octave. Red noise decreases the level by 6 dB per octave.
- Blue noise: Blue noise is inverse pink noise, and increases the level of all frequencies in higher octaves by 3 dB.
You can deform the basic waveforms to create new waveforms, which results in a different timbre, or tonal color, thus expanding the palette of sounds you can create.
There are many ways to reshape a waveform, the most common of which is changing the pulse width of a square wave. Other ways include changing the phase angle, moving the start point of a waveform cycle, or combining multiple waveforms in multioscillator synthesizers.
When waveforms are reshaped in these and other ways, the relationships between the fundamental tone and other harmonics change, thus altering the frequency spectrum and the basic sound being produced.
Tone Shaping
The waveforms are our raw material. We wouldn’t want every sound we produce to sound like a square wave or a saw tooth wave, so we use a filter to change it.
The purpose of the filter in a subtractive synthesizer is to remove portions of the signal—the frequency spectrum—sent from the oscillators. After filtering, a brilliant-sounding sawtooth wave can become a smooth, warm sound without sharp treble.
The filter sections of most subtractive synthesizers contain two primary controls known as cutoff frequency—often abbreviated to cutoff—and resonance. Other common filter parameters are drive and slope. The filter section of most synthesizers can be modulated by envelopes, LFOs, the keyboard, or other controls such as the modulation wheel.
There are several basic filter types. Each has a different effect on various portions of the frequency spectrum.
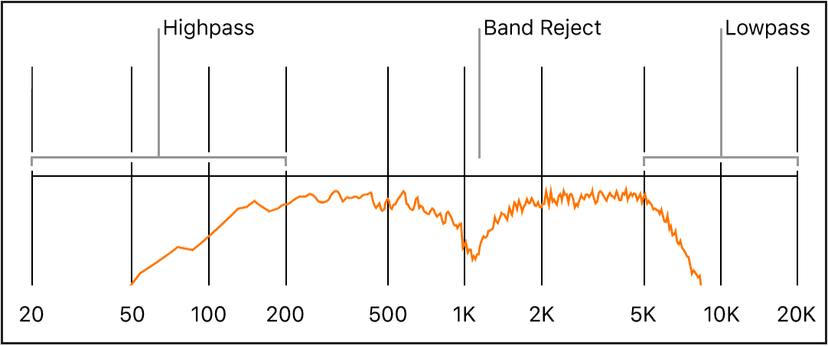
- Highpass filter: High frequencies are passed; low frequencies are attenuated.
- Lowpass filter: Low frequencies are passed; high frequencies are attenuated.
- Bandpass filter: Only frequencies within a frequency band are passed.
- Band reject filter: Only frequencies within a frequency band are attenuated. This filter type is also known as a notchfilter.
- Allpass filter: All frequencies in the spectrum are passed, but the phase of the output is modified.
Volume Shaping
The amplifier module of a synthesizer is responsible for controlling the level, or loudness, of the signal over time.
Consider the sound of a violin, for example. The sound slowly ramps up to a peak, or maximum, level as the bow is dragged across a string, then it is sustained for a period until the bow is moved away from the string, at which point it cuts off abruptly.
In contrast to the violin example, hitting a snare drum with a drumstick results in a very fast peak level with no sustain portion, then the sound immediately dies out—although there is some decay, the time it takes to fall from the peak level.
These two sounds clearly have different characteristics over time.
Synthesizers emulate these sonic characteristics by providing control over different parts—the beginning, middle, and end—of the sound level over time. This control is achieved using a component called an envelope generator. The envelope of a sound can be thought of as it’s loudness contour- or how the loudness is shaped over the time the sound is heard.
Although some “loudness contours” or “envelopes” may appear quite complex, we use a four-stage process to describe, track and mimic any envelope we like.
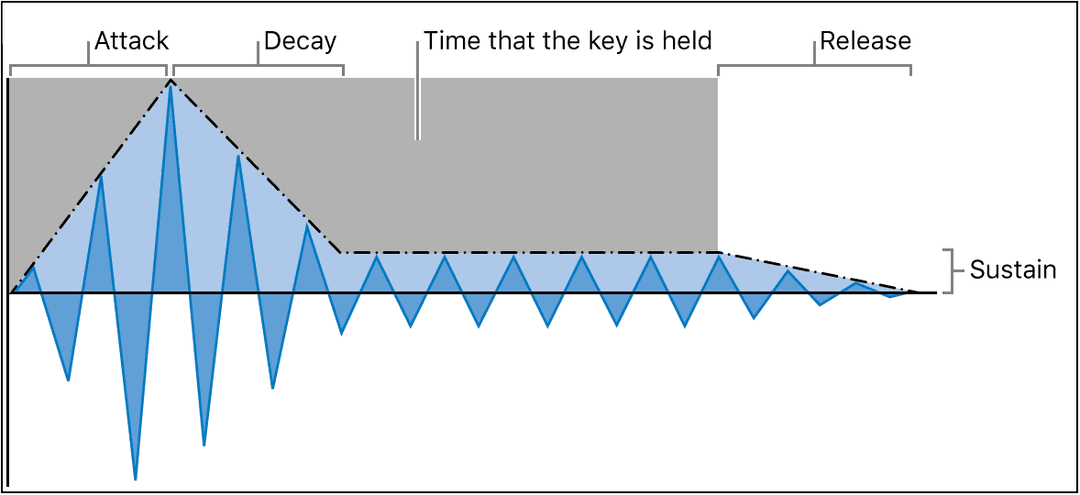
The oscillogram of a percussive tone shown below illustrates the level rising immediately to the top of its range and then decaying. If you drew a box around the upper half of the oscillogram, you could consider it the “envelope” of the sound—an image of the level as a function of time. The role of the envelope generator is to set the shape of this envelope.
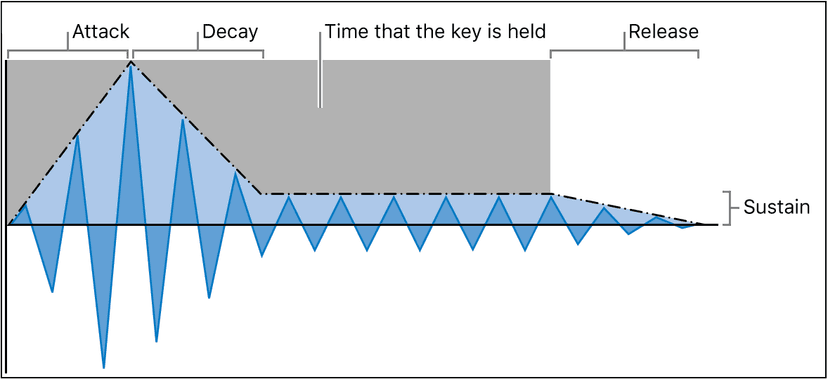
The envelope generator usually features four controls—Attack, Decay, Sustain, and Release, commonly abbreviated as ADSR.
Envelope controls
- Attack: Sets the time it takes for the signal to rise from an amplitude of 0 to 100% (full amplitude). It would be shorter for a percussive sound, but longer if you were to hear a slow rising pad/string type sound
- Decay: Sets the time it takes for the signal to fall from 100% amplitude to the designated sustain level.
- Sustain: Sets the steady amplitude level produced when a key is held down. This is not a length of time but a volume level at which the sound sustains after the decay phase. In most sounds is it lower than the attack volume, but it could be the same or even higher. Usually, it’s the volume at which a sound plays while a key is being held down. This phase can, theoretically, last forever.
- Release: Sets the time it takes for the sound to decay from the sustain level to an amplitude of 0 when the key is released.
Something to bear in mind is that a sound does not have to have all 4 phases. A woodblock, for example, only has an attack phase and a decay phase. An organ has an attack phase, a sustain phase and a release phase but no decay phase. If a key is released during the attack or decay stage, the sustain phase is usually skipped. A sustain level of 0 produces a piano-like—or percussive—envelope, with no continuous steady level, even when a key is held.
Note: Envelope generators are not limited to controlling signal amplitude. They can also control the rise and fall of the filter cutoff frequency or they can modulate other parameters. In short, envelope generators can be used as a modulation source—or as a “remote control” for a given parameter
Using just these three building blocks – oscillator, filter and envelope generator – it’s possible to create a huge range of sounds, both natural-sounding and artificial. In many synths, including Alchemy, the modules are already connected (or hardwired, to use the correct terminology), which means you only have to play with the modules’ parameters in order to create sounds. In other synths, they’re not, which means they have to be connected using virtual patch cords before you get any sound at all. This is what we would refer to as a modular synth- one where we must connect one module to another.
Obviously, synths of the hardwired variety are easier to use, but modular synths are much more flexible and capable of producing a greater range of sounds. You will need to read the instructions to learn exactly how to connect the modules and use your imagination as to how you might be able to incoroporate modules with each other in a variety of ways. This is where things can get very complicated very quickly. But always take it back to the basics if you get lost: The oscillator starts the sound by generating a waveform, this is fed into a filter, which changes its tone, and this is fed into the output amplifier. The envelope generator controls the volume the amplifier produces. That set-up is essentially all you need to create a simple analog synthesizer. Most analog synths have several oscillators, filters and envelope generators, plus many modules of other sorts. But no matter how many modules you add or how you patch them together, the basic signal path stays the same: Oscillator > Filter > Amplifier.
Pushing the Envelope If we use an envelope generator to control the amplitude, can we also use it to control a different module? Yes, we certainly can. Let’s take a simple woodblock-type envelope, which goes straight up and comes straight down again. What would happen if we plugged this into a filter so it controlled the cutoff frequency? Yes, the cut-off frequency would follow the same pattern. If the cut-off frequency had been set to a mid point, for example, the envelope would raise it on the way up and lower it on the way down creating a filter sweep effect. The filter would open as the sound increased in volume and close as it decreased in volume making the sound brighter on the way up and then filtering out the harmonics on the way down.
What if we had two envelope generators – one to control the amplitude and the other to control the filter? We’d have independent control over them both. Most synths have at least two envelopes that can be used for this very purpose. Here’s another thought: could it be used to control pitch? Yes indeed! Plug it into the oscillator and the pitch will shoot up and then drop down, creating a sort of siren or whistle effect. These are very simple examples, which you will be able to create with any modular synthesizer. Hard-wired synths may not be as flexible, and although most will allow you to route an envelope to the filter, not all will allow you to route it to the oscillator, for example. These described changes fall under the umbrella of modulation.
Modulation
Without modulation, sounds tend to be uninteresting and fatiguing to the ear. They also sound synthetic, rather than natural, in the absence of some type of sonic modulation. Vibrato is a type of modulation commonly used by orchestral string players to add animation to their instrument pitch.
To make sounds less static, you can use a range of synthesizer controls to modulate basic sound parameters. To this end, many synthesizers, including ES1, ES2, and Sampler, provide a modulation router. Alchemy and Sculpture provide further unique modulation options.
The router enables you to direct, or route, one or more modulation sources (the parameter or control that is modulating another parameter) to one or more modulation targets (the parameter being modulated).
You can affect modulation targets, such as oscillator pitch or filter cutoff frequency, by using modulation sources that include the following:
- Velocity modulation: You can modulate a target in different ways with the impact of your keyboard playing (harder or softer). The most common example of modulation controller use is a velocity-sensitive keyboard, set to control the filter and level envelopes. The harder you strike the notes, the louder and brighter the sound is.
- Key scaling: You can modulate a target in different ways by adjusting the position you play on the keyboard (low or high notes). Keyscale modulation is often used to control filter cutoff, resonance, or both; higher notes sound brighter than low notes. This emulates the behavior of many acoustic instruments.
- Controls: You can use controls such as the modulation wheel, ribbon controllers, or pedals attached to your keyboard. The modulation wheel is most commonly used for pitch bends during performance.
- Automatic modulation: You can use envelope generators or LFOs to modulate signals automatically. The most common LFO modulations are control of the pitch or level of a sustained note, resulting in a vibrato or tremolo.
Modulation sources can be—and often are—triggered by something you’ve done, such as playing a note on the keyboard or moving the modulation wheel.
The modulation wheel, pitch bend ribbons, foot pedals, keyboard, and other input options are referred to as modulation controllers, MIDI controllers, or just controllers.
LFO’s
The LFO is probably the most common additional module to be found in an analog synth. No, this is not a Low Flying Object but a Low Frequency Oscillator.
As its name suggests, it’s an Oscillator that vibrates at a frequency way below our range of hearing. It could be set to oscillate a few times each second or even once a minute. The choices of waveforms in an LFO are often the same as in an oscillator.
The two main controls in an LFO are depth and frequency. The frequency determines how quickly the LFO runs, and the depth is the amount of volume of the wave. LFOs are most often applied to the sound to modulate (change) the pitch. Using a sine wave, for example, the pitch will rise and fall regularly up and down. With a frequency setting of around seven cycles per second, the result will be a musical vibrato. Turn the depth up, however, and it will turn into a siren! If a square wave is used instead of a sine wave, the pitch would oscillate between two pitches, rather like a trill. Select a noise waveform and pitches will be generated at random. The depth setting here would determine the upper and lower limits of the pitch range.
The common LFO controls are:
- Waveform: Allows you to choose the type of waveform—triangle waves and square waves are common.
- Triangle waves are useful for filter sweeps—slow changes to the filter cutoff frequency—or when simulating an ambulance siren—slow changes to the oscillator frequency.
- The square waveform is useful for rapid switches between two different pitches, such as vibratos or octaving.
- Frequency/Rate: Determines the speed of the waveform cycles produced by the LFO. When it is set to low values, very slow ramps are produced, making it easy to create sounds such as ocean waves rolling in—when white noise is chosen as the waveform in the main oscillator.
- Sync mode: Allows you to choose between free running—a user-defined LFO rate—or synchronization with the Logic Pro X project tempo.
- LFO Envelopes: The LFO can also be controlled with an envelope generator in some synthesizers. For example, imagine a sustained string section sound where vibrato is introduced a second or two into the sustained portion of the sound. If this can happen automatically, it allows you to keep both hands on the keyboard. Some synthesizers include a simple LFO envelope generator for this purpose. Often, this envelope consists only of an attack parameter—some may also include decay or release options. These parameters perform in the same way as the amplitude envelope parameters, but they are limited to control of LFO modulations.
Synths will also have “Global Controls” that affect the overall output signal of your synthesizer.
Here are some common Global Controls you can expect to find:
- Level or Volume: Sets the overall loudness of your sound. This control is the master output volume control of your synthesizer.
- Tune: Sets the overall pitch of your sound—typically in semitone steps. Many Logic Pro X instruments provide additional fine-tuning in cents; a hundredth of a semitone.
- Glide (portamento): Sets the amount of time that it takes for one note pitch to slide up or down to another note pitch. This control is useful for emulating wind instruments that slide from note to note, rather than move directly to another clear and distinct pitch.
- Bender/bend range: Bends the pitch—the oscillator frequency—up or down. This control is generally hard-wired to a pitch bend wheel on a keyboard. As the name suggests, moving the wheel up or down from its centered position bends the pitch up or down. The Bender/Bend Range parameter usually has an upper and lower limit of one octave but is typically set to around three semitones up or down. This setting is ideal for emulating small (or extreme) pitch fluctuations that occur in some instruments—such as when moving between notes with a trumpet, or bending the strings during a guitar solo.
- Voices: Sets an upper limit to the number of notes that can be played at a given time. Producing notes simultaneously is known as the polyphony—literally, “many voices”—of the instrument. The Voices parameter sets an upper limit to the number of notes that can be produced simultaneously.
- Unison: Used to “stack” voices—with the unison voice being heard one octave above the frequency of the played note. Because two voices are being used when you play a note, unison has two effects—it makes the sound richer and fuller, and it halves the polyphony.
- Trigger mode: Determines how the polyphony of the instrument is handled when the number of notes played exceeds the number of available voices. Trigger mode also allows you to assign legato mode. Essentially, this control changes the way the synthesizer responds to your playing technique. It is invaluable when you are emulating monophonic instruments, such as flutes, clarinets, and trumpets. When you use the trigger mode control and assign a last note priority, the played note is cut off by playing another note.
- Last note priority: When new notes are triggered while all voices are playing, the synthesizer frees up polyphony (voices) by ending the notes played earliest. This is the default trigger mode of Logic Pro X synthesizers when in a monophonic mode.
- First note priority: Notes played earlier are not stopped. In this mode you need to stop playing notes in order to play a new one after you have reached the limit of the polyphony (voices) of the instrument.
Further Reading:
Other Synthesis Methods
Of course, Subtractive Synthesis is not the only method of synthesis we have, but most other ways of synthesiszing sounds incorporate at least some elements of the subtractive synthesis design.
We also have:
- Sample-based synthesis – sometimes known as Pulse Code Modulation (PCM), or sampling and synthesis (S&S) synthesis, is differentiated from subtractive synthesis mainly by the use of samples in place of oscillator waveforms.
- Frequency modulation (FM) synthesis – uses a modulator oscillator and a sine wave carrier oscillator. The modulator oscillator modulates the frequency of the waveform generated by the carrier oscillator within the audio range, thus producing new harmonics. These harmonics are known as sidebands.
- Component modeling synthesis – Also known as physical modeling, this synthesis method uses mathematical models to simulate instruments. Parameters are used to describe the physical characteristics of an instrument, such as the materials the instrument is made of, the dimensions of the instrument, and the environment it is played in—under water, or in the air, for example. Equally important are descriptions of how the player would interact with the instrument—whether it is played by blowing; by plucking, bowing, or strumming strings; by hitting it with sticks; by placing fingers on sound holes, and so on.
- Wavetable, Vector, and LA synthesis – Wavetable synthesis uses a number of different single-cycle waveforms, laid out in what is known as a wavetable.Roland LA (Linear Arithmetic) synthesizers such as the D-50 work on a similar principle. In these synthesizers, complex sampled attack phases are combined with simple sustain or decay phases to create a sound. In essence, this is a simple wavetable that consists of two samples.Vector synthesis—used in the Sequential Circuits Prophet-VS and Korg Wavestation—allows you to move through wavetables and sequences arranged on a two-dimensional grid (two different vectors, or less technically, on the X or Y axis).
- Additive synthesis – Additive synthesis could be considered the reverse approach to subtractive synthesis. In additive synthesis, you start out with nothing and build a sound by combining multiple sine waves of differing levels and frequencies. As more sine waves are combined, they begin to generate additional harmonics. In most additive synthesizers, each set of sine waves is viewed and used much like an oscillator.
- Spectral synthesis – Spectral (modeling) synthesis lets you build a sound by combining multiple (sine wave) harmonics and filtered noise signals. This synthesis method shares many underlying principles with vocoders, but tracks peaks in the overall spectrum, rather than individual amplitudes and frequencies in the signal.
- Resynthesis – You can analyze the frequency components of a recorded sound and then resynthesize—reconstruct—a representation of the sound using additive or spectral techniques.
- Phase distortion synthesis – Phase distortion synthesis creates different waveforms by modifying the phase angle of a sine wave with a second modulator wave. In some respects, this is similar to FM synthesis. The principal difference between the two approaches is that the two waveforms are synchronized each cycle in phase distortion synthesis, resulting in the creation of more harmonic overtones.
- Granular synthesis – The basic premise behind granular synthesis is that a sound can be broken down into tiny particles, or grains. In many respects, granular synthesis is similar to wavetable synthesis, but it works on a much finer scale. This method is ideal for creating constantly evolving sounds and truly unique tones.
How we got to where we are now…
The beginning of Synthesis
The earliest seeds of modern electronic synthesizers began in the twilight years of the 19th century. In 1897, an American inventor named Thaddeus Cahill was issued a patent to protect the principle behind an instrument known as the Telharmonium, or Dynamophone. Weighing in at 200 tons, this mammoth electronic instrument was driven by 12 steam-powered electromagnetic generators. It was played in real time using velocity-sensitive keys and, amazingly, was able to generate several different sounds simultaneously. The Telharmonium was presented to the public in a series of “concerts” held in 1906. Christened “Telharmony,” this music was piped into the public telephone network, because no public address systems were available at the time.
In 1919, Russian inventor Leon Theremin took a markedly different approach. Named after the man who masterminded it, the monophonic Theremin was played without actually touching the instrument. It gauged the proximity of the player’s hands as they were waved about in an electrostatic field between two antennae, and used this information to generate sound. This unorthodox technique made the Theremin enormously difficult to play. Its eerie, spine-tingling—but almost unvarying—timbre made it a favorite on countless horror movie soundtracks. R. A. Moog, whose synthesizers would later garner worldwide fame, began to build Theremins at the age of 19.
The Seminal Moog Minimoog
Moog and Buchla’s voltage-controlled synthesizers were modular. One chassis, or several, housed the power supply and the actual modules. The inputs and outputs of the modules had to be interconnected via a confusing tangle of patch cords before the synthesizer would make a sound. Establishing these connections properly was an art unto itself, and obtaining useful settings on the modules required significant expertise.
Moog realized that these modular synthesizers were too complex and expensive for the average musician and were likely to fail if sold through traditional music retailers. In 1969, Moog collaborated with engineers Jim Scott, Bill Hemsath, and Chad Hunt to design a compact, portable, affordable, and easy-to-use synthesizer. After three prototypes were built, the Minimoog Model D was released in the summer of 1970.
In contrast to previous modular synthesizers, it was neither necessary nor possible for players to connect the modules of the Minimoog as they saw fit. All of the modules’ connecting circuitry was hard-wired at the factory. The type and number of modules was also fixed. This simplified manufacturing considerably, and cut costs dramatically. A major marketing campaign saw the Minimoog become a huge success. Without alteration to its basic design, 13,000 Minimoogs were sold worldwide, right up to 1981.
The advent of Polyphony and Storage
Customers weren’t entirely satisfied with the Minimoog and contemporary synthesizers, however. Although musicians no longer had to contend with countless cords in order to play a synthesizer, they still had to deal with numerous knobs and switches before they could do something as simple as switch from one sound to another. Moreover, keyboardists were bored with playing monophonic melody lines on synthesizers—they wanted to play chords. Although dual-voice keyboards that connected two monophonic synthesizers were available as early as 1970, customers wanted more.
Attempting to satisfy these demands, two schools of thought emerged in synthesizer design. One approach called for an independent, monophonic synthesizer to be assigned to every key on the keyboard. To this end, designers married the design principles of electronic organs to synthesizer technology. Although this breed of instrument was fully polyphonic—all notes of the keyboard could be heard simultaneously—it wasn’t as versatile in its control options as a true synthesizer. The first fully polyphonic synthesizer to feature this type of design was the Moog Polymoog, released in 1975. Developed primarily by David Luce, it featured 71 weighted, velocity-sensitive keys.
In the second approach to polyphonic sound generation, a synthesizer was assigned to a key only when the key was pressed—in effect, semi-polyphony. As early as 1973, American company E-MU Systems introduced the Modular Keyboard System Series 4050, a digital keyboard that could be connected to up to ten monophonic synthesizers, and thus had ten-voice polyphony. The problem with this approach was that very few people owned ten synthesizers, and the amount of time and effort involved in programming a new sound was an overwhelming deterrent. Digital memory was still waiting to be developed, and, once again, the evolution of semi-polyphonic synthesizers required the qualities that only digital keyboards could provide.
The same prerequisite—digital engineering—eventually led to synthesizers that allowed sounds to be stored. Without the benefit of digital technology, early attempts at storing sounds included some unusual solutions. For example, a synthesizer with analog programmability required a dedicated row featuring all of the instrument’s control elements for every “memory” slot. In this case, a selector switch accessed one of the many identical control panels and connected it to the sound generator.
The first synthesizer featuring storage slots implemented in this manner was the 1975 Yamaha GX1. The control elements for the system’s storage slots were so small that they could be adjusted only by using jeweler’s screwdrivers and complicated tools—called programmers and comparators.
It was not until 1978 that the problem was resolved. The five-voice polyphonic Prophet-5, released by the American company Sequential Circuits, was the world’s first synthesizer with a global storage feature. All settings for each of its five onboard monophonic synthesizers were stored in memory slots—40 in the debut model. Moreover, all five synthesizers shared a single user interface, which simplified matters considerably. In spite of its initially high price, this instrument proved extremely popular and approximately 8,000 were built up until 1985. In addition to its digitally implemented polyphony and memory, the success of the Prophet-5 is due to the quality of its analog sound generation system.
Digital Synthesis
Modern digital synthesizers featuring variable polyphony, memory, and completely digital sound generation systems follow a semi-polyphonic approach. The number of voices that these instruments are able to generate, however, no longer depends on the number of built-in monophonic synthesizers. Rather, polyphony depends entirely on the performance capability of the computers that power them.
The rapid developments in the digital world are best illustrated by the following example. The first program that emulated sound generation entirely by means of a computer was Music I, authored by the American programmer Max Mathew. Invented in 1957, it ran on a university mainframe, an exorbitantly expensive IBM 704. Its sole claim to fame was that it could compute a triangle wave, although doing it in real time was beyond its capabilities.
This lack of capacity for real-time performance is the reason why early digital technology was used solely for control and storage purposes in commercial synthesizers. Digital control circuitry debuted in 1971 in the form of the digital sequencer found in the Synthi 100 modular synthesizer—in all other respects an analog synthesizer—from the English company EMS. Priced out of reach of all but the wealthiest musicians, the Synthi 100 sequencer featured a total of 256 events.
Ever-increasing processor performance made it possible to integrate digital technology into parts of the sound generation engine itself. The monophonic Harmonic Synthesizer, manufactured by Rocky Mountain Instruments (RMI), was the first instrument to do so. This synthesizer had two digital oscillators, combined with analog filters and amplifier circuits.
The Synclavier, introduced in 1976 by New England Digital Corporation (NED), was the first synthesizer with completely digital sound generation. Instruments like the Synclavier were based on specialized processors that had to be developed by the manufacturers themselves. This development cost made the Synclavier an investment that few could afford.
An alternative solution was the use of general-purpose processors made by third-party computer processor manufacturers. These processors, especially designed for multiplication and accumulation operations—common in audio processing tasks—are called digital signal processors (DSPs). Peavey’s DPM-3, released in 1990, was the first commercially available synthesizer completely based on standard DSPs. The instrument was 16-note polyphonic and based mainly on three Motorola 56001 DSPs. It featured an integrated sequencer and sample-based subtractive synthesis, with factory presets and user-definable samples.
Another solution was to design synthesizers as a computer peripheral, rather than as a standalone unit. The growing popularity of personal computers from the early 1980s made this option commercially viable. Passport Soundchaser and the Syntauri alphaSyntauri were the first examples of this concept. Both systems consisted of a processor card with a standard musical keyboard attached to it. The processor card was inserted into an Apple II computer. The synthesizers were programmed via the Apple keyboard and monitor. They were polyphonic and had programmable waveforms, envelopes, and sequencers. Today’s sound cards, introduced in countless numbers since 1989, follow this concept.
Do this now
- Load any synth and turn everything off except one oscillator.
- Build a sound in order: oscillator, then filter, then amp envelope, then modulation. Nothing out of order.
- Write down what each stage changed.
Every synth in existence is that chain. Learn the order once and every new synth is just a new front panel.