Print an effect onto a piece of audio instead of running it on the track. The plug-ins here have nothing to do with the channel strip - they process the selection and commit it.
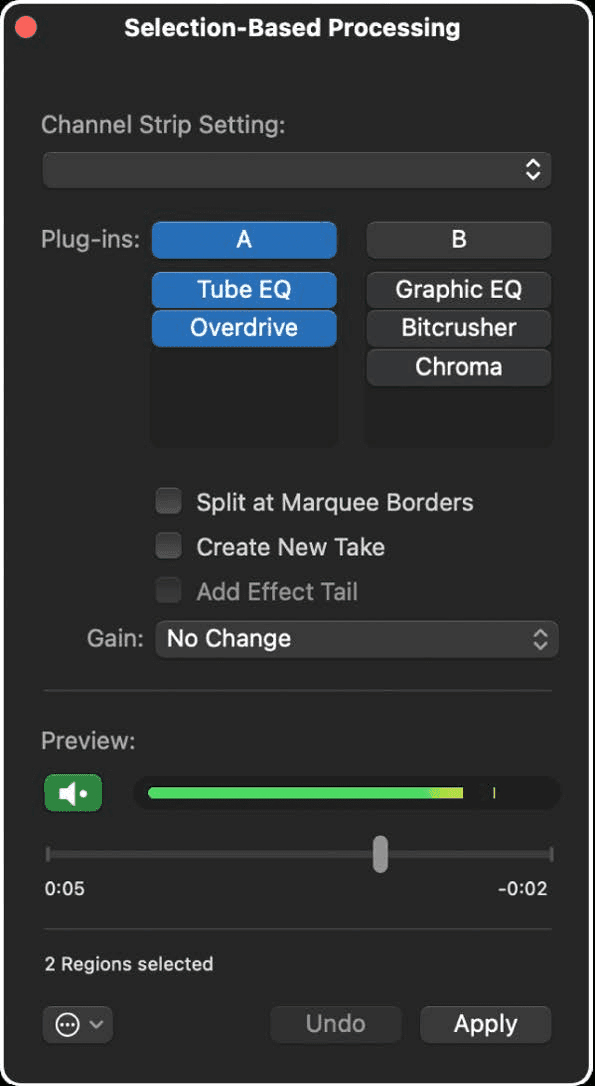
It takes both Logic's own effects and third-party Audio Units, and it works on whole regions or on a marquee selection inside one.
Use it
- Select one or more audio regions, or make a marquee selection over the part you want.
- Press Option-Shift-P, or choose Functions > Selection-Based Processing.
- Build a chain in set A or set B.
- Preview, then Apply.
It also works in the Audio Track Editor, which is usually the easier place to make a tight marquee selection - you can see the waveform at a useful size.
A and B
Two independent plug-in sets. Turning one on turns the other off, and you can switch between them freely during playback - so build the obvious version in A, the ambitious one in B, and compare them on the actual audio rather than from memory.
You can load a whole channel strip setting into a set and then add, remove and adjust individual plug-ins from there, which is quicker than assembling a chain from nothing.
The four checkboxes
- Split at Marquee Borders - make the processed part its own region instead of leaving it inside the original.
- Create New Take - put the result in a take folder so the dry version is still there. With both this and Split at Marquee Borders on, and a marquee on a region rather than a take folder, the take folder contains only the marquee selection.
- Add Effect Tail - extend the printed file so a reverb or delay tail is not chopped at the region edge. Tick this more often than you think you need to.
- Gain - what to do about level, covered below.
The Gain menu is not just make-up gain
- No Change - print it as it is.
- Loudness Compensation - matches the processed signal to the *perceived* loudness of the original, so you judge the effect rather than the level. This is the one to use while auditioning.
- Overload Protection - pulls the signal down only if it clips, leaving anything under 0 dB alone.
- Normalize - takes it to the highest level that does not clip.
Previewing honestly
Click Preview and by default you hear the selection soloed, with its own volume slider so you can level-match by ear.
Two options in the Action menu change that, and both are worth knowing:
- Preview enables Solo - turn it off to hear the processed part *in the mix* rather than alone. Most decisions about whether an effect works are wrong when made in solo.
- Preview enables Cycle - turn it on to loop the selection while you adjust.
The command that makes it a workflow
Functions > Apply Selection-Based Processing Again. Make a new selection, run it, and the same chain prints again with no window and no setup.
That turns a one-off into a tool: build a telephone EQ once, then apply it to the four other words in the verse that need it, in four keystrokes.
When to print and when not to
Printing is a commitment, and the reason to make one is not always technical:
- Print when the decision is made. A sound you have stopped auditioning is costing CPU and attention for nothing.
- Print when the effect only works committed - reversed anything, resampled anything, tape stop.
- Print when it applies to a fragment, not a track. A track insert processes everything; this processes the two seconds that needed it.
- Do not print while the arrangement is still moving. If the section might get cut, an insert is easier to undo than an audio file.
- Do not print the only copy. Create New Take costs nothing and keeps the dry version in the take folder.
What we use it for
- One word in a vocal that needs different treatment from the rest of the take.
- Printed reverse reverb and other effects that only exist committed.
- Committing a sound so the CPU is not carrying six plug-ins on a part you have finished deciding about.
- Destroying something on purpose - bitcrush eight bars of a loop and leave the rest clean.
- Third-party plug-ins you own one licence for, printed rather than left open across twelve tracks.
There is an Undo in the window itself and it stays available while the window is open. Once you close it you are back to normal undo history - so audition before you commit.
Do this now
- Select one word of a vocal and apply a heavy effect to only that word.
- Preview it honestly - A/B against the unprocessed selection, not against silence.
- Print it, then undo and do the same with an automated send instead.
Printing is faster. Automation is reversible. Know which one you are choosing.