Sampling: Sampler
Sampler is a software sampler, and in essence an extended version of Quick Sampler. It plays back samples, that you load into it, but these samples are combined into tuned, organized collections called sampler instruments. A sampler instrument is the file type that is loaded into Sampler with the plug-in Settings pop-up menu. When you choose a sampler instrument from the Settings pop-up menu, the associated audio files are automatically located on the hard disk (or disks) and are loaded into your computer’s RAM. You play and record the loaded sampler instrument in the same way as any software instrument.
Because sampler instruments are based on audio recordings, they are ideally suited to emulating real instruments such as guitars, pianos, and drums. Sampler provides an extensive library of sampler instruments that includes these and many other sounds. Many of Logic’s Software Instruments that are emulating real instruments are using Sampler as the engine for those sounds.
You can also use Sampler to edit and create sampler instruments. You can assign samples to specific key and velocity ranges in existing or new sampler instruments and can process them with filters and modulators. Because Sampler is a flexible synthesizer in its own right you can create expressive sounds by using any sample as a basic synthesizer waveform.
You can use Sampler as a mono, stereo, or surround instrument, and can route loaded samples to multiple audio outputs. This lets you independently process individual drum sounds in a drum kit, for example.
Sampler is what many will have known on previous versions as EX24, but now has a much more user friendly interface!
If you want to play and edit a single sample instrument, Quick Sampler is recommended.
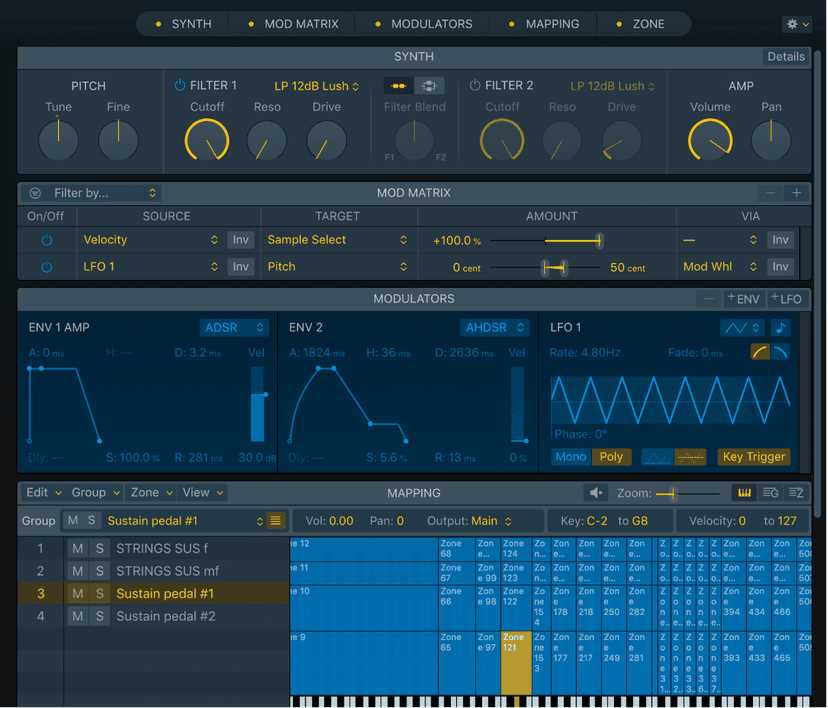
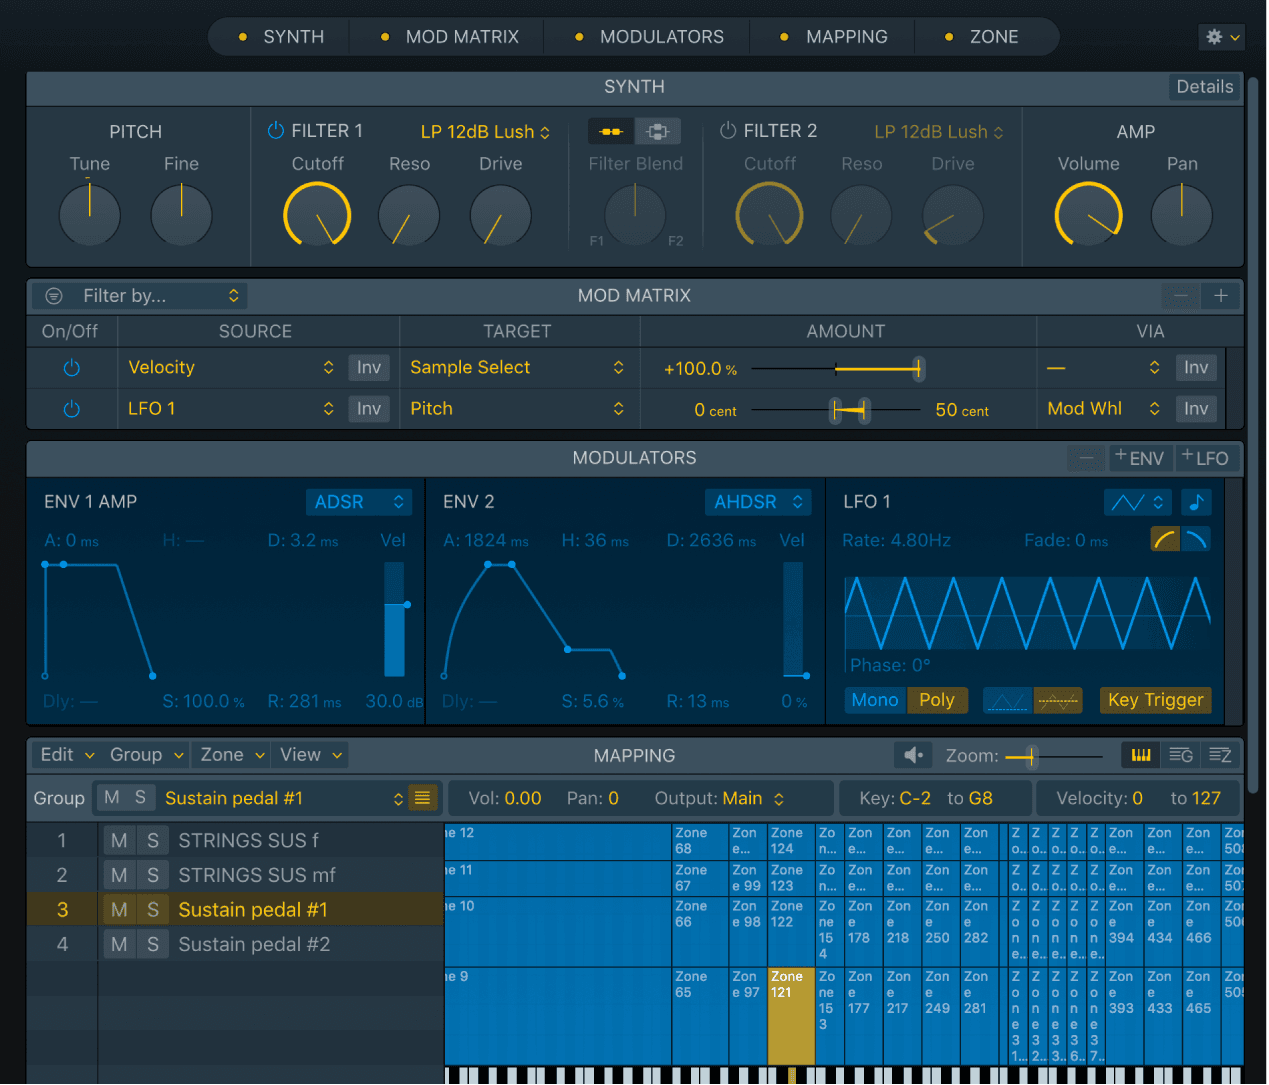
The Sampler interface is contained in a single scrolling window, with shortcut buttons shown in the Navigation bar at the top. You can show or hide sections (panes) of the interface and can use the Navigation bar buttons to resize and quickly navigate between panes.
- Synth pane: This pane contains synthesis options that you use to set global pitch, filter, pan and volume settings for your sounds.
- Mod Matrix pane: This pane contains modulation routing options that you can configure to affect the playback of your sounds.
- Modulators pane: This pane contains LFO and envelope modulators that you use to control the pitch, amplitude, and filter settings of your sounds. These modulators can be routed to parameters in the Mod Matrix.
- Mapping pane: You use this pane to create and edit sampler instruments, and to set and control group and zone parameters.
- Zone pane: You use this pane to edit individual samples (zones) within sampler instruments.
Before we dive in to looking around the Sampler interface- I wanted to make you aware of a really simple way of making a Sampler Instrument:
Converting audio regions to Sampler zones
You can convert one or more regions or tracks into one-note/one-sample zones of a new Sampler instrument. This Sampler instrument is set up on a new software instrument track, which contains trigger notes to play the zones at their original positions.
- Select the audio regions you want to convert in the Tracks area.
- Control-click one of the selected regions, then choose Convert > Convert Regions to New Sampler Track from the shortcut menu.
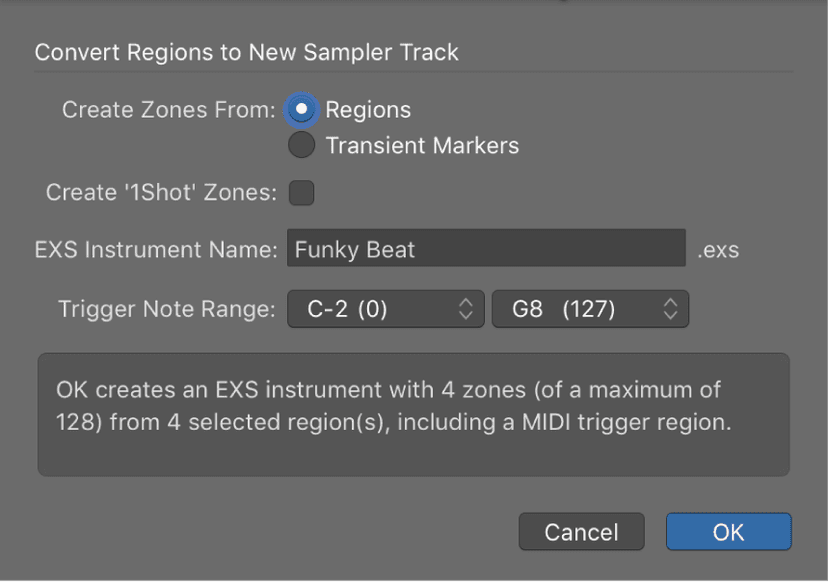
- Choose whether you want to create zones from regions or transient markers:
- Regions: Converts the entire selected region or regions into a Sampler zone.
- Transient Markers: Converts only those sections between transient markers into a Sampler zone. Note: If you create zones from transient markers, Logic Pro analyzes the audio region or regions to detect transients, if they have not previously been analyzed.
- Enter the Sampler instrument name in the text field. The default is the name of the first region selected.
- Choose settings from the Trigger Note Range pop-up menus—the lowest and highest note for the one-note zones created in the new Sampler instrument.
- Click OK to perform the conversion.
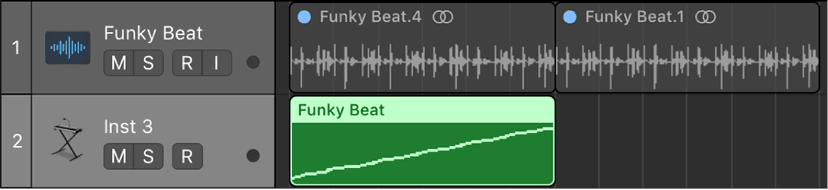
- A new software instrument track is created, below the selected track, with Sampler inserted as the instrument plug-in. MIDI regions with ascending trigger notes are created on this track. The new track and regions are selected, while the processed regions are muted and deselected.
Note: The Sampler samples are saved to the project only if the File > Project Settings > Assets > “Copy Sampler audio data into project” setting is turned on. The Sampler instrument is always saved to the project, regardless of this setting.
Sampler Synth pane
You can use the Synth parameters to control Sampler global and filter settings for the entire loaded sampler instrument. Click the Details button at the top right of the Synth pane to view or hide the Synth Details slide-out pane which provides additional parameters. Several synthesizer parameter handling commands are also found in the Navigation bar Action pop-up menu.
You can use the Modulators pane to assign and adjust the LFOs and envelopes which control synthesizer and other parameters and can use the Mod Matrix pane to set up modulation routings.
You can adjust and control individual samples (zones), or grouped samples, in the Mapping and Zone panes.
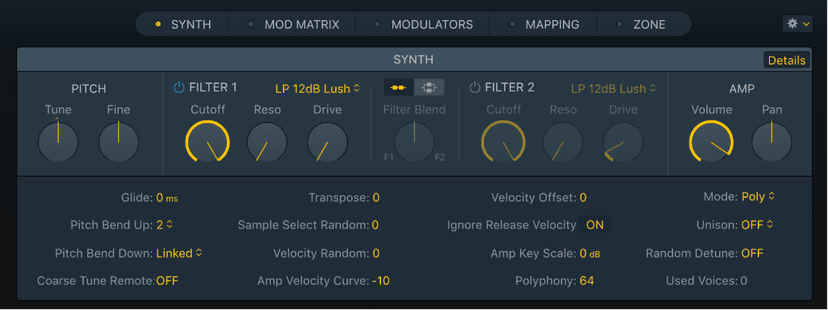
Synth pane parameters
- Details button: View or hide a slide-out pane which provides additional synthesis parameters.
- Tune knob and field: Raise or lower the pitch of the sampler instrument in semitone increments. At the default (zero) position, no pitch change occurs.
- Fine knob and field: Tune the sampler instrument in cent increments—1/100th of a semitone. Use this parameter to correct samples that are slightly out of tune.
- Filter On/Off buttons: Turn each filter section on or off. Each filter can have an independent or shared envelope, defined in the Mod Matrix pane. Disabling the filter section makes it easier to hear adjustments to other sound parameters because the filter always heavily affects the sound.
- Filter Type pop-up menu: Choose the type and slope of the filter.
- Cutoff knob: Set the cutoff frequency of the filter. The Cutoff value also serves as the starting point for any modulation involving the filter.
- In a lowpass filter, the higher the cutoff frequency is set, the higher the frequencies of signals that are allowed to pass.
- In a highpass filter, the cutoff frequency determines the point where lower frequencies are suppressed, with only upper frequencies allowed to pass.
- In a bandpass/band-rejection filter, the cutoff frequency determines the center frequency for the bandpass or band-rejection filter.
- Resonance knob: Boost or cut the frequency area surrounding the cutoff frequency. Very high Resonance values introduce self-oscillation, causing the filter to produce an audible sine wave.
- In a lowpass filter, resonance emphasizes the frequencies at the cutoff frequency.
- In a highpass filter, resonance emphasizes the frequencies at the cutoff frequency.
- In bandpass filters, resonance emphasizes the portions of the signal—the frequency band—that surround the defined frequency, set with the Cutoff knob. In Sampler, Resonance defines the width of the frequency band.
- Drive knob: Overdrive the filter input, leading to a denser, more saturated signal, which introduces additional harmonics. Drive affects each voice independently. When every voice is overdriven individually—like having six fuzz boxes for a guitar, one for each string—you can play extremely complex harmonies over the entire keyboard range. They’ll sound clean, without unwanted intermodulation effects spoiling the sound. Some Drive settings lead to a different tonal character. The way analog filters behave when overdriven forms an essential part of the sonic character of a synthesizer. Each synthesizer is unique in the way its filters behave when overdriven. Sampler is flexible in this regard, allowing tonal colors that range from a subtle fuzz to a hard distortion.
- Filter configuration buttons: Switch between a series or parallel filter configuration.
- Series button: Turn on to pass the signal through the first filter, which forwards this filtered signal through Filter 2. The output signal of Filter 2 is then sent to the input of the dynamic stage (Amplifier section).
- Parallel button: Turn on to pass the signal through both filters. If the Filter Blend knob is set to the center position, you’ll hear a 50/50 mix of the signal, routed via Filter 1 and Filter 2. The output signals of the two filters are mixed, then sent to the input of the dynamic stage (Amplifier section).Tip: If one of the two filters is turned off (bypassed), you can mix the original signal and the filtered signal to create a simple phaser effect, for example.
- Filter Blend knob: Set the balance between Filter 1 and Filter 2 in parallel mode.
- Volume knob: Set the overall output signal level of Sampler. The levels of individual samples or groups of samples are set in the Mapping and Zone panes.
- Pan knob: Set the pan position—or balance—of the Sampler output signal.
Create or view a modulation routing with the Synth pane shortcut menu
- In Logic Pro Sampler, Control-click any parameter in the Synth pane that is available as a modulation target to open a shortcut menu, then choose one of the following:
- Add Modulation: Use to create a new modulation routing in the Mod Matrix pane and set the parameter as the target.
- Show Modulation: Use to highlight all existing modulation routings that use the parameter by activating the view filter in the Mod Matrix pane.
Sampler Synth Details
You can use the Synth and Synth Details parameters to affect the overall behavior of the loaded instrument.
Click the Details button to view or hide the Synth Details slide-out pane.
- Drag vertically in parameter value fields to change them.
- Option-click a parameter value to reset it to the default value.
- Double-click a parameter value field to type in a new value. Press Enter to complete the operation.
Synth Details parameters
- Glide field: Set the time it takes to slide from one note pitch to another—the portamento time.Note: In Legato mode, Glide is active only on tied notes and envelopes are not retriggered when tied notes are played. In other words, playing a series of tied notes results in only a single envelope trigger. In Mono mode, Glide is always active and the envelopes are retriggered by every note played.
- Pitch Bend Up/Down pop-up menus: Set the upper and lower limit of pitch bends in semitones. A value of 0 disables pitch bends.Note: When you choose Linked in the Pitch Bend Down pop-up menu, the bend range is identical in both directions. For example, if you assign an upward bend of 4 semitones, the downward bend is also set to 4 semitones, resulting in a combined bend range of 8 semitones (9, if you include the standard pitch, or no bend position).
- Coarse Tune Remote pop-up menu: Choose a note value that sets the center key for keyboard-controlled transposition. The range is an octave above and below this key. Play any key within this range to transpose the mapping in semitones. This is much like using the Tune parameter.
- Transpose field: Use to transpose the MIDI input value in semitone increments.
- Sample Select Random field: Set the range of randomization values for Sample Select modulation. This is useful for instruments with multiple layered zones as it can emulate the subtle tonal fluctuations caused by changes in playing technique. You can also use it to switch wildly between samples for more extreme sonic results.
- Velocity Random field: Set the range of randomization values for velocity modulation. This is useful for emulating tonal variations in instruments when played, struck, or blown at different levels.
- Amp Velocity Curve field: Use to determine how Sampler responds to incoming velocity values. Negative values increase the responsiveness to soft key strikes, and positive values decrease responsiveness.
- Velocity Offset field: Use to increase or decrease incoming MIDI note velocity values, expanding or limiting the dynamic response to MIDI note events.
- Ignore Release Velocity button: Turn on to play samples at a note-off velocity level that is equal to the note-on velocity level. Turn off to control the note-off velocity level with a suitably-equipped MIDI keyboard. If your keyboard cannot send note-off velocity data, Logic Pro ignores the Ignore Release Velocity setting, and the note-off velocity level is always equal to the note-on velocity level.Note: This parameter applies to the release trigger function of the Gigasampler format, and should be turned on for this purpose.
- Amp Key Scale field: Set the amount of level modulation by keyboard position. Negative values increase the level of lower notes. Positive values increase the level of higher notes. This is useful when you are emulating a number of acoustic instruments, where lower-pitched notes are often louder than high notes.
- Polyphony field: Set the maximum number of keys that can be played simultaneously.
- Mode pop-up menu: Switch between legato, monophonic, and polyphonic behaviors.
- Unison pop-up menu: Set the number of unison voices or turn unison mode off.
- Random Detune field: Set the amount of random detuning applied to each voice. Use this parameter to simulate the tuning drift of analog synthesizers or to thicken the sound. Random Detune is also effective when you are emulating various stringed instruments.
- Used Voices field: Shows the number of playing voices in real time.
Sampler modulation overview
In Sampler, you can use the extensive range of modulation sources and targets to generate extraordinary sounds that constantly evolve, or are just plain expressive to play. You can use modulators to more accurately emulate different playing techniques of various instruments. As examples, emulating the change in embouchure of a brass player, or introducing a delayed vibrato for a stringed instrument.
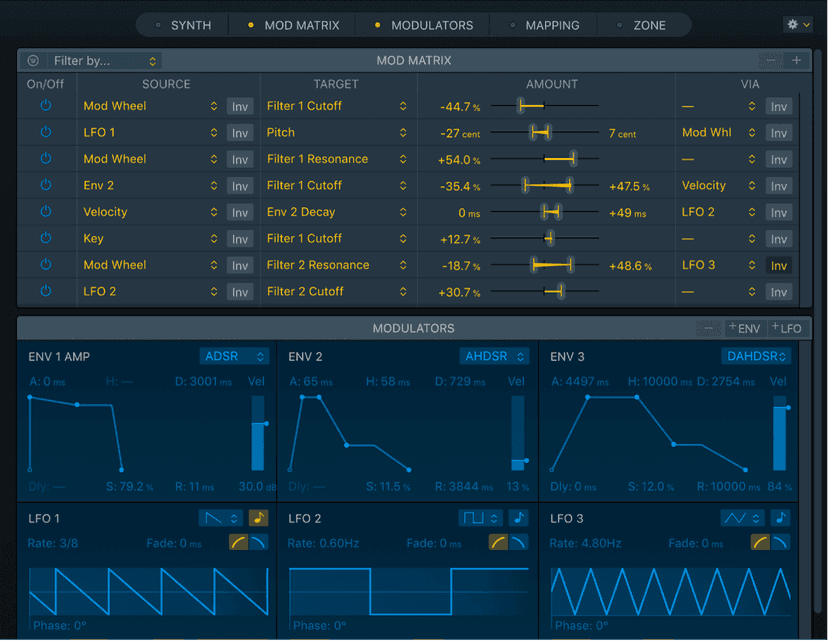
You can access all Sampler modulation parameters and functions in two panes.
- Mod Matrix pane: Use to create a modulation routing where you can link a modulation source, such as an envelope, to a modulation target, such as the filter. You can use up to twenty modulation routings in your sampler instruments.
- Modulators pane: You can use the modulators, which include the LFOs and envelopes, to control your sounds.
Sampler Mod Matrix
You can use the Mod Matrix pane to route any modulation source to any modulation target—much like the connections made in an old-fashioned telephone exchange or a studio patch bay.
You can use up to twenty modulation routings of source, via, and target—arranged in horizontal rows—simultaneously. You can select the same target in several parallel modulation routings, and you can also use the same sources and the same via controllers in multiple modulation routings of different targets.
You can set the modulation intensity—how strongly the target is influenced by the source—with the Amount slider to the right of the modulation routing source and target.
The intensity of the modulation can itself be modulated: The via parameter defines a further modulation source, which you can use to control the modulation intensity. When via is active, you can specify upper and lower limits for the modulation intensity.
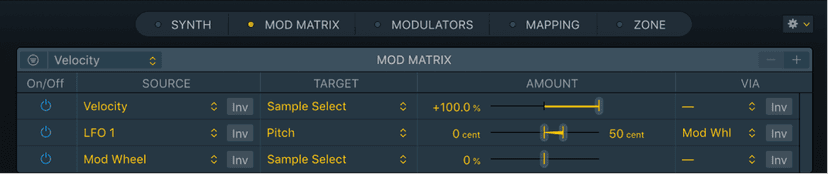
Mod Matrix parameters
Double-click a parameter value field to type in a new value. Press Enter to complete the operation.
- Filter On/Off button: Turn on the Mod Matrix view filter to restrict the display of modulation routings to match the criteria set in the Filter pop-up menu.Note: This is a visual filter only. It does not remove or disable non-matching modulation routings.
- Filter pop-up menu: Choose a filter criteria to limit the display of modulation routings. Only routings that match this criteria are shown when the (view) Filter button is active.
- Filter by Source/Via: Only routings that contain the matching source or via source are shown.
- Filter by Target: Only routings that contain the matching target are shown.
- Always select last clicked: The filter criteria is automatically set to show only routings that contain the matching source, via source, or target of the most recently clicked parameter.Note: Only parameters that can be selected as sources, via sources, or targets in the Mod Matrix pane can be clicked.
- -/+ buttons: Delete or add a modulation routing.
- Column sort buttons: Use to alphabetically sort all visible Source, Target, or Via routings. Click again to reverse the sort order.
- On/Off button: Turn on the modulation routing, or turn off to disable (bypass) it, without losing settings.
- Source pop-up menu: Choose the parameter you want to use as the modulator of the target.
- Inv button: Invert the effect of the modulation source. A negative value becomes positive, and vice-versa.
- Target pop-up menu: Choose the parameter you want to modulate.
- (Max) Amount slider handle and field: Drag to set the maximum modulation intensity when a via source is active.
- Amount slider handle and field: Set the modulation intensity. When a via source is active, this field sets the minimum modulation intensity with the via controller set to its minimum value.
- Amount slider: Drag to set the modulation intensity. Drag either handle when a via source is active. Drag the area between handles to move both.
- Via pop-up menu: Via defines a further modulation source, which is used to control the modulation intensity.
- Inv button: Invert the effect of the via modulation source. A negative value becomes positive, and vice-versa.
Sampler Mapping and Zone panes
You can use the Mapping and Zone panes to create and edit sampler instruments. The two panes are designed for different tasks, but work together to provide full control of individual samples, or zones, and their use within one or more collections of zones, known as groups.
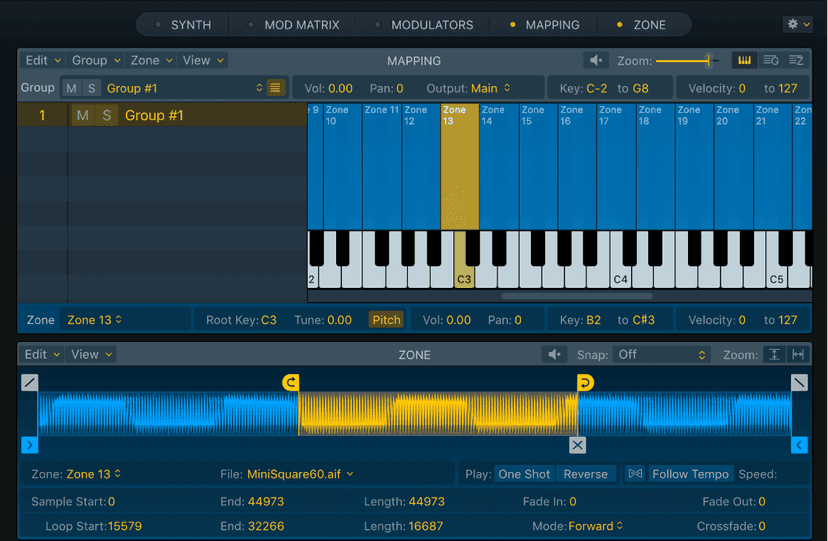
A sampler instrument consists of zones and groups:
- A zone is a location into which a single sample (an audio file) is loaded from hard disk. You can edit allzone parameters in the Mapping pane zone view. Direct, graphical edits to zone parameters such as start, fade and loop marker positions, can be performed in the Zone pane.
- Zones are assigned to groups, which provide parameters that you can use to simultaneously affect all zones contained in the group. You can define as many groups as required. You can edit group parameters in the Mapping pane group view.
- The assignment of zones to keyboard notes or note ranges is most easily done in the Mapping pane keyboard view. Zones can also be graphically assigned to velocity ranges in keyboard view, making it easy to create multi-layered sampler instruments.
Switch between Mapping pane views
The Mapping pane has three views:
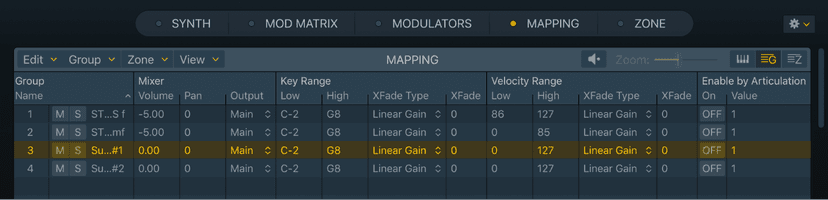
- In Logic Pro Sampler, click the View buttons at the top right to switch between views.
- Keyboard view button: Shows groups to the left, with zones arranged graphically across a keyboard in the Key Mapping Editor.
- Group view button: Shows groups and associated parameters in a column layout.
- Zone view button: Shows groups to the left, with zones and associated parameters in a column layout.
- Menu bar: The menu bar at the top of the Mapping pane contains elements that are common to all views.
Sampler Zone pane
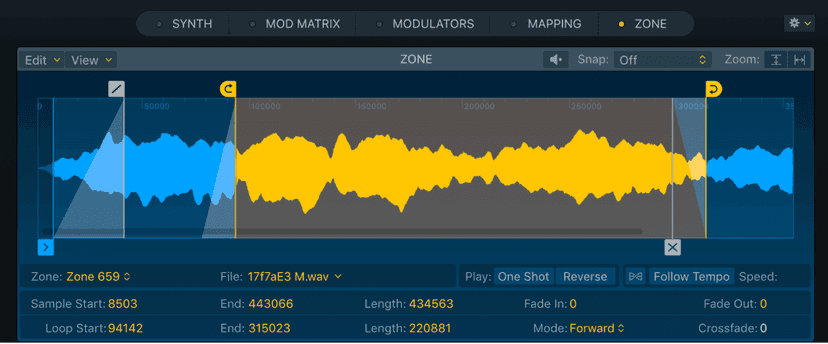
You can see the current waveform of the selected zone and can directly edit a number of sample playback parameters in the Zone pane waveform display. You can zoom in or out with pinch gestures, or scroll the waveform display using two-finger swipes or by dragging the scroll bar. You can use single-finger swipes if you are using a Magic Mouse.
Important: Use of gestures, such as swiping or pinching require these features to be enabled in the Mouse or Trackpad panes of your System Preferences.
As you move the pointer across the waveform display, it changes in appearance and function. For example, the pointer will change to indicate that you can move a slice marker or fade marker. In addition, parameters and values related to the current pointer tool function are shown below the waveform display (and in the Mapping pane zone view).
Click or drag markers and handles in the waveform display to change values. Drag vertically in parameter value fields to change them. For example, vertically drag the value shown for Loop Start to change it. Alternatively, you can double-click in a field and type in a value, then press the Enter key.
You can also Control-click the waveform display to open a shortcut menu that allows you to open the sample in the Logic Pro Audio File Editor (or an external editor), if you prefer.
You can specify the audio editor in Sampler preferences.
Tip: The Zone pane is best used with the Mapping pane also visible.
Zone pane parameters
Double-click a parameter value field to type in a new value. Press Enter to complete the operation.
- Waveform display: Shows the selected zone waveform, marker handles, and shaded marker areas. You can drag the marker handles to adjust zone playback.
- Edit menu: Choose an editing command or function.
- View menu: Choose an option that affects the appearance of the display.
- Preview button: Play the selected zone.
- Snap pop-up menu: Choose a value. Edits to crossfade, sample, fade, or loop markers in the waveform display automatically snap to the nearest possible value.
- Zoom vertical button: Switch between the maximum vertical zoom view for the currently displayed waveform section and the default zoom view.
- Zoom horizontal button: Switch between the last manually set zoom level, if applicable, and an optimized zoom level that shows the area between the sample start and end markers. When no manual zoom level is set, the entire audio file is shown.Tip: You can use your trackpad to zoom in or out on the waveform display with pinch gestures, or scroll using two-finger swipes or by dragging the scroll bar. You can use a Magic Mouse to perform the following gestures: one finger horizontal swipe to scroll, or use a one finger vertical swipe to zoom.
- Zone pop-up menu: Displays the zone name. Click to choose other zones.
- File pop-up menu: Displays the audio filename. Click to choose file handling commands.
- Load Audio File: Opens a dialog where you can select an audio file.
- Reveal in Finder: Shows the full path of the loaded audio file in the Finder.
- Open in Audio File Editor: Opens the selected sample in the Logic Pro Audio File Editor, or the sample editor chosen in the External Sample Editor preference.Note: This command is available only when Destructive audio editing is enabled in the Logic Pro preferences.
- Playback buttons: Use these options to determine zone playback behavior.
- One Shot button: Turn on to make the zone ignore the length of incoming MIDI note events, resulting in the sample always being played from start to end whenever a note-on event is received. This is useful for drum samples, where you often don’t want the MIDI note length to affect sample playback. Also see the Fade field parameters.Loop and crossfade parameters are dimmed when the One Shot button is active.
- Reverse button: Turn on to play the sample from the sample end marker to the sample start marker.
- Flex On/Off button: Turn Flex mode on or off. If Flex mode is turned on, an audio sample is played at its original speed for all note pitches.
- Follow Tempo button: When Flex mode is active, turn on to follow the project tempo.
- (Flex) Speed pop-up menu: When Flex mode is active, choose a playback speed division or multiplication value.Tip: Flex Speed is also available as a modulation target.
- Sample Start/End handles and fields: Set the sample start and end points. Drag to reposition. Option-click, then drag either handle to move both markers.
- Sample Length field: Displays the length between the sample start and end marker positions. Drag vertically to move the end and fade-out marker.
- Fade In/Fade Out handles and fields: Set the fade-in or fade-out time for the zone. Drag to reposition. Option-click, then drag either handle to move both markers. The fade markers cannot be positioned before or after the sample start and and markers.
- Loop Start/Loop End handles and fields: Set the loop start and end points. Drag to reposition. Drag the shaded loop area to move both markers and the crossfade marker. Alternatively, you can Option-click, then drag either handle to move both markers and the crossfade marker.
- Loop Length field: Displays the length between the loop start and end marker positions. Drag vertically to move the loop end and crossfade marker.
- Loop Mode pop-up menu: Choose a looping mode. Set to No Loop to disable looping.
- No Loop: Turn off looped playback. This hides loop markers and crossfades from the waveform display.
- Forward: Playback cycles from the loop start point to the loop end point while you hold a key.
- Reverse: Playback cycles from the loop end point to the loop start point while you hold a key.
- Alternate: Playback continuously cycles from the loop start point to the loop end point, then switches from the loop end point to the loop start point, while you hold a key.
- Play to End on Release: Turn on to continue playback to the end marker position after you have released the key—provided that the amp release time is long enough for the audio portion after the loop to be audible. This feature is useful for allowing the natural decay of a sampled acoustic instrument to be heard during the envelope release phase, for example.
- Crossfade handle and field: Drag to set the crossfade time between the end and start of a looped sample. The crossfade marker handle is indicated with an X in the waveform display. Option-click, then drag the handle to move both crossfades.In a crossfaded loop, there is no step between the loop end and loop start points. The higher the value, the longer the crossfade and the smoother the transition between the loop end and start points. This is especially convenient with samples that are hard to loop and that would normally produce clicks at the transition point—the join in the loop.
Navigation, Loading and Saving in Sampler
You can use the Navigation bar shortcut buttons to hide or show panes within the Sampler interface, to quickly navigate between visible panes, and to resize panes within the visible area. The navigation bar also contains an Action pop-up menu that provides a number of commands related to synthesizer parameter and mapping data handling.

Navigation bar parameters
- Navigation buttons: Use to view, and scroll to panes. Double-click to switch pane zoom levels. Click the LED to hide panes. Drag samples here to add them. You can do the following:
- Click a navigation button to scroll the main UI to the corresponding pane.
- Click the yellow LED inside a navigation button to hide the corresponding pane.
- Click the navigation button of a hidden pane to show the pane and automatically scroll to it.
- Double-click a navigation button to expand the corresponding pane vertically. The pane expands to the maximum useful pane height, in proportion to the height of other open panes and the overall height of the plug-in window.
- Double-click the navigation button of a vertically expanded pane to reduce the pane to its default height or to a height that you have set.Tip: You can resize panes vertically by moving the pointer over the boundary between panes until it becomes a handle, then dragging the handle.
- Option-click a navigation button to expand the corresponding pane vertically and hide all other panes.
- Action pop-up menu: Choose commands related to synthesizer parameter and mapping data handling.Note: You can directly drag one or more samples onto the Navigation bar to create new groups and zones.
Scrolling, zooming, and resizing in Sampler
The overall Sampler window and panes within it can be resized. You can scroll panes vertically, and horizontally in some cases, and can zoom the Mapping and Zone panes. Combine these features and those of the Navigation bar to quickly move in, and adjust, the Sampler interface.
Important: Use of gestures, such as swiping or pinching require these features to be enabled in the Mouse or Trackpad panes of your System Preferences.
Do any of the following to scroll:
- Drag vertically on the scrollbar at the right edge of the Sampler window to move between panes.Each pane provides one or more transparent scrollbars that you can drag to move vertically or horizontally withinthe pane.Note: Scrollbars are shown only when the pane or Sampler window content exceeds the display area size.
- Use a two-finger vertical swipe to scroll with the trackpad, or a single-finger vertical swipe with a Magic Mouse to vertically scroll a pane (except the Zone pane) or to scroll the Sampler window.
- In the Mapping or Zone panes, use a two-finger horizontal swipe with the trackpad, or a single-finger horizontal swipe with a Magic Mouse to horizontally scroll.
Do any of the following to zoom:
- In the Mapping or Zone panes, use a pinch gesture to zoom.
- In the Mapping pane, use the zoom slider.
- In the Zone pane, use a two-finger vertical swipe to zoom with the trackpad, or a single-finger vertical swipe with a Magic Mouse to zoom the waveform.
- In the Zone pane, use the zoom buttons.Tip: You can double-click any pane button in the Navigation bar to quickly toggle between a maximized view and the current view of that pane.
Do any of the following to resize:
- Drag vertically on the top or bottom edge of the Sampler window to change the window height.
- Drag horizontally on the left or right edge of the Sampler window to change the window width.
- Drag diagonally on any corner of the Sampler window to change both the window height and width.A resize handle is shown when you move the pointer over any edge or corner of the Sampler window.
- Double-click the name at the top of any pane to change its height.
- Drag vertically on the top or bottom edge of a pane to change the pane height.A resize handle is shown when you move the pointer over the boundary between panes. The adjacent pane is also resized.Tip: You can double-click any pane button in the Navigation bar to quickly toggle between a maximized view and the current view of that pane.
To load an instrument from the Settings pop-up menu: in the Sampler plug-in header, click the Settings pop-up menu. Browse to the instrument family, Factory, or other folder, then choose the sampler instrument you want to play or edit.
To load an instrument from the Library, Browse to the folder, then choose the sampler instrument you want to play or edit. For example, browse to Orchestral > Strings > Pop Strings.
To load the next or previous instrument in your sampler instrument library, do one of the following:
- In the plug-in header, click the next or previous icons.
- Use the Next Instrument or Previous Instrument key command.If Sampler is the key focus window, you can also use the following key commands:
- Next Plug-In Setting or Instrument
- Next Channel Strip or Plug-In Setting or Instrument
- Previous Plug-In Setting or Instrument
- Previous Channel Strip or Plug-In Setting or Instrument
Tip: You can also browse through your sampler instruments by using your MIDI keyboard. You can assign a MIDI event, such as a MIDI note, control change, or program change to select the previous or next sampler instrument in the Sampler Preferences.
You can open Quick Sampler settings with Sampler by doing one of the following:
- Choose the Quick Sampler setting name from the Sampler Setting menu. Use the Load menu item to browse to the default location: ~/Music/Audio Music Apps/Plug-In Settings/Quick Sampler.The Quick Sampler sound is loaded as a group containing one or more zones and you can edit, process, and handle the content as you would with any group or zone.
- Choose Sampler from the Instrument pop-up menu on an instrument channel strip that contains a Quick Sampler instance.Quick Sampler is replaced with Sampler on the channel strip and the sound is automatically loaded as a group containing one or more zones.Important: You can not open a Sampler setting with Quick Sampler.
To save a sampler instrument, you must access all basic sampler instrument file operations using the commands in the plug-in header Setting menu.
- Save: Saves the currently loaded sampler instrument. When you create a new instrument and save it for the first time, you are asked to provide a name. If you have edited an existing sampler instrument and use this command, the existing filename is used and the original instrument is overwritten. You can also use the Save Instrument key command.
- Save As: Saves the currently loaded sampler instrument, but you are prompted to provide a different filename. Use this command when you want to save a copy or multiple versions of an edited sampler instrument, rather than overwriting the original version. This, and the Save A Copy As, command may be useful when you want to save a Sampler Setting (including audio data) that is unique to a specific project. Storing this in a location outside of the factory library or user folders may also be practical for sharing a copy of your Sampler Setting (with or without audio data) with a colleague or friend.In the Finder window, you can:
- Browse to any folder location or create a new folder.
- Click the Save with audio data checkbox to duplicate the samples and place them in a folder named after the Sampler Setting file.If the save location is the User Library (the default), the ‘.exs’ files are placed in a folder called Sampler Instruments. The audio files are placed in a subfolder named after the Setting. This subfolder is placed in a Samples folder. The original audio files are not touched or moved.
- Save A Copy As: Saves a copy of the currently loaded sampler instrument. You are prompted to provide a different filename. Use this command when you want to save a copy or multiple versions of an edited sampler instrument, rather than overwriting the original version.In the Finder window, you can:
- Browse to any folder location or create a new folder.
- Click the Save A Copy with audio data checkbox to duplicate the samples and place them in a folder named after the Sampler Setting file.If the save location is the User Library (the default), the ‘.exs’ files are placed in a folder called Sampler Instruments. The audio files are placed in a subfolder named after the Setting. This subfolder is placed in a Samples folder.The original audio files are not touched or moved.
- Save As Default: Saves the currently loaded sampler instrument as the Default instrument. This instrument serves as a template for future sampler instruments and is used when you create a new instrument. It is also used when you choose the Initialize Synth Parameters command from the Navigation bar Action pop-up menu.
You can save patches, comprised of a sampler instrument and associated plug-in settings, in the Library.
- Click the Save button at the bottom of the Library pane.In the Finder window:
- Browse to the file location you want to use. The default folder location is User Patches. If required, create a new folder.
- Type the patch name, then press the Save button.
Do this now
- Record one note of something around you, four times at different pitches.
- Load them into Sampler and map them across zones with crossfades.
- Add a filter and an envelope and play it as an instrument.
You have just made a multisampled instrument nobody else has.