Sampling: Quick Sampler
Quick Sampler lets you quickly create sampler instruments consisting of a single audio file. You can load any audio file, including Apple Loops, into Quick Sampler or use Quick Sampler to record a new sample.
Quick Sampler is inserted in instrument channel strips and is useful as both an instrument and audio manipulation utility. You can use it in a number of ways in your productions, such as experimentation with Live Loops.
Quick Sampler offers independent control of pitch, filter, and amp parameters, coupled with flexible sampler modes and modulation options.
If you need to work with more than one audio file at a time, use Sampler. You can directly replace Quick Sampler with Sampler on an instrument channel strip and your current content is automatically transferred. Sampler can also directly load saved Quick Sampler settings.
Important: You can not open a Sampler setting with Quick Sampler.
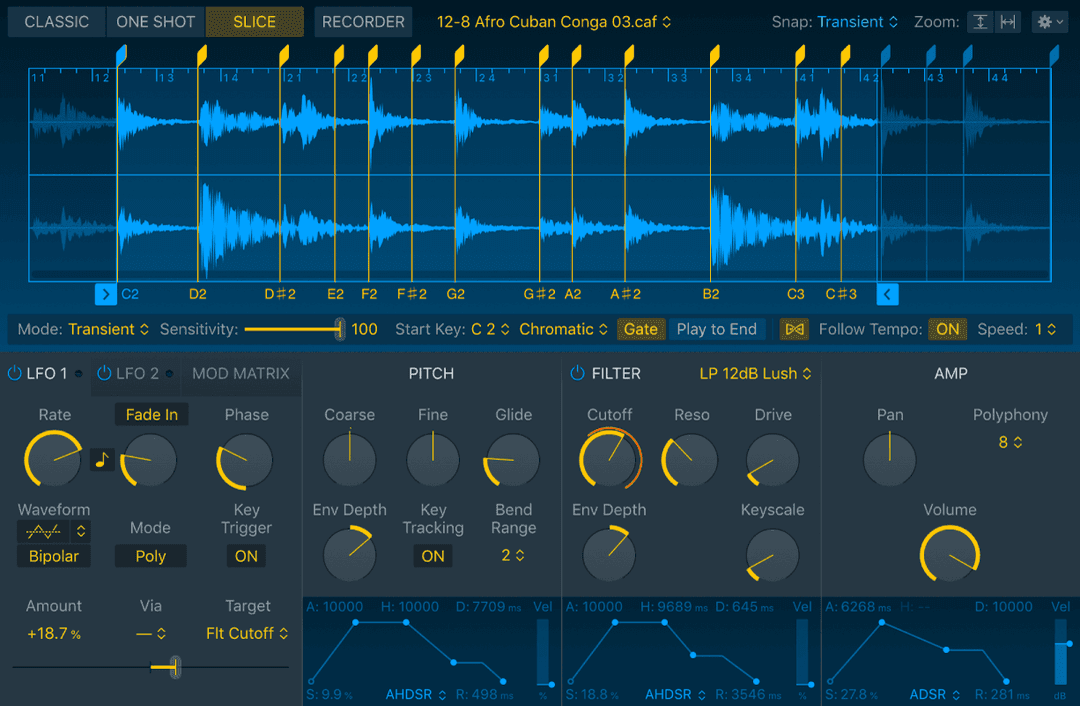
In the Quick Sampler interface, you can see two primary sections:
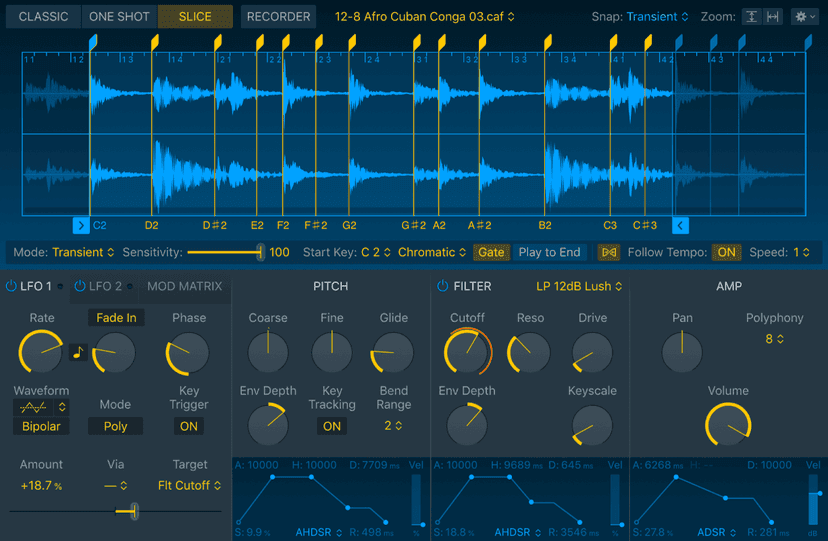
- The upper section contains all sample-related functions, including the sampler mode, the waveform display, and analysis, playback, mapping and other options.
- The lower section contains two LFOs and Pitch, Filter, and Amp panes that each have an independent envelope. A dedicated Mod Matrix pane provides extensive modulation options.
Adding content to Logic Pro Quick Sampler
Quick Sampler provides two direct methods to add an audio file, or region. Once you’ve added the file, you can choose different modes to change playback behavior, you can directly edit waveform markers, and you can use the synthesis and modulation parameters. You also have the option to record audio directly into Quick Sampler.
You can quickly replace the sound for Quick Sampler on a software instrument track by dragging an audio file, audio or software instrument region, or Apple Loop to the track header. When you drag content to one of the Quick Sampler zones to replace the existing sound, you can choose whether Quick Sampler uses the original tuning, loudness, looping, and length of the material, or analyzes the material and optimizes its tuning, searches for loop points, and crops silence.
1. Add an audio file with the Sample name field
Click the “Sample name” field at the top center, and choose Load Audio File to open Finder. In the Finder, browse to the file you want to import, then select one of the following checkboxes.
Original: Adds the audio file to the waveform display, which uses the tuning, loudness, looping, and length characteristics of the source file.
Optimized: Analyzes the source file, optimizing its tuning, loudness, and length, then adds the audio file. If the contents are rhythmic and/or cyclical (looped), Quick Sampler automatically adds loop and crossfade markers to the waveform display. Silence at the beginning or end of the source audio is cropped (cut), shortening the imported content.
Note: These checkboxes are visible only when the Options button at the bottom left of the Finder window is turned on.
2. Drag and drop content into Quick Sampler
Drag a region or an audio file from the Audio File window, Apple Loops window, or Finder into the Quick Sampler waveform display. Drop the file into either the Original or Optimized portion of the waveform display.
you will get the same options as in the first method- Original, or Optimized.
Note: A resampling process is triggered when you drop a region into Quick Sampler. The region is bounced offline and added to the waveform display.
Quick Sampler waveform display
You can see the current audio file in the waveform display and directly edit a number of sample playback parameters. If you are using a trackpad, you can zoom in or out with pinch gestures, or scroll using two-finger swipes or by dragging the scroll bar. If you are using a Magic Mouse, use a single-finger horizontal swipe to scroll, and a single-finger vertical swipe to zoom.
As you move the pointer across the waveform display, it changes in appearance and function. For example, the pointer will change to indicate that you can move a slice marker or fade marker. In addition, parameters and values related to the current pointer tool function are shown below the waveform display. Click or drag markers and handles in the waveform display to change values.
Tip: You can double-click on any marker handle to permanently display parameter values below the waveform display. Click the “X” icon at the left of the parameter display bar to revert to the default behavior and parameter view.
Note: Some editing features are available only in certain modes.
Waveform display parameters
- Sample name field and pop-up menu: Load, choose, or rename an audio file or perform file handling tasks.
- Reveal in Finder: Opens the Finder at the file folder location.
- Rename Current File: Opens a file renaming dialog. Type the new filename and click OK or press Return.
- Remove Current File: Removes the selected audio file, indicated with a checkmark beside the filename.
- Clear History: Clears all but the most recently used file.
- Load Audio File: Adds an audio file from any folder you select. You can also drag audio files directly into the waveform display area.
- Snap pop-up menu: Choose a value. Edits to crossfade, sample, slice, or loop start and end markers in the waveform display automatically snap to the nearest possible value.
- Zoom vertical button: Switch between the maximum vertical zoom view and the default waveform display view.
- Zoom horizontal button: Switch between the last manually set zoom level, if applicable, and an optimized zoom level that shows the area between the sample start and end markers. When no manual zoom level is set, the entire audio file is shown.Tip: You can use your trackpad to zoom in or out on the waveform display with pinch gestures, or scroll using two-finger swipes or by dragging the scroll bar. You can use a Magic Mouse to perform the following gestures: use a one-finger horizontal swipe to scroll, or a one-finger vertical swipe to zoom.
- Action pop-up menu: Choose a sample handling, processing, or display function for the active mode.Note: Control-click the waveform display to access shortcut menu items that apply to the active mode.
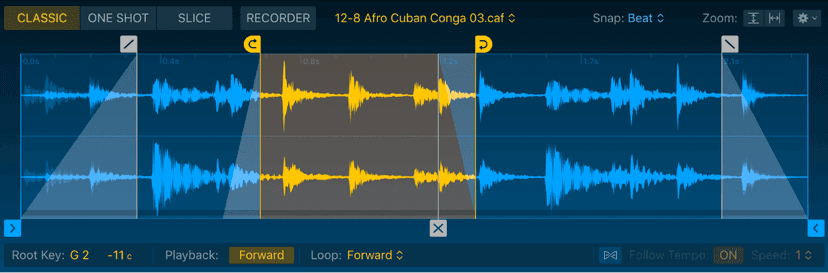
You can use markers to alter audio playback. You can define the possible positions for markers using the Snap menu.
Note: Different marker types are shown in each mode.
- Start and end markers: Drag the blue start or end marker to set the sample start and end point. Playback occurs between these markers. Hold Option, then drag either the start or end marker to move the entire audio section between these markers.Note: The Option drag feature works only when the start and end markers are not set to encompass the entire audio file.
- Loop start and end markers: Drag the yellow loop start or end marker to set loop boundaries. Playback cycles between these markers when you hold a note. Drag the yellow shaded area between the loop start and end markers to move the entire loop. Alternatively, hold Option, then drag either the loop start or end marker to move the entire loop.
- Crossfade marker: Drag the gray crossfade marker to set the length of the crossfade at the beginning and end of loop boundaries, smoothing out audible glitches as the loop cycles across the loop end and start points.
- Fade in/fade out markers: Drag the gray fade in or fade out marker to adjust the length of the fade at the beginning and end of the audio file segment between the start and end markers. Hold Option, then drag either fade marker to move both fade markers.
- Slice marker: Shown in Slice mode. Drag any yellow slice marker to set its position. Click between slice markers to create a new slice marker.
Using the Quick Sampler Action or shortcut menu
In Quick Sampler, you can use the Action or shortcut menu to choose a number of sample-handling commands that differ in Classic, One Shot, and Slice modes. Control-click in the waveform display to access available options from the shortcut menu.
Note: Not all commands are available in the shortcut menu. Some commands are available only in certain modes.
- Add Slice Marker: Creates a new slice marker at the current playhead position in the waveform display.
- Auto-Loop: Analyzes the audio content and automatically sets a loop. You can use the command multiple times to try different automatic loops.
- Auto-Loop within loop area: Analyzes the audio content and automatically sets a loop within the area defined by the loop start and end markers. You can use the command multiple times to try shorter automatic loops.
- Copy MIDI Pattern: Analyzes and copies slice markers to the Clipboard. You can paste the Clipboard contents to a MIDI or instrument track as a new MIDI region. This feature is ideal for creating perfectly synchronized instrument parts and for drum replacement, Foley, and other uses.
- Create Drum Machine Designer Track: Creates a new Drum Machine Designer track that contains the current Quick Sampler content.
- Crop Loop: Crops (cuts) the portion(s) of the sample outside the loop start and end markers.
- Crop Sample: Crops (cuts) the portion(s) of the sample outside the start and end markers.
- Delete Slice Marker: Deletes the highlighted slice marker. Move the pointer over a slice marker to highlight it. You can also double-click a slice marker to remove it.
- Derive Tempo from Loop Length: Calculates a tempo for the audio file based on the Loop Length. If using the Follow Tempo button does not yield the desired results, you can choose this option to calculate a revised tempo at which the loop is aligned to the beat.
- Display Seconds/Sample/Beats Units: Shows time, sample, or bar/beat values in the waveform display.
- Display Stereo Channels/Mono Sum: Shows a stereo or summed mono waveform view in the waveform display.
- Equal Power Crossfade: Sets the crossfade gain value behavior.
- Initialize Synth Parameters: Recalls a neutral setting for all parameters in the Pitch, Filter, Amp, Mod Matrix, and LFO panes. This provides a “clean slate” when you are adjusting the parameters of your instrument.
- Linear Crossfade: Sets the crossfade gain value behavior.
- Optimize Sample Gain: Analyzes the audio content and sets automatic gain values.
- Re-Analyze Transients and Tempo: Re-analyzes the current audio for transient and tempo changes, following edits you have made.
- Reimport Optimized: Reimports the current audio with optimized tuning, loudness, and length characteristics of the source file. Quick Sampler automatically adds loop and crossfade markers to the waveform display for appropriate material and crops (cuts) silence at the beginning or end of the source audio, shortening the imported content.
- Reimport Original: Reimports the current audio with the tuning, loudness, looping, and length characteristics of the source file.
- Retune: Analyzes the audio content and sets the root key and tuning value automatically.
- Write Sample Loop to Audio File: Saves the loop data to the file header of the audio file. To save the new audio file with a different name, click the Name field and choose the Rename Current Audio command.
Using slice markers to create new instruments and regions
One of the most handy features that quick Sampler offers is that you can use slice markers to create Drum Machine Designer tracks and to create MIDI regions containing note-on events.
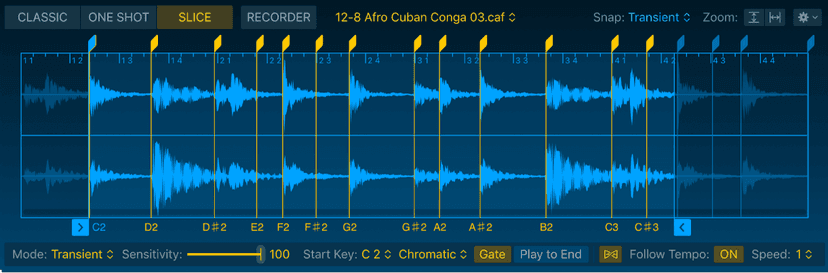
In the Slice mode waveform display, drag the slice handles to adjust existing transient and start and end markers. You can also choose a number of commands from the Action and shortcut menus. Control-click to access available options from the shortcut menu.
Do any of the following:
- Click to the right of the start marker in the lower part of the waveform display, then drag a MIDI region to an audio track, a MIDI track, or a software instrument track.A curved arrow is shown to indicate the region can be dragged to a track. A new MIDI region which contains note-on events that correspond to each slice between the start and markers is created on the target track. You can edit these as you can any other MIDI region.
- Choose Create Slice Marker from the Action or shortcut menu to insert a slice marker at the pointer position, if required.
- Choose Delete Slice Marker from the Action or shortcut menu to delete the highlighted slice marker. Move the pointer over a slice marker to highlight it.
- Choose the Create Drum Machine Designer Track command from the Action pop-up menu.You will see an analysis dialog. A new Drum Machine Designer track is created and a new MIDI region is created on this track. The MIDI region contains note-on events that correspond to each slice between the start and markers, and you can edit these as you can any other MIDI region. Individual audio slices are automatically mapped to pads in Drum Machine Designer, and you can edit, replace, process, or route these as you like.
- Choose the Copy MIDI Pattern command from the Action pop-up menu to analyze and copy all slice markers between the start and end markers to the Clipboard.You can paste the Clipboard contents to a MIDI or instrument track as a new MIDI region. This feature is ideal for creating perfectly synchronized instrument parts and for drum replacement, Foley, and other uses.
Saving Quick Sampler instruments
You can access all basic Quick Sampler file operations using the commands in the plug-in header Setting menu.
- Save: Saves the currently loaded instrument. When you create a new instrument and save it for the first time, you are asked to provide a name. If you have edited an existing instrument and use this command, the existing filename is used and the original instrument is overwritten.
- Save As: Saves the currently loaded instrument content, but you are prompted to provide a different filename. Use this command when you want to save a copy or multiple versions of an edited Quick Sampler instrument, rather than overwriting the original version. This, and the Save A Copy As, command may be useful when you want to save a Quick Sampler Setting that is unique to a specific project. Storing this in a location outside of user folders may also be practical for sharing a copy of your Quick Sampler Setting with a colleague or friend.
- Save A Copy As: Saves a copy of the currently loaded Quick Sampler content. You are prompted to provide a different filename. Use this command when you want to save a copy or multiple versions of an edited instrument, rather than overwriting the original version.
- Save As Default: Saves the currently loaded Quick Sampler parameter settings as the Default instrument. This instrument serves as a template for future Quick Sampler instruments and is used when you create a new instrument. It is also used when you choose Initialize Setting from the Setting pop-up menu.
Saving a Quick Sampler patch in the Library
You can save patches, comprised of a Quick Sampler instrument and associated plug-in settings, in the Library.
- Click the Save button at the bottom of the Library pane. If the Library is not visible, click the Library button on the Logic Pro menu bar or use the default keyboard shortcut: Y.In the Finder window:
- Browse to the file location you want to use. The default folder location is User Patches. If required, create a new folder.
- Type the patch name, then press the Save button.
Quick Sampler modes
You can use the Classic, One Shot, Slice, and Recorder buttons to determine the sample playback or recording mode.
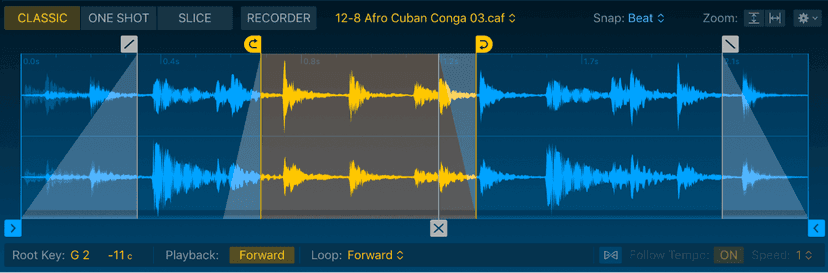
- Classic button: Enable Classic playback mode. The sample is played back while you hold a key and stops when the key is released, depending on the envelope settings. Playback starts from the start marker position. Classic mode also enables looped playback, set with parameters below the waveform display. This is the most useful mode if you want to “play” a sound across the keyboard range.
- One Shot button: Enable One Shot playback mode. Sample playback begins at the start marker position and finishes at the end marker position when a key is pressed or a note is received. This mode is great for quickly dropping a processed sample into an arrangement, for drum loop playback, and for “effects” use.
- Slice button: Enable Slice playback mode to divide samples into multiple segments (slices) mapped to keys starting from the defined start key. Hold a key to start playback from the beginning of each slice. Depending on settings, playback continues until the next slice marker or the end marker while the key is held. When the Gate parameter is active, playback stops when you release the key. A number of Slice mode parameters are shown below the waveform display. This mode is ideal for manipulation of musical phrases and looped, rhythmic material, allowing you to play different slices in any order. You can also quickly create new Drum Machine Designer instruments.
- Recorder button: Enable Recorder mode to capture any audio signal as an audio recording. This recording can be played while in Recorder mode, but not edited. Choose another mode to set markers, to change playback behavior, and to change modulation or filtering options.
Classic mode
Quick Sampler Classic mode will play and loop full or partial samples. The audio file is mapped to keys above and below the defined root key. Keys below this will play the sample at a lower pitch and slower speed. Keys above this will play the sample at a higher pitch and faster speed.
This mode is useful for a number of simple playback scenarios, including use on tracks with Flex enabled and when using Live Loops.
Classic mode parameters
- Start and end markers: Drag the blue start and end markers to set the sample start and end points. Playback occurs between these markers. Hold Option, then drag either the start or end marker to move the entire audio section between these markers.Tip: You can double-click on any marker handle to permanently display parameter values below the waveform display. Click the “X” icon at the left of the parameter display bar to revert to the default behavior and parameter view.
- Loop start and end markers: Drag the yellow loop start and end markers to set loop boundaries. Playback begins from the start marker position and cycles between the loop start and end markers while you hold a key. Drag the yellow shaded area between the loop start and end markers to move the entire loop. Alternatively, hold Option, then drag either the loop start or end marker to move the entire loop.
- Fade in and fade out markers: Drag the gray fade in or fade out marker to adjust the length of the fade at the beginning and end of the audio file segment between the start and end markers. Hold Option, then drag either fade marker to move both fade markers.
- Crossfade marker: Drag the gray crossfade marker to adjust the length of the crossfade at the beginning and end of loop boundaries. Crossfading helps to smooth out audible glitches at the point where the loop cycles across the loop end and start points.
- Root Key pop-up menu: Choose a keyboard note value that is used to play the sample at the original pitch. Keys below this will play the sample at a lower pitch and slower speed. Keys above this will play the sample at a higher pitch and faster speed.
- Tune field: Drag vertically or double-click and type to set a tuning value for the assigned root key in Cents (1/100th of a semitone).
- Playback button: Enable forward or reversed playback from the start marker position, inclusive of loop playback.
- Loop mode pop-up menu: Choose a loop playback mode.
- No Loop: Turn off looped playback. This hides loop markers and crossfades from the waveform display.
- Forward: Playback cycles from the loop start point to the loop end point while you hold a key.
- Reverse: Playback cycles from the loop end point to the loop start point while you hold a key.
- Alternate: Playback continuously cycles from the loop start point to the loop end point, then switches from the loop end point to the loop start point, while you hold a key.
- Play to End on Release: When you release a key, the loop plays to the loop end marker position, and playback smoothly continues to the sample end marker position—provided that the amp release time is long enough for the audio portion after the loop to be audible. This feature is useful for allowing the natural decay of a sampled acoustic instrument to be heard during the envelope release phase, for example.
- Flex On/Off button: Turn Flex mode on or off. If Flex mode is turned on, an audio sample is played at its original speed for all note pitches.
- Follow Tempo button: When Flex mode is active, turn on to follow the project tempo.Tip: The Derive Tempo from Loop Length command in the Action pop-up menu calculates a tempo for the audio file based on the Loop Length. If using the Follow Tempo button does not yield the desired results, you can choose this option to calculate a revised tempo at which the loop is aligned to the beat.
- (Flex) Speed pop-up menu: When Flex mode is active, choose a playback speed division or multiplication value.
One Shot mode
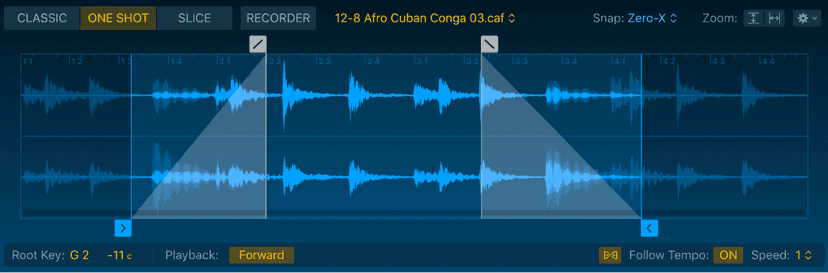
Use Quick Sampler One Shot mode to play an audio file, or a portion of it. It provides fade in and fade out parameters. Notes run for the duration of the Amp envelope when you strike a key.
One Shot mode is useful for adding effects such as a reversed portion of a sample played alongside the original, or fading in a slightly detuned version to double parts. Use Classic mode if you want to loop part or all of the sample.
One Shot mode parameters
- Fade in/fade out markers: Drag the gray fade in or fade out marker to adjust the length of the fade at the beginning and end of the audio file segment between the start and end markers. Hold Option, then drag either fade marker to move both fade markers.Tip: You can double-click on any marker handle to permanently display parameter values below the waveform display. Click the “X” icon at the left of the parameter display bar to revert to the default behavior and parameter view.
- Start and end markers: Drag the blue start and end markers to set the sample start and end points for playback. Hold Option, then drag either the start or end marker to move the entire audio section between these markers.
- Root Key pop-up menu: Choose a keyboard note value that is used to play the sample at the original pitch. Keys below this will play the sample at a lower pitch and slower speed. Keys above this will play the sample at a higher pitch and faster speed.
- Tune field: Drag vertically or double-click and type to set a tuning value for the assigned root key in Cents (1/100th of a semitone).
- Playback button: Enable forward or reverse playback between the start and end marker positions. Loop markers are ignored.
- Flex On/Off button: Turn Flex mode on or off. If Flex mode is turned on, an audio sample is played at its original speed for all note pitches.
- Follow Tempo button: When Flex mode is active, turn on to follow the project tempo.Tip: The Derive Tempo from Loop Length command in the Action pop-up menu calculates a tempo for the audio file based on the Loop Length. If using the Follow Tempo button does not yield the desired results, you can choose this option to calculate a revised tempo at which the loop is aligned to the beat.
- (Flex) Speed pop-up menu: When Flex mode is active, choose a playback speed division or multiplication value.Tip: Flex Speed is also available as a modulation target.
Slice mode
Quick Sampler Slice mode divides the audio file into segments (slices). You can map each segment to a keyboard key and play each slice independently. This mode is useful for playing individual hits or portions of a sample. Slices can be played in any order, enabling you to totally change the rhythm or pattern. For example, you may sequentially play every second or third note to create pseudo gating effects.
Slice mode parameters
- Slice markers: Drag any yellow slice marker to adjust the playback start position and length of the sample segment. Playback of each segment starts when you strike the corresponding key.Tip: Move your pointer to the bottom of each slice marker to show a Play icon. Press this to play the slice.
- Start and end markers: Drag the blue start and end markers to set the sample start and end points for playback. Hold Option, then drag either the start or end marker to move the entire audio section between these markers.Tip: You can click on any marker handle to permanently display parameter values below the waveform display. Click the “X” icon at the left of the parameter display bar to revert to the default behavior and parameter view.
- Fade in and fade out fields: Drag vertically to set the length of the fade at the beginning and end of the audio file segment between the start and end markers. The fade time values you set are applied to all slices. Depending on the sliced audio material, a small fade may help to avoid clicks that sometimes occur at the start or end of a slice.Note: These fields are shown only in the parameter display bar below the waveform display when you have clicked a slice marker in Slice mode.
- Mode pop-up menu: Choose the slicing mode. You can automatically set divisions at transient or beat positions, or divide the audio file equally. You can also manually set divisions by placing slice markers.
- Sensitivity slider: From the Mode pop-up menu, choose Transient. Set the number of slice markers, based on detection of transients in the audio file. Higher values display more slice markers.
- Division slider: From the Mode pop-up menu, choose Beat Divisions. Set the number of slice markers in the audio file by beat values. Higher values display more slice markers.
- Slices slider: From the Mode pop-up menu, choose Equal Divisions. Set the number of slice markers shown between the start and end markers. Higher values display more slice markers.
- Start Key pop-up menu: Assign the key (note) for the first slice.
- Start Key Mapping pop-up menu: Choose Chromatic, White, or Black to map slices to keys above the Start key.
- Gate button: Turn on to enable the release phase of Pitch, Filter, and Amp envelopes when the key is released. Turn off to play the sample in One Shot mode.
- Play to End button: Turn on to play the triggered slice to the end marker position.
- Flex On/Off button: Turn Flex mode on or off. If Flex mode is turned on, an audio sample is played at its original speed for all note pitches.
- Follow Tempo button: When Flex mode is active, turn on to follow the project tempo.
- *(Flex) Speed pop-up menu:*When Flex mode is active, choose a playback speed division or multiplication value.Tip: Flex Speed is also available as a modulation target.
Creating and edit slices
In Slice mode, you can do the following:
- Insert a slice marker by moving your pointer over the waveform display and clicking. The vertical line at the pointer position indicates the insert position. Control-click to open a shortcut menu, and choose Create Slice Marker to place a slice marker at the current playback position.
- Reposition a slice marker by horizontally dragging the slice marker or its handle.
- Double-click a slice marker (not the slice marker handle) to delete it.
- Control-click a slice marker or its handle to open a shortcut menu, then choose Delete Slice Marker or use another command.
- Click a slice marker handle to permanently display slice parameter values below the waveform display. Click the “X” icon at the left of the parameter display bar to close it.Note: This is the only way to view the Fade in and Fade Out parameters in Slice mode.
- Move your pointer to the bottom of each slice marker to show a Play icon. Press this to play the slice.
Recording in Quick Sampler
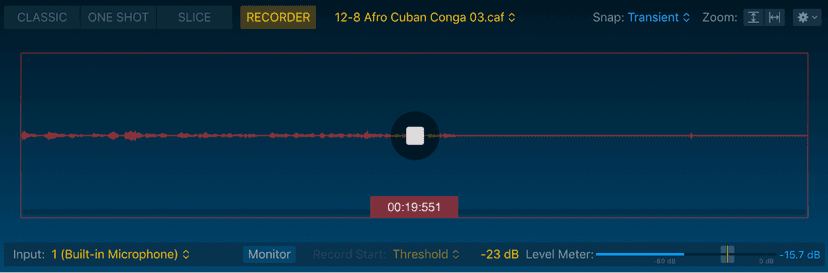
You can use Quick Sampler to directly record the signal from any audio input.
Quick Sampler Recorder mode parameters
- Record button: Click to start and stop recording.
- Input pop-up menu: Choose the audio input source.
- Monitor button: Turn on to hear the incoming signal.Tip: Take care with levels to avoid audio feedback.
- Record Start pop-up menu: Choose to start recording immediately when the Record button is pressed or when the signal reaches the defined threshold level.Note: Recording will not start until the Record button is pressed if “Wait for signal to pass Threshold” is chosen in the Record Start pop-up menu.
- Level Meter: Shows the input signal level.
- Level Meter slider: Set the threshold level for the input signal.
Recording audio in Quick Sampler
- Choose an input from the Input pop-up menu.
- Click the Record button.
- Choose the Record Start pop-up menu option you want to use.
- Choose “Start immediately” to begin recording when you press the Record button.
- Choose “Wait for signal to pass Threshold” to begin recording when a defined level is reached.
- To hear the incoming audio signal, enable the Monitor button. Tip: Take care with levels to avoid audio feedback.
- If you chose “Wait for signal to pass Threshold” in the Record Start pop-up menu, keep an eye on the Level Meter to set the Level Meter slider value.
- Press the Record button to begin recording.
- Press the Record button again to stop recording.
Quick Sampler Mod Matrix pane
In a way, you can think of Quick Sampler like a synth where the Oscillators are the samples you load in. This is made more of a reality when you look at the Mod Matrix section.
In Quick Sampler LFOs and envelopes are known as modulation generators. These modulation sources are used to control modulation targets, such as oscillator pitch or filter cutoff.
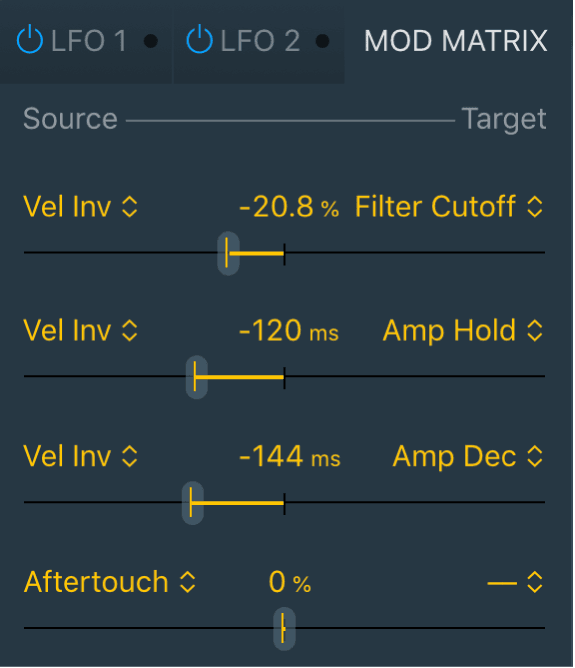
You can assign up to four independent routings of modulation sources and targets in the Mod Matrix pane.
Quick Sampler provides two LFOs and dedicated Pitch, Filter, and Amplitude envelopes that can also be assigned as modulation sources or targets in the Mod Matrix pane.
Your keyboard modulation wheel, aftertouch, pitch bend, velocity, and MIDI continuous controller features can also be assigned as real-time control sources for Quick Sampler parameters in the Mod Matrix.
Mod Matrix parameters
- Source pop-up menu: Choose a modulation source.
- Target pop-up menu: Choose a modulation target.
- Amount slider: Set the maximum value or intensity of modulation.
Here are a couple of things to try out to get the hang of the Mod Matrix…
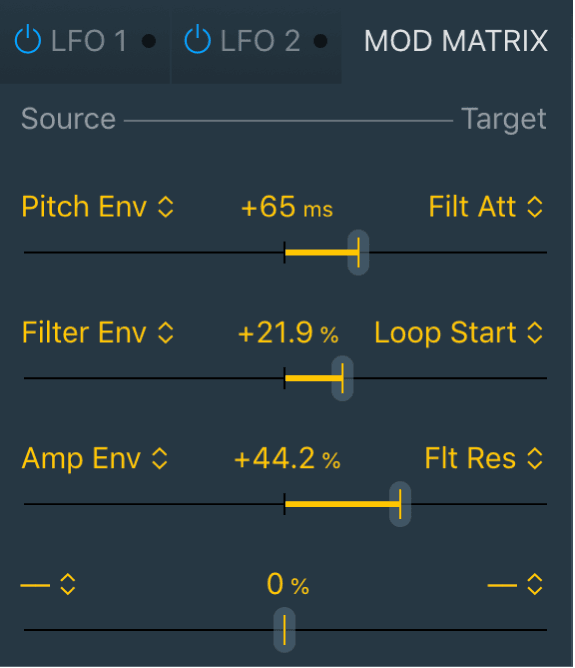
Set up a modulation routing
You can assign Quick Sampler LFOs and envelopes as modulation sources or targets in the Mod Matrix pane.
You can also assign your keyboard modulation wheel, aftertouch, pitch bend, velocity, and MIDI continuous controllers as real-time control sources for Quick Sampler target parameters in the Mod Matrix pane.
In the Mod Matrix pane:
- Choose a modulation target from the Target pop-up menu.
- Choose a modulation source from the Source pop-up menu.Note: The envelope modulators shown in the image are hard-wired to control Pitch, Filter, and Amplitude, but you can also assign them as sources to modulate other Quick Sampler parameters in the Mod Matrix pane. The envelopes and LFOs are also available as modulation targets.
- Set the maximum value or intensity of modulation with the Amount slider.
Set up a modulation routing of sample or loop start and end, or loop position
The Sample Start & End, Loop Start & End, and Loop Position targets can be quantized in musical values. For example, if you modulate the loop position (the entire loop) using an LFO, a quantization of one bar moves the loop back and forth along the time line in one bar increments instead of the usual smooth LFO motion.
You could also choose to assign your keyboard modulation wheel as a real-time control source for Loop Position, or perhaps to Sample Start or Loop Start, providing you with direct, physical control of these parameters.
In the Mod Matrix pane:
- Choose an LFO from the Source pop-up menu.
- Choose a Loop Position option from the Target pop-up menu.The quantization value you choose in the modulation Target pop-up menu applies to all modulation routings assigned to this target.
- Set the amount of modulation with the Amount slider.
- As an optional second modulation routing, set up your keyboard modulation wheel (Mod Wheel) as the source, and Loop Start as the target.
Do this now
- Drop a full vocal acapella into Quick Sampler in Slice mode.
- Play the slices from the keyboard and record a new phrase out of the old one.
- Switch to Classic and play the same sample chromatically to hear what changes.
Slice mode turns any recording into an instrument in about ten seconds.