MIDI FX
A brief history of MIDI
MIDI stands for Musical Instrument Digital Interface and is a a means of communication between two or more suitably equipped electronic musical instruments. Prior to the introduction of MIDI in 1982, it was impossible for instruments from different manufacturers to work in sync with each other, as the ‘language’ between them was like one was speaking Spanish and the other speaking Swahili. Roland founder Ikutaro Kakehashi and Sequential Circuits President got together and got other manufacturers on board to create a standardised protocol for instruments to be able to to talk to each other.
The introduction of MIDI allowed a wide range of instruments to work together- eliminating the need for masses of interconnecting wires. MIDI having been a standard for communication between instruments for 35+ years has allowed older instruments, like hardware synthesizers, be used as MIDI controllers by people- even if your synth was made in 1984 and your computer was made in 2020.
MIDI is fundamentally very simple to use, and we don’t even realise it is doing any work most of the time- kind of like electricity- we know it’s there, but forget it’s doing a vital job! Nowadays, we have MIDI over USB and MIDI over Bluetooth/WIFI connections, and we’ll be working with MIDI 2.0 soon enough- an upgrade of the standard that should provide faster and better connectivity. At it’s advent, MIDI sockets were employed to connect MIDI cable to. Most studio devices had three MIDI sockets – MIDI IN, MIDI OUT and MIDI THRU.
MIDI IN socket: allows all MIDI data to be transmitted in to a device. MIDI OUT socket: allows all MIDI data to be transmitted out of a device. MIDI THRU socket: allows all MIDI data to be transmitted thru a device allowing a chain of MIDI data with other devices (DAISYCHAIN).
It’s important to keep in mind that MIDI is simply a way of delivering messages between devices- for instance, which note was played on the controller, how hard it was played and how long it was played for. The message is transmitted between your MIDI controller and computer- or more specfically for us- into Logic.
An Intro to MIDI FX Plug-ins
Logic Pro X’s MIDI plug-ins system offers some intriguing new ways of looking at MIDI data within your Logic projects. Although it’s possible to edit MIDI data using the Piano Roll, MIDI plug-ins offer an intriguing new way of “tweaking” your MIDI data, especially when it comes to plug-ins like the Velocity Processor. From a creative standpoint, MIDI plug-ins are a dream come true for musicians working in the field of dance music. Rather than programming or performing note data from scratch, you can use features such as the Arpeggiator, Chord Trigger & Note Repeater as a means of actually creating your musical parts.
MIDI FX plug-ins effect your data in a slightly different way to other effects as they change it on the way IN to Logic, rather than for instance, when you apply an audio effect- which usually happens AFTER the audio is inside your project.
MIDI plug-ins are connected in series before the audio path of a software instrument channel strip and have a MIDI input, the MIDI processor, and a MIDI output. The output signals sent from MIDI plug-ins are standard MIDI events such as MIDI note or controller messages.
Therefore, MIDI plug-ins are able to be inserted in software instrument channel strips and process or generate MIDI data—played from a MIDI region or a MIDI keyboard—in real time.
Included FX are the Arpeggiator, Chord Trigger, and Modulator, along with plug-ins for transposition, randomization and other processing. Scripter enables you to create your own MIDI processing and generation scripts.
To insert one or more MIDI plug-ins, click the space between the EQ graphic and the Instrument slot of a software instrument channel strip.
Choose the name of the MIDI plug-in you want to use from the MIDI plug-ins pop-up menu.
The selected MIDI plug-in window opens, and a green label with the MIDI plug-in name is shown in the channel strip.
To insert additional MIDI plug-ins, move the pointer over the top or bottom edge of the inserted MIDI plug-in label in the channel strip, then click when you see a green line.
Note: The plug-in window does not open automatically for MIDI plug-ins inserted in this way. Click the label to open the plug-in window.
To change the order of MIDI plug-ins, drag the label of the MIDI plug-in that you want to move over the label of the target MIDI plug-in.
- If the target MIDI plug-in is in the top slot: It is moved down the list.
- If the target MIDI plug-in is in the bottom slot: It is moved up the list.
- If the target MIDI plug-in is in a middle slot: The positions of the two plug-ins are swapped.
To remove a MIDI plug-in, click the arrows near the right edge of the MIDI plug-in label that you want to remove, then choose No Plug-in from the pop-up menu.
To bypass a MIDI plug-in, click the Bypass button near the left edge of the MIDI plug-in label. The plug-in label is dimmed. All parameter settings of the plug-in are retained when bypassed. Click the Bypass button to restore the MIDI plug-in.
Arpeggiator MIDI plug-in
The Arpeggiator MIDI plug-in generates musically interesting arpeggios based on incoming MIDI notes. It provides split and remote features that let you control nearly all Arpeggiator functions without taking your hands off the keyboard, making it a powerful live performance tool.
An arpeggio is a succession of notes in a chord. Rather than all notes being played at one time, they are played one after the other in a pattern: up, down, random, and so on. The Arpeggiator plug-in provides a number of preset patterns, inclusive of switchable variations and inversions. Inversions change the root note of the chord from the lowest note, resulting in a different start note in arpeggiated patterns. These features let you quickly switch between patterns and feels when performing live, or when creating new projects in the studio.
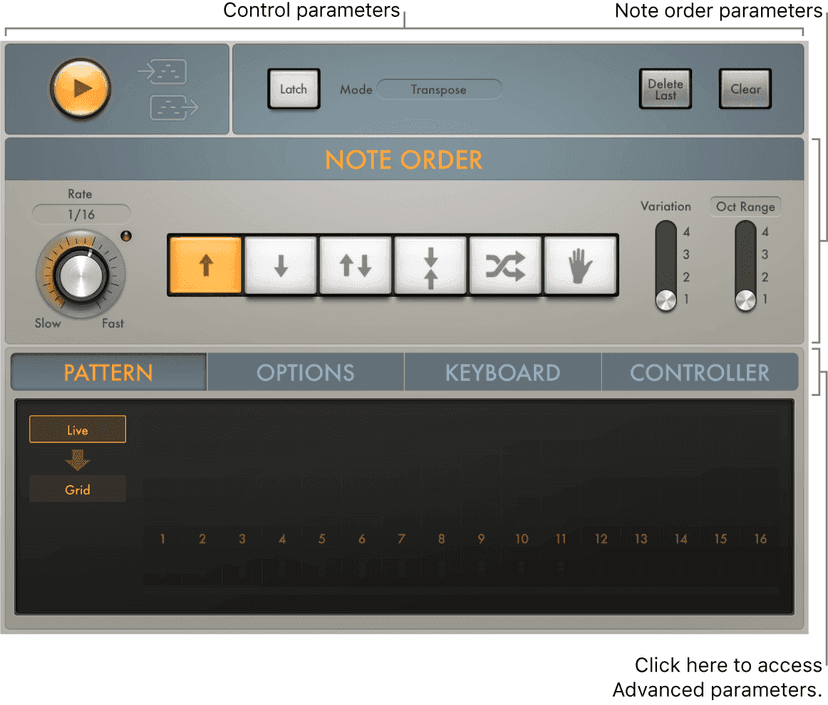
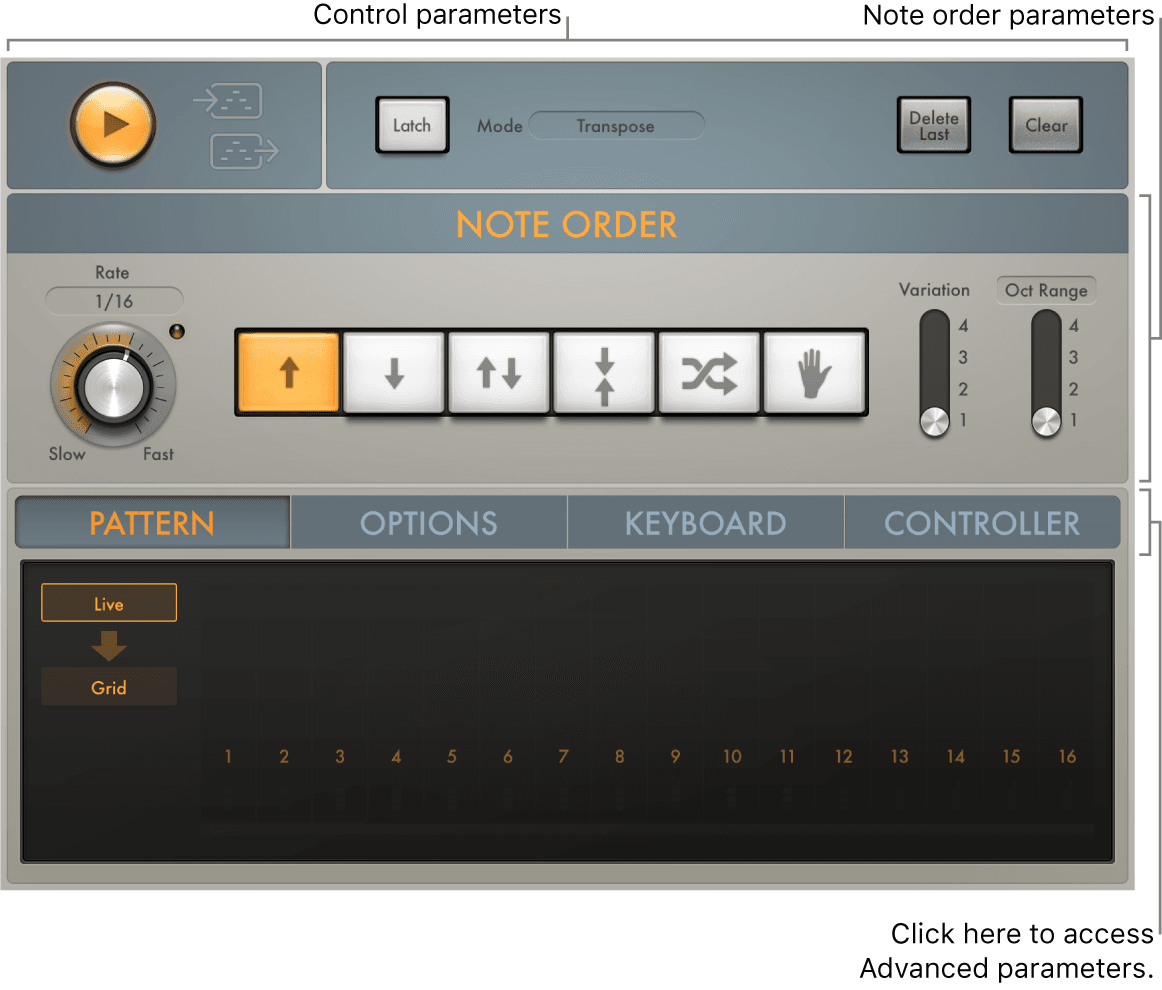
The Arpeggiator MIDI plug-in is divided into three areas.
- Control parameters: This area contains the Play and Latch controls.
- Note order parameters: The note order parameters determine the arpeggio type and include four variations or inversions, the arpeggio octave range, and the arpeggio speed.
- Advanced parameters: The advanced Arpeggiator controls are divided into four groups. Click the Pattern, Options, Keyboard, or Controller button to open each parameter group.
Arpeggiator control parameters
The control parameters start and stop the Arpeggiator and determine the latching behavior. You can also capture a live arpeggio as a MIDI region.

Control parameters
- Play button: Start or stop arpeggiated playback of note input from a MIDI keyboard or a MIDI region. The Play button is lit when in play mode. When the Arpeggiator plug-in is stopped, incoming MIDI notes are passed through, and the settings of the split and remote keyboard parameters are retained.
- When the host application is in play mode: The arpeggio starts playing whenever the Arpeggiator Play button is on, including when the plug-in is first inserted. Arpeggio playback is linked to the Logic song position.
- When the host application is stopped: Arpeggio playback stops. Incoming MIDI notes are passed through, and keyboard split and remote settings are retained.
- Note: You can click the Arpeggiator Play button while Logic Pro X is stopped to begin arpeggio playback from the first step in the arpeggio.
- Capture live performance buttons: Click, then drag the top button to copy source notes to any instrument track. Drag the lower button to copy the playing arpeggio. The played notes or currently playing arpeggio pattern is placed as a MIDI region at the target position.
- Latch button: Turn Latch mode on or off. This allows an arpeggio to run without you holding down keys. Latch mode behavior is determined with the Latch mode pop-up menu.
- Latch mode pop-up menu: Choose a Latch mode.
- Reset: The first key played clears the currently latched notes.
- Transpose: Play a single key to transpose the arpeggio relative to the note value of the pressed key and the lowest arpeggiated note.Note: Pressing more than one key simultaneously clears currently latched notes and starts a new arpeggio.
- Gated Transpose: This option is the same as Transpose Latch mode with the difference that the arpeggio only plays while a key is pressed. As soon as the key is released, the arpeggio is muted.
- Add: Play keys—one by one, or simultaneously as a chord—to add them to the latched arpeggio. You can play the same key multiple times and the note repeats the number of times it is struck.
- Add Temporarily: This option is the same as Add Latch mode except that played notes are added to the latched arpeggio only while held. When a temporarily added key is released, it is removed from the arpeggio.
- Through: All incoming MIDI notes are passed through the Arpeggiator plug-in, enabling you to play along with a latched arpeggio.
- Delete Last button: Delete the last note, rest, or tie that was added to the arpeggio.Note: Each event is allocated a unique position identification number and the “last” event has the highest position identification number.
- Clear button: Remove all notes from the Arpeggiator plug-in latch memory. The arpeggio stops playing and all position identification numbers are reset to zero, enabling you to create a new arpeggio without turning off Latch mode, which can be useful in a live situation when preparing for a chord change.
- Silent Capture checkbox (extended parameter): Click the disclosure triangle at the lower left to display the extended parameters. Select to capture an arpeggio step by step without being disturbed by the immediate response of the running arpeggiator.
- When enabled, the arpeggiator is stopped and Latch/Add mode is engaged.
- When disabled, Play is re-engaged (if previously active) and Latch mode switches to Transpose.
- Arpeggiator note order parameters
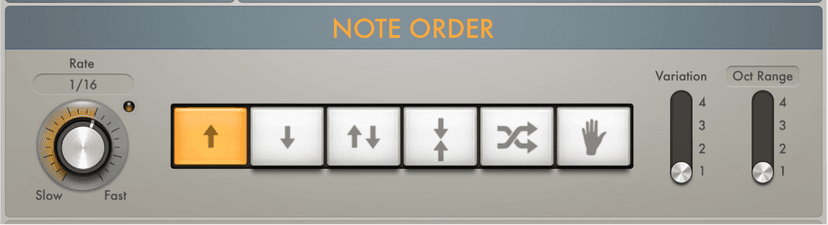
The note order parameters provide control of a pre-programmed order of notes that are played at a preset playback rate. Once all notes are played, the arpeggio cycles from the start. When you play a single key, it is repeated. When you play multiple keys, the held notes are played one after the other. As you play additional notes, these are seamlessly added to the arpeggio. When you release notes, they are removed from the arpeggio. The arpeggio stops when you release all played keys (unless Latch mode is turned on in the Arpeggiator MIDI plug-in control parameters).
The Arpeggiator plug-in automatically assigns position identification numbers to each note in the order they are played. These position identification numbers associate an event, such as a note, rest, or a tie, with a particular step. This lets you switch between note order presets while retaining a rest on the third step, for example.
Note order parameters
All note order parameters can be changed while an arpeggio is playing. Changes are immediate and are seamlessly applied to the running arpeggio.
- Rate knob and field: Set the arpeggiator rate. Choose from: 1/4, 1/8, 1/16 (including triplet and dotted notes), and 1/32. You can also click the field to choose a value from a pop-up menu. The LED indicates the rate and briefly changes color at the start of each new cycle.
- Direction buttons: Set the arpeggio direction.
- Up: The arpeggio is played from the lowest note to the highest note.
- Down: The arpeggio is played from the highest note to the lowest note.
- Up/Down: The arpeggio plays up and down, from the lowest note; the highest and lowest notes repeat.
- Outside-in: The arpeggio plays the highest then the lowest notes, then the second highest and second lowest, the third highest and third lowest, and so on.
- Random: Arpeggiated notes play in a random order.
- As played: All notes play in the order they were triggered.
- Lock button: Works in conjunction with the As played button. When you first click the As played button, an open lock symbol is shown. Click the open lock symbol once you have triggered an arpeggio to lock the current note order, indicated by a closed lock. This note order and feel is retained for any newly triggered arpeggios, but with new notes replacing the original notes. Click the lock symbol again to clear the locked note order and to revert to the standard “as played” behavior. The lock state and note order can be saved with a setting.
- Variation switch: Determine the type of note order variation.
- Oct Range/Inversions button: Switch between two modes: Octave Range or Inversions. The four-position Oct Range/Inversion switch below the buttons is used to determine the octave range or the chord inversion pattern.
- Oct Range/Inversion switch: Determine the octave range or the chord inversion pattern.In Octave Range mode:
- Position 1: The arpeggio repeats without transposition.
- Position 2: The lowest note is transposed by one octave. Once repeated, the arpeggio restarts in the original octave.
- Position 3: The first repetition is transposed by one octave, and the second repetition is transposed by two octaves. Once the second repetition is played, the arpeggio restarts in the original octave.
- Position 4: The first repetition is transposed by one octave, the second by two octaves, and the third by three octaves. Once the third repetition is played, the arpeggio restarts in the original octave.
- In Inversions mode:
- Position 1: The arpeggio repeats without inverting the held notes.
- Position 2: The arpeggio is inverted once during the first repetition. Once repeated, the arpeggio restarts.
- Position 3: The arpeggio is inverted twice, once each during the first and the second repetition. Once the second repetition is played, the arpeggio restarts.
- Position 4: The arpeggio is inverted three times, once each during the first, second, and third repetitions. Once the third repetition is played, the arpeggio restarts.
- Arpeggiator pattern parameters
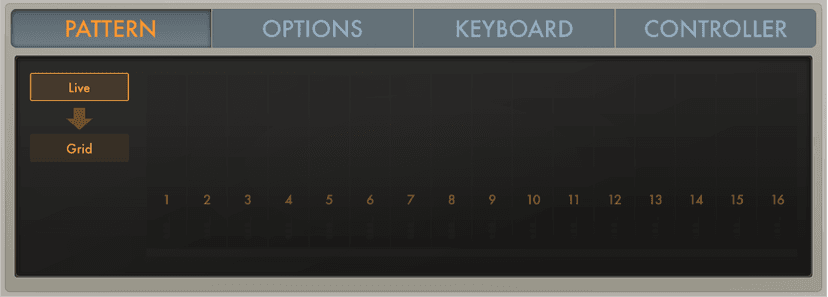
Click the Pattern button to open the Arpeggiator pattern parameters.
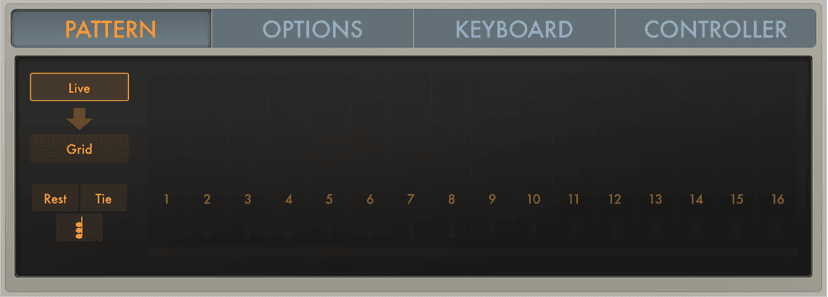
The Pattern parameters are divided into two distinct functional modes: Live and Grid. The modes are mutually exclusive, so turning on one turns off the other. It also provides a unique Live Capture to Grid facility.
When Grid mode is active, it controls the arpeggio velocity, cycle length, step length, rests, ties, and chords. All live input of available grid parameters, such as velocities, is ignored.
When you switch to Live mode, the arpeggio performance is controlled live by your input. For example, the velocities of arpeggiated notes are determined by the way you played them. Any existing grid values are retained but are disabled until you return to Grid mode.
Note: When you capture a live performance, grid values are not retained.
Pattern parameters
- Pattern button: Open the Arpeggiator pattern parameters, where you can edit and adjust pattern settings.
- Live button: Turn on Live mode, where you can add rests, ties, and chords in real time with onscreen buttons or MIDI keyboard keys.
- Arrow button (Live mode only): Capture the currently playing velocities, rests, ties, and chords. Grid mode is automatically turned on and the captured performance can be edited in the grid.
- Grid button: Turn on Grid mode. The grid has 16 steps. Each step controls velocity, length, rest, tie, and chord status.
- Using Arpeggiator Live mode
In Live mode, you can add rests, ties, and chords in real time by clicking the onscreen buttons or by using equivalent MIDI keyboard remote keys.
The grid acts as a display only. Incoming MIDI velocities, rests, ties, and chords are displayed in real time but cannot be edited in the grid. To edit individual arpeggiator steps, click the Grid button to turn on Logic Pro Arpeggiator MIDI plug-in Grid mode.
Note: Rests, ties, and chords are active only when Latch mode is turned on.
Live mode parameters
- Rest button: Insert a rest at the current arpeggiator step position. A position identification number is assigned to the rest, ensuring that its rhythmic position (step number) within the arpeggio is retained, even when different note order presets are chosen.Note: Rests can only be added while building the arpeggio, which means that at least one key must be held if you want to add a rest. Once all keys are released, the Arpeggiator acts in accordance with the rules of the set Latch mode and expects to receive a MIDI note for transposition and so on. In Latch Add mode, this restriction does not apply because it allows you to add MIDI notes, rests, ties, and chords after all keys are released.
- Tie button: Insert a tie at the current arpeggiator step position. A position identification number is assigned to the tie, ensuring that its rhythmic position (step number) within the arpeggio is retained, even when different note order presets are chosen.
- Chord button: Insert a chord at the current arpeggiator step position. When the arpeggiator encounters a chord step, it simultaneously plays all notes, including their unique velocities, currently in memory (latched or held). A position identification number is assigned to the chord, ensuring that its rhythmic position (step number) within the arpeggio is retained, even when different note order presets are chosen.
- Using Arpeggiator Grid mode
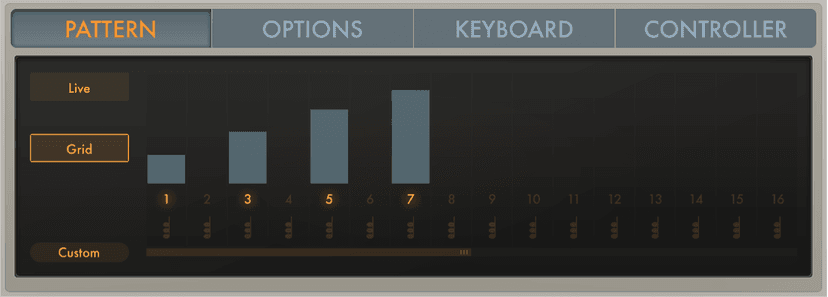
The grid consists of 16 steps. Each step controls the step velocity as well as its length, rest, tie, and chord status. In addition, a cycle length can be set. The current grid pattern is automatically saved with the project or concert. You can also save and load your own or factory grid patterns. The Arpeggiator plug-in assigns incremental position identification numbers to each note in the order they were received, regardless of the initially selected note order preset. These position identification numbers are used to “lock” an event, such as a note, a rest, or a tie to a particular step.
Grid mode parameters
- Step on/off buttons: Turn each of the 16 available steps on or off.
- If a step is turned on: An arpeggiator note is played at the respective grid position.
- If a step is turned off: The grid position is silent and is perceived as a rest.Note: To ensure the integrity of the arpeggio, the note that would have been played—if the step had been active—is moved to the next active grid position.
- Velocity/length bars: Drag vertically to set the velocity for each active step. Drag left to reduce step length. Drag right to increase step length or to create a tie to the next step.
- Where multiple velocity/length bars exist, click above them to draw in the velocity of several steps.
- Drag a velocity/length bar toward the left to reduce the step length. Dragging to the right increases the step length. This enables you to create different arpeggiator grooves. Dragging snaps to fixed positions at 25%, 50%, 75%, or 100% of the step length. Hold down Shift, then drag to set the step length freely. Changes are reflected immediately in the Grid display by a shaded bar that indicates the step length.
- Drag a velocity/length bar toward the right until it overlaps the next step to create a tie to that step. If the step to the right is a rest (an inactive step), this step is automatically turned on to create the tie. A step can be tied to multiple steps in a row. The original velocity values of tied steps are replaced by the velocity of the first step they are tied to, indicated graphically by the velocity bar extending over all tied steps. Changes are reflected immediately in the Grid display by a shaded bar that indicates the tie length.Note: Within an arpeggio, ties are perceived as a rhythmic element rather than a melodic variation. As a consequence, the tied note may change if notes are added after the tie has been entered, or if you choose a different note order preset.
- Chord on/off buttons: Turn on Chord mode for the respective step. When the Arpeggiator encounters a chord step, it simultaneously plays all notes currently in (latched or held) memory on that step. If a chord step is tied to a non-chord step, Chord mode is automatically activated for that step. If a non-chord step is tied to a chord step, Chord mode is automatically turned off for that step. Moving the velocity bar on a chord step changes the overall level of the chord, while retaining relative velocity differences between notes in the chord.
- Cycle length bar: Drag the handle at the end of the bar to change the grid length. The currently playing step is indicated by a light running inside the Cycle length bar.Note: The grid length set with the Cycle length bar is independent of the Arpeggio cycle length parameter (which sets the length of the arpeggiated note pattern) described in the Arpeggiator options parameters section below. The grid length cycles independently of the effective note pattern. This prevents disruptions to the perceived rhythmic pattern created by the grid that can be caused by a change to the arpeggio length.
- Scroll bar: Drag to move to steps that aren’t visible in the Grid display.
- Pattern pop-up menu: Choose a menu item to save or load user grid patterns or to load a factory grid pattern.
- Save Pattern as: Opens a name field. Enter a name, then click the Save button to save your pattern. Click Cancel to exit the “Save Pattern as” name field.User patterns are shown in the Pattern pop-up menu.Note: Factory grid patterns cannot be overwritten. If you attempt to do so, a Save Pattern as name field appears.
- Recall Default: Deletes all current data and reverts to a “from scratch” state.
- Delete User Pattern: Deletes the current user pattern.
- Custom: This menu item is shown automatically when any pattern changes have been made. It can be considered the “current state” pattern preset.
- Previous/Next Pattern button: Choose the previous or next pattern preset.
- Arpeggiator options parameters
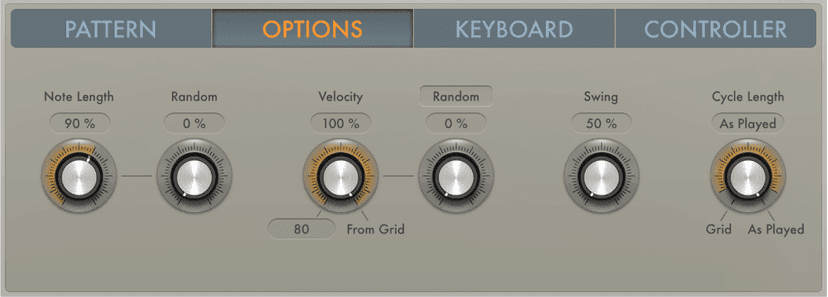
Click the Options button to set global Arpeggiator playback parameters, such as note length and velocity.
Options parameters
- Options button: Set global Arpeggiator playback parameters, such as note length and velocity.
- Note Length knob: Define the length of arpeggiated notes. This ranges from 1 to 150%.Note: This is a global scaling parameter that retains the relative length differences between individual steps that may have been changed in Grid mode.
- Random knob: Set the amount of random note length variation.
- Velocity knob: Determine the maximum range of possible velocity values for arpeggiated notes. At the far right position (100%), the original velocities of recorded or played notes are retained. At the far left position (0%), the original velocities of recorded or played notes are ignored and all notes are output at a constant velocity.
- Vel (Velocity Base) field: Drag vertically to set a minimum velocity value used for random velocity modulations and crescendos.
- Crescendo/Random button: Switch between two modes: Random and Crescendo. The amount of variation is controlled with the Crescendo/Random knob. The range of the crescendo or possible random velocities is set with the Velocity parameters.
- Crescendo/Random knob: Set the strength of the crescendo or random velocity variation for the chosen Crescendo/Random mode.
- When set to Crescendo: The set amount is added to, or subtracted from, the velocity of all notes on each arpeggio repetition, starting with the second cycle.
- When set to Random: The velocity values of all notes are randomized symmetrically by the set amount. At a value of 0% there is no randomization applied. At a value of 100% the velocity values are completely randomized.
- Swing knob and field: Set the strength of note swing. Swing moves every second note closer to the nearest downbeat. A value of 0% results in no note movement, whereas a value of 100% results in extreme note movement.
- Cycle Length knob: Set a length for the arpeggio. You can choose from the following:
- By Grid: Matches the arpeggio length to the host application division setting. This is useful for rhythmically synchronizing the arpeggio length with other regions.
- 1 to 32: Set the arpeggio length to the specified number of notes.
- As played: The arpeggio length is determined by the length of played notes.
- Arpeggiator keyboard parameters
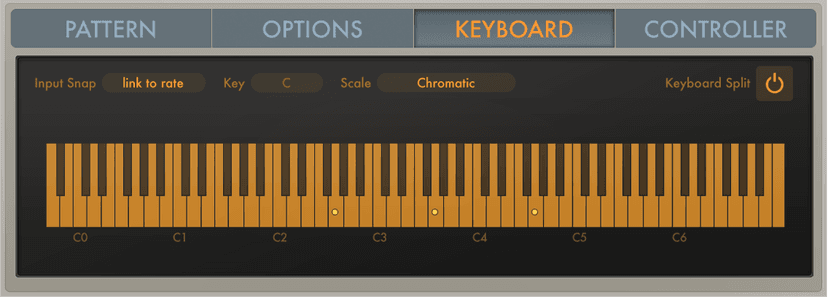
Click the Keyboard button to open the Arpeggiator keyboard parameters. The dots shown on the keyboard represent the output of currently playing notes, including any key and scale adjustments. You can also open the Remote Key editor window from the Keyboard pane.
Keyboard parameters
- Keyboard button: Set Arpeggiator keyboard parameters, such as scale and splits.
- Input Snap pop-up menu: Choose a beat value to snap the first incoming note to a position, thus quantizing the arpeggio start point.The default Input snap pop-up menu value is “link to rate,” which matches the set Arpeggiator Rate. Key pop-up menu: Choose a root key for the chosen scale. C is the default key.
- Scale pop-up menu: Choose a scale. Played keys are snapped to the nearest note in the chosen scale. Choose from: Chromatic (default), Major, Major Pentatonic, Major Blues, Lydian, Mixolydian, Klezmer, Minor Pentatonic, Minor Blues, Japanese, Natural Minor, Harmonic Minor, Melodic Minor, Dorian, Phrygian, Locrian, and South-East Asian.
- Keyboard Split button: Divide your MIDI keyboard range into three zones.
- Remote (Key editor) button: You must first click the Keyboard Split button to make the Remote (Key editor) button visible. Opens the Remote Key editor window, where you can assign a range of MIDI keys to Arpeggiator functions.
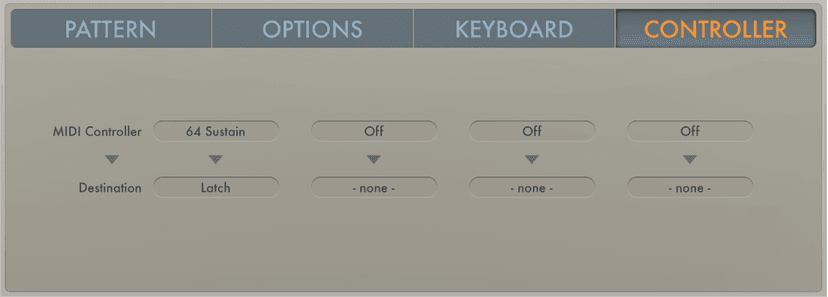
- Assigning Logic Pro Arpeggiator controllers
Controller button: Assign up to four MIDI controllers to Arpeggiator plug-in parameters.
To assign a MIDI controller to an Arpeggiator parameter, you need to choose:
- MIDI Controller pop-up menu: Choose a MIDI controller type.
- Destination pop-up menu: Choose a target parameter: Note Length, Note Length Random, Velocity Range, Velocity Base, and (De-)Crescendo.
- The Arpeggiator plug-in is powerful and unique- use it on synths, pianos, bass and even drum parts to bring some real flavour, character and movement to your parts. It’s one to explore and will keep you busy for some hours!
Logic Pro Chord Trigger MIDI plug-in
The Chord Trigger MIDI plug-in lets you trigger chords by playing a single MIDI key, a Godsend for those of you who aren’t proficient keyboard players!
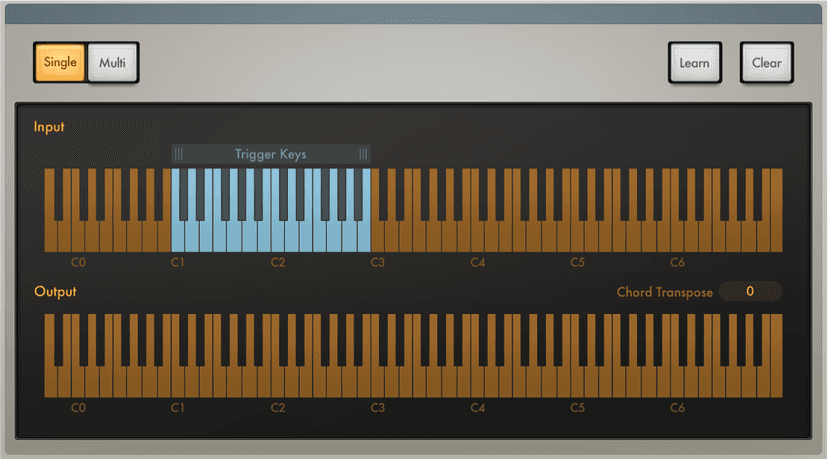
The onscreen keyboards have two functions: the display of incoming and outgoing MIDI notes and the assignment of chords to keys.
Chord Trigger parameters
- Single button: Assign a single chord to a trigger key. Play up and down the keyboard to transpose the memorized chord in relation to the trigger key. This mimics the Chord Memo or Note Stack feature found on many classic synthesizers.
- Multi button: Assign a different chord to each key on the keyboard.
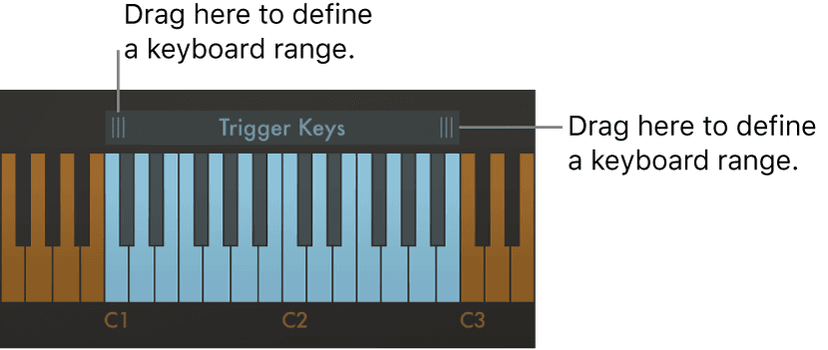
- Upper keyboard: Shows incoming MIDI notes, represented by orange dots, and the blue chord trigger range. Drag the handles above the keyboard to set the chord trigger range. Notes that fall within this range are processed. Notes outside the range are not processed. You can also click notes in the chord trigger range to trigger chords.
- Lower keyboard: Shows the resulting MIDI output—the chords triggered by incoming MIDI notes. The notes of each chord (in the chord trigger range) are displayed as blue dots. Chords outside the chord trigger range are displayed as orange dots.
- Learn button: Turn on Learn mode.
- Clear button: Erase a Trigger Key note and the corresponding chord.
- Chord Octave pop-up menu: Choose an octave transposition value for chord playback.
- Using the Logic Pro Chord Trigger MIDI plug-in
Chord Trigger is straightforward to use: choose a mode (single or multi), set a chord trigger range, select a trigger key, then set up a chord. You can also transpose chords and quickly assign multiple chords—onscreen or with your MIDI keyboard.
Define the chord trigger range
The shaded chord trigger range is shown on the upper keyboard. Incoming MIDI notes that fall within this range are interpreted as trigger keys that play the chord (Single Chord mode) or the chords (Multi Chord mode) assigned to them. Chords can be assigned to keys within the chord trigger range. Incoming MIDI notes that fall outside the defined chord trigger range are passed through Chord Trigger unaffected. This allows you to play a melody with the right hand while triggering/transposing memorized chords with the left, for example.
- Drag the handles of the chord trigger range bar above the upper keyboard to define a keyboard range.
- In Single Chord mode: Playing a MIDI note (or clicking the upper keyboard) within the defined chord trigger range plays and transposes a single memorized chord. The transposition is performed in relation to the trigger key the chord is assigned to. For example, if a chord is assigned to C2, playing a D2 transposes the chord upward by two semitones. Playing a B1 transposes the chord down by a semitone.
- In Multi Chord mode: Playing a MIDI note (or clicking the upper keyboard) within the defined chord trigger range triggers the chord that is memorized for the played key. Keys that do not have a chord assigned to them are silent when played.
- Note: If the chord trigger range is made shorter, memorized chords that fall outside the range become inaccessible but are not deleted. Lengthening the chord trigger range makes assigned chords accessible again.
Transpose chords in the chord trigger range (Multi Chord mode only)
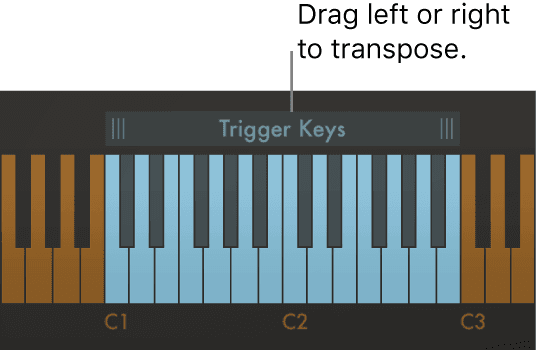
You may want to transpose triggered chords in some circumstances. For example, in Multi Chord mode you can move the entire chord trigger range upward by two semitones to change a chord progression in C-Major (starting with the C trigger key) into a progression that plays in D-Major, starting with the D trigger key.
Drag the center of the chord trigger range left or right. All memorized chords are moved with the chord trigger range and are automatically transposed.
To transpose chords by octaves, choose an octave transposition from the Chord Octave pop-up menu. All memorized chords can be transposed up or down by up to four octaves.
Assigning a chord to a key using the onscreen keyboard
- Click the Learn button.The Learn button label changes to “Trigger Key” and the button begins to blink.
- Click a trigger key—within the chord trigger range—on the upper keyboard.The trigger key is set up for chord assignment. The Learn (Trigger Key) button label changes to “Chord.”
- Click the note or notes you want to assign to the trigger key on the lower keyboard.As you click each note, you hear it and any previously assigned notes in the chord.Click assigned notes a second time to unassign or remove them from the chord.
- To end chord assignment, click the Learn button.
- You can repeat these steps to assign a different chord to each key in the chord trigger range when in Multi Chord mode. In Single Chord mode, only one chord can be learned.
Assigning a chord to a key using a MIDI keyboard
It can be faster to use your MIDI keyboard when assigning chords to trigger keys. The Learn process can be started and stopped by playing an assigned note on your MIDI keyboard.
- Click the disclosure triangle at the lower left to open the extended parameters.
- Choose the MIDI note number you want to use as a remote control for the Learn button from the Learn Remote pop-up menu.Choose Off if you no longer want to use a MIDI note as the Learn button remote control.
- Play the note selected as the Learn button remote control on your MIDI keyboard.The Learn button label changes to “Trigger Key” and the button begins to blink.
- Play a trigger key—within the chord trigger range—on your MIDI keyboard.This enables the trigger key for chord assignment. The Learn (Trigger Key) button label changes to “Chord.”
- Play the note or notes you want to assign to the trigger key on your MIDI keyboard.As you play each note, you hear it and any previously assigned notes in the chord.Play assigned notes a second time to unassign or remove them from the chord.
- Play the note selected as the Learn button remote control on your MIDI keyboard to end chord assignment.
- You can repeat steps 3–6 to assign a different chord to each key in the chord trigger range when in Multi Chord mode. In Single Chord mode, only one chord can be learned.
To clear a chord assignment, click the Clear button.In Single Chord mode: The assigned chord is erased.In Multi Chord mode: The button label changes to “Trigger Key” and begins to blink.Click the trigger key that you want to clear on the upper keyboard.The chord assigned to the trigger key is erased and the trigger key is dimmed, indicating that no chord is assigned.
To clear all chord assignments ( in Multi Chord mode only) press Option, then click the Clear button. All chords on all trigger keys are erased.
- Modulator MIDI plug-in
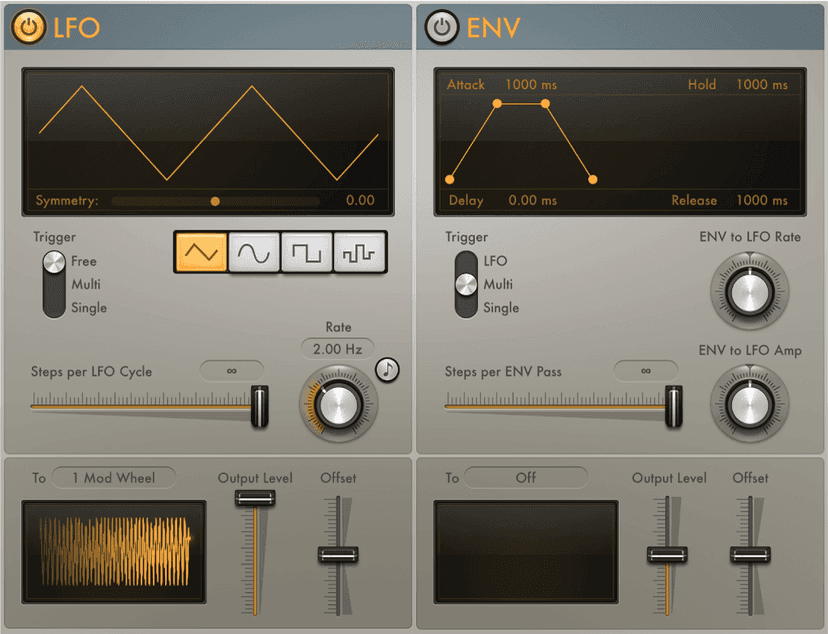
The Modulator MIDI plug-in can generate continuous controller, aftertouch, and pitch bend messages. It consists of one syncable LFO and one Delay/Attack/Hold/Release envelope.
Both the LFO and envelope can be assigned to output any continuous controller, aftertouch, plug-in parameter (in the same channel strip), or pitch bend message. You can also specify a step width for the continuous outputs of the LFO and envelope, resulting in modulations that are reminiscent of classic Sample & Hold circuits.
Modulator LFO parameters
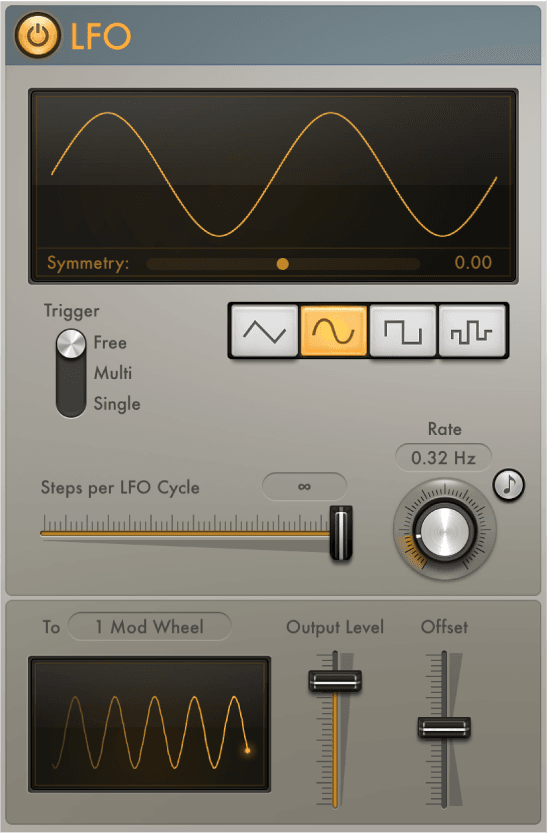
- LFO on/off button: Turn the LFO on or off.
- Waveform Shape buttons: Select a waveform shape. Choose from: triangle, sine, square, and random. Each is suited for different types of modulations.
- Waveform display: Shows the LFO waveform shape.
- Symmetry slider: Adjust the symmetry of the waveform. This deforms the waveform in the following ways:
- Triangle: Shapes the triangle waveform into either an upward-sawtooth or downward-sawtooth waveform. A symmetry value of 0 results in a perfect triangle waveform.
- Sine: Changes the angle of the waveform, resulting in a sawtooth-like waveform with peaks that lean left or right. A symmetry value of 0 results in a perfect sine waveform.
- Square: Symmetry acts as a pulse width control. A symmetry value of 0 results in a perfect square waveform.
- Similarity slider: Adjust the amount of deviation when a random waveform is chosen. This alters the waveform in the following way:
- Random: Similarity determines the maximum deviation between two consecutive random values. Low symmetry settings result in random values that are minimally different from one to the next, whereas high symmetry settings result in random values that deviate significantly.
- Trigger switch: Determine how the LFO reacts to incoming MIDI note on messages.
- Free: The LFO ignores MIDI note on messages.
- Single: After all notes have been released, the LFO is reset by the first MIDI note on message it receives.Note: This means that legato playing does not reset the LFO, so keep this in mind during performances.
- Multi: The LFO is reset by each received MIDI note on message.
- Steps per LFO Cycle (Smoothing) slider and field: Determine the number of steps per LFO cycle.By default, the LFO produces a smoothed continuous stream of controller events, but you can use this parameter to create a stepped controller signal that is similar to the output of a Sample and Hold circuit. When you set a manual step rate, the LFO rate can be changed without altering the number of steps.Note: If the square or random waveform is selected, the Steps per LFO Cycle slider is renamed to Smoothing. The slider smooths the normally steep slopes of the square and random waveforms.
- Rate knob: Set the cycle speed of the LFO in hertz or in beat values when the Sync button is on. The LFO rate can be modulated by the envelope.
- Sync button: Synchronize the LFO rate to the project tempo.
- To pop-up menu: Choose a continuous controller number, aftertouch, or pitch bend as the LFO output target. You can also learn a plug-in parameter.
- Output Level slider: Scale the LFO output level.
- Offset slider: Set a positive or negative offset in order to tailor the output for the intended target.
- Oscilloscope: Displays the shape of the LFO control signal before it is scaled.
- MIDI Channel pop-up menu (extended parameter): Click the disclosure triangle at the lower left. Choose a MIDI output channel.
- You can assign and send MIDI events to plug-ins in the same channel strip, allowing you to control parameters without using MIDI CC messages.
- Choose Learn Plug-in Parameter from the To pop-up menu.
- Click the parameter in the target plug-in.The name of the plug-in and parameter are shown in the To field.
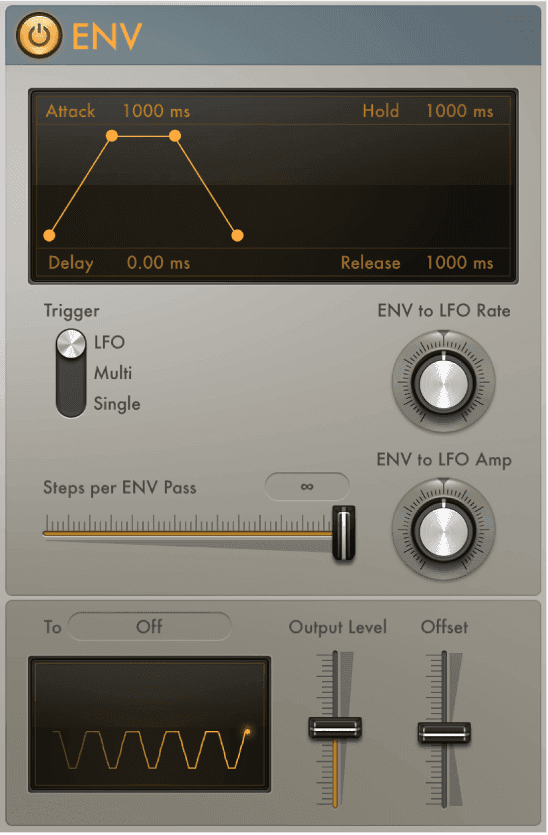
Modulator Envelope parameters
- Envelope on/off button: Turn the envelope on or off.
- Envelope display: Shows the current envelope shape. Drag the handles in the display to set the following parameters:
- Delay: Delay the onset of the envelope. Ranges from 0 to 10 seconds.
- Attack: Set the time required to reach the sustain level. Ranges from 0 to 10 seconds.
- Hold: Set the sustain level and duration. Ranges from 0 to 10 seconds.
- Release: Set the time required for the envelope to fall to a value of zero after the sustain phase of the envelope has finished. Ranges from 0 to 10 seconds.
- Trigger switch: Determine if the envelope is triggered by the LFO or by incoming MIDI note on messages.
- LFO: The envelope is retriggered when the LFO reaches its (positive) peak value.Note: The envelope ignores incoming LFO triggers if it is currently completing an envelope pass.
- Single: After all notes have been released, the envelope is re-triggered by the first MIDI note on message it receives.Note: This means that legato playing does not reset the envelope, so keep this in mind during performances.
- Multi: The envelope is re-triggered by each received MIDI note on message.
- Steps per Env(elope) Pass slider and field: Determine the number of steps per envelope pass. By default, the envelope produces a smoothed continuous stream of controller events, but you can use this parameter to create a stepped controller signal that is similar to the output of a Sample and Hold circuit. When you set a manual step rate, the envelope time can be changed without altering the number of steps.
- Env to LFO Rate knob: Set the maximum amount of LFO modulation (LFO depth). The LFO rate can be modulated by the Attack, Hold, and Release parameters (see above).
- Env to LFO Amp knob: Set the maximum amount of LFO output modulation. This enables you to fade the LFO in or out with the envelope.
- To pop-up menu: Choose a continuous controller number, aftertouch, or pitch bend as the envelope output target. You can also learn a plug-in parameter.
- Output Level slider: Scale the envelope output level.
- Offset slider: Set a positive or negative offset in order to tailor the output for the intended target.
- Oscilloscope: Displays the shape of the envelope control signal before it is scaled.
- MIDI Channel pop-up menu (extended parameter): Click the disclosure triangle at the lower left. Choose a MIDI output channel.
You can assign and send MIDI events to plug-ins in the same channel strip, allowing you to control parameters without using MIDI CC messages.
- Choose Learn Plug-in Parameter from the To pop-up menu.
- Click the parameter in the target plug-in.The name of the plug-in and parameter are shown in the To field.
Transposer MIDI plug-in
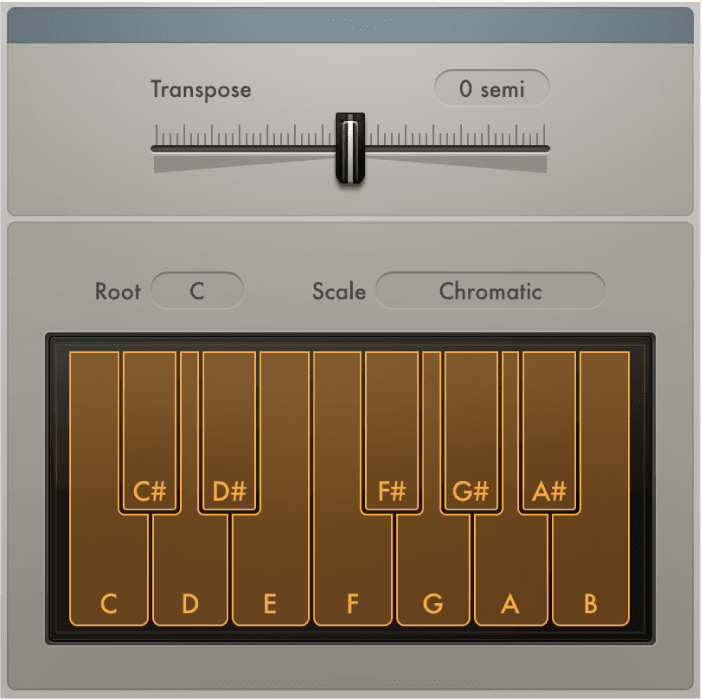
The Transposer MIDI plug-in can transpose incoming MIDI notes in real time and can correct notes to a selected scale. A super handy tool for if you want try the part you are playing in another key and scale- in real time!
Transposer parameters
- Transpose slider: Transpose incoming MIDI Notes by ± 24 semitones.
- Root pop-up menu: Choose the root note for the scale.
- Scale pop-up menu: Choose one of several preset scales or create your own custom scale (User) with the onscreen keyboard.
- Keyboard: Click notes to turn them on or off. Notes that are turned off are excluded from the User scale.
Randomizer MIDI plug-in
The Randomizer plug-in randomizes incoming MIDI events in real time. This one is for when you’re feeling a bit bored and well…random! Try it on pitch with a piano patch loaded for some interesting (random) melodies!
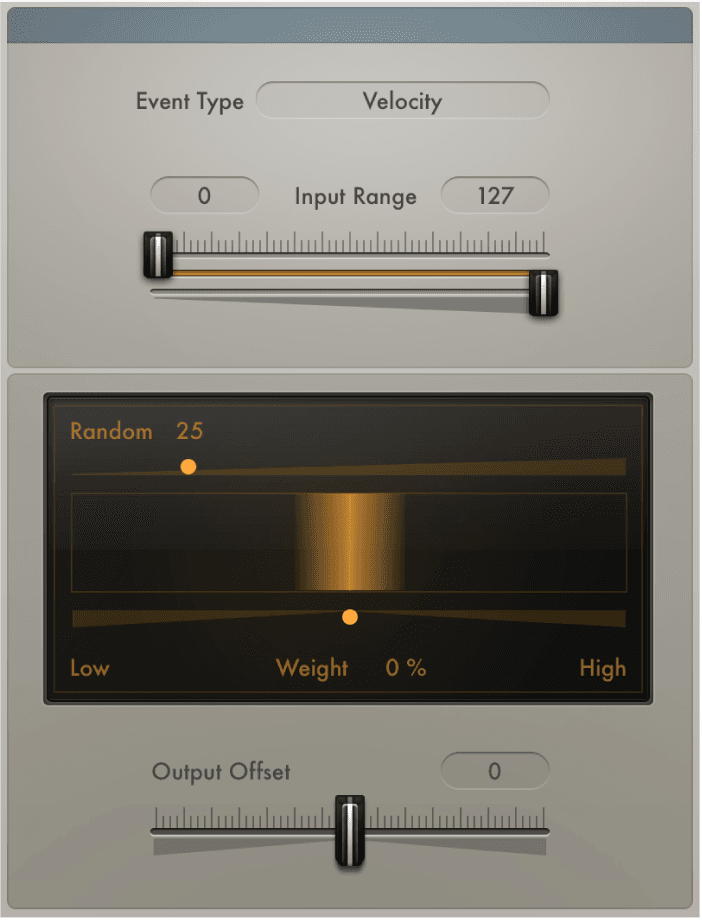
Randomizer parameters
- Event Type pop-up menu: Choose the MIDI event type that you want to randomize.
- Input Range sliders: Set the upper and lower limit for the range of values that are affected. Only parameter values that fall within the range are processed. All values outside the range pass through the plug-in.Note: You can position the lower Input Range slider above the upper Input Range slider and vice versa, which inverts the input range behavior: events that fall within the range are not processed and events outside the range are randomized.
- Amount slider: Set the intensity of randomization. The colored box shows the range of possible output values in comparison with the unprocessed input signal shown in the middle.
- Weight slider: Increase or decrease the likelihood that an event is randomized within the set Amount range. The colored box reflects the weight setting: a darker gradient means less chance, and a brighter color means more chance to produce values in the respective area.
- Drag toward the left (Low) to increase the chance of low values being randomized.
- Drag toward the right (High) to increase the chance of high values being randomized.
- In the centered position, neither low or high values are favored, resulting in the entire range of values being randomly altered.
- Output Offset slider: Offset the (random) MIDI output of the plug-in. Offsets can be negative or positive.
- Seed slider (extended parameter): Specify a starting point (or seed) for randomization.An example is when using the Randomizer plug-in to randomize a piano melody. If you bounce the piano part, your randomized melody is saved as an audio file. If you bounce the song again, with Seed set to Random, the two bounces sound different. If Seed is set to the same specific value for both bounces, they are identical.
Scripter MIDI plug-in
One you’re harldy ever likely to use as beginner and maybe even never, the Scripter plug-in lets you load and use factory or user-created scripts to process or generate MIDI data in real time. You don’t need any programming knowledge to use the plug-ins created in this environment, but you can view and modify them with the built-in script editor. Once authored and stored as a setting or patch or as part of a concert or project file, you can use the plug-in just like any other. A number of pre-built Scripter processors are included.
If you are an advanced user, you can create your own custom MIDI plug-ins.
Important: The version of JavaScript used by the Scripter plug-in is determined by the JavaScriptCore framework version installed on your system. To ensure the greatest level of compatibility, install the latest software updates.
The Scripter plug-in has one global parameter. Further parameters, defined by the JavaScript script that is currently running, are shown below the global parameter.
Do this now
- Put an Arpeggiator on a pad and hold one chord.
- Change the pattern, rate and octave range while it runs.
- Add a Chord Trigger in front of it so one key plays the whole chord.
MIDI FX write parts for you. The trick is printing the result and editing it by hand afterwards.