More about the Main Window
More about the Main Window
Logic Pro X has the area we looked at previously, Control Bar & Display, at the top- and under that we have the Track Header Area (which we'll explore more later) and the Workspace. The bit in between these is sometimes referred to as the Ruler Area, though as you'll see, that's not strictly the right thing to call it, so I've resorted to calling it the bit between the top and bottom.

We'll take a closer look at some of the things you can expect to encounter in this area:
The Ruler Area:
The (true) Ruler Area is the one which displays the bars, beats and divisions on the grid in a timeline/ruler fashion. Some people also like to see the time in this area too, and you can actually make that happen, by clicking on the "View" button to the left of the ruler area and choosing "Secondary Ruler" for your ruler to show you a timeline in hours, minutes and seconds- which is commonly known as SMPTE, a standard used between audio and visual industries.
Above the ruler area is the true in between area, which holds quite a few important buttons, menus and sliders. Let's take a look at this area from left to right.
Display Level Button:

Over on the far left, we have a simple button which is mostly greyed out, but if you have the right type of info, it lets you move up the display hierarchy. Let's say you've packed a folder (something you'll learn to do) and you want to go to the top level of that folder instead of viewing it's contents- you would use this button to get you back there in the Workspace.
Edit, Functions and View Menus:
These are pretty handy little menus to have to save yo from having to look around other parts of Logic.
The Edit menu actually mimics the Edit dropdown at the top of Logic in the computer control bar. The Function menu tends to relate more to functions specific to Regions, both Audio and MIDI. Some function examples would be the ability to rename all regions to track names, to strip silence audio and to transform a MIDI region to half speed.
The View menu allows you to do some basic things that are related to information you can choose to see on the screen- it's not very exciting.
Live Loops Grid and Tracks Area:
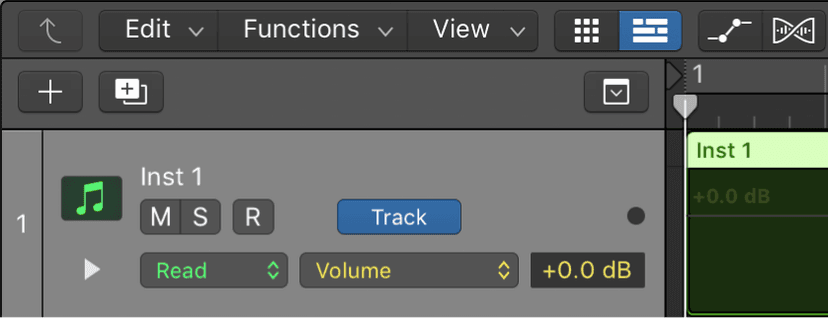
The two buttons shown below, from left to right, are the Live Loops Grid button and Tracks Area button. When these are blue, they're toggled on and you can see the relevant area, and when they are grey they're off and the area is hidden.


Automation (Shortcut: A)
Automation allows you to control and edit chosen parameters of a given track, like volume for instance, and this button allows you to see the automation curves (or lines) that you have created!
Before you can add automation points to a track’s automation curves, you need to show the automation curves. Automation curves are displayed as colored curves and points on top of audio and MIDI regions across the track, running the length of the project. You can choose whether to view and edit automation across the track (track-based automation) or only within the track’s regions (region-based automation).
After you show the automation curves, you can choose which parameter you want to work with—Volume, Pan, or any other track parameter. You can work with multiple parameters on the same track by switching between automation curves using the Automation Parameter pop-up menu, or you can work in separate subtracks, which appear below the main track.
Flex mode (Shortcut Cmd + F)
This button puts you in to Flex mode.
'Flex' refers to Logic's powerful Flew Time or Flex Pitch functions.
Flex Time—similar to what is often referred to as elastic audio in other applications—simplifies the process of editing the timing of notes, beats, and other events in audio regions.
Flex Pitch allows you to quantize and edit the pitch of audio material.
Catch Playhead:
This button controls how the main window updates to reflect changes to the playhead position using Catch modes. When you work in Catch mode (i.e. the button is on), the visible section of a window follows the playhead during playback or recording. If the Catch button is inactive, the display does not update, even when the playhead moves past the right edge of the visible portion of the window. Make sure it's on if you want to see where you are as your song is playing along.
Zoom Buttons:
In order to navigate your windows in your project, you'll want to zoom in and out often to help you work with your regions and data. These buttons and sliders help you to do that- and we'll look at zooming in a little more detail later- but for now, here are the buttons and sliders on the main page:

Waveform Zoom- Allows you to display your audio region waveforms larger, or smaller. You can also use Cmd + +/- to do this!
Vertical Auto Zoom- Fills the available Vertical space with all your Tracks
Horizontal Auto Zoom- Fills the available Horizontal space with all your Tracks
Vertical Zoom Slider- Dragging left increases the number of visible tracks, while dragging right increases the track height.
Horizontal Zoom Slider- Drag the horizontal zoom slider left or right. Dragging left shows more of the Tracks area, while dragging right zooms in for a more detailed view.
Tools:

Logic Pro includes a set of tools that you can select and use for various tasks. When you select a tool, the pointer changes to show the selected tool. Some tools are common to all working areas, while other tools are specific to one or more particular working areas (including the Piano Roll, Audio Track, Audio File, Score, and Step Editors).
When you choose a tool from the Tools menu, the pointer changes to show the chosen tool.
In general, you use a tool by clicking a region, note, or other item in that working area. If multiple regions are selected when you use a tool, the edits apply to all the selected regions (for example, the Scissors tool cuts all selected regions at the same time position).
Where tools are available, there are two Tools menus: a Left-click and a Command-click Tools menu. You can assign separate tools to the Left-click and Command-click Tool menus. This is very helpful if you need to quickly switch between a couple of tools, say when you are editing Audio or MIDI information. You can also assign the right mouse button if your mouse supports one.
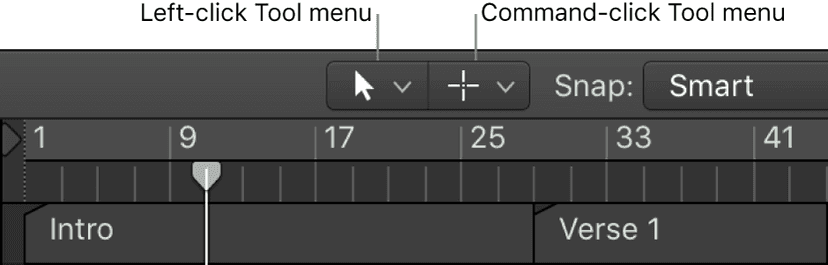
Opens Tool Menu:
Select the Left/Right Cursor Tool or simply press T in the Tracks area. When the Tool menu is open, you can also use the key shown next to a tool to select it.
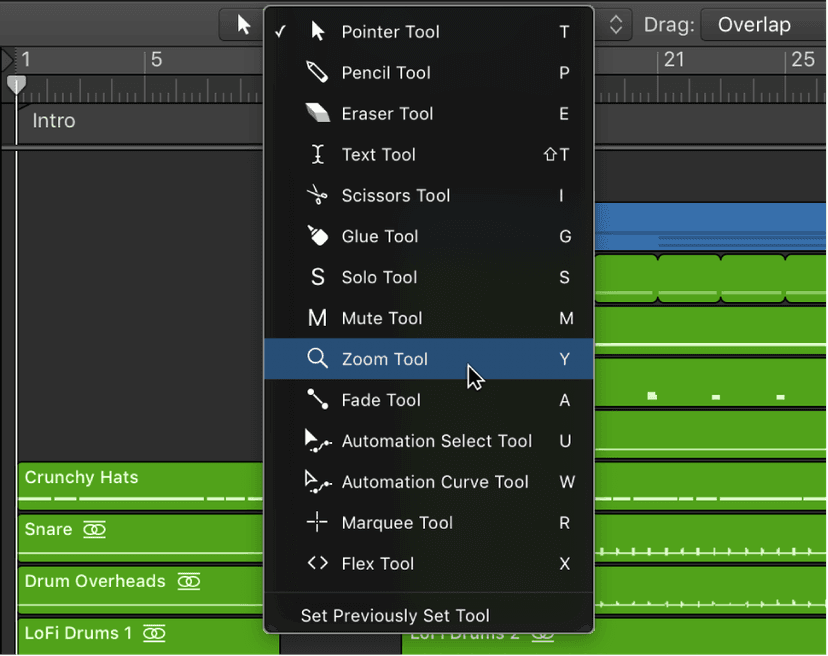
Here are the 'Common Tools' which are available in the Tracks area and in most other working areas.
Pointer tool
The Pointer is the default tool when you open Logic Pro. You can use the Pointer tool to:
- Select events, regions, or other items by clicking them. You can select multiple items by holding down Shift and dragging around the items.
- Move items (by grabbing and dragging).
- Copy items (by Option-dragging).
- Change the length of items (by grabbing the bottom-right or bottom-left corner and dragging).
- Loop regions (by grabbing the upper-right corner and dragging).
The pointer also takes the shape of this tool when outside the working area, when making a menu selection, or entering a value.
Pencil tool
Use the Pencil tool to add new regions or events. You can also select, drag, loop, and alter the length of regions or events using the Pencil tool. In the Score Editor, you can use the Pencil tool to add dynamic markings, accents, and other symbols to notes.
Eraser tool
Use the Eraser tool to delete selected regions or events. When you click a region or event with the Eraser tool, all of the currently selected regions or events are deleted (similar to pressing the Delete key). The Eraser tool can also delete an unselected region or event by clicking it.
Text tool
Use the Text tool to rename regions and other items, or add text to a score in the Score Editor.
Scissors tool
Use the Scissors tool to split regions and events, allowing individual sections to be copied, moved, or deleted.
Glue tool
Use the Glue tool to join selected regions or events into a single region or event.
Solo tool
Click and hold a region with the Solo tool to listen to the selected region or event apart from the rest of the project. Moving the mouse horizontally also scrubs any events the pointer touches.
Mute tool
Click an event or region with the Mute tool to silence it. You can unmute the region or event by clicking it a second time with the Mute tool. If multiple regions or events are selected, the mute state of the clicked region or event applies to all selected regions or events.
Zoom tool
Use the Zoom tool to zoom in by dragging over regions or other material, or over an empty part of the Tracks area. To revert to the normal zoom level, click the window background with the Zoom tool, or click while holding Control-Option.
You can also access the Zoom function by pressing and holding Control-Option, regardless of which tool is active. When the pointer is over an empty part of the Tracks area, Piano Roll Editor, Score Editor, or Step Editor, you can access the Zoom function by pressing and holding Option.
Fade tool
Use the Fade tool to create and edit fades, or to change the shape of fade curves.
Automation Select tool
Use the Automation Select tool to select automation data and create automation points at region borders.
Automation Curve tool
Use to Automation Curve tool to bend or reshape the curve between two automation points, creating a nonlinear transition between the points.
Marquee tool
Use the crosshair-shaped Marquee tool to select and edit parts of regions. In the Tracks area, you can select part of a region or regions with the Marquee tool and split the region (instead of using the Scissors tool) and delete parts of regions (instead of using the Erase tool).
Flex tool
Use the Flex tool for quick access to fundamental Flex editing functionality, without having to turn on Flex view in the Tracks area.
Tools for specific working areas
Tools specific to a particular editor or other working area are covered in the respective chapters for that working area.
- The Finger tool is available in the Piano Roll Editor and the Step Editor.
- The Quantize and Velocity tools are available in the Piano Roll Editor and the Score Editor.
- The Brush tool is available in the Piano Roll Editor.
- The Vibrato and Volume tools are available in the Audio Track Editor.
- The Move tool is available in the Audio File Editor.
- The Camera, Layout, Resize, and Voice Separation tools are available in the Score Editor.
- The Line tool is available in the Step Editor.
- The MIDI Thru tool is available in the MIDI Environment.
Snap & Drag Modes:

Snapping items to the Grid
The Tracks area includes a grid that helps you align regions, automation points, and other items with the time divisions in the ruler. When you perform any of the following actions, the items move according to the current Snap value:
- Moving and resizing regions
- Moving the playhead
- Adjusting the cycle region
- Dragging loops to the Tracks area
- Moving automation points in automation curves
Using the Snap pop-up menu, you can set the Snap value and perform other functions.
By default, the Snap function is relative. When you move or edit an item, it retains the same relative distance from its original grid position. For example, if a region is placed at position 1.2.1.16, and you move the region two beats forward (with the Snap value set to Bar), the region snaps to position 2.2.1.16, not 2.1.1.1 (or 2.2.1.1). You can move items so that they align with the nearest grid value by choosing Snap to Absolute Value from the Snap pop-up menu.
You can show the grid in the Tracks area, to help you visualize the positions of items in the Tracks area relative to the Snap value.
To set the Snap value for the Tracks area choose a value from the Snap pop-up menu in the Tracks area menu bar:
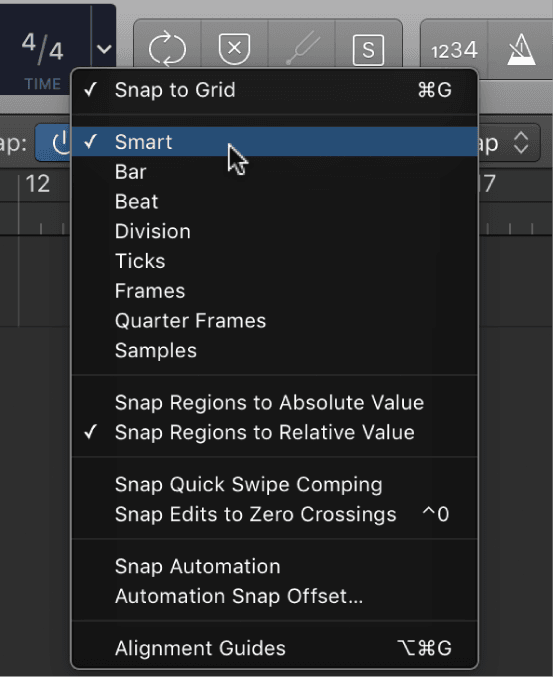
- Smart: Edit operations snap to the nearest bar, beat, sub-beat, and so on, depending on the current ruler division value and the zoom level.
- Bar: Edit operations snap to the nearest bar.
- Beat: Edit operations snap to the nearest beat in a bar.
- Division: Edit operations snap to the nearest division value. (This is the time signature shown in the LCD and the ruler.)
- Ticks: Edit operations snap to the nearest clock tick (1/3840 of a beat).
- Frames: Edit operations snap to the nearest SMPTE frame.
- Quarter Frames: Edit operations snap to the nearest SMPTE quarter frame.
- Samples: Edit operations snap to the nearest sample.
- Off: To turn off Snap To Grid, do one of the following:
- Click the On/Off button on the left side of the Snap pop-up menu.
- Choose the “Snap to Grid” menu item when it is checked.
Note: You can make sample-accurate edits only at a high zoom level. Use the Zoom slider to zoom in, and take advantage of the Save and Recall Zoom Setting key commands to speed up your workflow.
You can show and hide the grid in the Tracks area by choosing View > Grid Lines from the Tracks area menu bar.
In order to Snap to an absolute position choose Snap > Snap Regions to Absolute Value from the Tracks area menu bar. A checkmark appears to the left of this option when it’s active.
This feature works in conjunction with the chosen snap grid division. For example, if the Snap value is set to Bar, and Snap Regions to Absolute Value is active, moving a region (from position 1.2.1.16) two bars forward results in the region being snapped to position 2.2.1.1 rather than its relative position (2.2.1.16).
To return the Snap function to relative values, choose Snap > Snap Regions to Relative Value from the Tracks area menu bar.
Override Snapping
If you want to temporarily override the snap function- you can do in one of the following ways:
- Select the region (or other item), then press and hold Control while dragging the item in the Tracks area:
- The division value you choose in the control bar (1/16, for example) determines the editing grid scale at lower zoom levels (wider view).
- At higher zoom levels, (close-up view), the editing grid scales by a certain factor relative to the division value.
- Select the region (or other item), then press and hold Control and Shift while dragging the item in the Tracks area:
- The editing grid switches to ticks if editing at lower zoom levels (wider view).
- At higher zoom levels (close-up view), the editing grid switches to samples.
When the Tracks area is zoomed out so that the current Snap value would result in extremely large movements or edits, the Snap pop-up menu is temporarily dimmed, and Smart snap is used instead.
When the Tracks area is zoomed in very far, and a smaller Snap value (such as Division or Frames) is chosen, normal mouse movements move items by larger grid units. To use the chosen Snap value, either zoom out or press and hold Control while moving items.
Using Control-Shift breaks the 1:1 relationship between the pointer and region (or Edit tool) movements. This means that you may need to move the pointer a long way (horizontally) to make the region (or Edit tool) move one pixel. Watch the help tag for an exact numerical indication.
Using Drag modes
By using drag modes, you can control the results of moving, resizing, or deleting regions in the Tracks area and how they interact with each other.
To set the drag mode for the Tracks area choose one of the following modes from the Drag pop-up menu in the Tracks area menu bar:
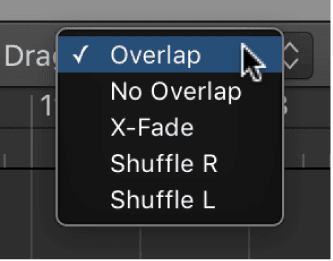
- Overlap: Preserves the current region borders when you drag one region over another.
- No Overlap: When two regions overlap, the overlapped area of the left (earlier) region is shortened.
- X-Fade: When two audio regions overlap, the overlapped area is crossfaded.
- Shuffle R: Aligns regions when you move, resize, or delete them, in the following ways:
- Move: Moving a region to the right aligns the end point of the region with the start point of the region that follows, so there is no space (gap) between them.
- Resize: When you resize the left edge of a region, the preceding regions move by the change in length. If this causes preceding regions to move past the start of the project, the resized region then overlaps the preceding ones by the corresponding amount.
- Delete: The remaining regions on the track move by the length of the deleted region.
- Shuffle L: Aligns regions when you move, resize, or delete them, in the following ways:
- Move: Moving a region to the left aligns the start point of the region with the end point of the preceding region, so there is no space (gap) between them.
- Resize: When you resize the right edge of a region, the regions that follow move by the change in length.
- Delete: The remaining regions on the track move by the length of the deleted region.
For both Shuffle R and Shuffle L, when you drag one region over another, the regions switch positions.
Notes: When it comes to Audio regions, only one audio region at a time can be played on each track. When two audio regions on the same track overlap, only the later (right) region is heard.
Track Header Area
Each track has a track header that shows the track name and icon, as well as a number of track controls including Mute, Solo, and Record Enable buttons. Audio tracks also feature an Input Monitoring button. The track headers are located along the left side of the Tracks area, so you can easily see the mute, solo, and other settings for all tracks while working.
Some track header controls, including volume, pan, mute, and solo controls, correspond to channel strip controls on the track’s channel strip in the Mixer—changing one (for instance, dragging the Volume slider in a track header) produces a corresponding change in the other (in this case, the Volume fader on the track’s channel strip).
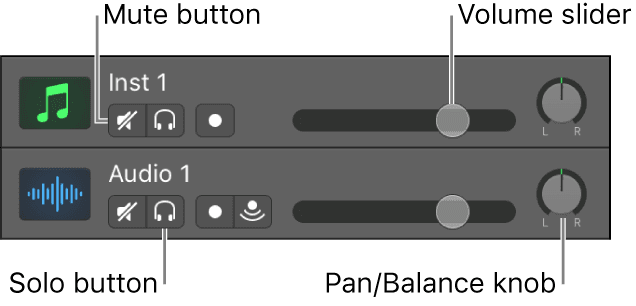
You can change track buttons on multiple tracks, say if you want to mute multiple tracks at once. Click and hold a button on a track header (i.e Mute) , then drag the pointer up or down over additional tracks. The corresponding buttons on all the swiped tracks switch to the same state.
Track Names
When you choose a patch for a track, the track takes the name of the patch. You can rename a track at any time.
- Double-click the name in the track header, then enter a new name for the track.
- Control-click the track header, choose Rename Track from the shortcut menu, then enter a new name for the track.
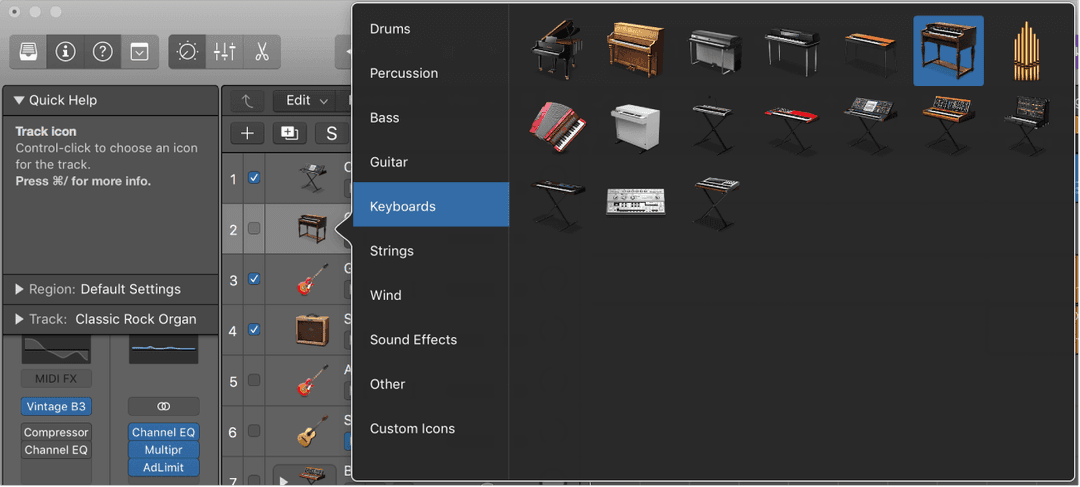
Track Icons
By default, tracks use the same icon as the patch chosen for the track. You can change a track’s icon at any time.
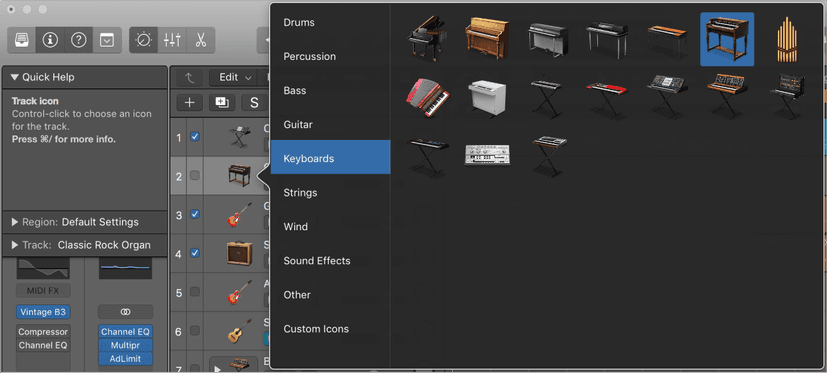
- Control-click the icon in the track header, then choose a new icon from the shortcut menu.
- Select the track, click the track icon in the Track inspector, then choose a new icon from the Icon pop-up menu.
- Select the track, choose Track > Assign Track Icon, then choose a new icon from the Icon pop-up menu.
If you want to make your track icons a little more 'you', you're able to add a custom icon at any time. Control-click the icon in the track header, then choose Custom Icons from the shortcut menu. Click the Add button (+). Browse to the location of the image file and select the file. Click Open.
Track Colors
By default, track colors reflect the track type. You can change the color of specific tracks, to use color to help visually organize the Tracks area and identify tracks in a large arrangement. Track colors are visible when you configure track header components to show the track color bars.
Changing the color of a track also changes the color of the corresponding channel strip in the Mixer.
To change track colors:

- Select the track, choose Track > Assign Track Color, then select a color from the Color palette.
- Control-click the track header, choose Assign Track Color from the shortcut menu, then select a color from the Color palette. (The shortcut for the color palette is Option+C)
Reordering and sorting Tracks
You can reorder tracks in the Tracks area. Changing the order of tracks doesn’t affect the sound of a project, but lets you organize tracks visually to keep instruments in a particular order, or keep related tracks together. For example, you can keep all drum tracks together, or keep all tracks that double the same melody together.
Simply press and hold an empty part of the track header, then drag the track up or down.
To sort tracks based on type, choose Track > Sort Tracks By, then choose an item from the submenu:
- MIDI Channel
- Audio Channel
- Output Channel
- Instrument Name
- Track Name
- Used or Unused
Track header components
You can customize the track header by showing or hiding different track header controls, to optimize your workflow. You can also resize the track headers to give yourself more room to work in the Tracks area.
Control-click the track header. Choose Track Header Components from the shortcut menu, then select or deselect items from the submenu. Selected items are indicated with a checkmark.
Configure track header components by bringing up the Track Header Configuration popover by doing one of the following:
- Choose Track > Configure Track Header.
- Control-click any track header, then choose Configure Track Header from the shortcut menu. Modify the track header elements in the Track Header Configuration popover.
You'll be presented with the folloing options:
- Buttons section: Select the checkboxes of the buttons you want to display in the track header.
- Controls section: Select checkboxes to display volume and pan controls. From the pop-up menu, choose whether the Pan knob controls the pan/balance setting, or the level of one of the available sends.
- Additional Name Column pop-up menu: Choose which if any items are displayed in the additional name column.
- Other View Options section: Select the checkboxes of the buttons you want to display in the track header.
- Control Surface Bars checkbox: When selected, control surface bars appear, indicating which tracks are accessed by control surfaces connected to your system. Each control surface can be assigned a different color in the Device inspector.
- Track Numbers checkbox: Select to display track numbers on the left side of the track headers. Tracks are numbered automatically in ascending order. During playback, each track number is replaced with a small level meter showing the output level (for audio tracks) or velocity value (for software instrument tracks).
- Color Bars checkbox: Select to show a color bar on the left edge of each track header.
- Groove Track checkbox: When selected, the groove indicator appears on the left edge of each track header.
- Track Icons checkbox: Select to show track icons in the track header.
- Track Alternatives checkbox: Select to show the Track Alternatives menu in the track header. To close the popover, click outside its borders.
Turning tracks on/off
When no other track is assigned to the same channel strip, turning off a track also saves processing power, because plug-ins on the channel strip are no longer processed. Turning a track off (or turning it back on) takes slightly longer than muting or unmuting the track, due to internal pre-processing. Unlike muting a track, turning off a track can not be automated.
You can also control dynamic loading of plug-ins on a track using the On/Off button. When you open a project, plug-ins on tracks that are turned off aren’t loaded, even if the tracks contain regions. While working on the project, plug-ins aren’t loaded on a track that is turned off when the track is focused, or when regions are added to the track. When the track is turned on, plug-ins are loaded if the track becomes focused. You can also make the plug-ins on a track inactive using the On/Off button.
If the On/Off button is not visible, you can show it by configuring the track header components.
In order to make only the plug-ins inactive on a track hold down Option and click the On/Off button in the track header.
When a Software Instrument track is turned off, all MIDI regions on the track are silenced, but live input (playing) is still audible.
Protecting Tracks
You can protect a track to prevent accidental changes. While a track is protected, you can’t record on the track, edit regions on the track, or create new regions on the track. If you want to edit the track, you can unprotect it, make the changes, and then protect the track again.
If the Protect button is not visible, you can show it by configuring track header components. The lock turns green to indicate that the track is protected. To unprotect the track, click the Protect button again.
If you Command-click the Protect button in any track header, you can protect all the tracks at once. The locks turn green to indicate that all tracks are protected. To change the state of multiple tracks, click and hold the Protect button of one track, then drag the pointer up or down. The Protect buttons of all swiped tracks switch to the same state. To unprotect all tracks, Command-click the Protect button on any track header.
If you try to make changes to a protected track, a dialog tells you that the track is locked.
Freezing Tracks
Freezing a track reduces its processor usage to that of a high-resolution audio track with no effects plug-ins, regardless of the number or complexity of the plug-ins actually used on the track. Freezing is particularly useful for software instrument tracks and for audio tracks that use complex effects.
When you freeze a track, the track is bounced to an audio file. The freeze file includes the output of any plug-ins on the track and any track automation. While the track is frozen, the freeze file plays back in place of the original track, which is temporarily deactivated (including any plug-ins). Channel strip controls (such as track mute and solo) are available, but no track content can be edited (including region mute and solo, for example).
While a track is frozen, it cannot be edited. If you want to edit the track, you can unfreeze it, make the changes, and then freeze the track again.
Freeze is designed to circumvent very CPU-intensive processes, such as software instruments with a complex voice architecture, and complex plug-ins (such as reverbs, filter banks, or FFT-based effects). If your computer can calculate all active processes in real time, freezing tracks is unnecessary. Freezing tracks is recommended when tracks with CPU-intensive software instrument or effects plug-ins are in a finalized state, or require no further changes.
By freezing tracks, you can use extra effects plug-ins or software instruments in additional audio or software iinstrument tracks, which would normally be impossible as it would exceed the CPU- processing limits of your computer.
If the Freeze button is not visible, you can show it or configure track header components.
Click the Freeze button in the track header. The lock turns blue to indicate that the track is ready to freeze.
If you try to make changes to a frozen track, a dialog tells you that the track is frozen.
Hide tracks
Hiding tracks is useful when you’re working on projects using a large number of tracks, for example. Hiding a track has no effect on playback, only the appearance of the Tracks area.
You can hide and unhide tracks using the menu commands in the Track menu (Hide Track, Unhide All Tracks, and Show Hidden Tracks), or using key commands. The first time you hide a track, you use the key command, after which the Hide button appears above the track headers.
The following menu functions and key commands also affect the Hide Tracks feature:
- Even when the toolbar Hide button is deactivated, you can still hide an individual track with the Track > Hide Track and Select Next Track command (or press Control-H).
- The Track > Unhide All Tracks command (or the corresponding key command) resets the Hide buttons of each track, making them all visible.
Note: You can also link the Hide functions of all tracks belonging to a group by selecting Hide in the Group Settings window. Keep in mind that there is no Unhide Selected Track key command because there is no way that you can select a hidden track.
Do this now
- Open a project with a few tracks in it.
- Switch the ruler between bars and time, and set the LCD to show both.
- Toggle A for automation and Cmd+F for Flex, then turn both off again.
- Zoom in and out with Cmd+Left/Right and change track height with Cmd+Up/Down until it is muscle memory.
Every one of these is a keystroke you will make thousands of times. Learning them now is the highest-value ten minutes in the course.