Making Beats In Step Sequencer
Making Beats In Step Sequencer
The Step Sequencer in Logic is inspired by classic hardware step sequencers that have rows of configurable switches or knobs used to generate repeating musical patterns. In Step Sequencer, you create patterns by editing multifunctional steps in the step grid. Each row controls either a sound (which can be a drum kit piece, a note on an instrument, or a range of notes) or an automation parameter (letting you create automation changes over time in the pattern). Each step represents a definable length of musical time–by default, steps are of equal length, but you can change the length for individual rows or steps. You can adjust a wide range of parameters for individual steps, including velocity, pitch, gate time, and more; and edit pattern and row settings including pattern length, row loop start and end points, playback position, and rotation.
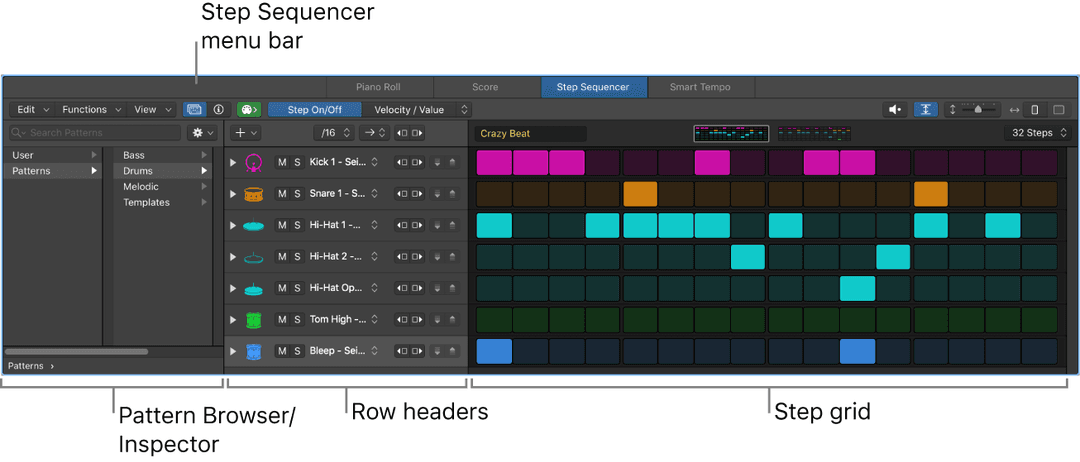
Step Sequencer appears in the Editors working area below the Tracks area. The Step Sequencer interface includes the following:
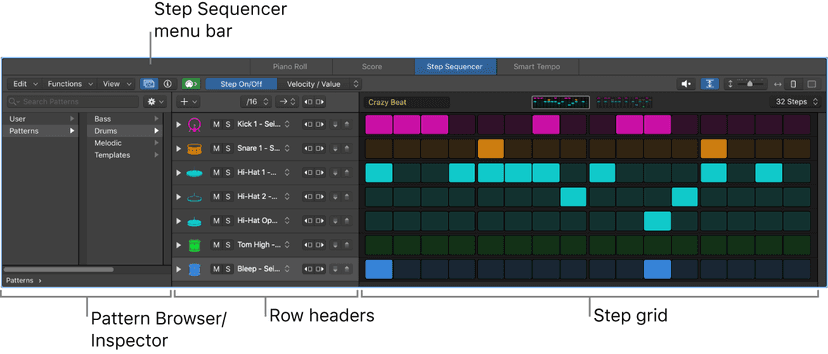
- Step grid: The main working area where you turn steps on and off, and graphically edit step settings using edit modes.
- Step Sequencer menu bar: Contains menus with various editing and view functions, buttons to show the Pattern Browser and the Step Sequencer inspector, a MIDI Out button, an Edit Mode selector, a Preview button, and Zoom controls.
- Pattern Browser: Access preset patterns and templates to use in your projects, and save custom patterns and templates.
- Step Sequencer inspector: Contains tabbed sets of controls providing a central location to view and edit pattern, row, and step settings.
- Row headers: Each header contains a row icon, a disclosure triangle to show subrows, and a set of controls for the row, including Mute and Solo buttons, a Row Assignment pop-up menu, Rotate buttons, and Increment/Decrement Value buttons.
Pattern regions and pattern cells
Step Sequencer patterns are contained in pattern regions (in the Tracks area) and pattern cells (in the Live Loops grid). Pattern regions and cells are used primarily on MIDI-based (software instrument, external instrument, and Drummer) tracks. Pattern regions (but not pattern cells) can also be used on audio tracks to automate effect and channel strip parameters. A project can contain any number of pattern regions or cells.
Each pattern region or cell functions as an independent step sequencer, with its own configuration and settings. You can copy and move pattern regions like other regions in the Tracks area, while pattern cells can be copied, moved, triggered, and queued like other Live Loops cells. You can modify pattern region and cell parameters in the Region inspector or Cell inspector, respectively.
All pattern, row, and step settings, as well as Step Sequencer view settings, are stored with the pattern. You can also save a pattern as a template, which contains all the current settings for the pattern, except for the step values, so you can use it as a starting point for creating new patterns.
Patterns can include two types of rows:
- Note rows: Generate MIDI note events (for each active step). By default, all notes in a note row have the same pitch, but you can change the pitch for individual steps using the Note and Octave edit modes.
- Automation rows: Generate stepped automation events for an automatable parameter. You can assign an automation row to any automatable parameter, including MIDI continuous controller (CC) parameters, channel strip controls, plug-in parameters, and Smart Controls.
Each row can have its own length, step rate, playback mode, start offset, and other settings. Patterns can be from 12 to 64 steps in length, allowing for different time signatures and multiple bar patterns.
(You can add rows to a pattern manually or using Learn mode. When Learn mode is active, rows are added when you play notes for which no row exists, or when you manipulate an automation parameter for which no row exists.)
Edit modes
Using edit modes, you can control different attributes of the note or event triggered by a step. Some edit modes apply to only one row type, while others are common to both types. For note rows, you can change the velocity, pitch, gate time, number of note repetitions in a step, and other attributes. For automation rows, you can change the value of the automated parameter. Edit modes common to both row types include skipping and tying steps, changing the loop start and end point, and changing the step rate.

You select the edit mode for all rows in the pattern using the Edit Mode selector in the Step Sequencer menu bar. You can also view and edit multiple edit modes per row using subrows. Rows always match the edit mode selected in the Edit Mode selector, while you can choose any unused edit mode for a subrow. You can add and delete subrows as needed.
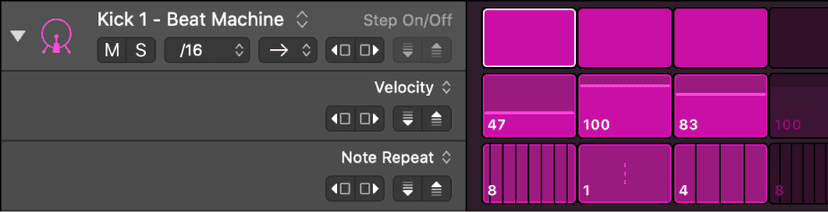
Step Sequencer is especially suited to creating drum patterns using Drum Machine Designer patches. When you create a new pattern region on a track with a Drum Machine Designer patch, note rows show names and icons matching the kit pieces in the patch, and the Row Assignment pop-up menu shows the kit piece names rather than MIDI note names.
Pattern creation basics:
Using Step Sequencer, you can create rhythm-based drum patterns and note-based instrument patterns using any available software instrument. You can start with an empty pattern, or use an existing pattern or template as a starting point.
You create a pattern by turning steps on and off, modifying the sound and duration of steps using edit modes, and editing aspects of the overall pattern, including the pattern length, the step rate for the pattern, and the pattern key. You can increase the number of notes or drum sounds in a pattern by adding rows and choosing the row assignment. By activating Learn mode, you can quickly add rows by playing notes or manipulating automation parameters.
To create an empty pattern region in the Tracks area, Control-click in an empty software track, then choose Create Pattern Region from the shortcut menu.
To create an empty pattern cell in the Live Loops grid:
- Select an empty software instrument cell, click the Step Sequencer tab in the Editors area, then click a step in the step grid.
- Control-click an empty software instrument cell in the Live Loops grid, then choose Create Pattern Cell from the shortcut menu.Note: When you select a MIDI region or MIDI cell, the editor that appears in the Editors area is the editor last used for a MIDI region or MIDI cell. After you work with a pattern region or cell, the next time you click in a new cell, the Step Sequencer editor is available in the Editors area, so you can start editing steps without first creating an empty pattern cell.
To turn steps on or off with the Edit Mode selector set to Step On/Off, click an inactive step in the grid to turn it on. Click an active step to turn it off.
You can preview a pattern (with the project stopped), by clicking the Preview button in the Step Sequencer menu bar.Click the Preview button again to stop the pattern playing.
You can add a row, and choose the pitch (for note rows) or automation parameter (for automation rows) directly from the Add Row pop-up menu.
In the Step Sequencer menu bar, choose one of the following from the Add Row pop-up menu :
- To add a note row: Choose Notes, then do one of the following:
- Choose a fixed pitch or a drum sound for the row from the Notes submenu.
- Choose Melodic if you plan to add a note row that uses different pitches.When you add a Melodic row, Note and Octave subrows are created for the row by default.
- To add an automation row: Choose Automation, then choose the automation parameter for the row from one of the submenus.
- To activate Learn mode: Choose Learn, then follow the steps described later.
After adding a row, you can turn steps on or off, and edit other settings using edit mode.
You can add rows by playing MIDI notes or manipulating automatable parameters using Learn mode. When Learn mode is active, Step Sequencer creates a new note row for any played MIDI note for which a row does not already exist. Similarly, it creates a new automation row for any received parameter controller event for which a row does not exist. Learn mode simplifies the process of creating a step grid with the notes, drum sounds, and automation parameters you want to use in your pattern.
- To activate Learn mode, do one of the following:
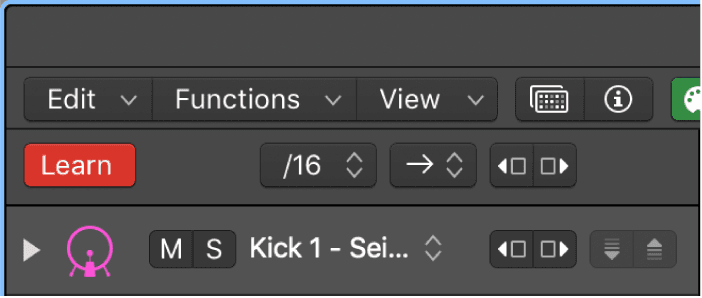
- Choose Learn Mode from the Functions pop-up menu in the Step Sequencer menu bar.
- Choose Learn from the Add Row pop-up menu .While Learn mode is active, a red Learn button appears in place of the Add Row pop-up menu.
- Do either of the following:
- To add note rows: Play notes on a connected MIDI keyboard or other MIDI controller.
- To add automation rows: Manipulate a control for an automatable parameter, either in Logic Pro or using a connected MIDI controller.
- To turn off Learn mode, click the Learn button, or choose Learn Mode in the Functions pop-up menu again.
After adding a row, you can turn steps on or off, and edit other settings using edit modes.
Changing Pattern Lengths:
Several factors determine the musical length of a Step Sequencer pattern (the time in bars and beats before the pattern repeats). The most fundamental are the pattern length, which defines the maximum number in steps available to each row, and the pattern step rate, which defines the length of each step in musical divisions (note values).
Another important factor affecting the musical length of a pattern is the Loop Start/End edit mode. Using Loop Start/End, you can set the number of steps for each row independently from the pattern length, and the length of other rows. Technically, the musical length of a pattern is the length of the longest row. For example, if all rows in a pattern loop after four steps, and each step has a step rate of 1/16th, then the musical length is only one beat (1/4), even if the pattern length is 16 steps or longer.
When row lengths are evenly divisible with one another, the overall length is equal to the longest row. For example, if you shorten several rows in a 16-step pattern to four or eight steps (which both divide evenly into 16), the pattern remains a one-bar pattern. When row lengths are not evenly divisible, however, the musical length is increased (sometimes substantially) because the pattern doesn’t repeat until all rows start at the same time again.
Using the Skip edit mode can also result in the length of rows changing, which affects the overall musical length of the pattern in a similar manner to changing the Loop Start/End setting.
The playback mode can also affect the musical length of the pattern. Choosing Ping-Pong as the playback mode doubles the pattern length, while setting any row to Random playback mode can result in the musical length of the pattern being essentially infinite.
Ultimately, how long a pattern plays in a project depends on the length of the pattern region or pattern cell. If the musical length of the pattern exceeds the region or cell length, it plays only until the end of the region or cell is reached. When the region or cell length exceeds the pattern length, the pattern repeats until the end of the region or cell, or restarts if the region or cell is looping. If the musical length of the pattern, or of any row, does not fit equally into the region length (or cell length), then the rows in the pattern restart before they complete a full cycle.
To change the pattern length, choose a new length from the Pattern Length pop-up menu in the Step Sequencer menu bar.
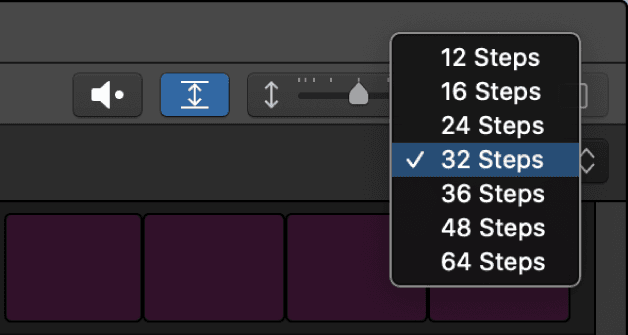
When you increase the pattern length, the added steps duplicate the existing pattern. You can edit the added steps to add variation or change the pattern.
When the pattern length is more than 16 beats, the entire pattern may not be visible in the step grid, depending on the zoom level. In this case, the pattern is divided into sections called pages, each showing a part of the complete pattern. An overview of each page appears above the step grid. You can click the page overviews to quickly switch between different parts of the pattern.
You can also change the pattern length in the Step Sequencer inspector.
The step rate sets the duration of steps in the step grid as a note value. You can set the step rate for the overall pattern, and set a different step rate for individual rows and steps.
To change the step rate choose a new step rate from the Step Rate pop-up menu in the Step Sequencer menu bar.
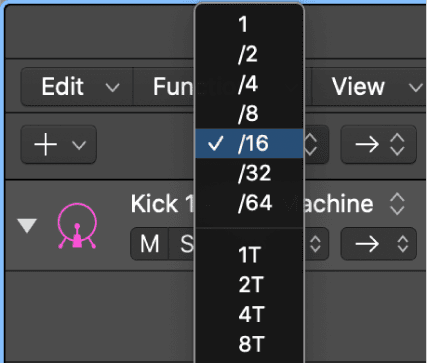
You can also change the step rate for the pattern in the Step Sequencer inspector.
Step Sequencer edit modes
You can control different aspects of the event triggered by a step using edit modes. You can choose the edit mode for a pattern, and view multiple edit modes for each row using subrows. Some edit modes are common to both note rows and automation rows, while others are specific to one row type.
The Edit Mode selector in the Step Sequencer menu bar controls the edit mode for all rows in the pattern. Step On/Off mode is always available on the left-side button on the selector. You can choose other edit modes from the menu on the right side of the selector. The chosen edit mode appears on the right-side button. Edit modes include the following:
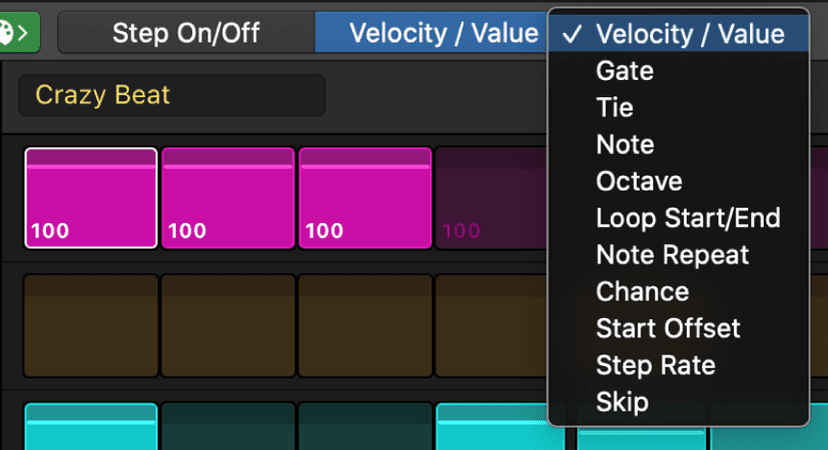
Edit modes for both row types:
- Step On/Off: Click steps to turn them on or off. Active steps appear highlighted in the step grid, while inactive steps appear darker.
- Tie: Click the right edge of a step to tie it to the following step, or click the left edge to tie it to the previous step. The duration of the step is lengthened by the value of the step it is tied to.
- Loop Start/End: When this mode is active, a frame appears around the row. Drag the left edge of the frame to set the start of the row relative to the overall pattern. Drag the right edge of the frame to set the end of the row relative to the overall pattern. You can also click a step to set the start or end point (whichever is closest) to that step, and drag vertically to other rows to set their start or end positions.
- Chance: Drag vertically in the step to set the Chance percentage. Chance controls the probability that the step plays each time the pattern repeats. The active state of the step is determined when you edit the Chance value and does not change until you edit it again.
- Start Offset: Drag vertically in the step to move the start offset of the step from –50 to +50 percent of the step rate.
- Step Rate: Drag vertically in the step to set the length of the step (in note values, relative to the project tempo). This determines how long it takes for the playhead to move across the step, whether or not it is active.
- Skip: Click a step to turn skipping on or off. When skipping is on, the step is skipped and playback moves immediately to the next step, in effect shortening the row by the duration of the skipped step.
Edit modes for note rows only:
- Velocity: Drag vertically in the step to set the Velocity value from 1 to 127. Velocity typically controls the loudness of the note attack, but can control other parameters depending on the parameter mapped to Velocity for the patch.
- Gate: Drag vertically in the step to set the Gate value as a percentage of the step. The Gate value shortens the note length to less than the duration of the step.
- Note: Drag vertically in the step to set the Note value from –12 to 12 semitones, transposing the pitch of the step in notes.When you change the pitch of a step in a fixed-pitch note row, the row header label changes to Melodic to indicate that the row contains multiple pitches.
- Octave: Drag vertically in the step to set the Octave value from –2 to 8 octaves, transposing the pitch of the step in octaves.
- Note Repeat: Drag vertically in the step to set the Note Repeat value from 1 to 16. Note Repeat controls how often the note repeats during the duration of the step.
Edit modes for automation rows:
- Value: Drag vertically to set the value for the automation parameter controlled by the row. The value range depends on which parameter the row is set to control
Note: In the Edit Mode selector, choosing Velocity / Value sets the edit mode to velocity for note rows, and to the automation value for automation rows. In row headers, Velocity appears in the Edit Mode pop-up menu for note rows only.
You can view and edit multiple edit modes for a row using subrows. When you click the disclosure triangle in the row header, a default set of subrows appear, each with its own edit mode. When you add a subrow, it defaults to the next available edit mode for that row type. Two subrows of a row cannot have the same edit mode.
Choosing the edit mode for a pattern:
The Edit Mode selector consists of three parts: Step On/Off can always be selected directly using the left-side button. The right-side button shows the edit mode currently selected in the Edit Mode pop-up menu, which is accessed using the arrows on the right side of the selector.
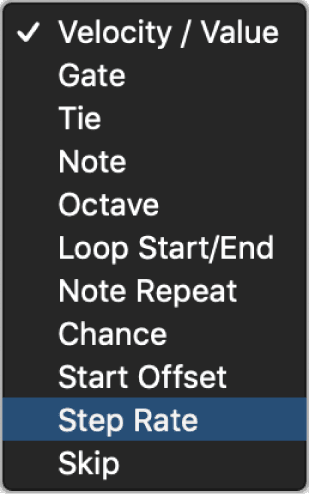
- To choose Step On/Off, click the button on the left side of the Edit Mode selector.
- To choose a different edit mode, click the up and down arrows on the right side of the selector and choose the edit mode from the list.
When you choose an edit mode from the list, it becomes active for all rows. Subrows keep their current edit mode.
Changing the edit mode values for steps in the grid:
In the menu bar, choose an edit mode from the Edit Mode selector. By default, each step shows the current value for the selected mode. You can change the display of step values in the step grid. In the step grid, edit the value of each step. For most edit modes (except Tie and Skip), you edit the value by dragging vertically in the step. The value appears above the step as you drag. Some edit modes have only on and off states, rather than a range of values. In this case, clicking the step switches between the two states. For Loop Start/End, clicking a step sets the loop start or loop end position (whichever is closer) to that step.
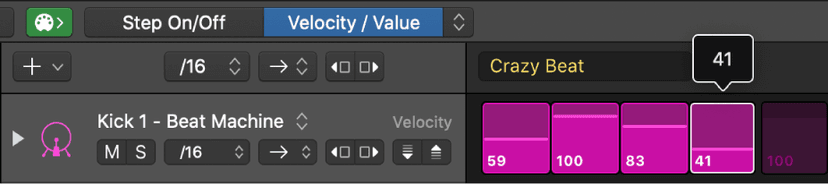
You can view and edit multiple edit modes for a row at the same time using subrows by clicking the disclosure triangle on the left of the row header.
By default, several subrows appear below the row, depending on the row type. You can Add subrows and change the edit mode for a subrow.
Change the edit mode for a subrow by choosing a new edit mode from the Edit Mode pop-up menu, located in the upper-right area of the subrow header.
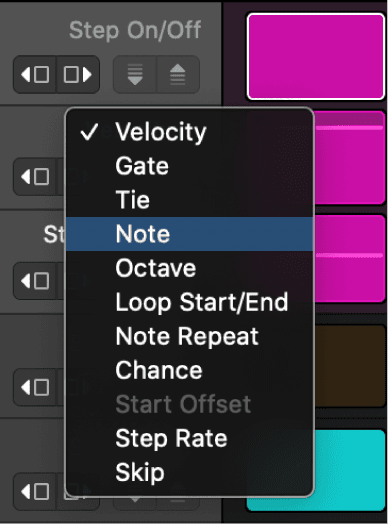
Adding a subrow
Whenever you add a subrow, it defaults to the next available edit mode for that row type. Two subrows of one row cannot have the same edit mode. You can add a subrow by:
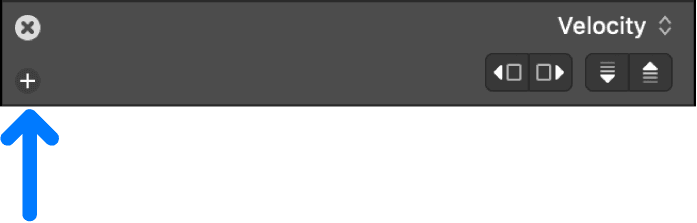
- Hold the pointer over the left edge of a subrow header, then click the Add Subrow icon that appears.A subrow appears below the subrow, set to the next available edit mode for the row.
- Click the Edit Mode pop-up menu and choose an edit mode for the subrow.The steps in the subrow show the values for the selected edit mode.
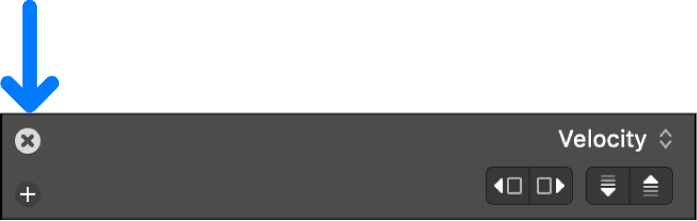
To delete a subrow, hold the pointer over the left edge of the subrow header, then click the Delete Subrow icon that appears.
Pattern creation examples
The following examples provide steps to follow as well as general guidelines for working with different types of patterns:
Drum pattern example:
For drum and percussion (rhythm-based) patterns, edit modes such as Velocity and Note Repeat can be effective for creating interesting-sounding patterns. You can also create interesting variations by copying the pattern and changing the pattern length of the copy.
- Choose an Electronic Drum Kit patch that uses Drum Machine Designer from the Library.
- Create an empty pattern region in the Tracks area, or an empty pattern cell in the Live Loops grid.
- Turn on some steps in the pattern to create a basic beat. It’s often good to begin with a simple kick pattern to set the foundation, followed by a few snare hits and a hi-hat pattern.
- Click the Preview button in the Step Sequencer menu bar to hear the pattern as you work.
- Choose Velocity / Value from the Edit Mode selector and adjust the velocity of steps.
- Choose Note Repeat from the Edit Mode selector and add note repetition to some steps. This can work especially well with closed hi-hats or other sounds with a quick decay.
- Click the Preview button again to stop the pattern playing.
- Choose a different pattern length from the Pattern Length pop-up menu.
- With either the Tracks area or the Live Loops grid in focus, press Command-R (or choose Edit > Repeat > Once) to create a copy of the region (or cell) to the right of the original one.
- With the new region or cell selected, choose the 1/8 step rate from the Pattern Step Rate pop-up menu above the row headers, and listen to the difference in how the pattern sounds at the new step rate.
Instrumental pattern example:
Edit modes such as Velocity, Note, Octave, and Tie can be useful for creating interesting instrument and melodic patterns.
- Choose a synthesizer patch featuring a relatively fast note attack from the Library (The Analog Poly Synth, Luminous Tines, or Short Pulse Waves patches in the Synthesizer > Classic subdirectory of the Library are suitable examples).
- Create an empty pattern region in the Tracks area, or an empty pattern cell in the Live Loops grid.
- Click the Preview button in the Step Sequencer menu bar to hear the pattern as you work.
- Turn on some steps in the pattern to create the basic feel.
- Choose Velocity / Value from the Edit Mode selector and adjust the velocity of steps.
- While still in Velocity / Value edit mode, hold down the Command key while clicking steps to turn them on or off. You can use this key command while in any edit mode other than Step On/Off.
- Choose Tie from the Edit Mode selector and tie some steps to lengthen some notes.
- Click the disclosure triangle on the left edge of a row header to show subrows for that row.
- In the Gate subrow, choose Note from the Edit Mode pop-up menu to change the edit mode for the subrow.
- Drag vertically in some steps to change their pitch. The new pitch appears above the step as you edit it.Note: When you change the pitch of individual steps in a row, the row is labeled Melodic to indicate that the steps in that row no longer trigger the same pitch.
Adding automation example:
Using Learn mode to quickly add automation rows by manipulating Smart Controls and other parameters simplifies the process of adding automation to a pattern.
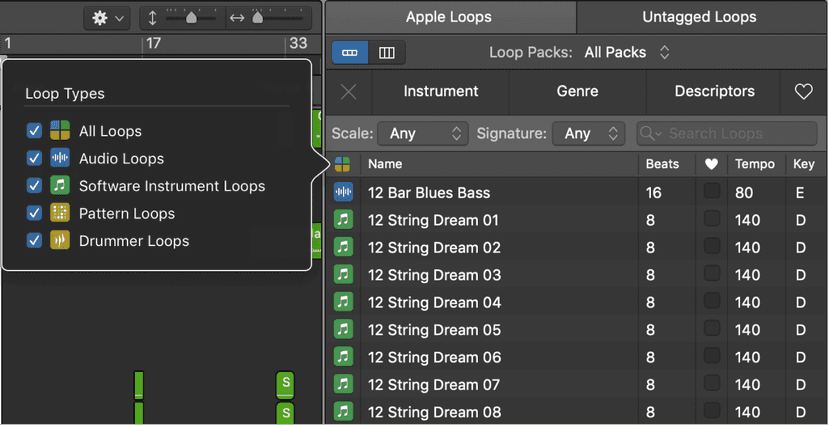
- Open the Loop Browser, choose Abstract Harps Pattern 01 (as an example), and drag it to a new software instrument track or Live Loops cell.
- Click the Preview button in the Step Sequencer menu bar and listen to the pattern.
- Choose Window > Open Smart Controls from the Logic Pro control bar.
- Click the Add Row pop-up menu located above the row headers, and choose Learn to activate Learn mode.
- (Manipulate the Timbre screen controls in the Smart Controls window and see a row created for that parameter in Step Sequencer.
- Choose Velocity / Value in the Edit Mode selector.
- Change the value for a few steps in the new row for the Timbre parameter in the pattern.Notice how the parameter jumps from one value to the next.
- Open the Step Sequencer inspector and click the Row tab to show the Row inspector.Choose Slide from the Automation Mode pop-up menu.Notice that automation parameters now move smoothly between values.
Loading and saving patterns
Step Sequencer includes a Pattern Browser where you can choose and save patterns and templates. The Pattern Browser contains a variety of premade patterns for drums, bass, keys, and other instrument categories that you can use in your projects. The Pattern Browser also features templates, which include pattern, row, and step settings but with an empty step grid, that you can use as as a starting point for creating patterns.
Patterns can also be contained in pattern loops. A pattern loop contains the patch for the pattern’s sound as well as the pattern, row, and step settings, and step values. The Loop Browser includes a collection of pattern loops you can use in your projects. You add pattern loops to the Tracks area or the Live Loops grid in the same way as other loops.
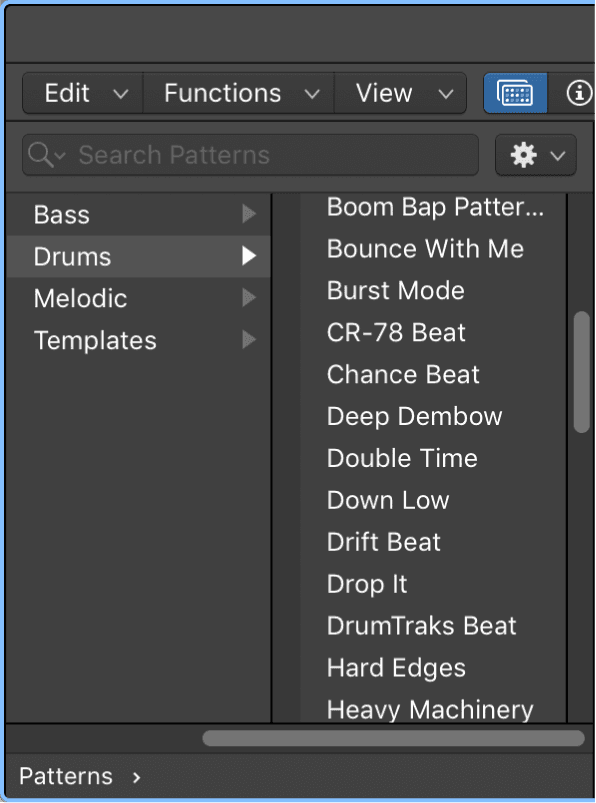
Choose a pattern from the Pattern Browser by clicking the Pattern Browser button in the Step Sequencer menu bar. The Pattern Browser opens to the left of the step grid. Choose a pattern.
You can search for any existing patterns by name in the search field. You can also transpose a pattern to the project key signature.
To save a pattern to the Pattern Browser, choose Save Pattern from the Action pop-up menu in the Pattern Browser. You're also able to save a pattern as a template, by choosing Save Template from the same Action pop-up menu.
You can also create folders for patterns and templates in Logic. With the pattern open in the Step Sequencer, click User in the Pattern Browser, then click either Pattern or Template . Choose 'New Folder' from the Action pop-up menu in the Pattern Browser. A new untitled folder appears, selected and ready to name. You can also delete user created folders here if you need to.
Adding a pattern loop from the Loop Browser
Much like Apple Loops, you have pre-made step sequencer loops available to you via the Loop Browser (shortcut: O). In the Loop Browser, click the Loop Types button and select Pattern Loops from the pop- up menu, to make sure you can see the correct loop type. Drag a pattern loop to a software instrument track (or external instrument track) or to the empty area below the bottom track. You can also drag a Drummer pattern loop to a Drummer track, but if the track uses a different drummer, the pattern may sound different.
Modifying Step Sequencer pattern playback
Some options in Step Sequencer control how and when steps play back, and can be fun to manipulate while the pattern is playing. For example, you can mute and solo rows, rotate rows (moving all steps in a row left or right, including their step values and other edit mode settings), and change the playback mode for the pattern or for a row, and perform other actions while the pattern is playing. In addition to controls and menu items, Step Sequencer includes a collection of key commands to facilitate making these and other changes in real time, allowing you to play around with different patterns for different sections on the fly, with ease.
To mute a row, click the Mute button in the row header. Click the Mute button again to unmute the row.
To solo a row, click the Solo button in the row header. Click the Solo button again to unsolo the row.
Rotating Rows
When you rotate a row, all steps in the row, including their edit mode values, are shifted either left (counterclockwise) or right (clockwise). When you rotate a subrow, the edit mode value for that subrow is shifted left or right.
- To rotate the row left (counterclockwise): Click the Rotate Left button in the row header.
- To rotate the row right (clockwise): Click the Rotate Right button in the row header.
Rotating steps in the pattern
- To rotate steps left (counterclockwise): Click the Rotate Left button .
- To rotate steps right (clockwise): Click the Rotate Right button .
Rotate edit mode values for steps a row
When you use the Rotate controls in a subrow, you can rotate edit mode values for the subrow independently of the step values (on or off). You can use this technique to, for example, keep the same rhythm while changing the pitches being played.
- Click the disclosure triangle to show subrows for a row.
- If necessary, change the edit mode for a subrow to show the one you want to rotate.
- Click the Rotate Left button or the Rotate Right button in the subrow to rotate edit mode values.
Changing the playback mode for the pattern
By default, steps in a pattern sound from left to right, similar to how the playhead moves from left to right in the Tracks area. You can change the playback mode for the overall pattern, and choose a different playback mode for individual rows.
- Choose a playback mode from the Playback Mode pop-up menu in the Step Sequencer menu bar.The choices are:
- Forward: Steps play from left to right.
- Backward: Steps play from right to left.
- Ping-Pong: Playback alternates between left to right and right to left.
- Random: Steps play in an undetermined order.
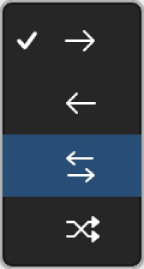
- You can also change the playback mode for the pattern in the Step Sequencer inspector.
Changing the playback mode for a row
- Choose a playback mode from the Playback Mode pop-up menu in the row header.The choices are:
- Forward: Steps play from left to right.
- Backward: Steps play from right to left.
- Ping-Pong: Playback alternates between left to right and right to left.
- Random: Steps play in an undetermined order.
- You can also change the playback mode for a row in the Step Sequencer inspector.
Editing Step Sequencer steps
You can edit individual steps in several ways, including cutting, copying, and pasting steps. You can also repeat a step, decrement or increment the values of all steps in a row, transpose all steps in a pattern by semitones or octaves, randomize values for all steps in a row or all steps in the pattern, and reset steps to default values.
Pattern regions can be edited only in the Step Sequencer, not in the other MIDI editors. You can convert a pattern region to a MIDI region, which can be edited in the Tracks area and in the Piano Roll Editor.
To cut a step, do one of the following to select the step:
- In any edit mode except for Loop Start/End, Shift-click the step, then choose Edit > Cut (or press Command-X).
- Control-click the step, then choose Cut from the shortcut menu.
When you cut a step, the step value and edit mode settings are cut, but the empty step remains in the step grid. The order of following steps does not change.
You can copy a step, including all of its step settings. When you paste a copied step, the destination row should be of the same row type (note or automation) as the source row. All step settings are copied, with one exception: If the step rate was not edited for that individual step (that is, if it still uses the pattern or row step rate), the pasted step inherits the step rate of the step that it replaces.
- In any edit mode except for Loop Start/End, Shift-click the step, then choose Edit > Copy (or press Command-C). Control-click the step, then choose Copy from the shortcut menu.
- Shift-click the destination step, then choose Edit > Paste (or press Command-V). Control-click the destination step, then choose Paste from the shortcut menu.
To repeat a step, do one of the following:
- Shift-click the step to select it, then choose Edit > Repeat Step from the Step Sequencer menu bar.
- Control-click the step, then choose Repeat from the shortcut menu.
To raise or lower the values of all steps in a row:
- To lower the value of all steps in a row: Click the Decrement Value button in the row header.
- To raise the value of all steps in a row: Click the Increment Value button in the row header.
You can also continuously change the value for all steps in a row by clicking either button and dragging vertically.
To transpose all steps in a pattern, choose one of the following from the Functions menu in the Step Sequencer menu bar:
- To transpose the pattern up one semitone: Choose Transpose +1 Semitone.
- To transpose the pattern down one semitone: Choose Transpose –1 Semitone.
- To transpose the pattern up one octave: Choose Transpose +1 Octave.
- To transpose the pattern down one octave: Choose Transpose –1 Octave.
You can also randomize the values for a specific edit mode, either for a single row or for all rows.
- To randomize settings for a row: Select the row, then choose Functions > Randomize Row Values from the Step Sequencer local Edit menu.
- To randomize settings for all applicable rows: Choose Functions > Randomize All Row Values from the Step Sequencer local Edit menu.
Reset row values to default settings
When you create a pattern, many Step Sequencer settings, including all edit modes and the playback mode, have a default value. After you change the value for a step, it no longer retains the default value. You can clear steps, which resets all their edit mode values to default values (for the step rate, the default is defined by the row step rate). You can clear a single step, all steps in a row, or all steps in the pattern. You can also clear the values for a specific edit mode in a single row or for steps in all rows.
- To clear edit mode values for a step: Shift-click the step to select it, then choose Functions > Clear Step from the Step Sequencer menu bar.
- To clear edit mode values for all steps in a row: Select the row, then choose Functions > Clear Row from the Step Sequencer menu bar. Alternatively, you can Control-click the row, then choose Clear Row from the shortcut menu.
- To clear all steps in the pattern: Choose Functions > Clear Pattern from the Step Sequencer menu bar.
Edit Step Sequencer rows
You can edit Step Sequencer rows in a variety of ways, including copying and pasting rows or row settings, duplicating a row with the next row assignment, changing the row assignment, resetting row values to a default setting, and deleting a row.
Copy and paste rows:
- Click the row icon to select the row, then choose Edit > Copy Row from the Step Sequencer menu bar.
- Select a row that you want to replace with the pasted row.
- Choose Edit > Paste Row from the Step Sequencer menu bar.
When the copied and pasted rows are both fixed note rows, the Note and Octave values are ignored. You can copy and paste a row to duplicate the rhythm of the copied row to a row with a different drum sound or pitch. When you copy from a Melodic note row, however, the Note and Octave values are maintained.
Copy a row to a new row:
- Click the row icon to select the row, then choose Edit > Copy Row from the Step Sequencer menu bar.
- Choose Edit > Paste to New Row.
This can be particularly useful when you want to copy a row from one pattern to another.
Copy and paste row settings:
Click the row icon to select the source row, then choose Edit > Copy Row from the Step Sequencer menu bar.Select the destination row (in the same or another pattern region) and choose Edit > Paste Row Settings from the Step Sequencer menu bar.
Duplicate a row with the next available row assignment:
- Click the row icon to select a row, then choose Edit > Duplicate Row with Next Assignment from the Step Sequencer menu bar.
The row, including row settings and active steps, is duplicated using the next available row assignment.
Change the row assignment:
You can change the row assignment for a row, including changing the row type.
- Click and hold the Row Assignment menu in the row header, then do one of the following:
- For a note row: Choose Notes, then choose a different note value from the submenu, or else choose Melodic (if you plan to assign different pitches to different steps).Note: When a pattern using a Drum Machine Designer patch is selected, the Row Assignment pop-up menu shows the kit piece names rather than MIDI note names. For patches using Ultrabeat or a Sampler instrument set to show note labels, choose Labeled Notes to display notes with their descriptive label.
- For an automation row: Choose Automation, then choose an automation parameter from one of the submenus.
You can also change the row assignment in the Step Sequencer inspector.
Delete a row:
- Select the row, then choose Edit > Delete Row from the Step Sequencer menu bar.
Edit Step Sequencer pattern, row, and step settings in the Inspector
You can edit a variety of settings for patterns, rows, and individual steps in the Step Sequencer inspector. When you open the Step Sequencer inspector, you see tabs along the top for Pattern, Row, and Step inspectors. Clicking a tab displays settings for that level.
Some controls in the Step Sequencer inspector are also available in other parts of Step Sequencer (for example, some pattern settings are available in the Step Sequencer menu bar, and many row settings are available in the row headers). By viewing and editing them in the inspector, you can more easily compare values, and copy and paste values between settings.
Open the Step Sequencer inspector:
- Click the Inspector button to show the Step Sequencer inspector (or choose View > Show Local Inspector).
Edit pattern settings:
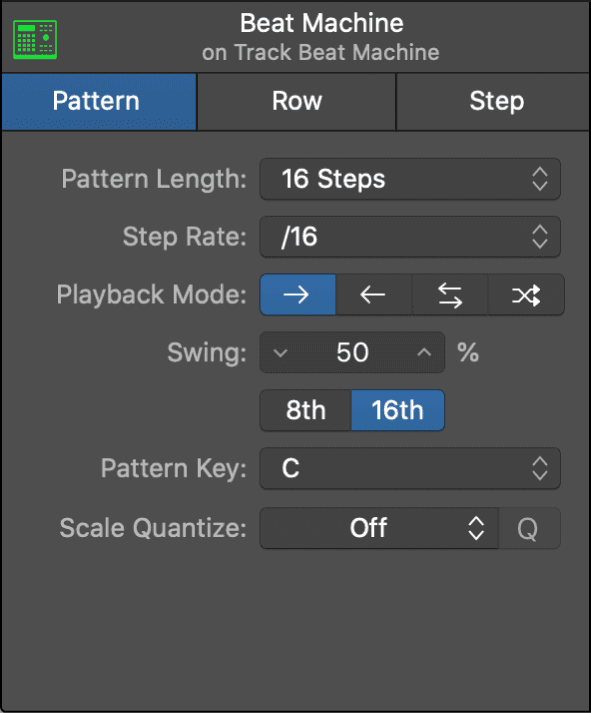
- Click the Pattern tab in the Step Sequencer inspector to show the Pattern inspector.
- Do any of the following:
- To change the pattern length: Choose the number of steps in the pattern from the Pattern Length pop-up menu.
- To change the step rate: Choose the note value for steps in the pattern from the Step Rate pop-up menu.
- To change the playback mode: Click one of the Playback Mode buttons. The choices are, from left to right:
- Forward: Steps play from left to right.
- Backward: Steps play from right to left.
- Ping-Pong: Playback alternates between left to right and right to left.
- Random: Steps play in an undetermined order.
- To change the Swing percentage: Set the Swing percentage using the Swing value slider, then click one of the Swing Note Value buttons to apply the swing value to either 8th or 16th notes.
- To change the key: Choose a musical key for the pattern from the Pattern Key pop-up menu.By default, when you choose a key from the Pattern Key pop-up menu, steps are transposed to the new key. You can also choose No Transpose from the menu. When No Transpose is active, steps do not transpose when you choose a new key.
- To change the scale: Choose a musical scale for the pattern from the Scale Quantize pop-up menu.
- To quantize unquantized notes to the scale: Click the Quantize (Q) button next to the Scale Quantize pop-up menu.After you choose the scale from the Scale Quantize pop-up menu, notes are quantized and the Quantize (Q) button is inactive. The Quantize button becomes active when you change the row assignment or Note value for a step to a note outside the chosen scale. Click the Quantize button to reapply scale quantization to those nonconforming notes.
Note: When Scale Quantize is set to Off, changing the pattern key transposes notes but does not conform them to a Scale, unless No Transpose is selected in the Pattern Key pop-up menu. (See above in “To change the key”.) When Scale Quantize is set to any other setting, changing the key both transposes notes and conforms them to the chosen scale.
Edit row settings:
Click a row header to select the row. In the Step Sequencer inspector, click the Row tab to show the Row inspector. Do any of the following:
To change the row assignment:
For note rows: Choose a note value or drum sound from the Note submenu of the Row Assignment pop-up menu.When a pattern using a Drum Machine Designer patch is selected, the Row Assignment pop-up menu shows the kit piece names rather than MIDI note names.
For automation rows: Choose a parameter from the Automation submenu of the Row Assignment pop-up menu.
To change the step rate for the row: Choose a note value for steps in the row from the Step Rate pop-up menu.
To change the playback mode for the row: Click one of the Playback Mode buttons. The choices are, from left to right:
- Forward: Steps play from left to right.
- Backward: Steps play from right to left
- Ping-Pong: Playback alternates between left to right and right to left.
- Random: Steps play in an undetermined order.
To change the loop start: Set the value in steps using the Loop Start value slider.
To change the loop end: Set the value in steps using the Loop End value slider.
To change the MIDI channel for the row: Set the channel number from the MIDI Channel value slider.
To set the automation mode for the row: Choose a mode from the Automation Mode pop-up menu. The choices are:Latch:Once set, the automation parameter value remains constant until a step with a different value is triggered.Slide:Interpolates between the last set automation parameter value and the next, to produce a smooth, gradual change.
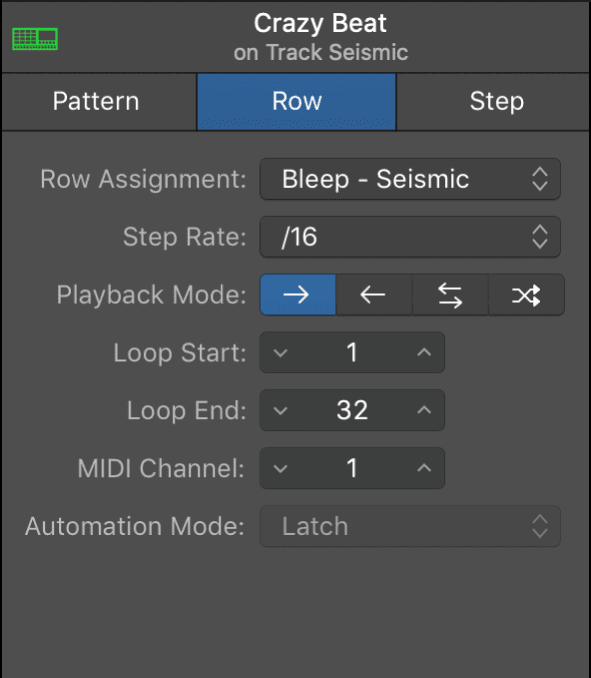
Edit step settings:
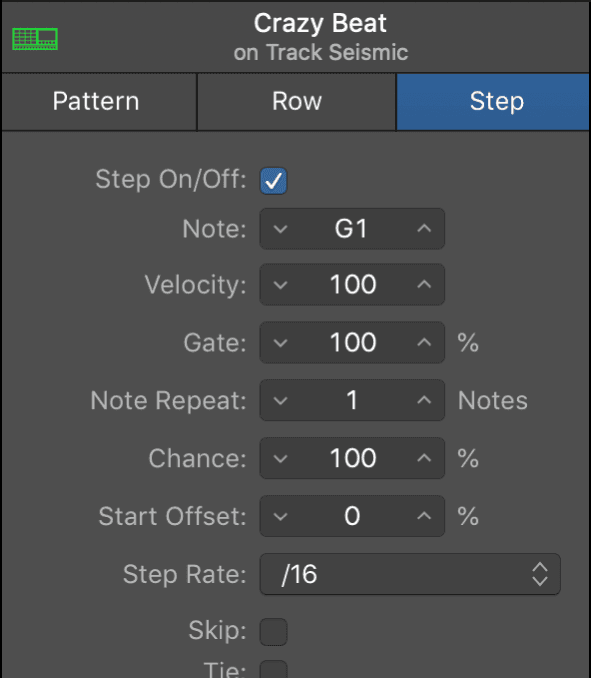
Shift-click a step to select it. In the Step Sequencer inspector, click the Step tab to show the Step inspector. Do any of the following:
To turn the step on or off: Select the Step On/Off checkbox.
To change the note or sound for the step: Set the note or drum sound using the Note value slider.
To change the velocity level for the step: Set the velocity value from 1 to 127 using the Velocity value slider.
To change the gate amount for the step: Set the gate value from 1 to 127 using the Gate value slider.
To change the note repeat value for the step: Set the value from 1 to 16 using the Note Repeat value slider.
To change the Chance value for the step: Set the percentage using the Chance value slider.
To change the offset value for the step: Set the percentage using the Start Offset value slider.
To change the step rate for the step: Choose a note value for the step from the Step Rate pop-up menu.
To skip the step during playback: Select the Skip checkbox.
To tie the step during playback: Select the Tie checkbox.
Customize the Step Sequencer interface in Logic Pro
You can customize several aspects of Step Sequencer to suit the pattern you are working on and the task you want to accomplish. You can zoom in and out to work in greater detail or view a larger part of the step grid, show or hide step values, color rows and steps, and reorder rows and subrows. You can also save the current pattern configuration as the default template for the channel strip, and revert to the original default template for the channel strip.
Zoom the step grid:

- Do one of the following:
- To zoom vertically: Drag the Vertical Zoom slider left or right.
- To zoom horizontally: Click one of the Step Width buttons.The Step Width buttons switch between minimum and maximum step widths. The actual widths vary depending on the overall width of the Step Sequencer pane and the pattern length. When the entire pattern is not visible in the step grid, page overviews appear above the step grid. You can click the page overviews to move to different parts of the pattern.
- Automatically zoom vertically: Click the Vertical Auto Zoom button to fill the available vertical space.
Show or hide step values:
Choose one of the following from View > Display Edit Mode Values in the Step Sequencer menu bar:
- To display step values only when editing a step: Choose Only When Editing Values.
- To display step values for the selected row: Choose Always for Selected Row.
- To display step values for all rows: Choose Always for All Rows.
Change row colors:
Click a row header to select the row.Choose View > Show Row Colors from the Step Sequencer menu bar.Select a color from the Color palette.When you are finished, choose View > Hide Row Colors to close the Color palette.

Reorder rows:
- Click and hold a row header, then drag the row up or down.
Turn on MIDI Out for note rows and steps:
When the MIDI Out button in the Step Sequencer menu bar is turned on, the note or drum sound for a fixed note row sounds when you select the row, and the note or drum sound of a step sounds when you edit the step using either the Note or Octave edit mode.
- Click the MIDI Out button in the Step Sequencer menu bar to turn it on.Click the MIDI Out button again to turn it off.
Save a pattern as the default template
You can save the current row assignments and view state of Step Sequencer as the default template for new patterns created on the same track, or another track using the same channel strip. This also determines the default view of the editor when the track is selected and there is no region on the track.
- With the pattern open in Step Sequencer, choose Functions > Store as Default Pattern Template from the Step Sequencer menu bar.
Revert to the original default template
You can clear the pattern configuration data so that new patterns, and the default view, appear as they did before the “Save as Row Default” option was used.
- With the pattern open in Step Sequencer, choose Functions > Revert to Default Pattern Template from the Step Sequencer menu bar.
What changed in Logic Pro 12
Step Sequencer was substantially rebuilt. The basics above are unchanged, but there is a lot more available than this chapter covers:
- Rows can be assigned to chord degrees instead of fixed pitches, so a pattern follows the Chord track.
- Randomization controls for a whole pattern or a single row.
- More note repeat parameters, and additional playback modes.
- Pattern lengths for 5/4 and 7/8, alongside 3/4 and 4/4.
- The Pattern, Row and Step inspectors have been reorganised.
All of it is covered in Step Sequencer: Beyond the Grid, in the Logic Producer course.
Do this now
- Create a pattern region on a Drum Machine Designer track.
- Program a kick and snare, then add a hat row and set its steps to a different loop length so the pattern drifts.
- Add a subrow for velocity on the hats, and a second for gate.
Different row lengths are how a sixteen-step sequencer stops sounding like a sixteen-step sequencer.