Live Loops
Live Loops
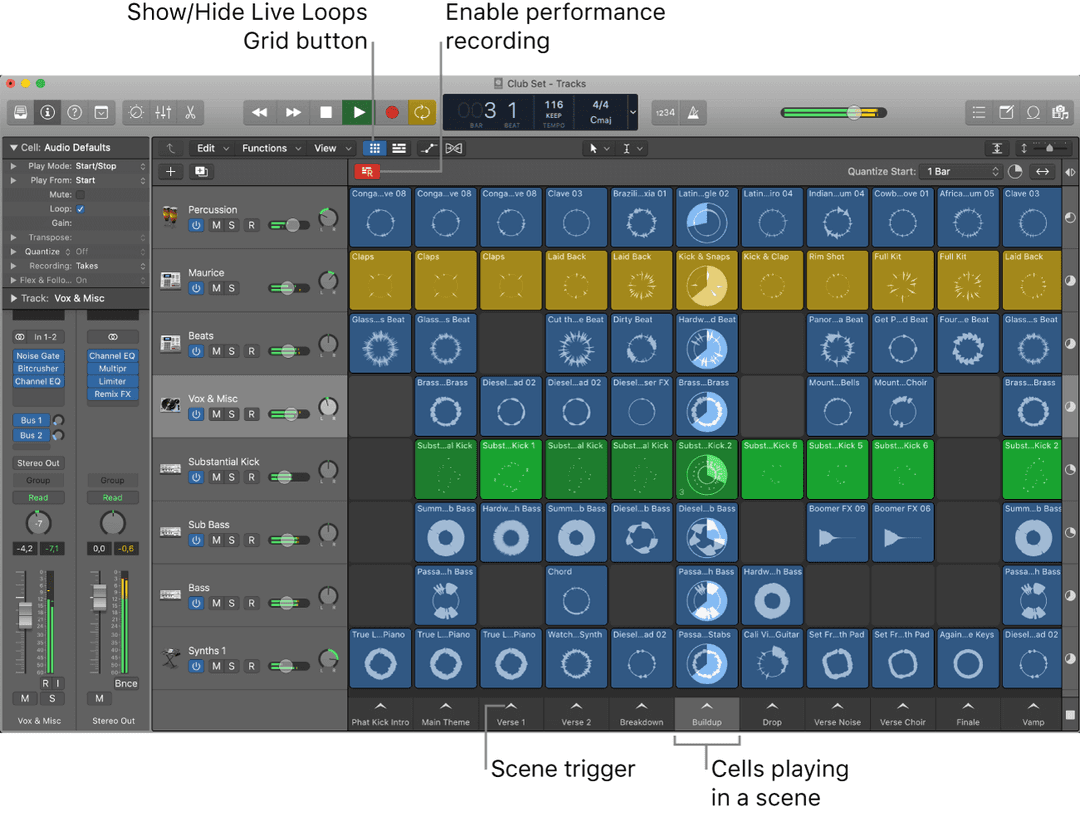
Live Loops lets you arrange and play with musical ideas in real time in a grid of cells, each containing a musical phrase or loop. You can start and stop cells freely while keeping everything in sync with the beat and the project tempo. This feature of Logic is brand new as of May 2020, but has been around in another DAW, Ableton Live, ever since it was created!
Each grid row uses the same signal routing and channel strip settings as the adjacent track in the Tracks area. Cells in grid columns, called scenes, can be triggered together to act as musical sections. An extensive set of parameters gives you full control over playback, recording, and looping, so you can spontaneously take your music in new directions.
To the right of the Live Loops grid, the Divider column separates the grid from the Tracks area. Buttons in the Divider column show the status of playing or queued cells in each track. You can use the buttons to pause, start, or stop cells individually or all at once. You can also use the Divider column to switch playback between cells and regions on individual or multiple tracks.
Live Loops is designed for use with the Remix FX plug-in, a multi-effect featuring several realtime DJ-style effects. You can also use a control surface or Logic Remote to control Live Loops, helping enhance your creative flow and achieve greater flexibility and precision.
You can record to both audio and software instrument cells, add regions or Apple Loops to the Live Loops grid, and record a Live Loops performance as regions to the Tracks area. Logic Pro provides several starter grids containing instruments and prerecorded cells to help you get started.
Show the Live Loops grid
You can view either the Live Loops grid or Tracks view, or both at the same time.

To do so, do either of the following:
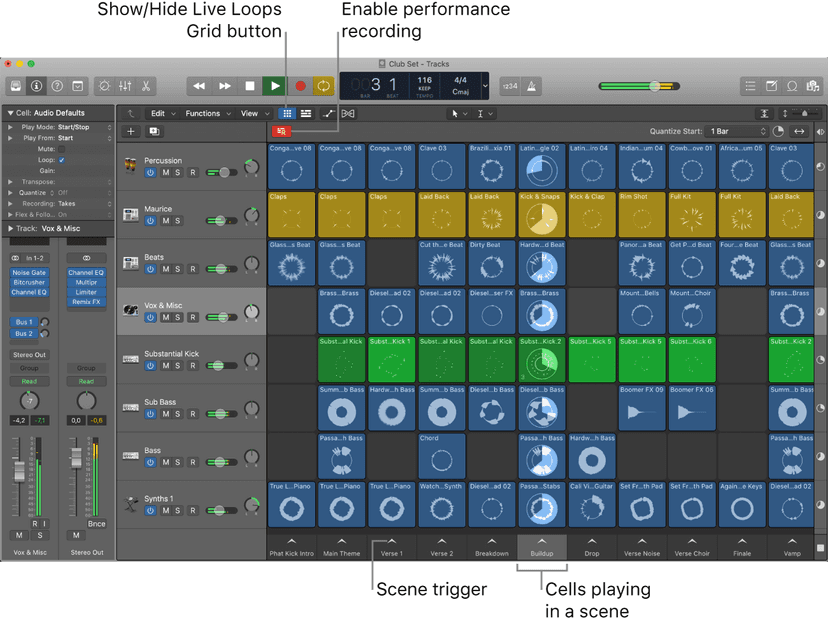
- Show or hide the Live Loops grid: Click the Live Loops Grid button in the Tracks area menu bar or use the Show/Hide Live Loops Grid key command.
- Show or hide Tracks view: Click the Tracks View button in the Tracks area menu bar.
- Toggle between the Live Loops grid and Tracks view: Click the active button (or use the corresponding key command, default: Option-V).
- Show Live Loops grid and Tracks view: Press Option-B.
You can add Live Loops to any existing project by showing the Live Loops grid and adding cells.
Create a Live Loops project
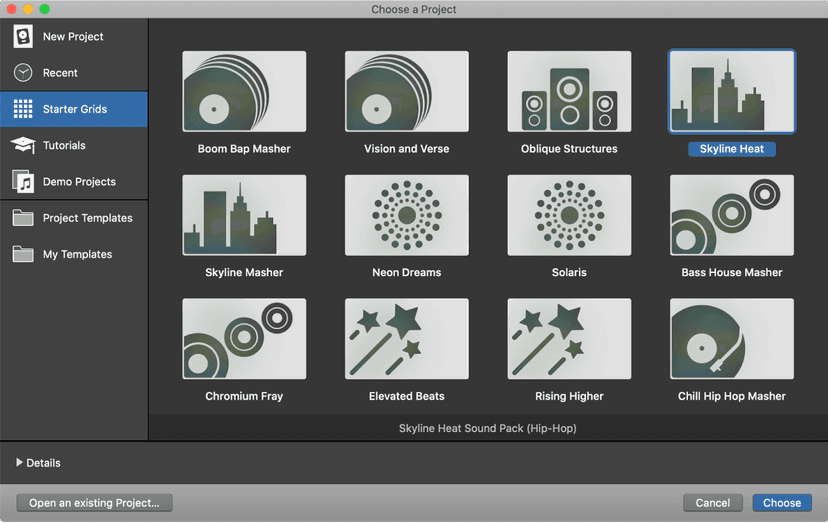
Choose File > New from Template (or press Command-N). In the Project Chooser, select an option from the list on the left:
To create a new, empty Live Loops project: Click New Project, then select Live Loops.
To open a Live Loops starter grid: Click Starter Grids, select the project you want to open, then click Choose.
You can import a Live Loops grid from another Logic Pro project, including cells and track settings, into your current project.
- Choose File > Import > Live Loops Grid.New tracks and rows containing the imported track settings and cells are now visible under those in the current project.
You can also import cells from individual tracks when you use the import data and settings from other projects by selecting the checkbox in the Cells column in the Track Import view.
Starting and stopping Live Loops cells
You can start and stop cells individually, or start and stop all the cells in a scene (a column in the grid) simultaneously. Only one cell can play on a track at any time. You can select one or more cells in different scenes and queue them to play together. While a cell is playing, a circular indicator in the middle of the cell shows the current playback position.
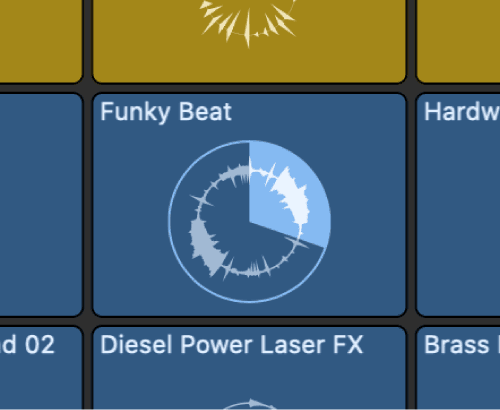
The point in time when a cell starts or stops is determined by the Quantize Start value. Quantize Start ensures that cells start at musically meaningful positions (beats or bars), so they are in sync with other cells and the project playhead position. You can change the Quantize Start value for the grid, for scenes, or for individual cells. Triggered cells flash to indicate that they are queued to start at the next Quantize Start point.
If you trigger a cell too late to start at the desired Quantize Start point, it starts playing at the next Quantize Start point. The cell will still be in sync with the project tempo, but it might lead to undesirable musical results, especially when cells are following a short Quantize Start value. Smart Pickup ensures that cells start immediately at the correct position, even when triggered slightly late. However, this can result in the beginnings of the cells being skipped in order to ensure that the cells are at the correct position when they start playing. In order to avoid this and ensure that cells start playing from the Start position set in the Cell inspector, turn Smart Pickup off and trigger cells with enough time before the upcoming Quantize Start point.
Cells in the Live Loops grid play at the project tempo. Apple Loops and untagged loops added to cells automatically play at the project tempo, as do any audio files containing tempo information. When you add an audio file without tempo information to a cell, Logic Pro analyzes the tempo of the audio file and adjusts the file to the project tempo. You can manually edit Smart Tempo and transients in the Cell Editor.
By default, when a cell is playing on a track containing regions, the regions on that track are silent. You can change this behavior using the buttons in the Divider column.
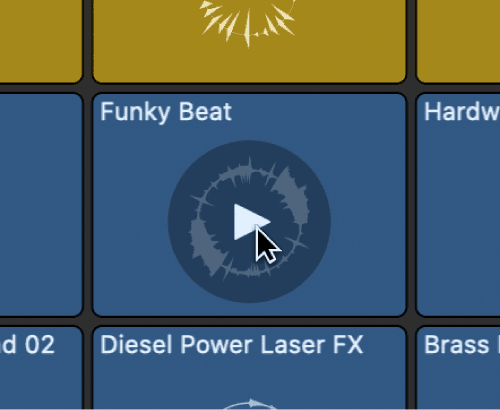

- Start a cell: Click the Play button in the center of a cell.
- Start all the cells in a scene: Click the trigger below a scene.
- Start all selected cells: Use the Play Live Loops key command (Return).
When cells are playing, the Play buttons in the cells become Stop buttons.
- Stop playback of a cell:
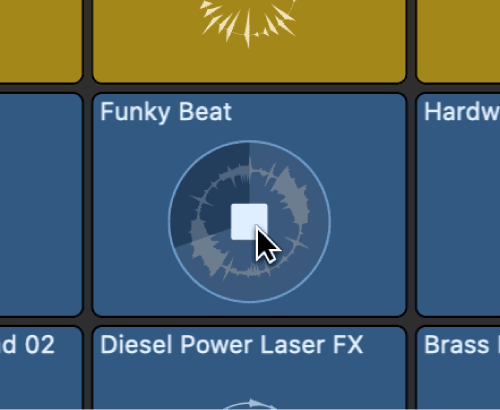
- Click the Stop button of the playing cell.
- Click the Stop button of an empty cell on the same track as the one playing.
- Stop playback of all cells at the next Quantize Start point:

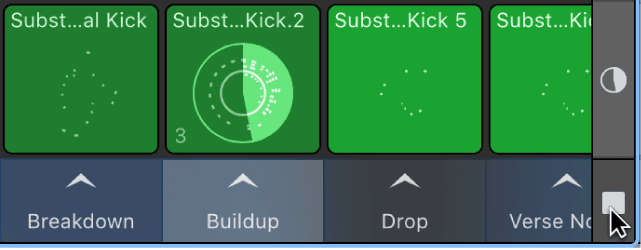
- Click the Grid Stop button at the bottom of the Divider column.
- Click the Scene trigger below an empty scene.
- Stop playback of all cells immediately:
- Use the Play or Stop key command (Space bar).
- Use the Stop key command (0 on the numeric keypad).
- Stop playback of all selected cells: Use the Play Live Loops key command (Return).
Queuing cells and scenes
You can queue cells and scenes to start playing when project playback starts or when you want cells in different scenes to start at the same time. Playing cells are automatically queued when you stop a project. You can then move the playhead and restart the queued cells at a different project position.
Do one of the following:
- Queue cells: Select one or more cells, Control-click one of the selected cells, then choose Queue Cell Playback from the shortcut menu.
- Queue a scene: Control-click the trigger of the scene you want to queue and choose Queue Scene from the shortcut menu.
- Queue selected cells or scene: Use the Queue Cell/Scene Playback key command (Option-Return).The queued cells start flashing.
To start queued cells playing, do one of the following: Start project playback, click the Restart button in any of the queued cells or use the Play Live Loops key command (Return) to play queued cells at the next Quantize Start.
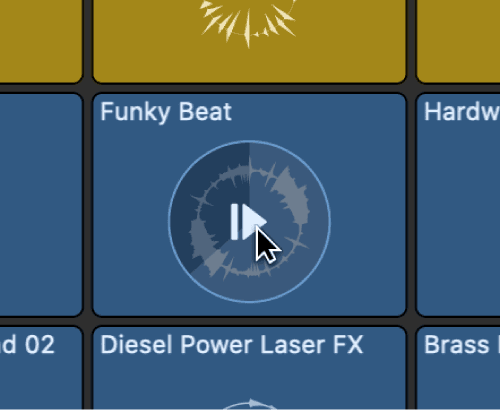
You can dequeue all queued cells by using the Queue Cell/Scene Playback key command again.
Setting the Quantize Start value:
You can set the Quantize Start value for the entire Live Loops grid, for a scene, or for individual cells, and change it while cells are playing. When you trigger a scene, all cells in the scene use the Quantize Start value for that scene. When you start or stop individual cells, each cell uses its own Quantize Start value.
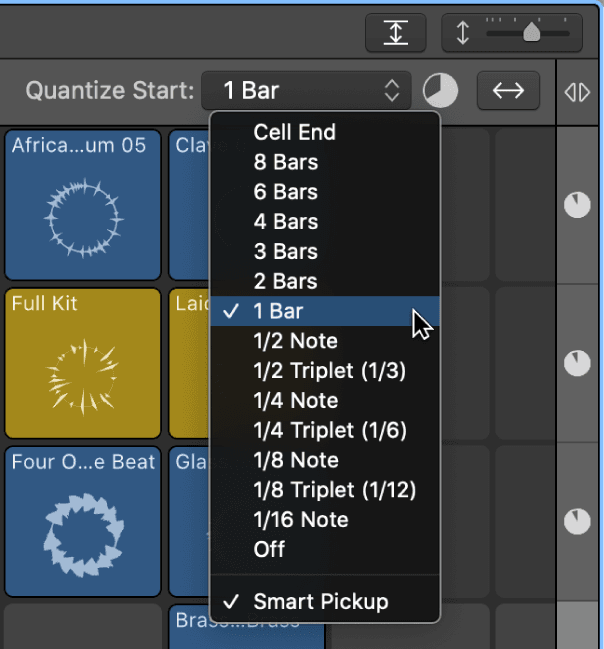
- To set the Quantize Start value for the Live Loops grid: Choose a value from the Quantize Start pop-up menu near the upper-right corner of the grid.
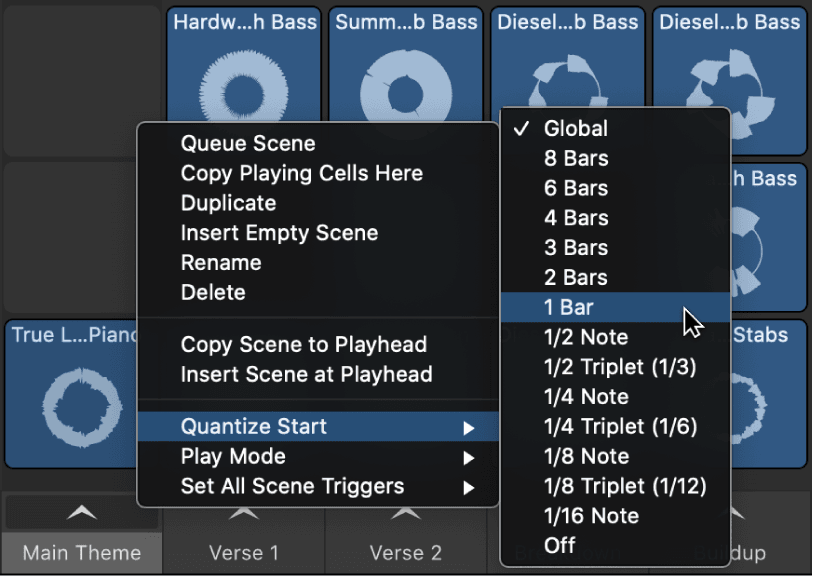
- To set the Quantize Start value for a Scene: Control-click the Scene trigger , choose Quantize Start, then choose a value from the submenu.
- To set the Quantize Start value for Cells: Select one or more cells and do one of the following:
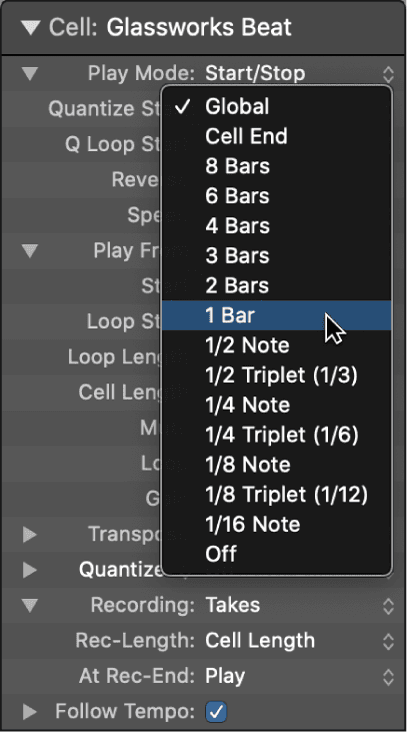
- Click the disclosure triangle in the Cell inspector next to Play Mode, then choose a value from the Quantize Start pop-up menu.
- Control-click a cell, choose Playback > Quantize Start, then choose a Quantize Start value from the submenu.
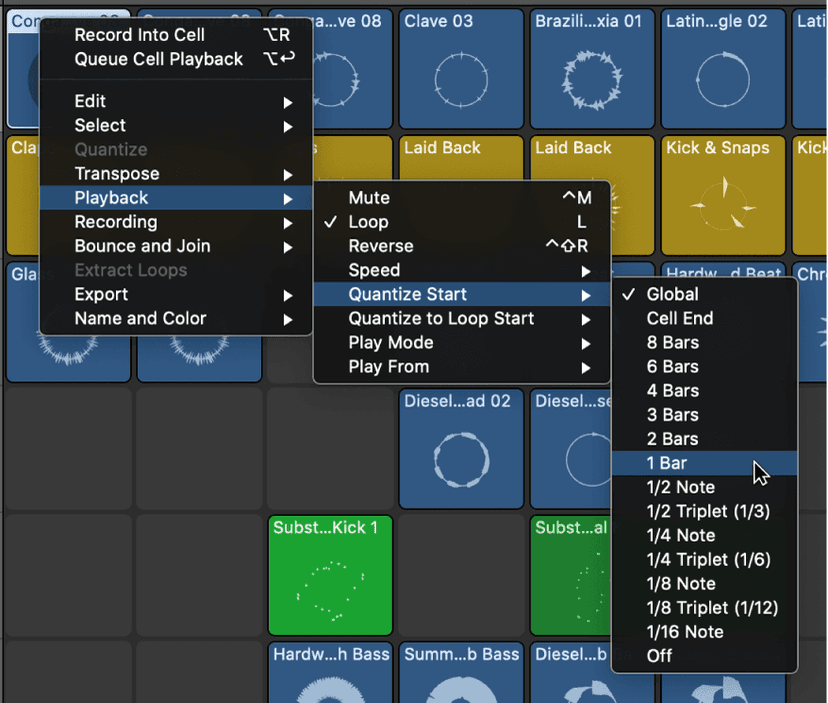
In addition to bar and beat values, you can also choose the following Quantize Start options:
- Cell End: If another cell in the same row is playing, the triggered cell starts when the playing cell reaches the end of the loop.
- Off: Cells start and stop when you click them, regardless of the Quantize Start value. Note that this can lead to cells playing out of sync.
- Global: The cell or scene follows the Quantize Start value of the grid. This is the default setting for cells and scenes, and probably the best choice for most situations.
Turn on Smart Pickup:
- Click the Quantize Start pop-up menu in the upper-right corner of the grid, then choose Smart Pickup.
Setting the play mode
The play mode in Logic Pro determines how a cell starts and stops when you click the Play/Stop button. Both actions are subject to the Quantize Start value. You can choose three play modes:
- Start/Stop: Cells start and stop playing when you click them.
- Momentary: Cells start playing when you click and hold the pointer on them, and stop playing when you release the pointer.
- Retrigger: If a cell is playing and you click it again, it starts playing from the beginning. Cells set to Retrigger can be stopped only by starting another cell in the same row, by stopping the row using the Divider column, or by stopping the entire grid.
Do either of the following:
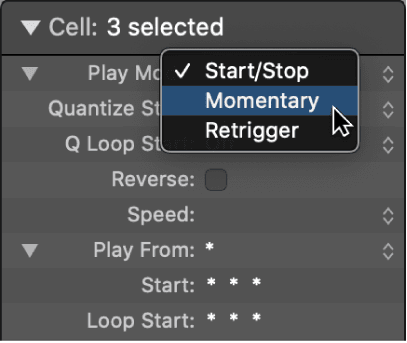
- Select one or more cells, then choose a play mode from the Play Mode pop-up menu in the Cell inspector.
- Control-click a cell, choose Playback > Play Mode, then choose a play mode from the submenu.
You can also change the play mode for scenes.
Changing the start behavior of a cell
The Play From setting determines the start behavior of a cell. By default, cells start playing from the Start position. However, depending on the content and timing of your music, you can choose other start behavior settings to create interesting transitions between cells.
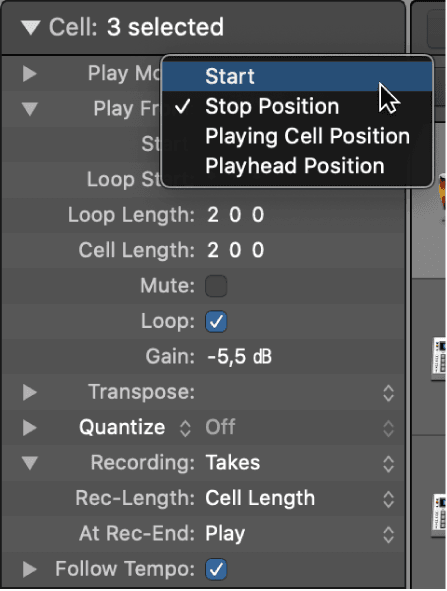
- Select one or more cells and choose one of the following settings from the Play From pop-up menu in the Cell inspector:
- Start: The cell starts at the position determined by the set Start position.
- Stop Position: The cell starts playing from the point where it last stopped, similar to Play/Pause.
- Playing Cell Position: If another cell in the same row is playing, the cell starts playing from the position where the first cell stops. Otherwise, the cell starts from the Start position.
- Playhead Position: The cell starts from the position where it would be, as if it had been playing from the beginning of the project. Otherwise, the cell starts from the Start position.
- Working with Live Loops cells
You can add regions or loops to cells in the Live Loops grid, as long as the region or loop matches the track type for the track containing the cell: for example, you can add audio regions to cells on audio tracks, and MIDI or pattern regions to cells in rows on software instrument tracks.
After adding Drummer regions or pattern regions to the grid, you can convert them to MIDI cells to allow for precise editing of notes and make use of functions not available in Step Sequencer. You can also extract loops from audio cells, with optimal loop start and end points set by Logic Pro.
In addition to adding regions to cells, you can record to Live Loops cells, and record a Live Loops performanceas regions to the Tracks area. You can also copy cells to the Tracks area, as well as copy and paste scenes to the playhead position in the Tracks area. When copying cells to the Tracks area, take care to match the track type to the cell type (for example, you can only paste audio cells to audio tracks).
When you add an audio file without tempo information to a cell, Logic Pro analyzes the tempo of the audio file. You can edit the tempo information using the Edit Smart Tempo and Edit Transients commands in the Cell EditorEdit menu.
If you plan to record audio without a constant tempo to a cell, it is recommended that you record the audio to an audio track in the Tracks area using the Smart Tempo functions in Logic Pro. Once the audio region is tagged with correct tempo information you can add the region to an audio cell, and have it play at a constant tempo.
Adding a region from the Tracks area to the Live Loops grid
Do one of the following:
- Drag a region from the Tracks area to a cell of the same type in the Live Loops grid.
- Drag a region from the Tracks area to an empty area of the grid, below the existing tracks.A new track of the appropriate type (audio or software instrument) is created, and the cell is added to the new track. The new track has the same channel strip settings as the original track.
- When you drag a region from the Tracks area to the Live Loops grid, Logic Pro places a copy of the region in the cell. The original region in the Tracks area remains unchanged. If the cell already contains a region, it is replaced with the new region.
Create new tracks when dragging multiple items to the Live Loops grid
When you drag multiple items (for example, cells, regions, Apple loops, or files from the Finder) to the empty area below the Live Loops grid, you can create a new track for each individual item.
- Press Shift when dragging the items to the empty area below the Live Loops grid.
- The items are arranged vertically and a new track is created for each individual item when you drop them below the Live Loops grid. Press Shift again before you drop the items to arrange them horizontally and add them to a single new track.
Copying and pasting regions to cells in the Live Loops grid
- Select one or more regions in the Tracks area, then choose Edit > Copy (or press Command-C).
- Select a cell.
- Choose Edit > Paste (or press Command-V).
- If you copy one region, you can only paste it to a cell on a track of the same type. If you copy multiple regions, you can only paste them to cells on the same tracks where the original regions are located.
Copying regions to Live Loops based on selection
Using the Copy to Live Loops key command in Logic Pro, you can copy various combinations of regions to new scenes, depending on what you have selected in the Tracks area. This is especially useful for populating a Live Loops grid in an existing project containing many different regions, sections, or markers. You can copy any of the following to Live Loops:
- Marquee selection: Copies the content on each track between the left and right edges of the marquee selection to the first empty scene.
- One or more regions: Copies the selected regions to a single cell in the first empty scene, for each track.
- Cycle range: If the cycle area is on and nothing is selected, copies the section between the locators to a single cell in the first empty scene, for each track.
- Markers: If Cycle mode is off and one or markers are selected, copies the regions between the start or end points for each selected marker to a new scene. Arrange markers have priority over normal markers.
- All Arrange markers: If Cycle mode is off and nothing is selected but the project contains arrange markers, copies all arrange markers to new scenes. This is a good way to quickly create a Live Loops scene for each section of a project.
- Determine what you want to copy to Live Loops (marquee, region, cycle, or marker).
- Choose Edit > Copy to Live Loops or use the Copy to Live Loops key command (Command-Home or Command-Fn-Left Arrow).The exact wording of the command in the menu changes depending on what you select.
- Importing an audio file to an empty cell
- Control-click an empty audio cell and choose Add Audio File (or press Shift-Command-I).A new audio cell is created containing the audio file.
- Convert Drummer and pattern cells to MIDI cells
You can convert Drummer cells and pattern cells to MIDI cells, to edit individual notes of a Drummer performance or to perform edits not possible in Step Sequencer.
- Control-click the Drummer or pattern cell you want to convert and choose Convert > Convert to MIDI Cell.
- Extracting loops from audio cells
Logic Pro can analyze the musical and sonic characteristics of a longer audio file in an audio cell and extract the best sounding loops to empty cells (up to 10) on the same track. You can choose the length of loops you want to extract, or let Logic Pro extract the best loops of any size.
By default, Logic Pro examines only the detected downbeat positions for potential loop start points. However, you can deactivate this setting to let loop points be set at other musically meaningful positions. You can always manually change the resulting loop points, if necessary.
To work effectively, loop extraction requires audio containing repetitions and accurate tempo information. To get the best results, check the cell in the Smart Tempo Editor before extracting loops and determine whether they show accurate beat mapping.
The loop extraction algorithm looks for loop points that deliver a smooth transition from loop end to loop start. Those loop points may not necessarily coincide with the musical structure of the analyzed audio.
- Control-Click an audio cell and choose any of the following from the Extract Loops submenu:
- Set Optimal Full Loop: Extracts the longest loop within the selected cell.
- Extract Best 2-Bar Loops: Determines the best two-bar loops and copies them to the next empty cells to the right.
- Extract Best 4-Bar Loops: Determines the best four-bar loops and copies them to the next empty cells to the right.
- Extract Best 8-Bar Loops: Determines the best eight-bar loops and copies them to the next empty cells to the right.
- Extract Best Loops of Any Size: Determines the best loops of any size through out the audio file and copies them to the next empty cells to the right.
- To consider all musically meaningful positions for potential loop start points, not just downbeats, make sure Limit Loop Points to Downbeats is turned off in the Extract Loops submenu.
- Loop extraction is disabled if:
- The cell is empty or contains multiple regions.
- The region in the cell is shorter than two bars.
- Flex & Follow in the Cell inspector is turned off.
- The cell contains Apple Loops or untagged loops.
- Multiple cells are selected.
- Creating cells
You can create new cells and then edit them in the Cell Editor or record audio and MIDI. Software instrument tracks can contain MIDI and pattern cells.
Adding a cell from the Live Loops grid to the Tracks area:
Do one of the following:
- Drag a cell to a track of the same type in the Tracks area.
- Drag a cell to an empty area of the Tracks area, below the existing tracks.A new track of the appropriate type (audio or software instrument) is created, and the region is added to the new track. The new track has the same channel strip settings as the original track.
- When you drag a cell from the Live Loops grid to the Tracks area, Logic Pro places a copy of the cell as a region in the Tracks area. The original cell in the Live Loops grid remains unchanged. If a track already contains a region at the position where you place the cell, it is replaced or overlapped with the resulting new region.
Copy a scene to the Tracks area
In the Tracks area, set the playhead at the position where you want to paste cells in the scene as regions. In the Live Loops grid, Control-click the scene and choose one of the following: - To shift the content of all tracks right of the playhead position by the length of the inserted scene: Choose Insert Scene at Playhead (or press Command-End or Command-Fn-Right Arrow).
- To copy the scene to the playhead position: Choose Copy Scene to Playhead.WARNING: When you copy a scene to the playhead position, any existing regions are overwritten or overlapped.
Create an Apple Loop from a cell
You can create Apple Loops from your own audio and software instrument cell recordings. When you create an Apple Loop from a cell, it’s added to the Apple Loops library and appears in the Loop Browser, so that you can use it in other projects.Do any of the following:
- To create an audio cell: Control-click an empty cell on an audio track, then choose Create Cell.
- To create a MIDI cell: Control-click an empty cell on a software instrument track, then choose Create MIDI Cell.
- To create a pattern cell: Control-click an empty cell on a software instrument track, then choose Create Pattern Cell.
- To create a Drummer cell: Control-click an empty cell on a Drummer track, then choose Create Drummer Cell.
- Do one of the following:
- Control-click a cell, then choose Export > Add to Loop Library from the shortcut menu.
- Select a cell, then choose File > Export > Region to Loop Library.
Record to Live Loops cells in Logic Pro
You can record to an audio or MIDI cell, even while other cells are playing. The settings for audio signal flow, software instruments, and the metronome are the same as when you record regions in the Tracks area.
If you need both hands to play an instrument while recording, you can set the length of the recording to a predefined value (determined by the Cell Length), otherwise you can set it to the nearest bar or beat while recording.
When the end of the recording length is reached, you can stop recording and automatically play what you recorded, continue recording multiple takes to the cell, or merge software instrument performances.
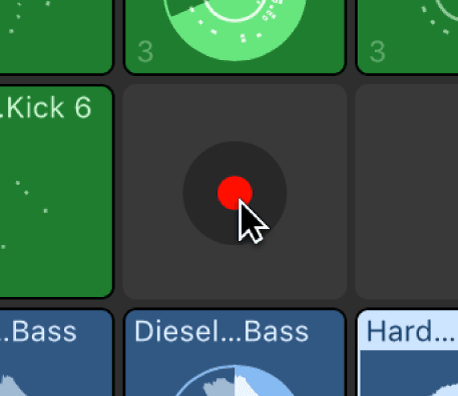
When you enable tracks for recording, a Cell Record button appears on empty cells when you move the pointer over them. Clicking the Cell Record button triggers the cell to start recording at the next Quantize Start point.
You can use the Record Into Cell key command to trigger cells to start and stop recording and to set the record length while recording. You can assign the key command to a controller, such as a footswitch or pedal to accelerate your workflow.
You can control cell recording using the following parameters in the Cell inspector:
- Recording: Determines what happens to existing cell content when you record in a cell. You can replace the previous performance with the current one, record new performances to a take folder, or, for software instruments, merge the performances.
- Rec-Length: Determines the duration of the recording. You can set it to match the Cell Length value, or manually set it to the next bar or beat while recording.
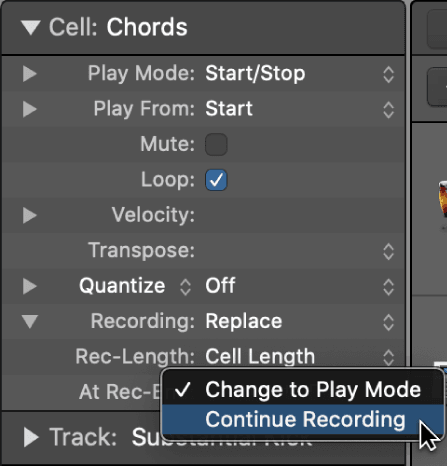
- At Rec-End: Determines what happens when the Record-Length is reached. You can set it to immediately play back what you record, continue recording multiple takes of a performance, or merge multiple software instrument performances, depending on the Recording setting.
Note: You can’t record to Drummer or Pattern cells.
Set the Recording parameter
The Recording parameter determines what happens to existing cell content when you record in a cell. You can replace a previous recording or create multiple takes. With software instruments you can also record continuously in a loop, merging each pass in a single cell. This can be useful for creating drum patterns or melodies on the fly.
- Select the cell you want to record to.
- In the Cell inspector, choose one of the following from the Recording pop-up menu:
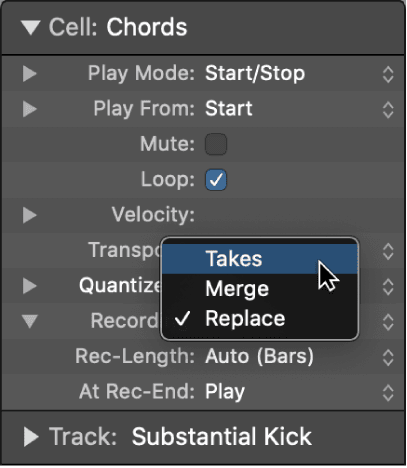
- Takes: Each new recording is added to a take folder in the cell. After recording, you can preview the takes and choose which one you want to use in the cell.
- Merge: Each new recording merges with the previous recording.This mode is only available for software instruments.
- Replace: Each new recording replaces the previous recording.
Set the 'Rec-Length' parameter
You can set the length of the cell recording using the Rec-Length parameter. You can either record with a pre-defined length or set it to the nearest bar or beat while recording.
- Select the cell you want to record to.
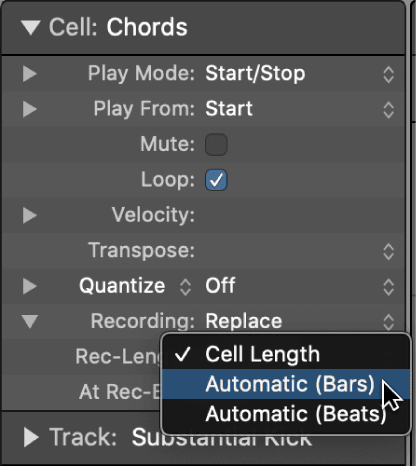
- In the Cell inspector, choose one of the following from the Rec-Length pop-up menu:
- Cell Length: The length of the recording is determined by the Cell Length value under the Play From settings in the Cell inspector.
- Automatic (Bars): The length of the recording is set to the nearest bar when you click the cell or use the Record Into Cell key command while recording.
- Automatic (Beats): The length of the recording is set to the nearest beat when you click the cell or use the Record Into Cell key command while recording.
Set the 'At Rec-End' action
The At Rec-End action determines what happens at the end of a recording pass. Depending on how you set this up, it can be useful for recording multiple takes of a performance, or for merging multiple performances when recording a software instrument.
- Select the cell you want to record to.
- In the Cell inspector, choose one of the following from the At Rec-End pop-up menu:
- Change to Play Mode: At the end of the record length, recording stops and the cell immediately begins playing the performance you just recorded.
- Continue Recording: At the end of the record length, recording continues and overwrites the previous recording, creates takes, or merges each subsequent recording, depending on the Recording parameter. When Continue Recording is selected and the Rec-Length parameter is set to Automatic, a Plus button (+) is visible in the middle of the cell while the cell is recording. Clicking the button sets the Rec-Length to the nearest bar or beat and starts the next recording pass.
Record to a cell
Click the Record Enable button in the track header of the track containing the cell you want to record to. Set the metronome and count-in for recording if desired.Select a cell and set the parameters for Recording, Rec-Length, and At Rec-End in the Cell inspector if necessary. Do any of the following:
Move the pointer over an empty cell and click the Cell Record button in the center of the cell.
Select a cell and use the Record Into Cell key command (Option-R).
Control-click a cell and choose Record Into Cell from the shortcut menu.
If cells are already playing, recording starts at the next Quantize Start point. Play, sing, or otherwise create the sound you want to record.
If the Rec-Length is set to Cell-Length and the At Rec-End action is set to Change to Play Mode, recording stops automatically and the cell plays. If you use different cell recording settings, do either of the following:
If the Rec-Length is set to Automatic and the At Rec-End action is set to Continue Recording, click the Plus button (+) in the cell to set the record length to the nearest bar or beat.
If the Rec-Length is set to Automatic and the At Rec-End action is set to Change to Play Mode, or the Rec-Length is set to Cell Length and the At Rec-End action is set to Continue Recording, click the Play button in the cell to stop recording and play the cell.
You can also use the Record Into Cell key command to start and stop cell recording and set the record length while recording.
Set recording defaults for cells by type
In some cases it can be convenient to set the cell length, recording mode, and MIDI quantization for cells before recording. You can set defaults for all cells of a particular type (audio or MIDI).
- Click in the Live Loops grid to ensure it is active.
- Select a track of the type for which you want to set the defaults.
- Deselect all cells in the grid (use Shift-D).In the Cell inspector, Cell: Audio Defaults or Cell: MIDI Defaults appears, depending on the track type you selected.
- In the Cell inspector, set the default values, including default cell length, recording settings, or quantize value for MIDI recordings.Note: Some default settings you make in the Cell inspector apply to both newly recorded cells and regions of the specified type.
Set recording defaults for an individual cell
You can also set defaults for individual cells. This can be useful when you want to predefine different recording lengths for different scenes, while keeping automatic recording lengths in bars as a general default.
- Select one or more cells for which you want to set recording defaults. The cells must all be of the same type (audio or MIDI).
- In the Cell inspector, set the default values, including default cell length, recording settings, or quantize value for MIDI recordings.
Record and edit takes in cells in Logic Pro
When you set the Recording parameter to Takes, each new recording in a cell creates a new take. If a cell contains takes, the number of takes is displayed in the lower-left corner of the cell, and the currently active take is displayed in the upper left. You can choose and preview each take individually, even while the cell is playing. You can also rename, delete, flatten, move, and copy takes.
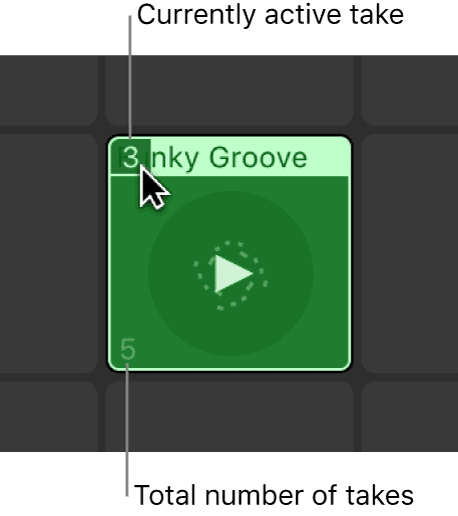
You can move take folders from the Tracks area to cells and move take folders from cells to the Tracks area. If you want to edit comps in a cell, you must drag the cell to the Tracks area, edit the comps there, then drag the resulting region back to the Live Loops grid when you are finished.
To open the Take Folder pop-up menu, click the upper-left corner of a cell containing takes.
To preview takes in a cell, choose a take from the Take Folder pop-up menu, then play the cell.
To rename takes, choose the take you want to rename from the Take Folder pop-up menu.Choose Rename Take from the Take Folder pop-up menu.Enter the new name in the dialog that appears, then click OK.
To delete takes, choose the take you want to delete from the Take Folder pop-up menu.Choose Delete Take from the Take Folder pop-up menu.
Delete all but the currently active take
- Choose the take you want to keep from the Take Folder pop-up menu.
- Click the upper-left corner of the cell, then choose Flatten from the Take Folder pop-up menu.
All takes, except the currently active take, are deleted.
Copy and move takes
You can copy or move takes to other cells, scenes or tracks.
- In Logic Pro, choose the take you want to copy or move from the Take Folder pop-up menu.
- To copy a take, choose any of the following from the Copy Take to submenu:
- New Scene: Copies the currently selected take to a new scene.
- Next Empty Cell Right: Copies the take to the next empty cell to the right.
- New Track: Copies the take to a new track below the current track.
- Next Matching Empty Cell Below: Copies the take to the next empty cell on the same kind of track below.
- To move a take, choose any of the following from the Move Take to submenu:
- New Scene: Moves the currently selected take to a new scene.
- Next Empty Cell Right: Moves the take to the next empty cell to the right.
- New Track: Moves the take to a new track below the current track.
- Next Matching Empty Cell Below: Moves the take to the next empty cell on the same kind of track below.
Unpack a take folder
You can unpack a cell take folder to other cells, scenes, or tracks.
- In Logic Pro, open the Take Folder pop-up menu.
- Choose one of the following from the Unpack Take Folder to submenu:
- New Scenes: Unpacks each take to a new scene.
- Next Empty Cells Right: Unpacks each take to the next empty cells to the right.
- New Tracks: Unpacks each take to a new track below the current track.
- Next Matching Empty Cells Below: Unpacks each take to the next empty cell on the same kind of track below.
Change loop settings for cells in Live Loops
When you select a cell, you can change the loop settings in the Cell inspector. You can create interesting variations by changing the following settings:
- Start: Determines the initial starting position of the cell. By default, this is the same as the Loop Start setting, but you can change it so the cell starts at a different place initially than when it loops. This setting is ignored if the Play From setting is set to a value other than Start, or if the Set the Quantize Loop Start position is set to On.
- Loop Start: Determines the position in the cell where the loop starts after the initial start and playback of the cell. For example, if you have a cell containing a four-bar piece of musical material, you can change the Start setting so the loop initially starts at the first bar, then plays from the third bar on each time it loops.
- Loop Length: Determines the length of the loop. Changing the Loop Length value can be useful when you want to loop only a particular portion of a cell.
- Cell Length: Determines the overall length of the cell. This can be longer than the amount of musical material contained in the cell. When the Loop checkbox is deselected, the cell plays to the end of the cell length, then stops.
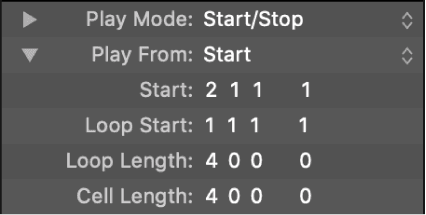
You can also change these settings graphically for audio and MIDI cells in the Cell Editor.
Change the start position of a cell:
- Select a cell.
- In the Cell inspector, click the disclosure triangle next to Play From to view the Start position, then do one of the following:
- Double-click the Start position, then enter a new value. Press Return to exit the field.
- Drag the specific position unit vertically. Release the mouse button when you’re finished.
When you change the start position in the Cell inspector for an audio or MIDI cell, the Start marker moves in the ruler of the Cell Editor. You can also drag the Start marker in the Cell Editor to change the start position.
Change the loop start position of a cell:
- Select a cell.
- In the Cell inspector, click the disclosure triangle next to Play From to view the loop start position, then do one of the following:
- Double-click the Loop Start position, then enter a new value. Press Return to exit the field.
- Drag the specific position unit vertically. Release the mouse button when you’re finished.
When you change the loop start position in the Cell inspector for an audio or MIDI cell, the Loop Start locator moves in the Cell Editor. You can also drag the Loop Start locator to change the loop start position.
Change the loop length of a cell:
- Select a cell.
- In the Cell inspector, click the disclosure triangle next to Play From to view the loop length, then do one of the following:
- Double-click the Loop Length setting, then enter a new value. Press Return to exit the field.
- Drag the specific position unit vertically. Release the mouse button when you’re finished.
When you change the loop length in the Cell inspector for an audio or MIDI cell, the Loop End locator moves in the Cell Editor. You can also drag the Loop End locator to change the loop length.
Change the cell length:
- Select a cell.
- In the Cell inspector, click the disclosure triangle next to Play From to view the cell length, then do one of the following:
- Double-click the Cell Length setting, then enter a new value. Press Return to exit the field.
- Drag the specific position unit vertically. Release the mouse button when you’re finished.
When you change the cell length in the Cell inspector for an audio or MIDI cell, the End marker moves in the Cell Editor. You can also drag the End marker to change the cell length.
Set the Quantize Loop Start position
If the Start and Loop Start positions are different, you can choose which position should hit an upcoming Quantize Start point when you trigger a cell. This can be useful if the Start position is set to an upbeat position, for example.
- Select one or more cells, click the disclosure triangle next to Play From in the Cell inspector, then choose one of the following settings from the Q Loop Start pop-up menu:
- Off: The cell starts playing from its Start position when the upcoming Quantize Start point is reached.
- On: The cell starts playing as soon as possible, so that the Loop Start position is reached at the next upcoming Quantize Start position. Some content after the Start position may be skipped.
- On, Preserve Start: The cell always starts playing from its Start position, so that the Loop Start position is reached at the upcoming or any following Quantize Start position. The cell may start later but plays all content between the Start and Loop Start positions.
Turn off cell looping
- Do one of the following:
- Select one or more cells, then deselect the Loop checkbox in the Cell inspector.
- Control-click a cell, then deselect Settings > Loop from the submenu.
- Click the cycle area in the ruler of the Cell Editor.
- The circular waveform in the cell changes to a linear shape. When the cell starts, it plays once to the end of the cell length, then stops (one-shot).
View cell length and loop length as positions
Do one of the following:
- Choose View > Length as Position from the Tracks area menu bar.
- Control-click anywhere in the Cell inspector, then choose Show Length as Position from the shortcut menu.
Cell Length appears as Cell End, Loop Length appears as Loop End, and both show a position value.
View start positions as an offset
Do one of the following:
- Choose View > Show Start Positions as Offset from the Tracks area menu bar.
- Control-click anywhere in the Cell inspector, then choose Show Start Positions as Offset from the shortcut menu.
The positions appear in the Cell inspector as the distance from the beginning of the cell.
Change the resolution of the position and length values
You can change the resolution shown for position and length values from the View menu, or from the shortcut menu in the Cell inspector.
- Do one of the following:
- Choose View > Live Loops: Position and Length Resolution from the Tracks area menu bar.
- Control-click anywhere inside the Cell inspector.
- Choose one of the following from the menu:
- Bars Only: View the position and length value for cells as bars.
- Bars and Beats: View the position and length value for cells as bars and beats.
- Bars, Beats, and Division: View the position and length value for cells as bars, beats, and division.
- Bars, Beats, Division, and Ticks: View the position and length value for cells as bars, beats, division, and ticks.
How the Live Loops grid and Tracks area interact in Logic
On each track in Logic Pro, you can either listen to a cell in the Live Loops grid or a region in the Tracks area—never both simultaneously. When you start a cell, any regions on the same track become inactive. When you stop a cell, the regions are not immediately reactivated; you need to use buttons in the Divider column or key commands to do this. You can also pause cells and activate regions on the same track simultaneously. The Divider column shows circular indicators next to tracks where cells are playing. When cells are stopped, the Track Activation buttons in the Divider column indicate with a solid arrow whether the cells or regions are activated. If you have a combination of tracks with activated cells and regions, both arrows of the Track Activation button are hollow.
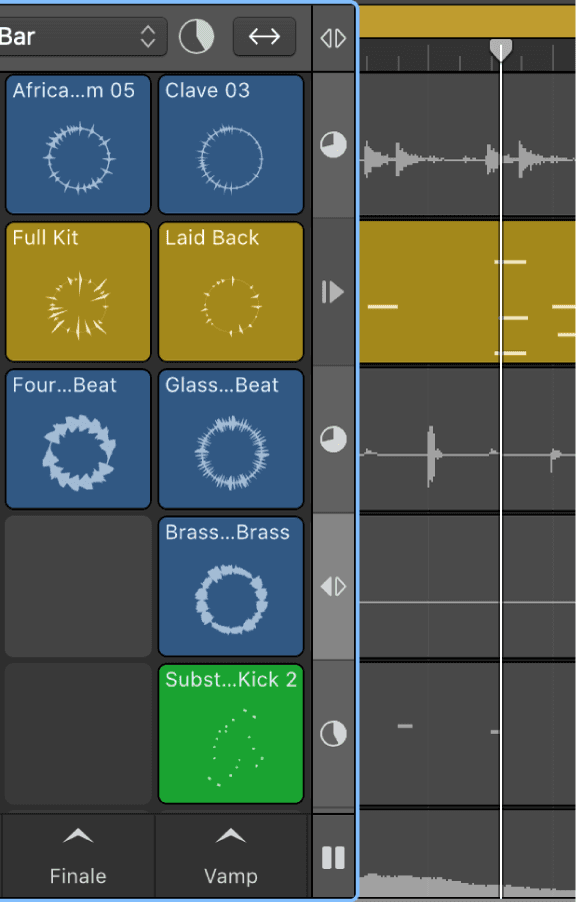
When you play cells while the project is stopped, the playhead starts. If the playhead starts from a Quantize Start point, the cells start playing immediately; otherwise, they start when the playhead reaches the next Quantize Start point.
If the playhead reaches the Project End marker while cells are playing, the playhead stops and the cells continue playing.
If you are only using Live Loops in your project, it is recommended to turn on Cycle mode. However, it is important to turn it off when you record a Live Loops performance.
Activate regions on an individual track
Do the following:


- While a cell is not playing: Stop a cell, then click the Track Activation button in the Divider column.The region on the track is immediately audible. To reactivate the cell, click the Track Activation button again in the Divider column or play the cell.
- While a cell is playing: Move the pointer over the Loop Position indicator in the Divider column, press Option, then click the Pause button .At the next Quantize Start point, the cell pauses and the regions on the track are audible. To restart the cell, press Option and click the Restart button in the Divider column, or click the Restart button on the paused cell.
Activate regions on all or multiple tracks
You can use the Track Activation button at the top of the Divider column to activate regions on all or multiple tracks. You can also activate all regions on tracks where cells are playing, when the project is playing.
- Do the following:
- While cells are not playing: Click the Grid Stop button at the bottom of the Divider column to stop all cells, or stop multiple cells individually, then click the Track Activation button at the top of the Divider column.The regions on the tracks are immediately audible. To reactivate the cells, click the Track Activation button again in the Divider column.
- While cells are playing: Press Option, then click the Pause button at the bottom of the Divider column.Atthe next Quantize Start point, the cells pause and the regions are audible. To restart the cells, press Option and click the Restart button at the bottom of the Divider column, press Option and click the Restart button in the Divider column on any track, or click the Restart button on any of the paused cells.
Edit Live Loops cells in Logic Pro
You can arrange and edit cells in the Live Loops grid much as you do when working with regions. Basic functions to cut, copy, paste, move, or delete cells are similar to the equivalent functions for regions in the Tracks area.
Parameters for selected cells appear in the Cell inspector, which replaces the Region inspector when cells are selected. When you select a single cell, the title bar of the Cell inspector shows the cell name; when you select multiple cells, the title bar shows the number of selected cells.
You can use the Cell Editor to view and edit the regions in cells, similar to how you edit regions in the Piano Roll Editor, Audio Track Editor, and Drummer Editor.
Select cells in the Live Loops grid
- Do any of the following:
- Select a single cell: Click the upper part of the cell.
- Select multiple cells: Do any of the following:
- Shift-click the upper part of cells.Shift-click the upper part of selected cells to deselect them.
- Starting from any empty cell, drag around cells to enclose them.
- Shift-click a cell to start a selection, then continue to hold Shift as you drag around other cells to enclose them.
- Select all cells: Choose Edit > Select > All (or press Command-A).
- Select all following cells: Select a cell, then choose Edit > Select > All Following (or press Shift-F).All cells in the same scene, and all other cells to the right, are selected.
- Select all following cells on the same track: Select one or more cells, then choose Edit > Select > All Following of Same Track (or press Control-Shift-F).All of the cells to the right of, and on the same track as, the selected cell are selected.
- Select all muted cells: Choose Edit > Select > Muted Cells (or press Shift-M).
- Select all cells of the same color: Choose Edit > Select > Same-Colored Cells (or press Shift-C).
- Select empty cells: Choose Edit > Select > Empty Regions/Cells.
- Invert selection of cells within a row: Choose Edit > Select > Invert Selection (or press Shift-I).
To cut a cell, select the cell, then choose Edit > Cut (or press Command-X).
To copy a cell, do either of the following:
- Select the cell, then choose Edit > Copy (or press Command-C).
- Option-drag the cell.
To paste a cell, select a cell, then choose Edit > Paste (or press Command-V).
Moving cells:
You can move cells to an empty or filled cell in the same row, or to another row of the same type. For example, you can move an audio cell to another row with audio cells, but not to a row with software instrument cells. If you move or paste cells to cells that already contain content, the new content replaces the existing content.
- Select a cell and do any of the following:
- Drag an audio cell to another cell on an audio track.
- Drag a MIDI cell to another cell on a software instrument track.
- Drag a Drummer cell to another cell on a Drummer track.
- Drag a pattern cell to another cell on a software instrument track.
Swapping cells:
You can swap cells with other cells of the same type.
- Select one or more cells, and drag them to the cells you want to swap them with.
- Before releasing the mouse, press and hold the Control key as you drop the cells.Left and right arrows appear with the pointer to indicate the cells are being swapped.
To rename a cell, do any of the following:
Control-click a cell, choose Name and Color > Rename Cell from the shortcut menu.
Select a cell, then click the name of the cell in the Cell inspector.
Select a cell, then press Shift-N.
Type a new name for the cell, then press the Return key.
To delete a cell, select one or more cells, then do either of the following:
- Choose Edit > Delete.
- Press the Delete key.
- Control-click one of the selected cells and choose Edit > Delete from the shortcut menu.
To mute a cell:
When you mute a cell, it stops playing. To hear the cell again, you must first unmute, then restart the cell.
- Select one or more cells, then do one of the following:
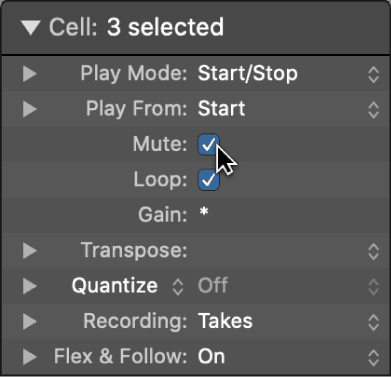
- Control-click one of the selected cells and choose Playback > Mute from the shortcut menu (or press Control-M).
- Click the selected cells with the Mute tool.
- Select the Mute checkbox in the Cell inspector.
Set an audio cell to ignore project tempo
In some cases you might want an audio cell to ignore the project tempo and play at its original tempo. This can be useful if you have cells containing spoken word, a one shot, or non-looping sound effects, for example.
- Select an audio cell and do the following:
- For Apple Loops: Deselect the Follow Tempo checkbox in the Cell inspector.
- If the track is in Flex mode: Turn off Flex & Follow in the Cell inspector.
Change the playback speed of a cell
- Select one or more cells, then do one of the following:
- Control-click one of the selected cells, choose Settings > Speed, then choose a value from the submenu.
- Click the disclosure triangle in the Cell inspector next to Play Mode, then choose a value from the Speed pop-up menu.
The Speed parameter is not available for audio cells that have Flex & Follow turned on in the Cell inspector.
Reverse cell playback
- Select one or more cells, then do one of the following:
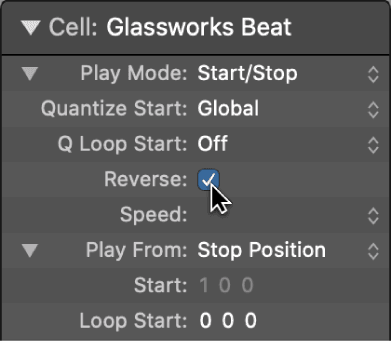
- Click the disclosure triangle in the Cell inspector next to Play Mode, then select the Reverse checkbox in the Cell inspector.
- Control-click one of the selected cells, then choose Playback > Reverse from the submenu.
- Use the Reverse key command (Control-Shift-R).
The Reverse parameter is not available for audio cells that have Flex & Follow turned on in the Cell inspector.
Edit Live Loops scenes
In addition to playing cells individually, you can play cells in a scene together, like a section in a musical arrangement. You can select, duplicate, rename, move, and delete scenes. You can also change the Quantize Start value and Play mode for each scene. When you trigger a scene, all cells in the scene use that scene’s Quantize Start value and Play mode. When you start or stop individual cells in a scene, each cell uses its own Quantize Start value and Play mode. You can add currently playing cells from different scenes to an empty scene or to a scene already containing cells.
Scene selection and focus
Scenes are similar to tracks regarding focus and selection: When you select multiple scenes, the first selected scene is the focused scene. Some operations, such as using a key command to trigger a scene, only affect the focused scene when multiple scenes are selected.
When multiple scenes are selected, the area around the trigger of the focused scene appears gray, unlike the other selected scenes.
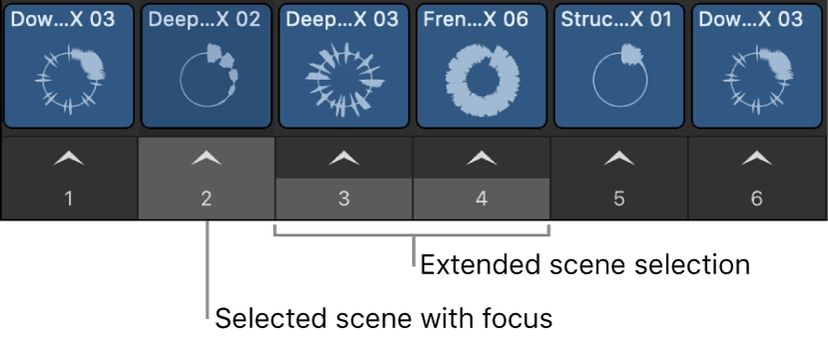
To select scenes, do the following:
- Select single scene: Click the scene name directly under the Scene trigger.
- Select the previous or next scene:
- When a scene is selected: Press the the Left Arrow or Right Arrow keys.
- When no scenes are selected: Press the Option-Left Arrow or Option-Right Arrow keys.
- Select multiple scenes: Shift-click the area under the Scene trigger to add that scene to the selection.
- Extend scene selection to previous or next scene: Press Shift and the Left Arrow or Right Arrow key.
When multiple scenes are selected, only one can have focus. You can change the focused scene while keeping the multiple selection. With multiple tracks selected, do one of the following:
- Move focus to previous or next scene: Press the Left Arrow to choose the previous scene, or the Right Arrow key to choose the next scene.
- Move focus to specific scene: Click the scene name under the Scene trigger for the scene you want to have focus.
To trigger the focused scene, use the Trigger Focused Scene key command.
When no cells are selected and the Live Loops grid is active, you can also use the Play Live Loops key command (or press Return) to trigger the focused scene.
You can copy playing cells to a single scene. This is useful if you want to combine cells from different scenes into a new scene. If you copy playing cells to a scene that already contains cells, the copied cells replace any existing cells on the same track in the scene.
Do one of the following:
- Control-click the Scene trigger of the destination scene and choose Copy Playing Cells Here.
- Select a scene and use the Copy Playing Cells Here key command.
To reorder scenes, click and hold the area under the Scene trigger, then drag the scene left or right.
To duplicate a scene, do one of the following:
- Control-click the Scene trigger and choose Duplicate.The duplicate scene appears to the right of the original scene.
- Option-drag a scene.
To insert an empty scene, do one of the following:
- Control-click the Scene trigger and choose Insert Empty Scene.
- Select a scene and use the Insert Empty Scene key command.
A new empty scene is created and the following scenes move to the right.
To add multiple empty scenes to the end of the grid, move the pointer over the right edge of the last scene in the Live Loops grid.When the pointer changes to a resize pointer, drag it to the right to add empty scenes, or to the left to remove empty scenes.
New scenes are numbered by default. You can rename them to help organize and arrange your Live Loops grid.
To rename a scene, do one of the following:
- Control-click the Scene trigger , then choose Rename from the shortcut menu.
- Double click the name of the scene.
- Enter a new name for the scene, then press Return.
To delete a scene, select one or more scenes, then do one of the following:
- Control-click the Scene trigger of one of the selected scenes, then choose Delete from the shortcut menu.
- Press the Delete key.
To change the Play mode for a scene, control-click the Scene trigger and choose a Play mode from the Play Mode submenu.
To change the Quantize Start value for a scene, control-click the Scene trigger and choose a Quantize Start value from the Quantize Start submenu.
You can change the Quantize Start value or Play mode for all scenes at the same time. To do so, Control-click the Scene trigger , choose Set All Scene Triggers, then choose a Quantize Start value or Play mode from the relevant submenu.
Any previous changes you made to the Quantize Start value or Play mode of an individual scene are updated with the new setting.
Work in the Cell Editor
You can use the Cell Editor to view and edit the regions in cells, similar to how you edit regions in the Piano Roll Editor, Audio Track Editor, Drummer Editor, and Step Sequencer. You can graphically change loop settings for Audio and MIDI cells. Audio and MIDI cells can contain multiple regions, so you can add regions to cells and edit them in the Cell Editor. You can also edit Smart Tempo, transient markers, Flex audio, and region automation for individual cells.
To open the Cell Editor, do any of the following:
- Double-click the top of a cell to open it in the Cell Editor.
- Select a cell, then click the Editors button (or press E).
- Select a cell, then choose View > Show Editor.
The Cell Editor opens below the Live Loops grid and the Tracks area (if visible). Audio cells show the audio waveform of the cell, MIDI cells show a Piano Roll interface, Drummer cells show the Drummer Editor controls, and pattern cells show the Step Sequencer.
Change loop settings for audio and MIDI cells
While you can change the loop settings for all cells numerically in the Cell inspector, you can also change them graphically for audio and MIDI cells in the Cell Editor.
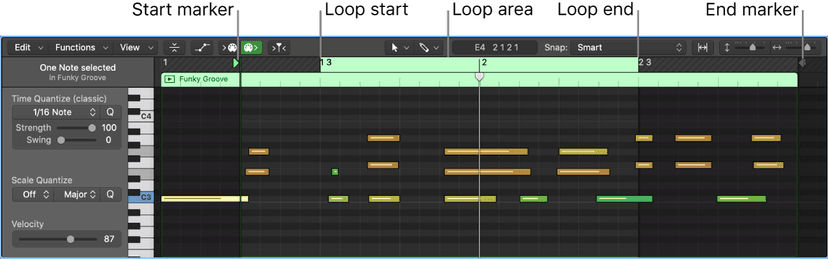
Open the Cell Editor and do any of the following:
- Move the Start position:
- Drag the Start marker to the desired position.
- Control-click the ruler where you want the Start position to be and choose Set Start Position Here from the shortcut menu.
- Move the Loop Start position:
- Drag the Loop Start to the desired position.
- Control-click the ruler where you want the Loop Start to be and choose Set Loop Start Here from the shortcut menu.
- Move the Loop End position:
- Drag the Loop End to the desired position.
- Control-click the ruler where you want the Loop End to be and choose Set Loop End Here from the shortcut menu.
- Move the End position: Drag the End marker to the desired position.
To move the Loop area:
- Move the Loop area: Grab the Loop area by the middle (the pointer turns into a hand) and drag it horizontally.
- Move the Loop area forward or backwards by the length of the loop:
- Forward: Control-click the ruler in the Cell Editor and choose Move Loop Forward by Loop Length from the shortcut menu (or press Shift-Command-Period).
- Backwards: Control-click the ruler in the Cell Editor and choose Move Loop Backwards by Loop Length from the shortcut menu (or press Shift-Command-Comma).
Edit Smart Tempo and transients for audio cells:
You can edit transients and Smart Tempo for individual audio cells
- In Logic Pro, double-click a audio cell to open it in the Cell Editor.
- If the cell contains multiple regions, click the audio waveform to select the region you want to edit.
- Choose one of the following:
- To edit Smart Tempo: Choose Edit > Edit Smart Tempo from the Cell Editor menu bar.
- To edit transients: Choose Edit > Edit Transients from the Cell Editor menu bar.

- When you are done, click the Display Level button in the menu bar of the editor you are working in.
Show automation curves for a cell:
You can view automation curves for regions in cells in the Cell Editor. Automation for cells is similar to region automation. Each region within a cell can have its own set of automation curves. When a cell contains automation curves, an Automation symbol

appears in the lower right corner of the cell in the Live Loops grid.
- Click the Show/Hide Automation button in the Cell Editor menu bar.
- Choose the desired automation or MIDI controller parameter from the Automation pop-up menu.
Record a Live Loops performance
You can record a Live Loops performance to the Tracks area. After you are done recording your Live Loops performance, you can play it back in the Tracks area, edit the regions, and finalize the mix.
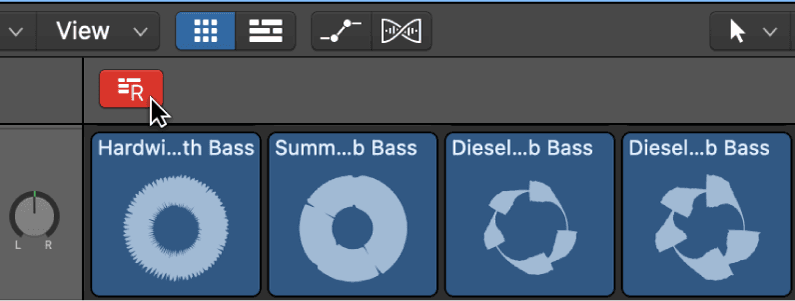
- Click the Enable Performance Recording button at the upper-left corner of the Live Loops grid.
- Make sure that Cycle mode is turned off and the project playhead is positioned where you want to start recording your Live Loops performance.
- Click the Record button in the control bar (or press R) to start recording.
- Start playing scenes, cells, or a combination of both.
- To stop recording:
- Click the Stop button in the control bar (or press the Space bar) to stop recording.
- Click the Play button in the control bar. The Live Loops performance stops recording, but the project continues to play.
When you record a Live Loops performance, you can also record changes to track controls and effect parameters using automation.
Changing Live Loops view settings
You can zoom cells horizontally in the Live Loops grid, control the shape of the cells when zooming, and change the width of the grid.
To control the shape of cells when zooming, choose View > Try to Keep Cells Squared When Zooming from the Tracks area menu bar.
By default, cells keep their square shape when you vertically zoom the tracks. However, if your project contains many scenes and you view the Live Loops grid and Tracks area at the same time, you can disable this so cells appear as thinner, vertical rectangles. This can help you maintain a visible overview of the scenes.
You can zoom cells horizontally in and out. This is useful if you want to see the names of cells that are too long to fit in the top of the cell. You can set the zoom factor and toggle the zoom on and off.

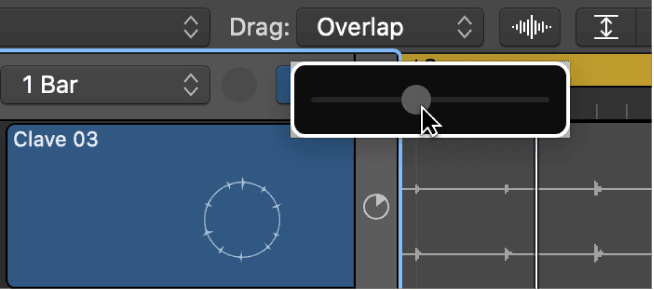
- Click and hold the Grid Zoom button until the zoom slider appears.
- Drag the slider horizontally to adjust the zoom.
- Release the pointer when you’re done.
- Click the Grid Zoom button to turn zoom on and off or use the Toggle Grid Horizontal Zoom key command.
Change the size of the Live Loops grid
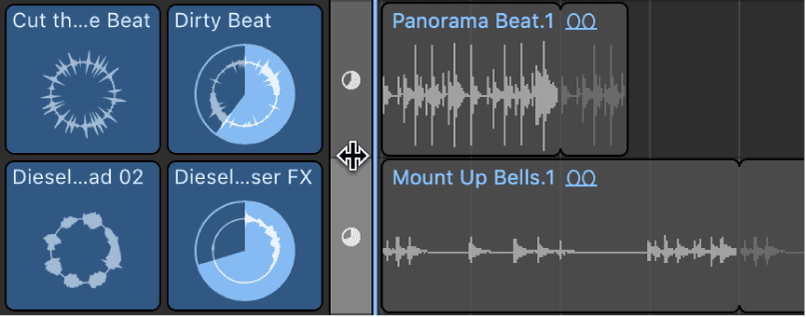
If you view the Live Loops grid and the Tracks area at the same time, you can change the size of the Live Loops grid in relation to the Tracks area.
- Move the pointer over the Divider column between the Live Loops grid and Tracks area.
When the pointer becomes a resize icon, drag it left or right.
Control Live Loops in Logic Pro with other devices
You can assign a MIDI control surface to Live Loops functions and key commands. For example, you can use controller assignments to start and stop cells and scenes, record to a cell, enable performance recording, and toggle activation of track regions. You can assign cells and scenes to the pads on a matrix controller, helping to enhance your creative flow and help you achieve greater flexibility and precision.
Logic Pro provides a dedicated support profile for Novation Launchpad controllers, automatically mapping Live Loops to the pads and controls when a Launchpad device is attached.
You can also control Live Loops remotely using Logic Remote using Logic Remote with your iPad or iPhone.
To assign a controller to Live Loops cells and scenes:
- Click a cell or Scene trigger .
- Choose Logic Pro X > Control Surfaces > Learn Assignment for [Live Loops cell or scene name], or press Command-L.The Controller Assignments window opens in Learn mode, waiting for a MIDI message from your control surface.
- On your control surface, press the button or other controller you want to assign to the cell or scene.The controller is assigned to the cell or scene.
- To make another assignment, select another cell or scene, then move the desired controller on the control surface.
- Click the Learn Mode button, close the Controller Assignment window, or press Command-L to complete the Learn process.
You can use Live Loops key commands and assign them to controllers on a MIDI control surface to optimize your workflow.
Assign a controller to Live Loops key commands:
- Choose Logic Pro X > Key Commands to open the Key Commands window, or press Option-K.
- Scroll down to the key commands grouped under Live Loops Grid. You can also search for the key command in the Search field.
- Select the key command you want to assign to your control surface.
- Click the Learn New Assignment button under the Assignments field.
- Press the control surface button that you want to assign to the key command. This sends a MIDI message to Logic Pro.The name of the controller appears in the Assignments field.
- Repeat steps 3 to 5 to make additional assignments.
- Close the Key Commands window when you are finished.
Do this now
- Build a grid of four scenes from loops you already have.
- Set one cell's play mode so it queues on the next bar rather than immediately.
- Perform the scenes, then record the performance into the Tracks area.
Live Loops is a writing tool before it is a performance tool. The recording is the useful bit.