Flex Time
Though we're taken a little bit of a look at the concepts of working with and time-stretching audio files when working with samples, one of the greatest features of Logic is that it has Flex Time- which makes further manipulation of your audio really easy.
Flex Time—similar to what is often referred to as elastic audio in other applications—simplifies the process of editing the timing of notes, beats, and other events in audio regions. You can compress or expand the time between specified events in an audio region without the need for trimming, moving, nudging, or crossfading.
You can edit the timing of notes and beats in audio regions using flex markers. When you choose a Flex Time algorithm, the contents of the audio track are analyzed for transients, or significant peaks, and any detected transients are marked in the audio regions. You can add a flex marker at a specific part of the waveform you want to edit. After adding flex markers to an audio region, you use them to time stretch—compress or expand—the audio material. The initial boundaries within which this is done are determined by the transient markers
Flex Time is integrated with the Smart Tempo feature and is also available in the Audio Track Editor and Flex Pitch in the Tracks area.
Turning on flex
In order to work with Flex time, you have to turn on Flex, by doing one of the following to show the flex parameters:
- Choose Edit > Show Flex Pitch/Time from the Tracks area menu bar (Shortcut: Cmd+F).
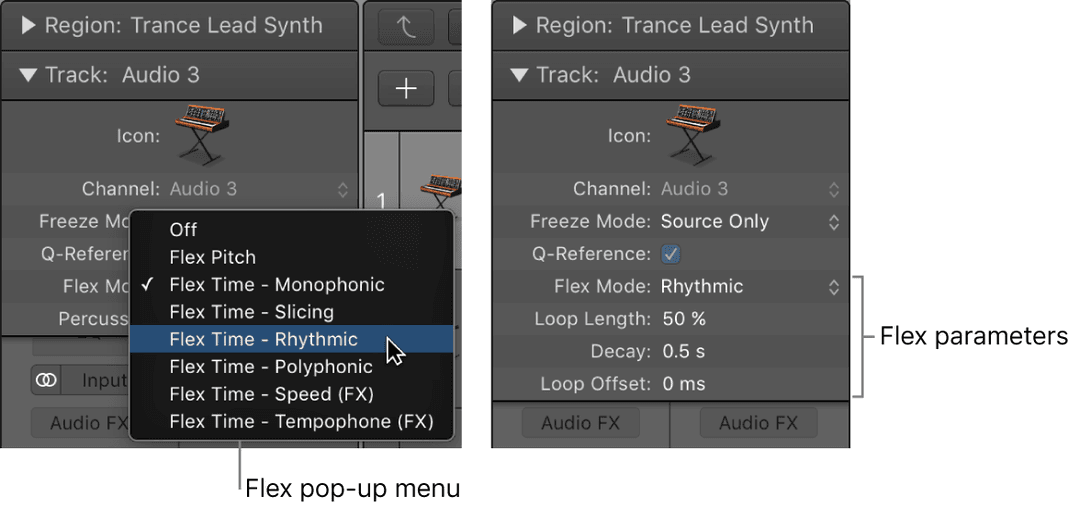
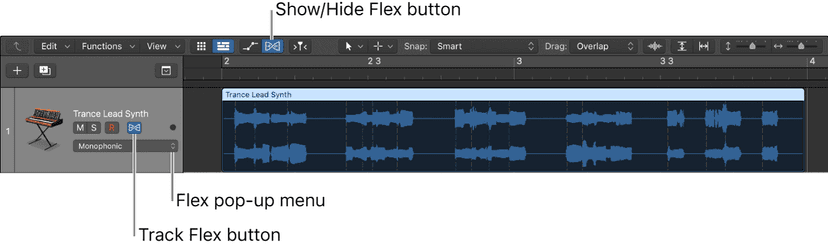
- Click the Show/Hide Flex button in the Tracks area menu bar. A Track Flex button and Flex pop-up menu appear in the track header of each audio track.
- Click the Track Flex button in the track header of the audio track you want to edit.
In the Tracks area, the regions on your track now display transient markers inside the waveform as shown in the figure above.
In the Region inspector the Flex & Follow pop-up menu is now available for use.
In the Track inspector the Flex pop-up menu is now available for use.
Choose one of the Flex Time algorithms from the Flex pop-up menu.
Turning on flex in the Audio Track Editor
Open the Audio Track Editor by doing one of the following:
- Select an audio track in the Tracks area, then choose View > Show Editors.
- Select an audio track in the Tracks area, then click the Editors button in the control bar
- Double-click an audio region.
- Click the Show/Hide Flex button in the Audio Track Editor menu bar (Shortcut: Cmd+F).
Note: Click the Audio Track Editor’s workspace before using the key command, to make sure that the Audio Track Editor has key focus.
A dialog window asks if you want to turn on flex for the selected track, if it’s not already on.
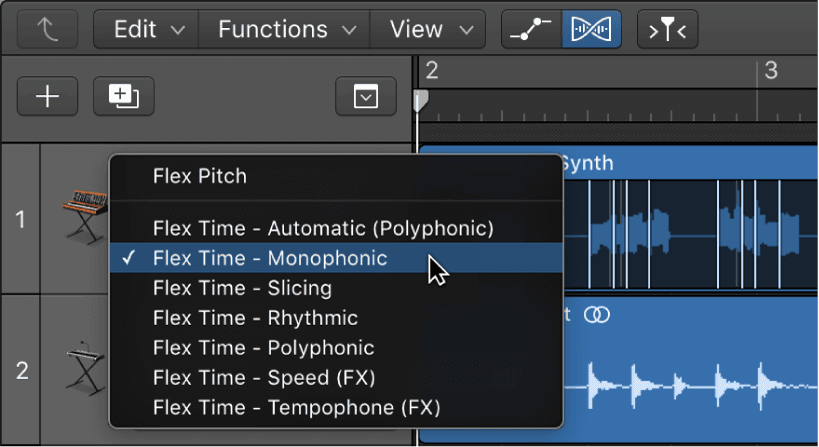
A Flex pop-up menu appears to the right of the Show/Hide Flex button in the Audio Track Editor menu bar.
Choose one of the Flex Time algorithms from the Flex pop-up menu.
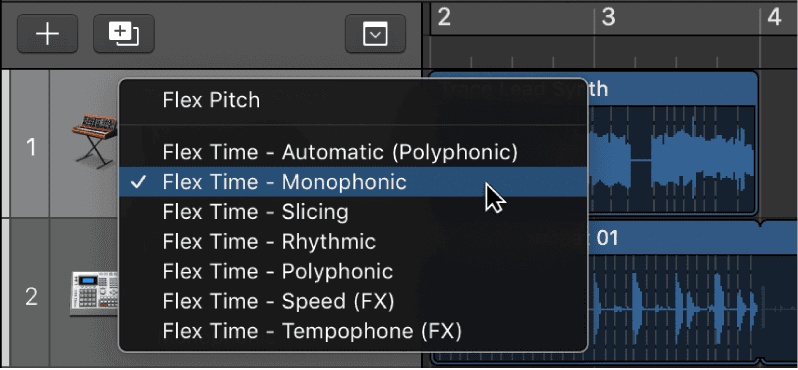
Note: You can assign the same flex algorithm to all audio tracks in the Tracks area or Audio Track Editor, just hold down Shift while choosing a flex algorithm from the Flex pop-up menu.
Flex Time and Follow Tempo
You can configure how Flex Time and Follow Tempo adjust each region on a flex-enabled track using the Flex & Follow pop-up menu.
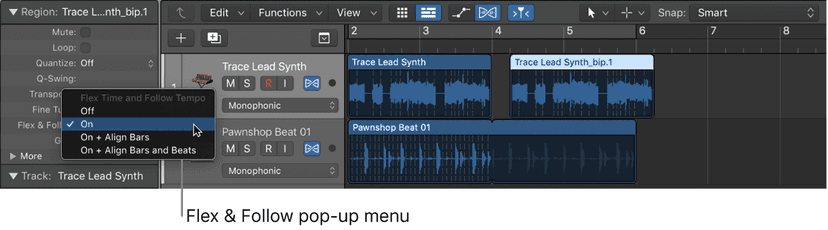
- Select an audio region.
- In the Flex & Follow pop-up menu in the Region inspector, choose one of the following options:Off: The region is not Flex enabled, and does not follow changes to the project tempo.On: The region is Flex enabled, and so follows any manual Flex edits. It also follows changes to the project tempo.On + Align Bars: The region is Flex enabled, and follows project tempo changes. Additionally, Smart Tempo beat markers are used to conform the region to the project tempo at every downbeat (bar).On + Align Bars and Beats: The region is Flex enabled, and follows project tempo changes. Additionally, Smart Tempo beat markers are used to conform the region to the project tempo at every beat.
Flex Time algorithms and parameters
Flex Time algorithms are track-based settings that determine how the timing or pitch of your audio material will be altered—using time compression or expansion, manipulating invisibly sliced segments, or speeding up or slowing down the material. You can choose an algorithm based on the type of audio material you’re working with. Each algorithm comes with its own individual parameters, located in the Track inspector.
You can also have Logic Pro choose the most suitable Flex Time algorithm based on an automatic analysis of your audio material, just choose Flex Time - Automatic from the Flex pop-up menu. The resulting algorithm is chosen as follows:
- Monophonic for monophonic audio material—bass line, for example
- Slicing for percussive, non-tonal audio material—drums, for example
- Polyphonic for chords, or complex material—mixes, for example
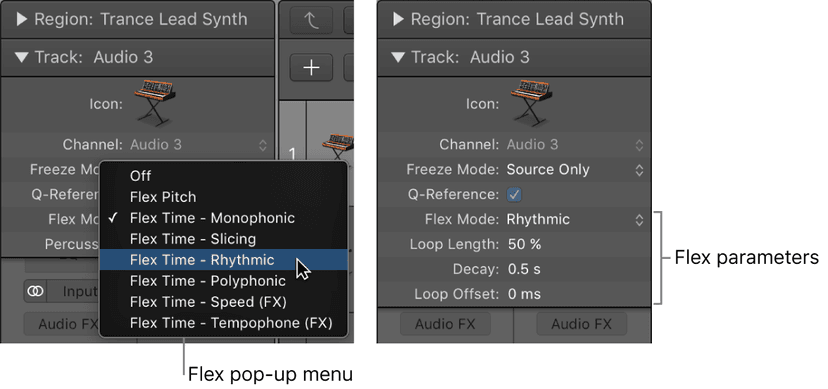
Note: When you choose a flex algorithm for a track, the Freeze Mode parameter in the Track inspector switches from Pre Fader to Source Only. This freezes the track signal without any effects plug-ins.
Slicing algorithm
Slicing cuts the audio material at transient markers, then shifts the audio while playing each slice at its original speed. No time compression or expansion is applied to the shifted audio. Any gaps that occur as a result of shifting the audio can be filled using the decay function. Slicing is a good choice for drums and percussion and comes with the following parameters:
- Fill Gaps: Turns the decay function on or off, allowing you to fill any gaps that occur between sounds as a result of shifting the audio.
- Decay: Sets the decay time between sounds, because no time stretching takes place to compensate for the gaps.
- Slice Length: Shortens each slice by a percentage value. Shortening slices can be helpful for removing unwanted pre-attack sounds from the following slice, or to create a gated effect.
- You can slice an audio region at transient marker positions, splitting it into seperate regions at each transient marker. You do this by Control-clicking the audio region, then choosing Slice at Transient Markers from the shortcut menu.
You can also slice an audio region at flex marker positions, splitting it into a seperate regions at each flex marker you have previously placed. You do this by Control-clicking the audio region, then choosing Slice at Flex Markers from the shortcut menu.
Note: You can use Slice at Transient Markers and Slice at Flex Markers regardless of the flex algorithm selected.
Rhythmic algorithm
Rhythmic time stretches the material, looping audio between slices in order to fill any gaps. This algorithm is most suitable for material such as rhythmic guitars, keyboard parts, and Apple Loops. Rhythmic comes with the following parameters:
- Loop Length: Sets the length of the looped section at the end of a slice that is used for time expansion.
- Decay: Defines a decay value for the looped area.
- Loop Offset: Allows you to move the looped area up to 100 ms to the left, preventing pre-attack sounds from the following transient to appear in the looped and crossfaded area.
- Use the Monophonic algorithm
Monophonic is designed to be used on melodic instruments only playing a single note at a time, and is therefore good for solo vocals and monophonic solo instruments—melody and bass lines, for example. When you use this flex algorithm, your recording should be relatively dry, without audible reverberation. Otherwise, you may want to try using Polyphonic. Monophonic comes with a single parameter:
- Percussive: Preserves the area around transient markers to protect the percussive part of the sound. If selected, allows better timing for all kinds of percussive monophonic tonal material, such as plucked strings (guitar, bass) or tonal percussion. If unselected, prevents glitches on transient markers in non-percussive tonal material, such as bowed strings or wind instruments.
- Use the Polyphonic algorithm
- Choose Flex Time - Polyphonic from the Flex pop-up menu.Polyphonic time stretches material based on a process called phase vocoding—a process that uses phase information to time stretch an audio signal without touching its pitch. It is the most processor intensive of all the flex algorithms, but it delivers high sonic quality with suitable polyphonic material. It’s recommended for complex polyphonic material and is good for all kinds of chords—such as guitar, piano, and choir—and also complex mixes. Polyphonic comes with a single parameter:
- Complex: Enables more internal transients in the audio material.
- Use the Tempophone algorithm
Tempophone emulates the effect of an historical tape-based time-stretching device known as a tempophone, and results in a mechanical sound with many artifacts similar to those produced with granular synthesis techniques. Tempophone is intended to be used creatively for special effects and comes with the following parameters:
- Grain Size: Sets the size of the grains that are played or repeated in their original speed and crossfaded to create time compression or expansion.
- Crossfade: Adjusts the crossfade length from 0.00, which produces hard artifacts, to the full grain length of 1.00, which tends to sound softer.
- Speed algorithm
Speed time stretches material by playing the source material faster or slower, including pitch change. Because of the pitch shifting, this flex algorithm is mainly useful for percussive material, but it can be used on all material for interesting creative effects.
Time stretching using flex markers
In the Tracks area, you edit the timing of audio material using flex markers. After adding flex markers to an audio region, you use them to time stretch—compress or expand—the audio material. The boundaries within which this is done are determined by the preceding and following flex markers, or the region start and end positions if there are no preceding and following flex markers.
You can also use transients in other audio regions as reference points, when dragging a flex marker in an audio region.
Time stretch audio using a flex marker
Choose a Flex Time algorithm for the track and add a flex marker by doing one of the following:
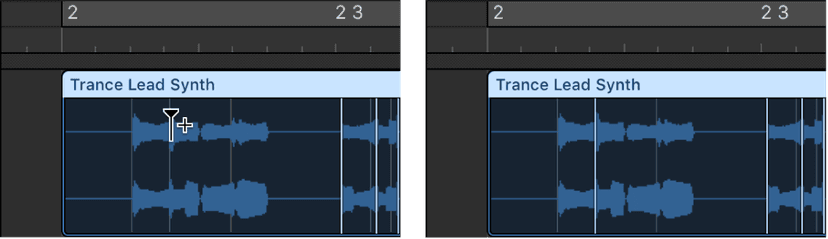
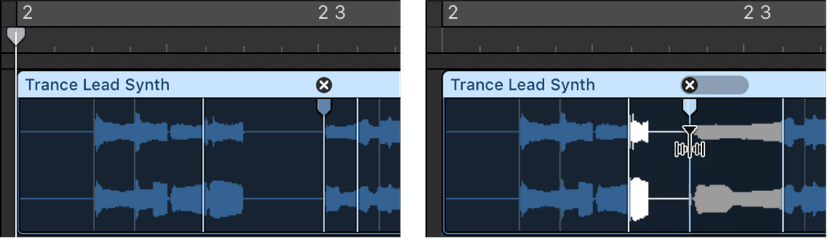
Place the pointer over or beside a transient marker in the upper half of the waveform body (note how the pointer changes), then click. A flex marker is added on top of the transient marker.
Place the pointer in the upper half of the waveform body where there is no transient marker (note how the pointer changes), then click. A flex marker is added at the clicked position.
Then, do one of the following:
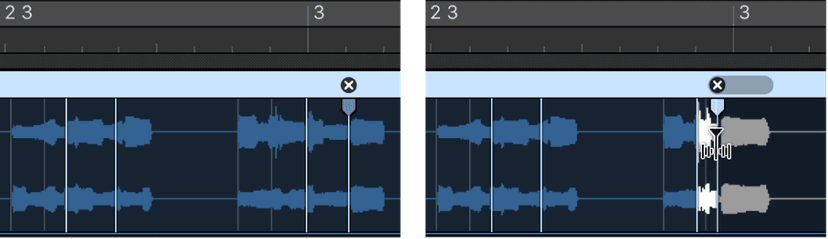
Drag the flex marker to the left. The audio material is time compressed up to the preceding flex marker, the preceding tempo marker, or the region start position. The audio material is time expanded up to the following flex marker or the following tempo marker (which can also be the region end position) .If you move the flex marker to the left and it crosses a previous flex marker, the previous flex marker jumps back to the previous transient marker. This allows you to extend the Flex Time editing range to the left. The same behavior occurs if a flex marker crosses a tempo marker.
Drag the flex marker to the right. The audio material is time expanded up to the preceding flex marker, the preceding tempo marker, or the region start position. The audio material is time compressed up to the following flex marker or the following tempo marker (which can also be the region end position). If you move the flex marker to the right and it crosses a following flex marker, the following flex marker jumps forward to the next transient marker. This allows you to extend the Flex Time editing range to the right. The same behavior occurs if a flex marker crosses a tempo marker.
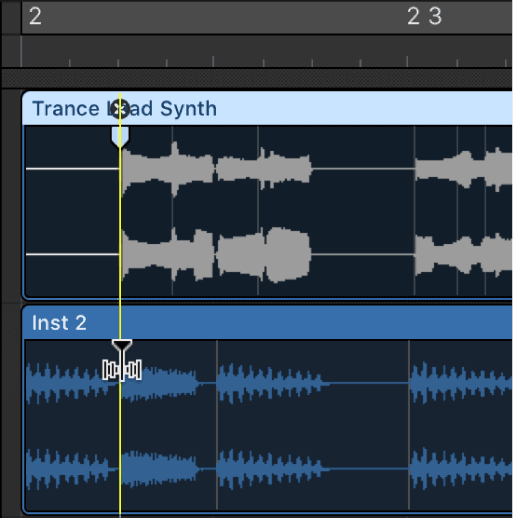
A helpful feature to help you get your tracks lining up a bit better is that you can snap a flex marker to a transient in another region. Click-hold the flex marker, then drag the pointer up or down over an adjacent track. A yellow guideline appears in the audio region on the adjacent track as you move from transient to transient. Release the mouse button to snap the flex marker to the highlighted transient marker.
You don't have to create markers one by one and you can easily add multiple flex markers to an audio region bydoing one of the following:
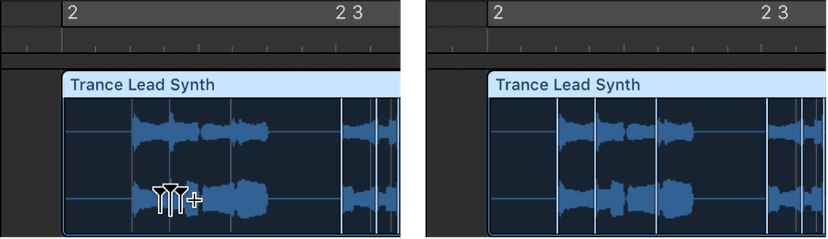
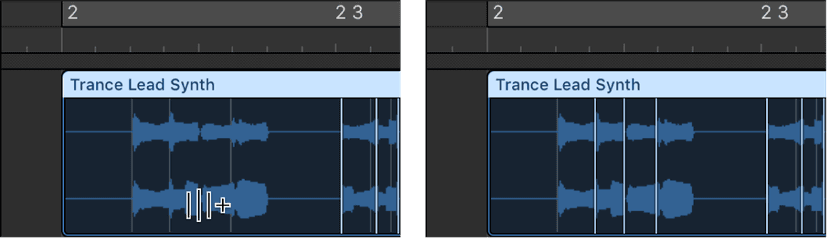
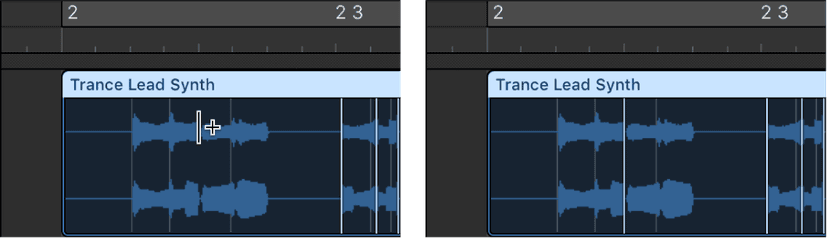
- Place the pointer over or beside a transient marker in the lower half of the waveform body (note how the pointer changes), then click.Three flex markers are added: on the transient marker, on the previous transient marker, and on the following transient marker.
- Place the pointer in the lower half of the waveform body where there is no transient marker (note how the pointer changes), then click.Three flex markers are added: at the clicked position, on the previous transient marker, and on the following transient marker.
Marquee selection time stretching
In the Tracks area, you can edit the timing of audio material using the Marquee tool in combination with flex markers.
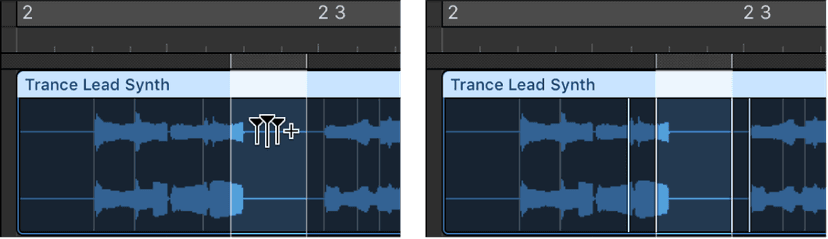
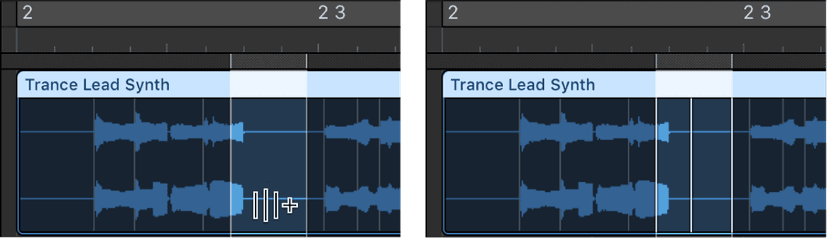
Using the Marquee tool, drag in the Tracks area to select part of a region.
Using the Pointer tool, do one of the following:
Click in the upper half of the marquee selection. Four flex markers are added: two at the marquee borders and two outside the marquee selection, at the previous and next transient markers.
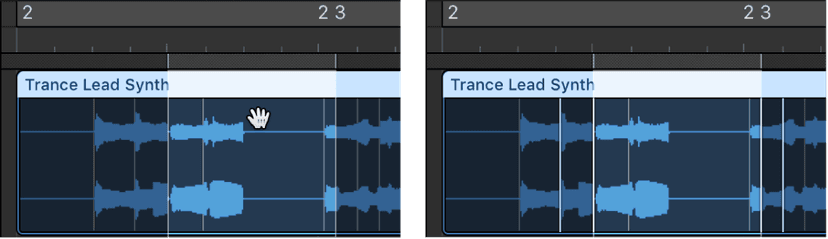
Click in the lower half of the marquee selection. Three flex markers are added: one at the clicked position and two at the marquee borders. Drag the marquee selection in either direction.
Flex tool time stretching
The Flex tool gives you quick access to basic Flex Time editing functionality, without having to turn on Flex view. When you click a region with the Flex tool for the first time, a transient detection process is performed on the audio material and the most suitable flex algorithm is chosen.
You use the Flex tool in the Tracks area to grab points in the region’s waveform and move them. The waveform’s movement is restricted by transient markers on either side of the place you begin dragging. To extend the editing area, drag beyond these transients and the boundary extends to the next or previous transient.
To time stretch audio using the Flex tool, do one of the following:
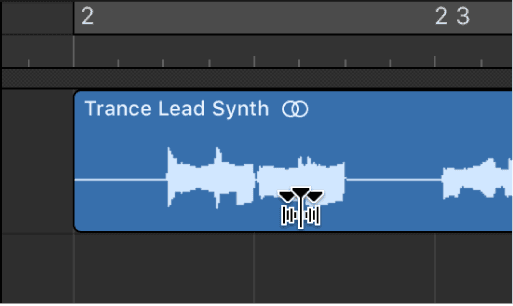
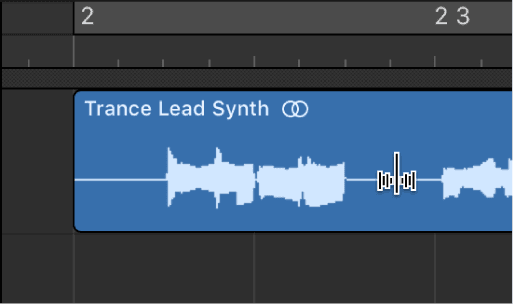
- Place the Flex tool over the region body, then drag when you see the following pointer:Three flex markers are added: on the transient marker, on the previous transient marker, and on the following transient marker.You are compressing or expanding the audio material between the middle flex marker and the other two.
- Place the Flex tool over the region body, then drag when you see the following pointer:Three flex markers are added: at the clicked position, on the previous transient marker, and on the following transient marker.You are compressing or expanding the audio material between the middle flex marker and the other two.
- Make a selection in the region with the Marquee tool, then drag the selection using the Flex tool.Four flex markers are added: two at the marquee borders and two outside the marquee selection, at the previous and next transient markers.You can edit the time position of the audio material between the first and second flex markers or between the third and fourth flex markers. Nothing happens to the audio material between the second and third flex markers.
Deleting, resetting, and moving flex markers
When you delete a flex marker, any time changes that occurred in the area around the flex marker are either removed—resetting the audio material to its original position—or reset according to the time-stretching offset of the previous flex marker or region start position and the following flex marker or region end position.
You can delete only those flex markers that were manually added or all flex edits that were carried out on the audio file, which includes audio quantization.
You can also change the position of a flex marker in an audio region without changing the timing of the audio material before or after the flex marker.
To delete a flex marker from an audio region, do one of the following:
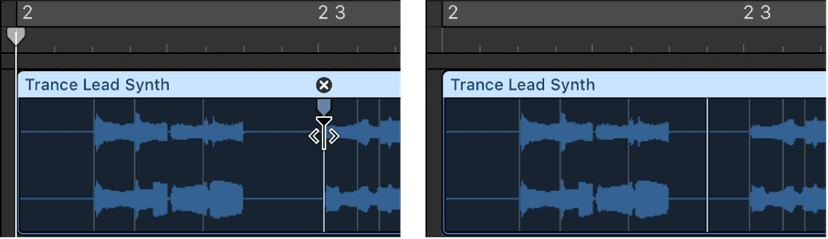
- Place the pointer over the flex marker, then click the “x” symbol in the region header.
- Double-click the flex marker.
- Drag across the flex marker with the Eraser tool.Important: Use the Eraser tool in the body of the waveform only. Using it in the region header deletes the entire region.
- Control-click the flex marker, then choose Delete Flex Marker from the shortcut menu.
- To delete multiple flex markers from an audio region, drag across multiple flex markers with the Eraser tool.
Important: Use the Eraser tool in the body of the waveform only. Using it in the region header deletes the entire region.
To delete all manually added flex markers from an audio region, control-click the region background, then choose Reset Manual Flex Edits from the shortcut menu.
To reset a region to its original length, control-click the region background, then choose Reset All Flex Edits from the shortcut menu.
All flex markers are deleted, including any that were placed automatically—during the audio quantization process, for example.
To move a flex marker to a neutral position, control-click the flex marker, then choose Set To Neutral Position from the shortcut menu.
The flex marker moves to the same position the audio sample would have moved to if the flex marker had been deleted.
To move a flex marker without time stretching, hold down Option while you drag the flex marker.
What changed in Logic Pro 12.3
The flex controls moved. If the screenshots above don't match what you're looking at, this is why:
- The Region inspector now has its own Flex checkbox, a Smart Tempo pop-up menu and a File Tempo field, rather than the single Flex & Follow menu described above.
- There are new options in the Smart Tempo project settings to go with them.
- Loop detection is better: import a file Logic recognises as a loop and it sets the file tempo to a constant value and drops the start on a downbeat.
- For Apple Loops, Follow Tempo & Pitch is now two separate parameters, so you can turn Flex Time and Flex Pitch on independently.
The algorithms themselves - Slicing, Monophonic, Polyphonic and the rest - are unchanged. Everything above about choosing the right one still applies.
Do this now
- Take a recorded part that is slightly out of time.
- Turn on Flex, choose the right algorithm for the material, and pull three transients onto the grid by hand.
- Undo it all and try Quantize in the Region inspector instead.
Do it by hand once so you can hear what the automatic version is doing for you.