Editing Audio & Managing Projects
It's a good idea to get familiar with some of the editing you might encounter when working with audio. Editing audio is done in part by some of the comping we have looked at, but editing with fades, cross fades and removing silences can be really effective in truly cleaning up your audio. It's a little boring but essential housekeeping that we have to do, in order that we don't have any audio pops and clicks and the like, that our listeners might notice and judge us as being unprofessional for!
Fades
You can fade in the beginning of audio regions, and fade out the end of audio regions (including audio Apple Loops). They help to clean up your audio so there are no little pops of clicks. When your playhead moves over a region that has audio data at the beginning of it, it will produce a clicking sound and a short fade can help to clean that up, ensuring it's not audible.
Fades are only visible if you are zoomed in enough to see the waveform in the audio region. You can create a fade using either the Fade tool or the Fade In and Fade Out parameters in the Region inspector.
Creating a fade-in or fade-out with the Fade tool
- Select the Fade tool.
- Do one of the following:
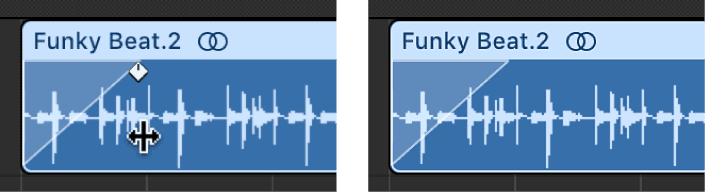

- Drag over the start or end point of an audio region.A fade-in or fade-out is created. The length of the fade drag area determines the length of the fade, so a longer drag area results in a longer fade time, and a shorter drag area, a quick fade.
- Drag over the end point of one audio region and the start point of the region that follows.This technique works even if the two sections don’t directly adjoin each other.
With the Fade tool selected, you can edit fades on regions after you make them.
Creating a fade-in or fade-out using the Region inspector
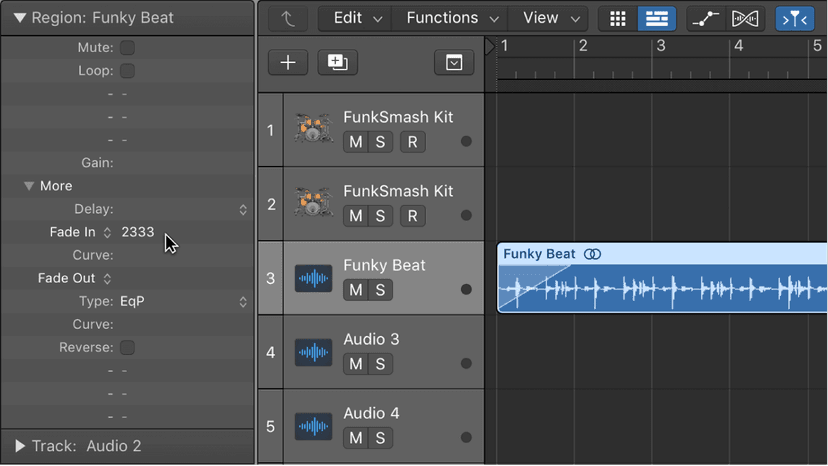
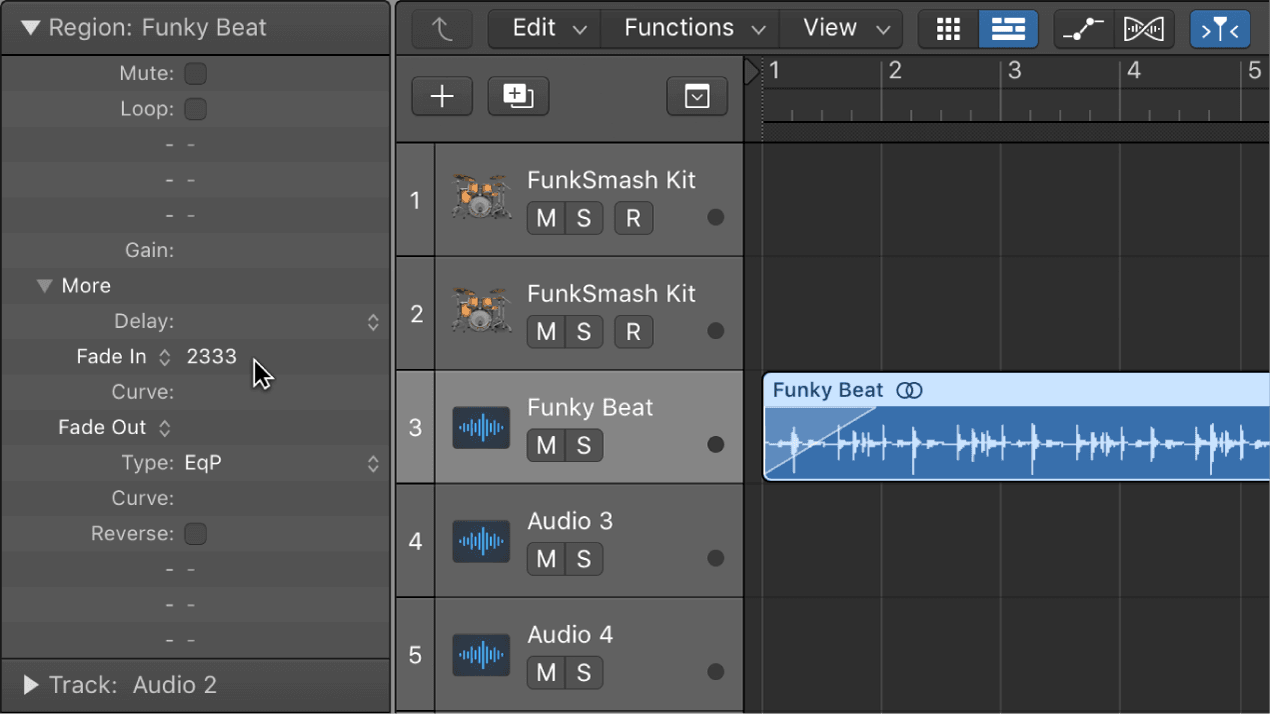
- Select one or more regions.
- Set the value for the Fade In or Fade Out setting in the Region inspector by dragging the pointer vertically, or double-clicking and entering a value.
Fades created using the Fade tool and the Region inspector are interactive. After you create a fade using the Fade tool, for example, you can adjust the fade using the Region inspector Fade In or Fade Out parameters.
Apply the last fade to selected regions
- In Logic Pro, select one or more regions.
- Use the “Apply Last Fade or Fade Marquee Selection” key command.
The Apply Last Fade or Fade Marquee Selection command applies the following region parameters to the selected regions:
- Fade In/Speed up–Time
- Fade In/Speed up–Curve
- Fade Out/Slow Down–Type
- Fade Out/Slow Down–Time
- Fade Out/Slow Down–Curve
The Fade Out/Slow Down Type change from “Out” to “EqP Crossfade,” or from any of the “Crossfade” types to “Out” depending on whether an adjacent region following the selected region (requires EqP Crossfade) or a gap (requires Out) exists.
Note: The Speed Up/Down Fades are used to create the infamous tape start/stop effects- so try them out!
Apply the last fade to a marquee selection
- Make a marquee selection to part of one or more regions.
- Use the “Apply Last Fade or Fade Marquee Selection” key command.
In case there is a marquee selection, the following are applied for every affected track:
- When the marquee selection encloses one region end which is followed by a gap, or the marquee selection starts later than the region start and ends exactly on the region end (within the same pixel, or so): apply a Fade Out from the marquee selection start to the region end.
- When the marquee selection encloses exactly one junction between two adjacent regions (starts later than the first region start, ends earlier than the second region end): apply an Equal Power Crossfade from the marquee selection start to the marquee selection end, with the crossfade pivot on the region junction.
- When the marquee selection encloses a region start, which follows a gap, or if the marquee selection starts on the region start and the marquee selection ends before the region end: apply a Fade In from the region start to the marquee selection end.
Editing fades
You can change the length of a fade, the fade curve shape, the fade type, and the fade playback speed (also called Speed Fade).
You can also choose between four different fade types in the Region inspector.
To edit the length of a fade, do one of the following:
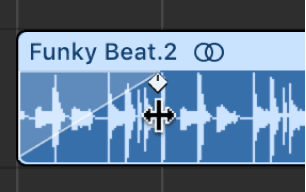
- Drag over the start or end point of a fade with the Fade tool.
- Select a region, then edit the Fade In or Fade Out value in the Region inspector.
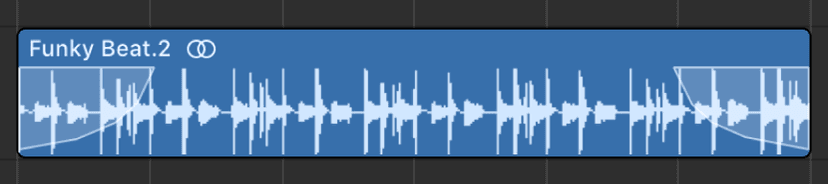
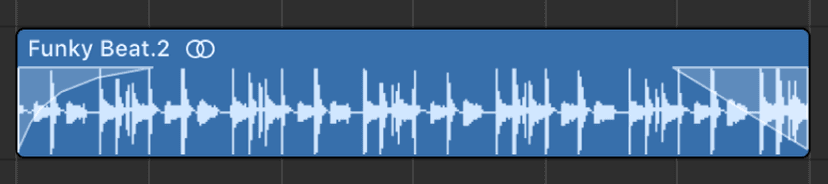
To adjust the fade curve shape, do one of the following:
- Drag the fade curve with the Fade tool.
- Select a region, then edit the Curve value in the Region inspector.
In the example below, a positive curve is shown for both the fade-in and fade-out.
In this next example, a negative curve is shown for the fade-in, and a linear fade (no curve) is shown for the fade-out.
To change the fade type:
- In the Region inspector, choose a fade type from the Fade Out pop-up menu.
- Out: Creates a standard fade-out whenever the Fade tool or Fade parameter is used.
- X (Crossfade): Crossfades the selected region with the following region when you use the Fade tool or Fade parameter.
- EqP (Equal Power Crossfade): Results in an equal power crossfade. This minimizes volume dips between audio regions, resulting in a more even crossfade between regions that may be slightly different in level.
- X S (S-Curved Crossfade): Delivers an S-curved crossfade. The fade curve, as the name suggests, is S shaped.
The last three items in the pop-up menu can only be applied to two consecutive regions. Also note that the Fade In (and corresponding Curve) parameters are made redundant when any of the X, EqP, or X S options are chosen.
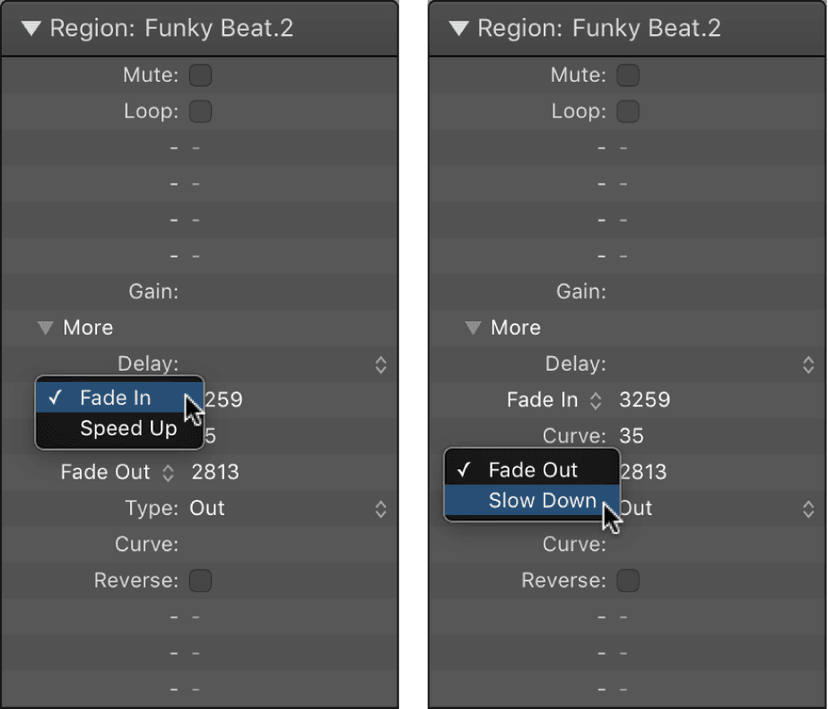
To change the playback speed of a fade, do one of the following:
- For a fade in, choose the Speed Up parameter, and modify the value.
- For a fade out, choose the Slow Down parameter, and modify the value.
Logic Pro offers Speed Up and Slow Down parameters in the Region inspector, which you can use to speed up or slow down the playback speed of fades. These parameters share pop-up menus with the Fade In and Fade Out parameters.
Deleting fades
You can delete a fade with a menu command, with the Fade tool, or by modifying the parameters in the Region inspector.
To delete a fade, do one of the following:
- Control-click an existing fade area, then choose Remove Fade from the shortcut menu.
- Option-click an existing fade area with the Fade tool.
- Set the Fade In or Fade Out parameter in the Region inspector to 0.
Removing silent passages
You can remove silent passages from audio regions in the Remove Silence window. The basic process is simple: all amplitude values below a threshold level are removed, and new regions are created from the remaining passages.
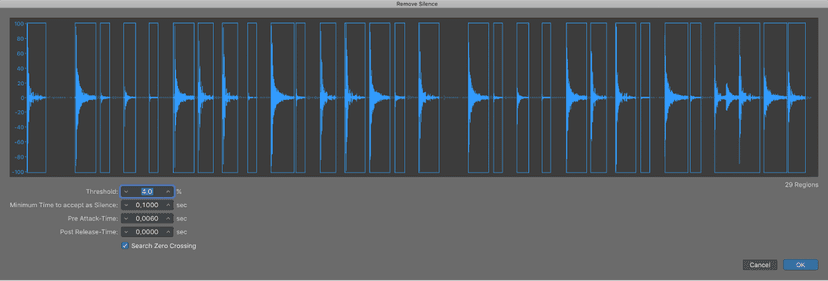
The parameters of the Remove Silence window are:
- Threshold: Use to define the amplitude level that a passage must exceed, in order to be defined as a region. In terms of the number and length of regions created by the process, this is the most important parameter. As a general rule: a higher Threshold value leads to numerous short regions. Low values create fewer large regions.
- Minimum Time to accept as Silence: Use to define the length of time that a section must be below the Threshold value, before it is considered a gap. Very small values tend to increase the number of regions, because even short dips in amplitude are interpreted as silence. Higher values prevent sections of audio from being interrupted by fluctuating amplitudes.
- Pre Attack-Time: Use to add a defined amount of pre-roll to the beginning of all regions created by the Remove Silence process. High threshold values prevent any amplitudes with slower attack times from being chopped. This function is useful for nonpercussive material such as vocals, wind instruments, strings, and so on. Overlaps are permitted—the pre-delayed start point of a region can extend back to the end of the previous region—but only if the Threshold value is not exceeded. The Pre Attack Time doesn’t affect the anchor position, which means the absolute position of the audio data (in the project) is retained.
- Post Release-Time: Use to define an automatic release time for the end points of all regions, avoiding abrupt cutoffs to amplitudes that fade out gradually (particularly if you have set a high Threshold value); for example, cymbals, open hi-hats, snares with long reverb tails, vocals, and so on. This parameter does not allow overlaps, which means that region end points cannot extend beyond the start point of the following region. The Post Release Time doesn’t affect the anchor position, which means the absolute position of the audio data (in the project) is retained.
- Search Zero Crossings: Select this checkbox to automatically snap the region start and end points to the nearest waveform zero crossings.
To open the Remove Silence window, in the Project Audio Browser, Control-click an audio region, then choose Remove Silence from the shortcut menu.
Removing silent passages from the selected region
You must set parameters in the Remove Silence window.
Note: Depending on the material in the audio file, all parameters can affect the number and division of regions. Try different values to see what produces the best result.
The graphic display of the region updates to show the result of your changes.
Click OK.
If you selected a region that is used in the Tracks area, a dialog asks if you want to replace the region in the Tracks area with the new regions.
Do one of the following:
To replace the region in the Tracks area with regions created by the Remove Silence function: Click Replace or press Return. This ensures that the relative timing of the individual audio segments remains unaltered.
To have the regions appear only in the Project Audio Browser: Click No. You can add regions manually from the Project Audio Browser.
You can use Remove Silence for a variety of different situations.
Remove background noises
The most common use for Remove Silence is simulation of the classic noise gate effect. When used on long recordings with numerous gaps—such as vocals or instrumental solos—you can obtain better results by setting a low threshold value. Background noise is removed, without affecting the main signal.
- For short percussive regions (drum loops), you can simulate time compression/expansion by simply altering the tempo.
- You can even quantize the individual segments in an audio recording.
Create segments of spoken recordings
You can use Remove Silence to divide long spoken passages into several convenient segments, like sentences, words, or syllables. For film synchronization or jingles, you can move or reposition the speech segments by simply dragging them around in the Tracks area.
Tempo changes allow you to simulate a time compression or expansion effect, as the syllables automatically move closer together, or farther apart.
Create segments for drum loops
Dividing drum loops into small segments is a good way to perfectly synchronize them. For example, in audio passages where the bass drum and snare are completely separate, you can often use Remove Silence to isolate each individual beat.
Optimize synchronization
Different computers, different synchronization sources (internal or SMPTE code), different tape machines, and—in theory—different samplers or hard disk recording systems will exhibit slight variations in clock speed. Changing just one component can lead to a loss of synchronization between recorded audio material and MIDI. This is particularly applicable to long audio regions.
This is another situation where the Remove Silence function can help, by creating several shorter audio regions, with more trigger points between the audio and MIDI events.
For example, you can use this method to roughly split up a whole audio file, and then divide the new regions, using different parameters. The new regions can then be processed again with the Remove Silence function.
Optimize files and regions
You can use Remove Silence to automatically create regions from an audio file that contains silent passages, such as a single vocal take that runs the length of a project. The unused regions or portions of the audio file can be deleted, saving hard disk space, and simplifying (file and) region management.
Use Remove Silence to extract audio files
Many sample library discs (CD or DVD) contain thousands of audio recordings stored as AIFF or WAV files. You can use Remove Silence to split these into individual regions, which can be used directly in the Tracks area. In addition, you can convert regions into individual audio files (samples), which can be used in the Sampler.
Cleaning up project files
Like we spoke about housekeeping for you audio regions, you should get into the good habit of cleaning your projects up. Doing this will keep your projects together and slim in size, saving you tons of hard drive space, particularly if you've been working with loads of audio takes and files!
To clean up your project file, choose File > Project Management > Clean Up.
In the dialog that appears, select the checkboxes for the cleanup options you want to apply to the current project.
Delete Unused Files: Files not used in any project alternative are deleted from the project, and removed from the Project Audio Browser. Note: Selecting Delete Unused Files will also select Delete Backups.
Delete Backups: Backups for all project alternatives are deleted from the project.
Delete Media Browser Files: Files shared to the Media Browser are deleted from the project.
Click OK.
A dialog appears, showing all of the files to be deleted from the project. To keep any individual files from being deleted from the project, deselect the Delete checkbox for those files.
When you create or save a project, you can choose whether the assets in your project are saved in the project, or referenced from their location on your computer or a connected storage device. Assets include audio and video files, sampler instruments and samples for the Sampler or Ultrabeat, and Space Designer reverb impulse response files.
Saving projects without assets can save disk space, but as a result, the project can’t access the referenced files when moved, unless the assets are also moved.
You can manage project assets in the Assets pane of the Logic Pro project settings. You can use this pane to determine which specific asset types to save in the project, and which to reference from their external location.
MIDI data from software instrument recordings, added loops or MIDI files, and parameter settings for the channel strips and plug-ins are always saved as part of a project.
Open the Assets project settings
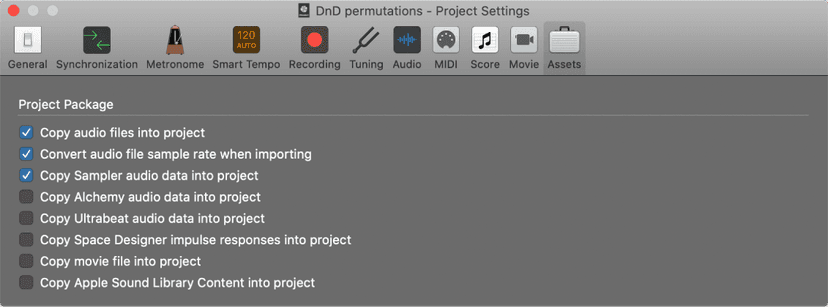
- In Logic Pro, choose File > Project Settings > Assets (or use the Open Assets Project Settings key command).
- To copy the respective file types to the project: Select any of the copy checkboxes.
- To automatically convert the sample rate of all imported files (with a different sample rate) to match the project sample rate: Select the “Convert audio file sample rate when importing” checkbox.
- If you deselect the “Copy Sampler instruments and samples to project folder” option, only Sampler instrument files are copied to the project when saving, not the samples associated with the Sampler instrument files.
Files are copied into the project when the project is saved.
Once the project is saved, you can move or copy the project without losing any references to files in the project.
You can also create your own folder structure to save the project and different assets in categorized folders, or reference media files anywhere on your system. You can also specify a recording path for audio files outside the project, in File > Project Settings > Record > Audio Recording Path. For more information about Recording project settings, see Recording settings in Logic Pro.
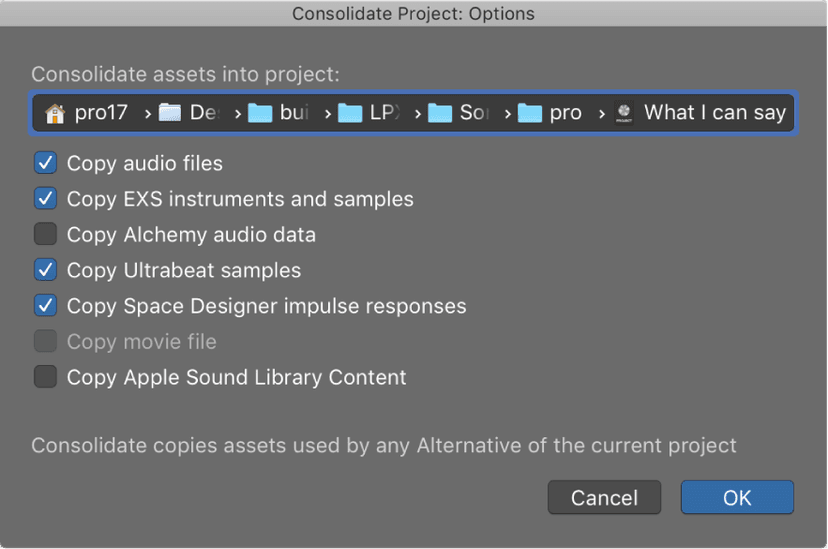
Using the Consolidate command, you can create a “consolidated” copy of a project, and select which types of assets are copied into the consolidated project.
Consolidating project assets
Choose File > Project Management > Consolidate (or use the Consolidate Project key command). Select the checkboxes for the file types you want to copy into the consolidate project, then click OK.
In the Project Information window, you can view the number of regions and other objects in a project, the number of different MIDI events, and the amount of memory they use.
A project may occasionally become corrupted due to driver or memory conflicts, or may feel sluggish. If corruption occurs, Logic Pro displays a warning message letting you know about the problem. These problems can generally be fixed in the Project Information window.
The Project Information window also provides the Reorganize Memory function that allows you to increase the amount of free memory, and to fix a number of potential project corruptions or problems.
To open the Project Information window, use the Project Information key command. The Project Information key command has no default assignment, so be sure to assign it if you need it!
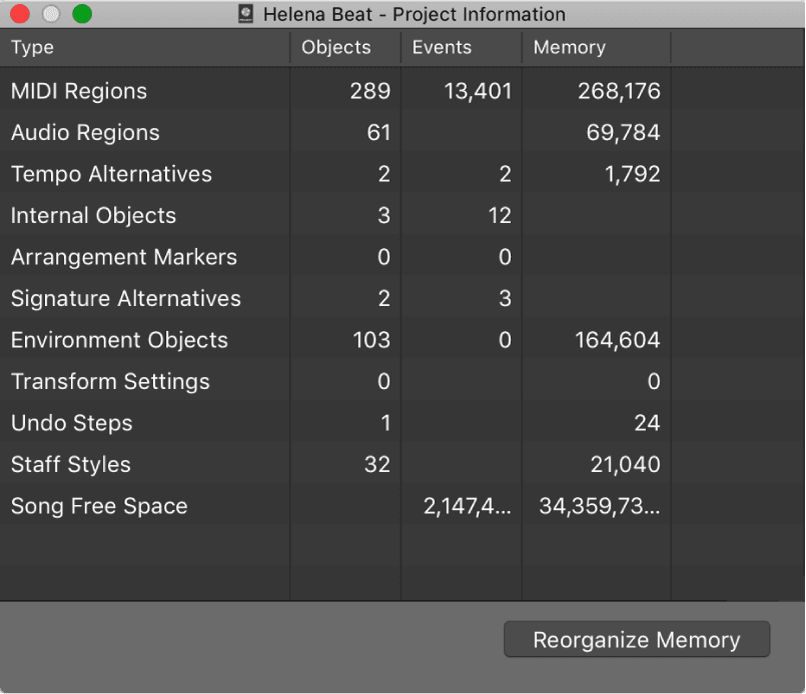
- Click the Reorganize Memory button in the Project Information window.
When you reorganize memory, the current project is checked for any signs of damage, structural problems, and unused blocks. If any unused blocks are found, you will be able to remove these, and repair the project.
Note: Project memory is also reorganized automatically after saving or opening a project. A common (and good) use of this feature is to free up memory after closing a project, if two or more projects were open prior to the Close operation.
Do this now
- Put fades on every audio region boundary in a project.
- Set one crossfade by hand, then apply it to the rest with Apply Last Fade.
- Run Project Management and delete the unused files.
Fades stop clicks. Cleanup stops a 40 GB project folder.