Automation
Automation is a tool that's used by many people to help static parameters develop into more dynamic ones and can really bring your sounds and productions to life. It's used often in developing sounds into more interesting and less lifeless ones, by manipulating parameters over time- the simplest ones being volume and panning. For instance, let's say you want a vocal to build in level and also pan from left to right whilst doing so- automation is your friend. Or, we want to take a parameter of one of our synths and manipulate it over a 4 bar phrase, like a filter we want to gradually open or close- once again, automation is what we want to work with here. Automation truly throws our world of sonics wide open as it provides us with seemingly endless ways of taking a sound and manipulating, evolving and shaping it to our desire. There are, in effect, 2 ways to “record” in your automation. You can manually draw/program in the Automation with “Offline” Automation or you can perform it live in using “Online” Automation. Either way, you're taking what is an already great sound and making it even greater by adding a little bit (or a lot!) of movement to it. Let's look at how we can work with Automation in Logic.
Before you can add automation points to a track’s automation curves, you need to show the automation curves. Automation curves are displayed as colored curves and points on top of audio and MIDI regions across the track, running the length of the project.
You can choose whether to view and edit automation across the track (track-based automation) or only within the track’s regions (region-based automation).
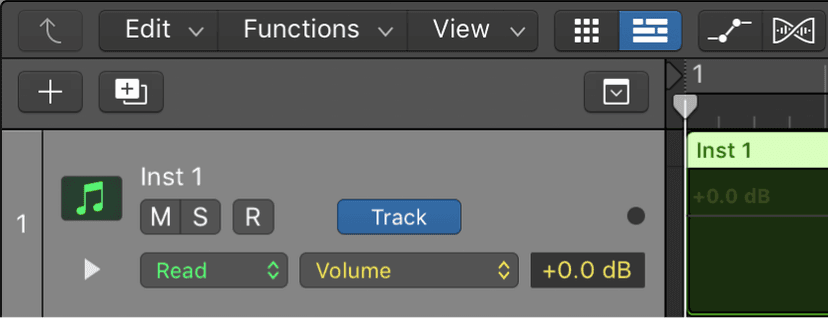
After you show the automation curves, you can choose which parameter you want to work with—Volume, Pan, or any other track parameter. You can work with multiple parameters on the same track by switching between automation curves using the Automation Parameter pop-up menu, or you can work in separate subtracks, which appear below the main track.
To show automation curves, do one of the following:

- Choose Mix > Show Automation (or press A).
- Click the Show/Hide Automation button in the Tracks area menu bar.
An Automation button, an Automation Parameter pop-up menu, and an Automation Mode pop-up menu appear in each track header. When you chose an automation mode, for most automation modes the background color of the Automation Mode pop-up menu reflects the mode (more about these later):
- Gray background = automation is off
- Mustard background = Touch mode
- Orange background = Latch mode
- Purple = Write mode
For Read mode, however, the button and text color display the current state of automation and if there is automation data present:
- Green text on a gray background = automation is on but there is no existing automation data to display
- White text on a green background = automation is on and there is existing automation data to display
Any existing automation is displayed on the track or within the regions. If you show automation on a collapsed Track Stack, all the automation from included tracks is displayed. You can choose the parameter you want to automate—Volume fader, Pan knob, or any other track parameter—from the Automation Parameter pop-up menu.
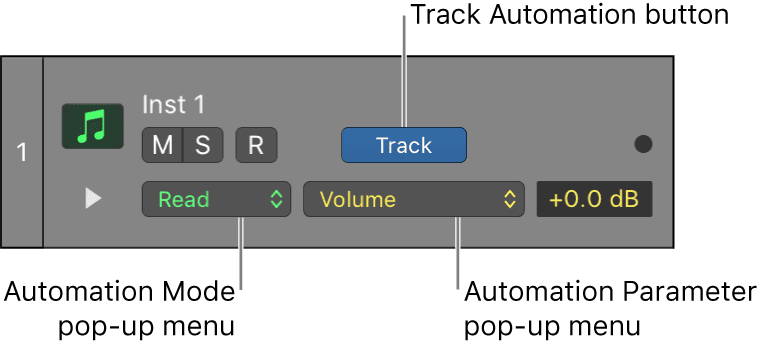
You can easily switch between viewing track-based and region-based automation, by clicking the Automation button in the track header to switch between track-based and region-based automation.

If you want to automate for instance Pan instead of Volume (usually the default parameter), do one of the following:
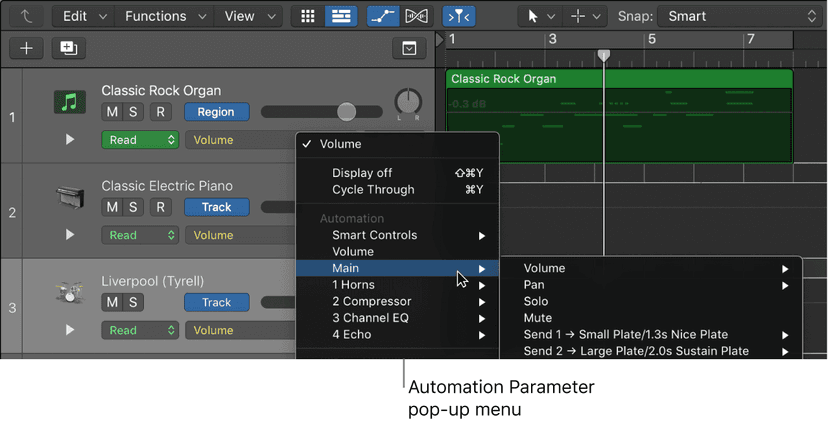
- Choose a parameter from the Automation Parameter pop-up menu in the track header.
- Control-click the track lane, then choose an automation parameter from the Automation Parameter pop-up menu in the shortcut menu that appears.
The parameter currently shown in the automation lane is shown at the top of the Automation Parameter pop-up menu. Volume, Pan, Solo, and Mute appear in the “Main” submenu. A submenu is also shown for Smart Controls.
Below the Smart Controls submenu, the Automation Parameter pop-up menu contains a submenu for each plug-in on the track. The plug-in submenus are numbered and named after the slot position and plug-in: 1 Sampler, for example. When using region-based automation with an instrument or Drummer track, a MIDI sub-section shows all available MIDI parameters available for you to automate.
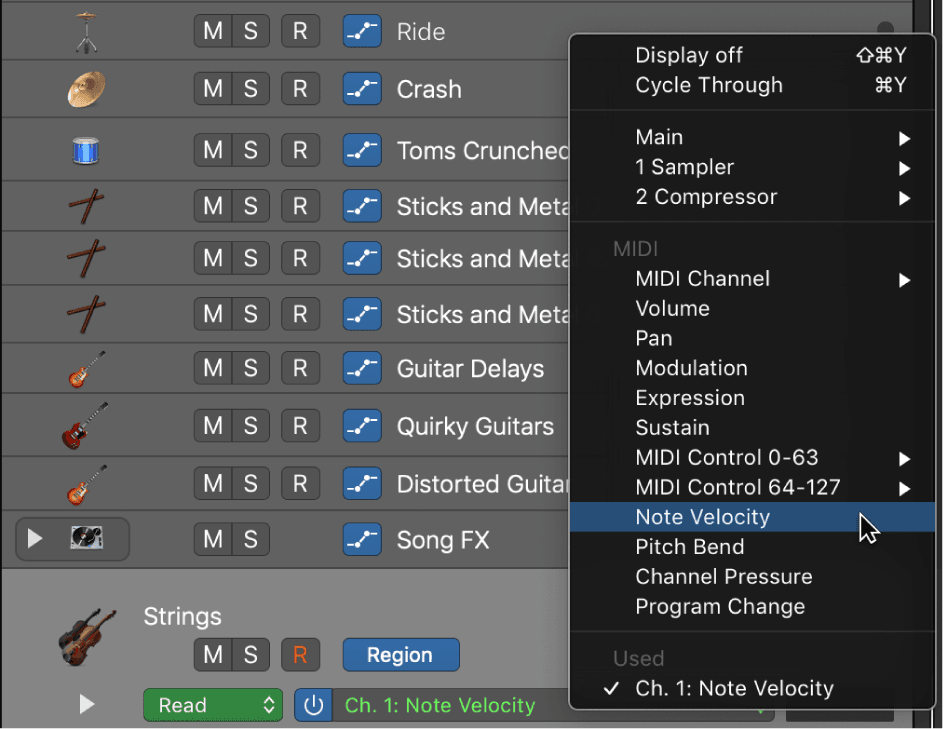
Note: Logic Pro offers more than two dozen unassigned key commands that you can use to select the automation curves of various region-based automation parameters directly. You can assign these key commands to keys, controllers, or a Touch Pad using the Key Commands window. When you select one or more regions and then use one of these key commands, the chosen automation curve will be shown on all tracks with regions selected. If you use one of these key commands without any regions selected, the selected track will show the chosen automation curve.
You can automatically show the automation curve of any parameter you click in a channel strip, plug-in editor, or track header on the main automation lane.
- Select Mix > Auto-Select Automation Parameter in Read Mode (or use the key command).
Automation must show in the main automation lane, and the automation mode must be set to Read, for “Auto-Select Automation Parameter” in Read mode to work.
Note: When Auto-Select Automation Parameter in Read Mode is active, Record Automation with MIDI Regions is disabled.
You can mute an individual automation parameter by turning it off in the track header.
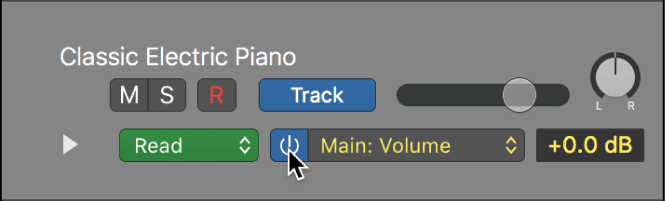
- Choose a parameter from the Automation Parameter pop-up menu in the track header.
- Place the pointer over the Automation Parameter pop-up menu, then click the On/Off button that appears.
When muted, the automation curve for the parameter will turn gray.
You can show multiple parameter curves on automation subtracks, if you want to see more than one parameter's automation data at once- ie- volume and panning data together.
Click the disclosure triangle at the lower left of a track header. Choose the parameter that you want to automate from the Automation Parameter pop-up menu in the track header.
To add additional subtracks, click the Plus button (+) that appears when you place the pointer over the track header. All additional automation subtracks are revealed.
Each additional subtrack is set to an automation parameter type that’s already recorded but not currently shown. The active automation parameter remains on the main track.
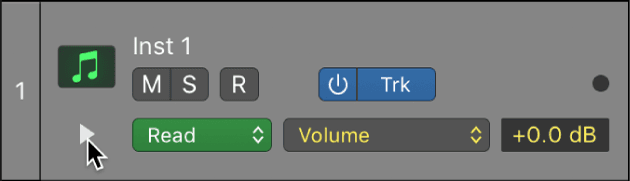
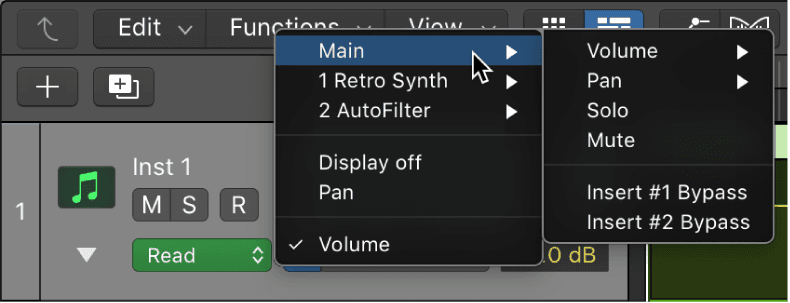
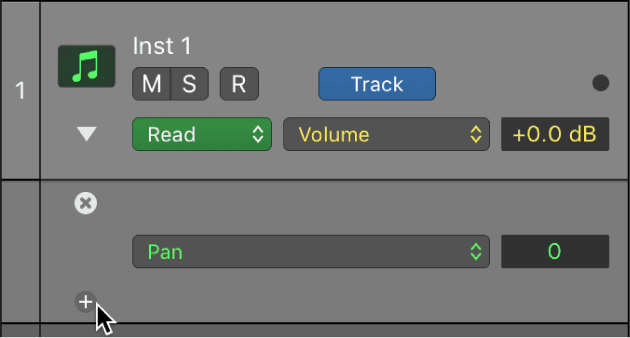
To add, remove, and reorder automation subtracks, do any of the following:
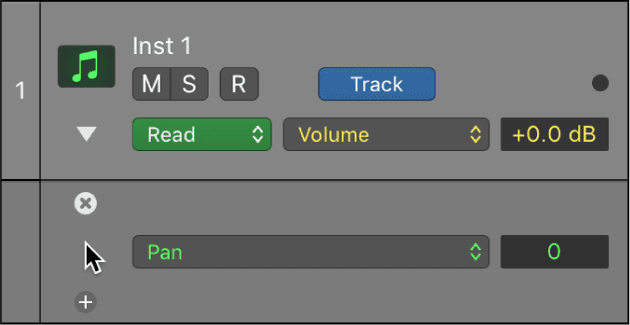
- To add a subtrack: Place the pointer over the subtrack header, then click the Plus (+) that appears.
- To remove a subtrack: Place the pointer over the subtrack header, then click the X icon that appears.The selected subtrack is removed without deleting its automation.
- To reorder subtracks: Drag the subtrack up or down.
Choosing automation modes
Automation modes determine how automation tracks are treated. Automation is either being read or being written. You can independently set the automation mode for each track. You can also trim automation values and record relative automation data.
- Read: Plays back all automation that exists on the track. If volume data exists, for example, the Volume fader moves during playback, following the prerecorded automation on the track. You can’t change the value of the chosen automation parameter by moving controls when in Read mode. However, you can record region-based information directly into a MIDI region in Read mode.
- Touch: Plays back automation in the same way as Read mode. You can modify the value of the chosen automation parameter by moving controls in Touch mode. After the fader or knob is released, the parameter follows existing automation on the track.
- Latch: Works like Touch mode, but after the fader or knob is released, the new parameter value replaces existing automation on the track.
- Write: Erases existing automation on the track as the playhead passes over it. Records the new control movement or deletes the existing data if you do nothing.
- Trim: Offsets the value of the existing automation (Volume, Pan, Send levels) by adjusting it up or down by the amount you move the fader or control. Works in combination with Touch and Latch automation modes.
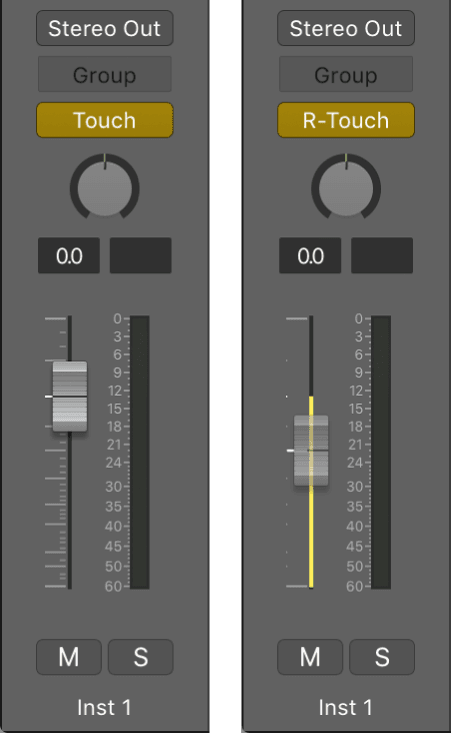
- Relative: Adds a secondary automation curve that offsets the existing primary curve for the selected parameter (Volume, Pan, Send levels). Both the primary and secondary curves are visible, and can be edited. Works in combination with Touch, Latch, and Write automation modes.
To set the automation mode for a track, do one of the following:
- Show the track’s automation curves, then choose a mode from the Automation Mode pop-up menu in the track header.
- Chose a mode from the Automation mode pop-up menu on a track’s channel strip.
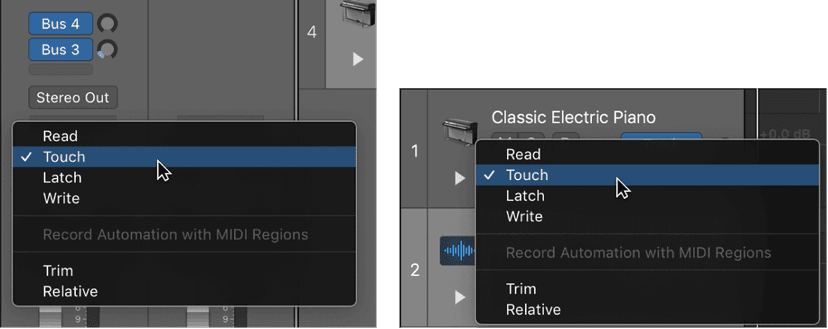
You're able to set the same automation mode for selected tracks, by doing one of the following:
- Shift-click track headers to select them, then choose a mode from the Automation Mode pop-up menu in one of the track headers.
- Shift-click channel strips in the Mixer to select them, then choose a mode from the Automation Mode pop-up menu in one of the selected channel strips.
You can also set the automation modes using key commands:
- Toggle Current Track Automation Off/Read
- Set Current Track to Automation Read
- Toggle Current Track Automation Touch/Read
- Toggle Current Track Automation Latch/Read
- Toggle Current Track Automation Write/Read
- Set All Tracks to Automation Off
- Set All Tracks to Automation Read
- Set All Tracks to Automation Touch
- Set All Tracks to Automation Latch
- Set All Tracks to Automation Write
Using Trim Automation mode
Trim can be handy when you do not need to re-write data completely, but just adjust already written data.
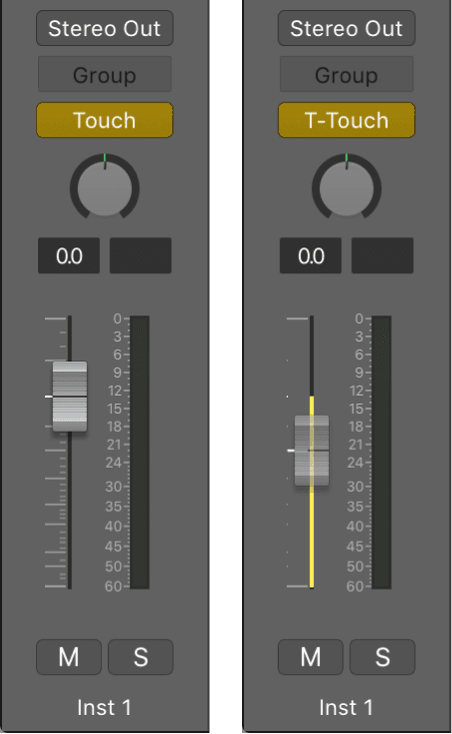
- Choose Touch or Latch from the Automation Mode pop-up menu in the track header or the track’s channel strip.
- Choose Trim from the Automation Mode pop-up menu in the track header or the track’s channel strip.Either T-Touch or T-Latch appears in the Automation Mode display. The Volume fader moves to a center position and the fader becomes transparent.
Now when you move the Volume fader during playback, it does not write completely new volume automation data but adjusts it proportionally to the existing data.
Using Relative Automation mode
Choose Touch, Latch, or Write from the Automation Mode pop-up menu in the track header or the track’s channel strip.
Choose Relative from the Automation Mode pop-up menu in the track header or the track’s channel strip. Either R-Touch, R-Latch, or R-Write appears in the Automation Mode display.
The Volume fader moves to a center position and the fader becomes transparent.
Record MIDI region automation when in Read mode
When recording a MIDI/Software Instrument part, you can record region-based automation data into MIDI regions on software instrument tracks even if the track is in Read mode.
In order to do so, do one of the following:
- Choose Record Automation with MIDI Regions from the Automation mode pop-up menu on the channel strip of a software instrument track.
- Choose Record Automation with MIDI Regions from the Automation Mode pop-up menu in the track header of a software instrument.
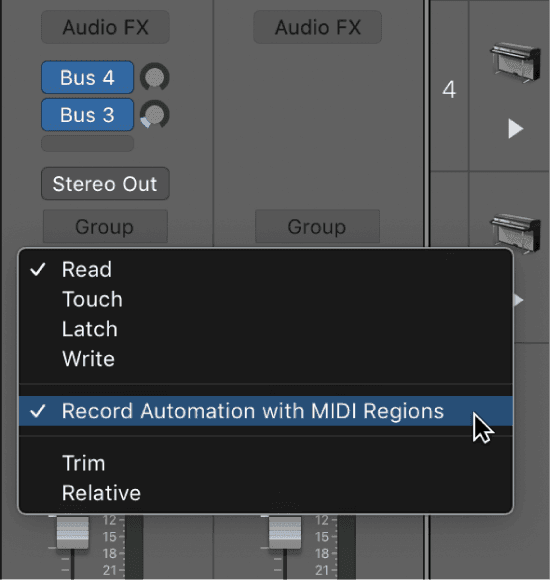
Note: When Record Automation with MIDI Regions is active, Auto-Select Automation Parameter in Read Mode is disabled. See Show automation curves in Logic Pro to learn about Auto-Select Automation Parameter in Read Mode.
Adding and adjusting automation points
To create changes over time to volume, pan, and effects settings, you add automation points to a track’s automation curve at different places, and then adjust the automation points so the value of the setting changes. You can adjust automation points by moving them up or down to a new value or by moving them left or right to a new point in the timeline.
Numerical values are displayed alongside each automation point. You can also raise or lower the value of MIDI parameters associated with notes in instrument tracks or Drummer tracks.
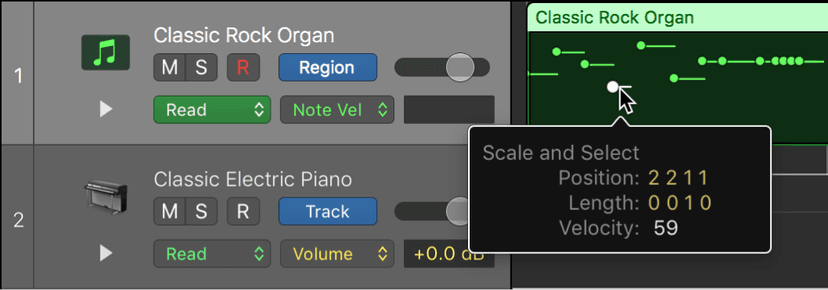
Note and numerical values are displayed alongside each MIDI data point. You can also add automation points at selection area or region borders.
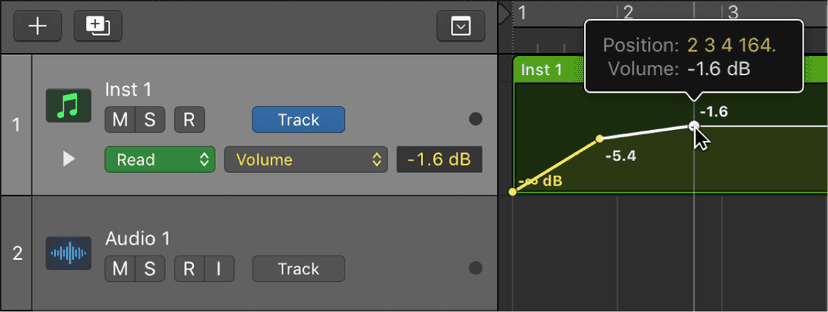
When splitting a region containing region-based automation, automation points are automatically added to the automation curves of the original region and the new region at the point of the split. These new points can then be adjusted and moved to create new changes over time for the new region.
Adding automation points
To add an automation point to an empty automation curve: Click anywhere in the automation track.
This adds an automation point at the project start position, using the current fader value.
To add an automation point to an existing automation curve, do any of the following:
- Click the automation curve.
- Double-click an empty area of the automation track.
- Click on or outside the automation curve with the Pencil tool.
All of these actions add an automation point at the clicked position.
You can add a series of MIDI data points using region-based automation. In the Piano Roll, with a MIDI controller data parameter showing in the Automation Parameter pop-up menu, drag a line across the portion of the region.
New MIDI data is created. If Velocity is the chose MIDI controller data parameter, new MIDI data is created at every point at which notes intersect the line you drew. This is great for snare rolls that rise in volume.
You can also use the Pencil Tool to draw multiple automation points on an automation curve. Simply click-drag or Option-click-drag the Pencil Tool across the automation curve.
The organization of automation points depends upon the Pencil Tool setting in the Automation preferences. You have two options:
Hold Option for Stepped Editing: In this mode, click-dragging with the Pencil Tool creates a series of automation points in a curved formation, and Option-click-dragging creates a series of automation points in a stepped formation.
Hold Option for Curved Editing: In this mode, click-dragging with the Pencil Tool creates a series of automation points in a stepped formation, and Option-click-dragging creates a series of automation points in a stepped formation.
Add automation points at marquee borders by dragging across a region with the Marquee tool, then click the marquee selection.
To add automation points at region borders:
- To add one automation point at each region border: In Logic Pro, select the region, then choose Mix > Create Track Automation > Create 1 Automation Point at Region Borders.
- To add two automation points at each region border: In Logic Pro, select the region, then choose Mix > Create Track Automation > Create 2 Automation Points at Region Borders.
To add automation points at selection borders, do either of the following:
- To add one automation point at each selection border: Control-Shift-drag across the Tracks area.
- To add two automation points at each selection border: Control-Shift-Option-drag across the Tracks area.
Adjusting automation points
You can simply adjust automation by doing any of the following:
- Drag an automation point up or down to change its value.
- Drag an automation point left or right to move it to a different point in the timeline. Use the ruler to make sure automation points are aligned with a beat or measure.
With a MIDI data parameter showing in the Automation Parameter pop-up menu, and set to Region Based Automation select one more more MIDI values. Drag up or down to change its value.
If you want to add curves to lines of automation you have drawn in, don't forget to reach for your Automation Curve Tool- which will allow you take a straight line and bend it into a convex or concave curve!
Writing automation with controllers
Logic Pro provides support for a number of dedicated control surfaces that make writing and editing track automation fast, efficient, and easy. Depending on the facilities available, you can simultaneously write automation for several channels, or multiple plug-in parameters. Any MIDI controller—such as the modulation wheel, or a front panel slider or knob on your MIDI keyboard—can be used to write automation. You can use one such controller for all automation writing duties, or you can assign individual controllers (if available on your MIDI keyboard) to different parameters.
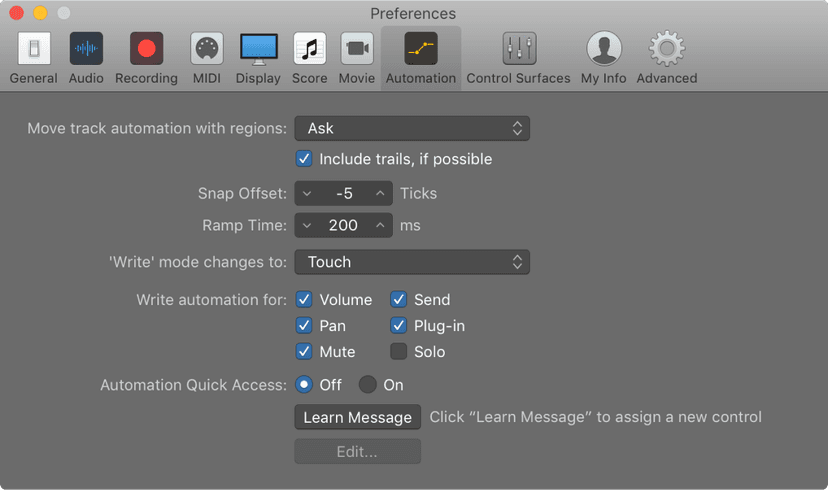
The Automation Quick Access (AQA) feature makes track automation extremely fast and simple if you only have one hardware MIDI controller available—one fader on your MIDI keyboard, or just the modulation wheel, for example. You can use this single hardware controller to automate the currently active automation parameter of the selected track in the main window.
Setting up Automation Quick Access is easy:
Choose Logic Pro > Preferences, or press Command-Comma (,), then choose Automation.
In the Automation pane, Automation Quick Access is turned off by default.
Click the On button in the Automation Quick Access section. A dialog prompts you to assign a controller.
Click the Assign button and slowly move the hardware controller that you want to use for Automation Quick Access. Make sure that it’s moved through its entire range.
Confirm your selection by clicking the Done button below the Off/On buttons in the Automation Quick Access section. The Done button changes into a Learn Message button.
Clicking the Learn Message button allows you to assign a new controller for Automation Quick Access. Clicking the Edit button opens the Controller Assignments window, where you can assign the controller manually.
Once set up, you have hardware control over the active automation parameter on the current track.
Learn Mode
One of the best feature of Logic is Learn Mode. When coupled with a MIDI controller you can easily assign a knob or a slider on your MIDI controller to ANY parameter in Logic. If you want to assign 2 knobs to your Filter cutoff and resonance in Retro Synth and then one slider to the volume of the Track in the channel strip- you can do it all with Learn Mode. Press Cmd+L and get assigning and playing!
Of course, this is so much fun to do when you have a Synth and can assign all of the functions you would like to adjust easily and quickly- but it ties in with automation too. Lets say you assign a few knobs and then you press record to play in your part. If you are in an automation mode at the same time you're recording your part on to the track- you're recording the MIDI and the automation all at once! Or of course, if you want to record your part first and then the automation after- it's so quick and easy to do.
One of the coolest things about Learn mode is that you can also quickly and easily setup buttons and parameters you wouldn't think of usually. So instead of having to press R on your computer keyboard to record, you could setup a button on your MIDI controller to toggle recording on and off! Or any other transport controls. Or something like Mute or Solo. The list is endless. Any parameter you can click in Logic can be assigned!
Note: Many MIDI controller keyboards come with Transport buttons already on them and they can automatically be detected and assigned by Logic when you plug it in for the first time. If you get a dialog asking you to auto assign the functions of your keyboard- click yes and the transport buttons on your MIDI controller keyboard will work, no assigning needed!
Assigning in Easy view
In the Logic Pro Mixer, or in any plug-in window, select a parameter.
Choose Logic Pro > Control Surfaces > Learn Assignment for [parameter name].
Alternatively, you can use the Learn new Controller Assignment key command to open the Controller Assignments window and automatically activate Learn mode.
The Controller Assignments window opens in Easy view, with the Learn Mode button activated. In most cases, the name of the selected parameter is shown in the Parameter field.
Move the hardware controller you want to assign to the selected parameter, then click the Learn Mode button to complete the Learn process.
Moving the controller sends a MIDI message to Logic Pro, which appears in the “Input message” field. This memorizes the controller assignment.
If you do not click the Learn Mode button, Learn mode remains active, allowing you to make further assignments.
To make another assignment, select another parameter, then move the controller on the control surface.
Click the Learn Mode button (or press Command-L) to complete the Learn process.
Note: Only one set of assignment parameters is visible at a time in Easy view.
Assign a controller using a modifier key
Choose Logic Pro > Control Surfaces > Learn Assignment for [parameter name] (or press Command-L) to open the Controller Assignments window.
Hold down the modifier key you want to use (Command, for example) as you select the parameter you want to assign, while moving the control.
Click the Learn Mode button to complete the Learn process.
If Logic Pro receives a MIDI message from the device while you are holding down the modifier key, the Learn Mode button is deactivated when you release the key, and the Learn process is complete.
If you release the modifier key before Logic Pro receives a MIDI message, the Learn Mode button remains active, so you can still move a controller to send a MIDI message.
In this situation, be sure to click the Learn Mode button when you are finished to end the Learn process.
Logic Pro includes a shortcut that makes it easy to assign a series of controllers to a series of similar parameters.For example, you can use this shortcut to assign a series of faders to volume; to assign a series of knobs or switches to other channel strip parameters such as pan, solo, or mute; or to assign a series of controllers to a set of plug-in parameters.
- In the Logic Pro Mixer, or in any plug-in window, select a parameter.
- Choose Logic Pro > Control Surfaces > Learn Assignment for [parameter name].Alternatively, you can use the Learn new Controller Assignment key command to open the Controller Assignments window, and activate Learn mode.The Controller Assignments window opens in Easy view, with the Learn Mode button activated. In most cases, the name of the selected parameter is shown in the Parameter field.
- Assign the first controller in the series to the first parameter. For example, assign fader 1 to control volume for channel strip 1.
- Assign the last controller in the series to the last parameter. For example, assign fader 16 to control volume for channel strip 16. The number of controllers between the first and last in the series must match the number of parameters between the first and last parameter. In the example, the distance between 1 and 16 would equal 15.A “Do you want to fill up in between?” dialog is shown.
- To automatically fill the controllers between the first and last with the corresponding assignments, click OK.Note:You can only use shortcuts for knobs that send a single channel message, where the first data byte is the controller number and the second data byte is the value. Alternatively, the controller number can be encoded in the MIDI channel, with a fixed first data byte. Consult the documentation that came with your device for information on its data structure.
To delete a controller assignment in Easy view, select the assignment you want to remove in the Controller Assignments Easy View window, then click the Delete button.
Assigning a control surface button to a key command
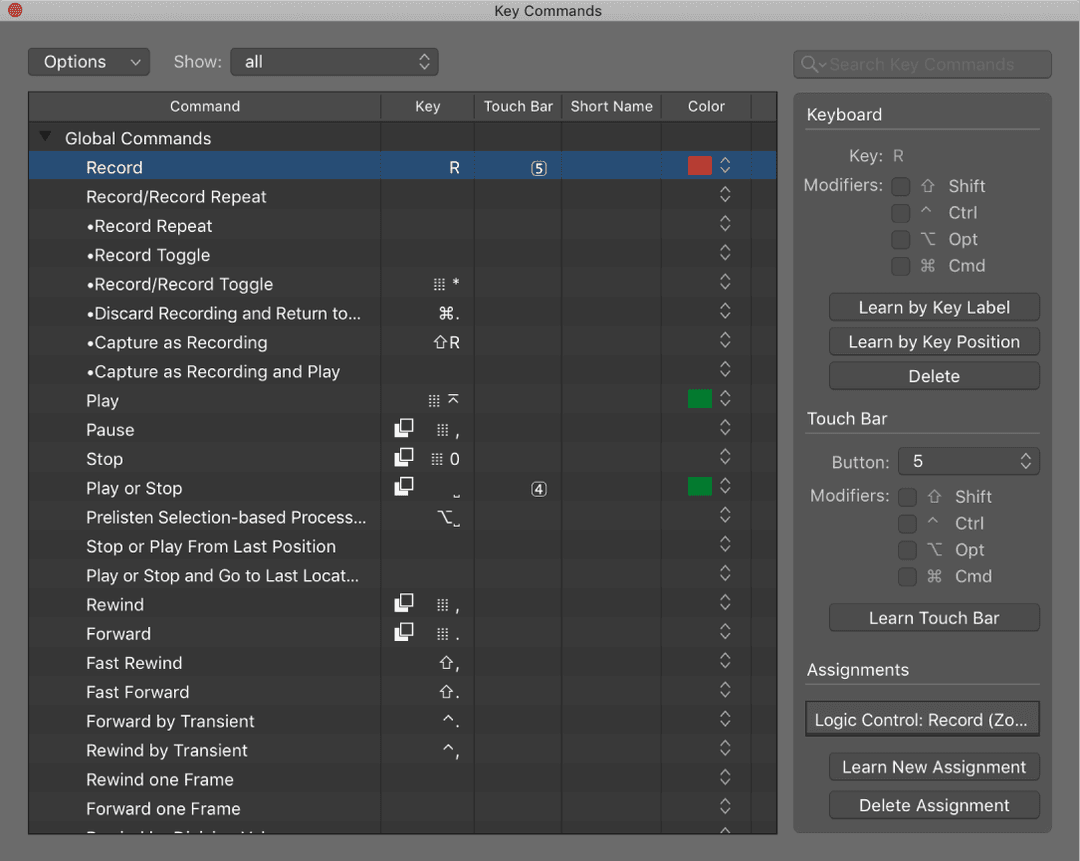
Choose Logic Pro > Key Commands (or shortcut Option+K) to open the Key Commands window.
In the Command list, click the disclosure triangle next to the category of commands you want to reveal, then select the key command you want to assign. You can also search for the key command in the Search field.
Click the Learn New Assignment button.
Press the control surface button that you want to assign to the key command. This sends a MIDI message to Logic Pro. The name of the controller appears in the Assignments field.
Repeat the above to make additional assignments.
Click the close button to exit the window.
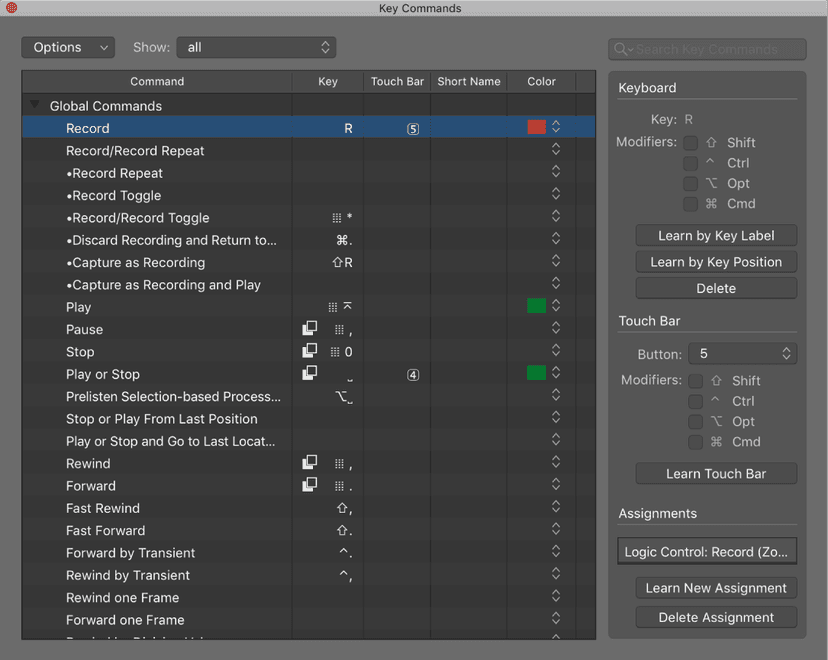
You can also delete a key command assignment in ****the Key Commands window.
Select the key command with an assignment you want to delete in the Command list.
Select the assignment for the key command in the Assignments field.
Press the Delete key.
Do this now
- Put a vocal or lead part on one track.
- In Touch mode, ride the fader once through the song without trying to be clever.
- Go back and smooth any spike the pass left behind.
- Now automate one send up for the last word of a phrase.
Compression evens out a part. Automation makes it mean something.