Arrangement, Global Tracks and Sharing
Arrangement, Global Tracks and Sharing or Bouncing your Music
As your productions/compositions grow, you're likely to want to move things around and change things on a bigger scale instead of just having the same things running thoughout your track- build ups, drops, middle sections and everything in between will need to be created in order to add interest and dynamics to your songs. This is known in the world of Production as arrangement. You can do simple things like moving sections around, or more complex stuff like adding a transposition one half step up across all your tracks. Lets explore how...
Sometimes you may want to remove an entire passage from a project—for example, you may want to remove the regions of all tracks between bars 17 and 20, so that all regions (and bar changes, tempo changes, and global score symbols) from bar 21 on are moved four bars to the left, closing the gap left by removing the four bars.
Alternatively, you may want to insert some empty bars in the middle of a project, to create space for another chorus, verse, or bridge, for example. As with the previous example, all existing tempo changes and so on are moved accordingly (to the right by the number of inserted bars).
You can limit changes to only selected regions. If you do this, rather than moving all regions within a project section, you are asked if you want to move global events such as bar changes, tempo changes, and score symbols. This global edit is performed on all regions, when used.
Note: The toolbar features a number of section-editing buttons that can be used to perform some of the operations described below. When these buttons are used, the operation affects all regions that fall between the locators, regardless of which regions in the area are selected. To perform these operations on selected regions within the locators, use the appropriate key command after selecting the regions.
To insert a gap between regions using the locators (i.e the cycle length), set the left and right locator positions by doing one of the following:
- Drag from left to right across a portion of the ruler.
- Set the values in the locator fields in the LCD.
- Select the regions you want to move by the cycle length.
If no selection is made, all regions that fall between the locators are affected. Clicking the Insert Silence button in the toolbar also affects all regions that fall between the locators.
Choose Edit > Cut/Insert Time > Insert Silence Between Locators (or use the corresponding key command).
For selected regions that are longer than the cycle length: Regions are cut at the left locator position; the second region (newly created from the cut) is moved to the right of the right locator position, creating a gap between the regions.
For selected regions that fall wholly within the locators: Regions that began at the left locator position now begin at the right locator position.
For a combination of partially and wholly selected regions that fall within the locators: The encompassed section is cut, and moved to the right locator position.
To remove gaps between regions, select the regions, then do one of the following:
Choose Edit > Move > Shuffle Left within Selection (or use the corresponding key command). The first selected region on each track remains unchanged, and all subsequent regions are moved to the left:
Choose Edit > Move > Shuffle Right within Selection (or use the corresponding key command). The first selected region on each track is moved to the right, and all subsequent regions remain unchanged.
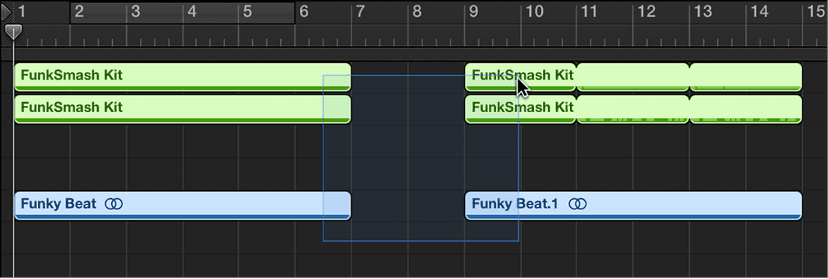
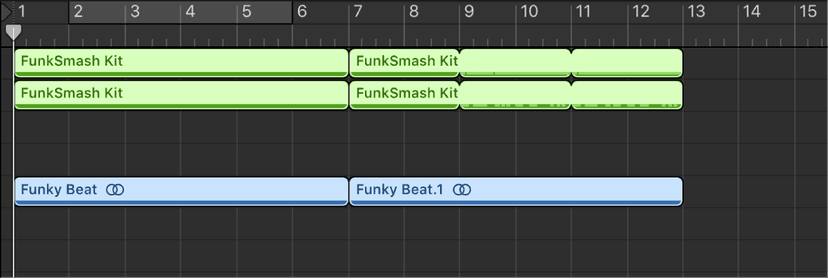
Removing a section of an arrangement using the locators
- Set the locators to span the section you want to remove (bars 5 through 8, for example).
- Do one of the following:
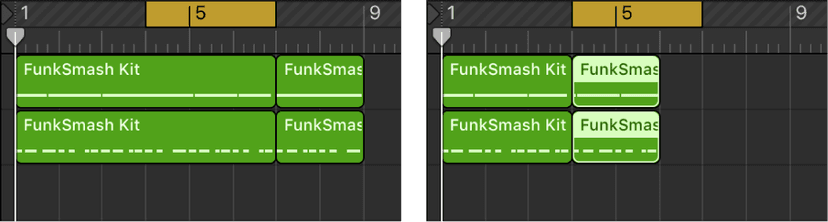
- To cut all regions that fall between the locators: Click the Cut Section button in the toolbar, or choose Edit > Cut/Insert Time > Cut Section Between Locators.
- To cut selected regions that fall between the locators: Use the Cut Section Between Locators (Selection) key command).
Any regions that span the cycle area (for example, a 16-bar region that starts at bar 1 and ends at the start of bar 17) are cut.
The section between the locators (bars 5 to 8) is deleted from all selected regions. (In fact, it is copied to the Clipboard and removed from the arrangement.)
All regions to the right of the right locator are moved to the left by the length of the cycle (4 bars), including newly created regions that result from the operation.
In the case of the 16-bar region example, from above, it would be cut into two regions:
- One would span bars 1 to 4.
- The other would now be an 8-bar region that is placed from bar 5 to the start of bar 13.
Tip: The Snip command is ideal for situations in which you want to remove an entire section of your arrangement, such as a chorus.
Inserting a cut section into the arrangement
- Set the locators to span the section you want to remove (bars 5 through 8, for example).
- Do one of the following:
- To cut all regions that fall between the locators: Click the Cut Section button in the toolbar, or choose Edit > Cut/Insert Time > Cut Section Between Locators.
- To cut selected regions that fall between the locators: Use the Cut Section Between Locators (Selection) key command.
- Set the playhead to the position where you want to insert the cut section.
- Either click the Insert Section button in the toolbar (to affect all tracks, regardless of selection), or choose Edit > Cut/Insert Time > Insert Section at Playhead.All selected regions are cut at the left locator, and a passage of one cycle length is inserted. Regions currently in the Clipboard are then pasted at the playhead position.
Tip: This workflow is perfect for when you want to insert a part (a chorus, for example) at another point in your arrangement. To guarantee all tracks are shifted, including tempo, time signature changes, and markers, make sure everything is selected (using Command-A or Shift-I) before cutting and inserting.
Copying a section of the arrangement
- Set the locators to span the section you want to copy (bars 5 through 8, for example).
- Choose Edit > Cut/Insert Time > Copy Section Between Locators (or use the Copy Section Between Locators (Global) key command).
- Set the playhead to the position where you want to insert the copied section.
- Either click the Insert Section button in the toolbar (to affect all tracks, regardless of selection), or choose Edit > Cut/Insert Time > Insert Section at Playhead.All selected regions are cut at the left locator, and a passage of one cycle length is inserted. Regions currently in the Clipboard are then pasted at the playhead position.
Tip: This workflow is perfect for when you want to insert a part (a chorus, for example) at another point in your arrangement. To guarantee all tracks are shifted, including tempo, time signature changes, and markers, make sure everything is selected (using Command-A or Shift-I) before cutting and inserting.
Repeating a section of the arrangement using the locators
This is one of my favourite things to do in a session- as it quickly and easily takes your arrangeent from a single 4 bar loop to something you can mould and adjust quickly and easily, with minimal fuss and in lightning fast time.
Set the locators to span the section you want to repeat (bars 5 through 8, for example).
Select the regions that you want to repeat. If no selection is made (or if you use the Repeat Section button in the toolbar), all regions that fall between the locators are affected.
Choose Edit > Cut/Insert Time > Repeat Section Between Locators (or use the corresponding key command).
The portions of all regions that are wholly or partially encompassed by the locators are copied and pasted starting at the right locator position, quickly creating a repeat of the section you had highlighted before.
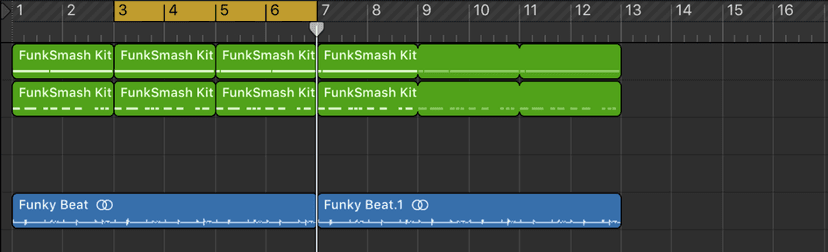
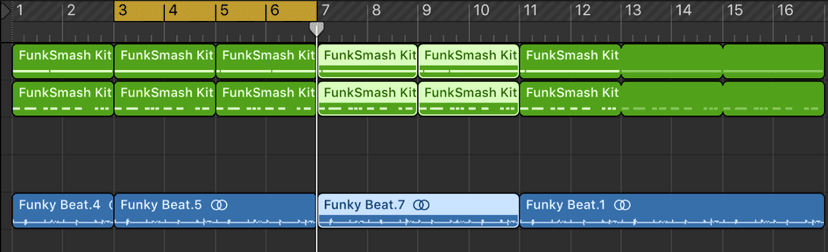
You can also move, copy, and delete sections of a project using arrangement markers.
Arrangement Markers
You can add arrangement markers to a project to create different sections, such as an intro, verse, and chorus, and then move the sections in the Tracks area to quickly rearrange the project. Working with Arrangement Markers is one of the best things you can do in Logic to quickly play around with your ideas. Arrangement markers can be particularly useful when you have added some material (recordings, loops, or media files) to the project and want to try out different arrangements.
By default, arrangement markers are eight bars long. The first arrangement marker begins at the start of the project. Each additional arrangement marker you add starts at the end of the previous one, with no space between. Arrangement markers are most useful if you add them to every section of the project, so that you can rearrange the entire project.
You add and edit arrangement markers in the arrangement track, which appears at the top of the Tracks area. When you add an arrangement marker, it is eight bars long. You can resize it to cover the section of the project you want it to include, and rename it to reflect its place in the project.
To use arrangement markers, first you must show the arrangement track by choosing:
Track > Global Tracks > Show Global Tracks,
or use the Show/Hide Global Tracks key command (G)
or Click the Global Tracks button

Add an arrangement marker by clicking the Add Marker button (+) in the arrangement track.

The arrangement marker appears at the start of the project, or at the end of the last existing arrangement marker. To resize an arrangement marker, drag the right edge of the arrangement marker left or right.
To rename an arrangement marker, do one of the following:
- Click the the name of the selected arrangement marker, then choose a name from the shortcut menu.
- Double-click the marker (except on the name), then enter a new name.
After you add arrangement markers to the arrangement track, you can use them to rearrange your project. Everything that falls under your arrangement marker will move when you slide it around your project.
You can select arrangement markers, move and copy them, replace them, and delete them from the arrangement track.
Copy an arrangement marker by holding Option and dragging it to wherever you would like to copy it to. Delete them by selecting the marker and pressing delete/backspace
More about Global Tracks
Logic Pro includes a set of global tracks that you can use to control different aspects of the overall project. You can show global tracks in the Tracks area and in the time-based editors (including the Audio Track Editor, Piano Roll Editor, and Step Editor). When you show the global tracks, they appear below the ruler for that particular area.
By default, the following global tracks are available:
- Arrangement track: Contains arrangement markers, which you can move, copy, and edit to quickly reorganize a project.
- Tempo track: Contains the project tempo, and all tempo changes in the project.
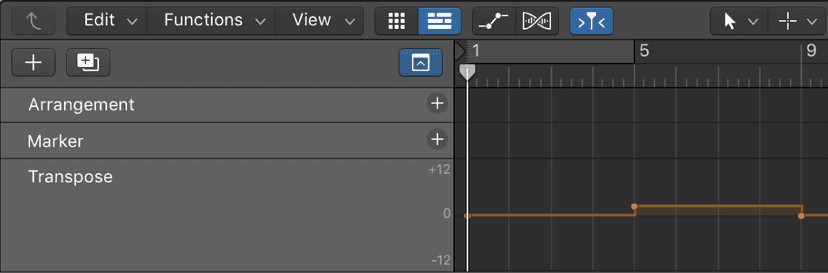
- Transposition track: Contains transposition events used to transpose parts of a project up or down in pitch. Transposition affects MIDI regions and Apple Loops, and can also affect audio regions.
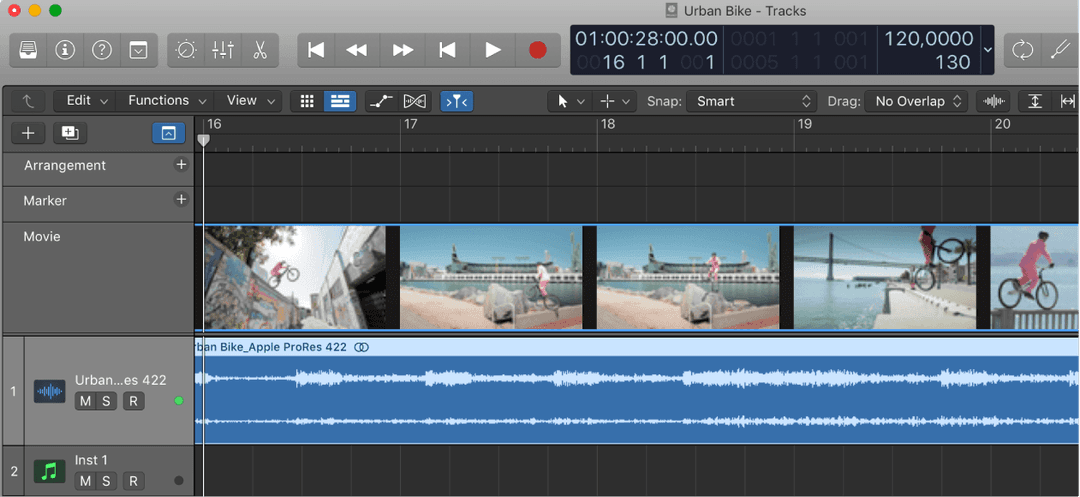
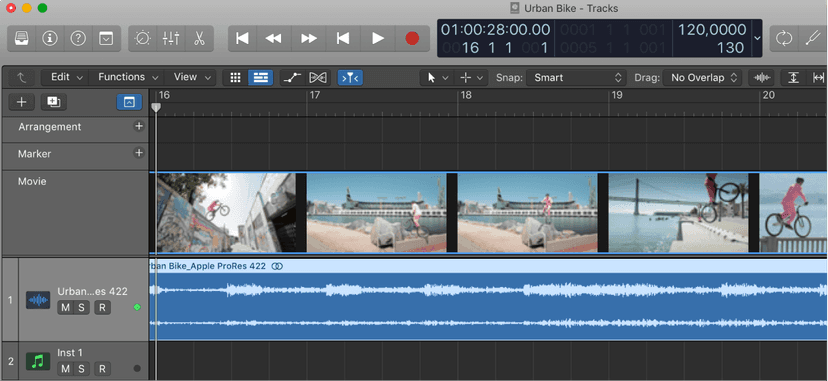
- Movie track: Displays frames of a QuickTime movie as thumbnails that are synchronized with the ruler, for use in film scoring. Cuts in the movie can be detected automatically and marked.
- Marker track: Contains markers, which are used to label bar positions and parts of the project. Their length, text, and color can be edited freely. Note: These are different to Arrangement Markers
- Signature track: Contains the basic time and key signatures of the project, along with any signature changes.
- Beat Mapping track: Use to adjust the tempo to follow recordings that do not follow a strict tempo, without changing the rhythmic feel of the recordings.
Tempo Track
You can easily add and edit tempo changes in the Tempo track. The Tempo track is available in the Tracks area, Piano Roll Editor, Step Editor, and Score Editor.
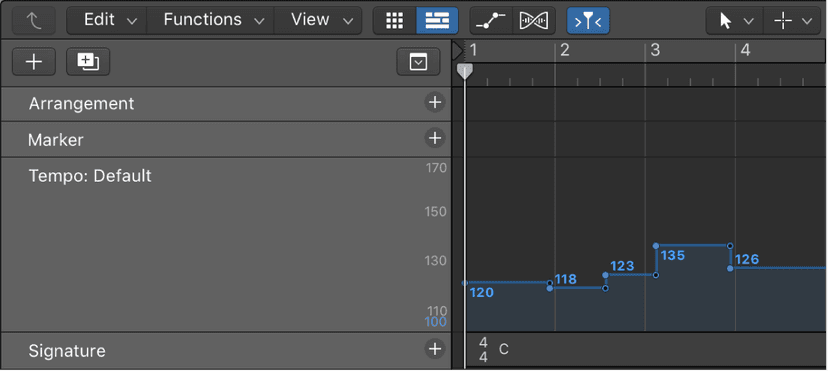
In the Tempo track, tempo changes are represented by tempo points. You create tempo changes by adding tempo points and editing their values. You can expand the Tempo track to give yourself more room to work, and adjust the range of values for the Tempo track.
The Tempo track also determines the relationship between incoming timecode and the current playhead position, for projects using timecode.
Show the Tempo track (and indeed all Global Track types) by following the same instructions we did previously for arrangement markers.
If the Tempo track is not visible, Control-click anywhere in the global tracks header area, then select Tempo in the dialog than appears.
To adjust the range of the Tempo track, do one of the following:
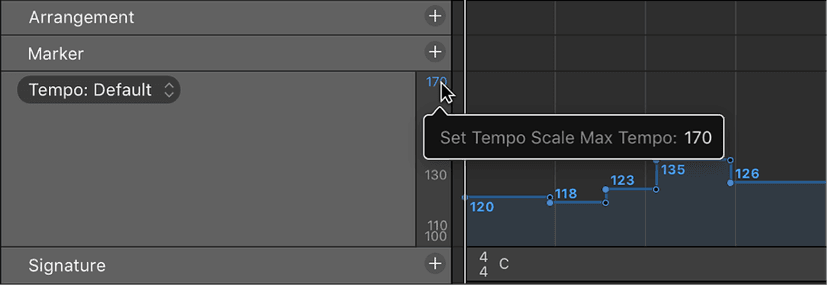
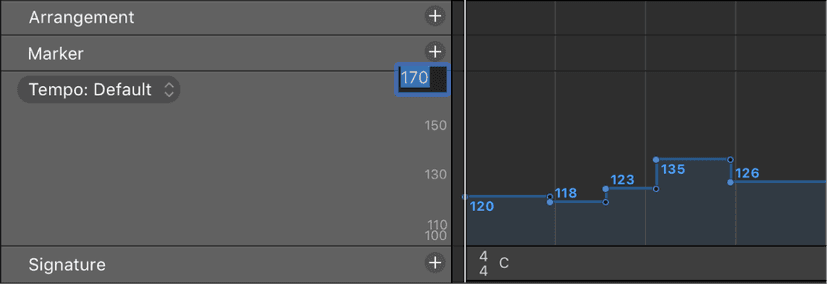

- Grab the maximum and minimum values in the tempo scale and drag vertically.
- Double-click either value and enter a numerical value in the field.
Transposition Track
You can you can transpose (change the playback pitch of) MIDI regions and Apple Loops in a project over time using the Transposition track. The Transposition track contains transposition points for pitch changes (transposition events). The project transposes at the position of the transposition point, and remains at the new value until the next transposition point.
Transposition affects both audio and software instrument Apple Loops (except drum loops, and other Apple Loops with no defined key) as well as MIDI regions. Audio regions other than audio Apple Loops are nottransposed.
The zero position of the Transposition track is determined by the current key signature in the Signature track. If the key signature changes during a project, the zero position of the Transposition track changes accordingly.
Transposition works non-destructively, and transposed MIDI notes return to their original values when the Transposition value is reset to zero (0). For example, starting with a C3 note event in a MIDI region, adding a transposition point with a value of +2 changes the note event to a D3. If you change the transposition point to a different value, the note is transposed by the corresponding amount. When you change the transposition point so that the transposition value is 0, the note returns to a C3. Similarly, if you copy a region to different parts of the project with different transposition values, the notes in the region change by the corresponding amount.
When you add or edit a transposition point, only existing MIDI events in a project are transposed. MIDI events recorded or created afterward are not affected.
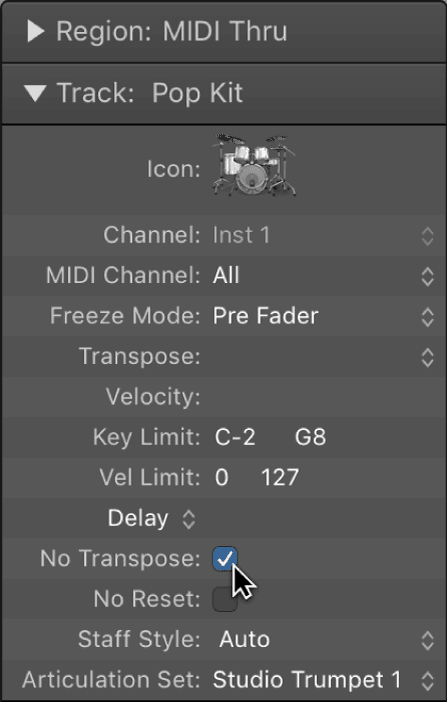
If the No Transpose checkbox is selected in the Track inspector, MIDI events (including instrument Apple Loops) are not transposed for that track.
Movie Track
The global Movie track in Logic Pro displays the opened QuickTime movie as thumbnails.
The number of frames displayed on the Movie track depends on both the track height and the zoom level of the window. All frames are aligned left, with only the very last frame aligned to the right. This guarantees that you can always see at least the first and last frames of video, independent of the current zoom level. Given the left alignment of all frames (except the last), the left margin of a frame is always displayed at the exact position of that particular frame.
We'll discuss working with video a little later, but for now here's where you'll find it!
Marker Track
You can use markers to tag different parts of a project, and quickly select the parts for playback, arranging, and editing. Markers can help you organize your project, and also act as storage areas for locator positions.
There are several ways to create and edit markers in Logic Pro. You can view and edit markers in the following work areas:
- Marker track: Displays markers as rectangular sections. You can select, copy, move, or resize markers in the Marker track.
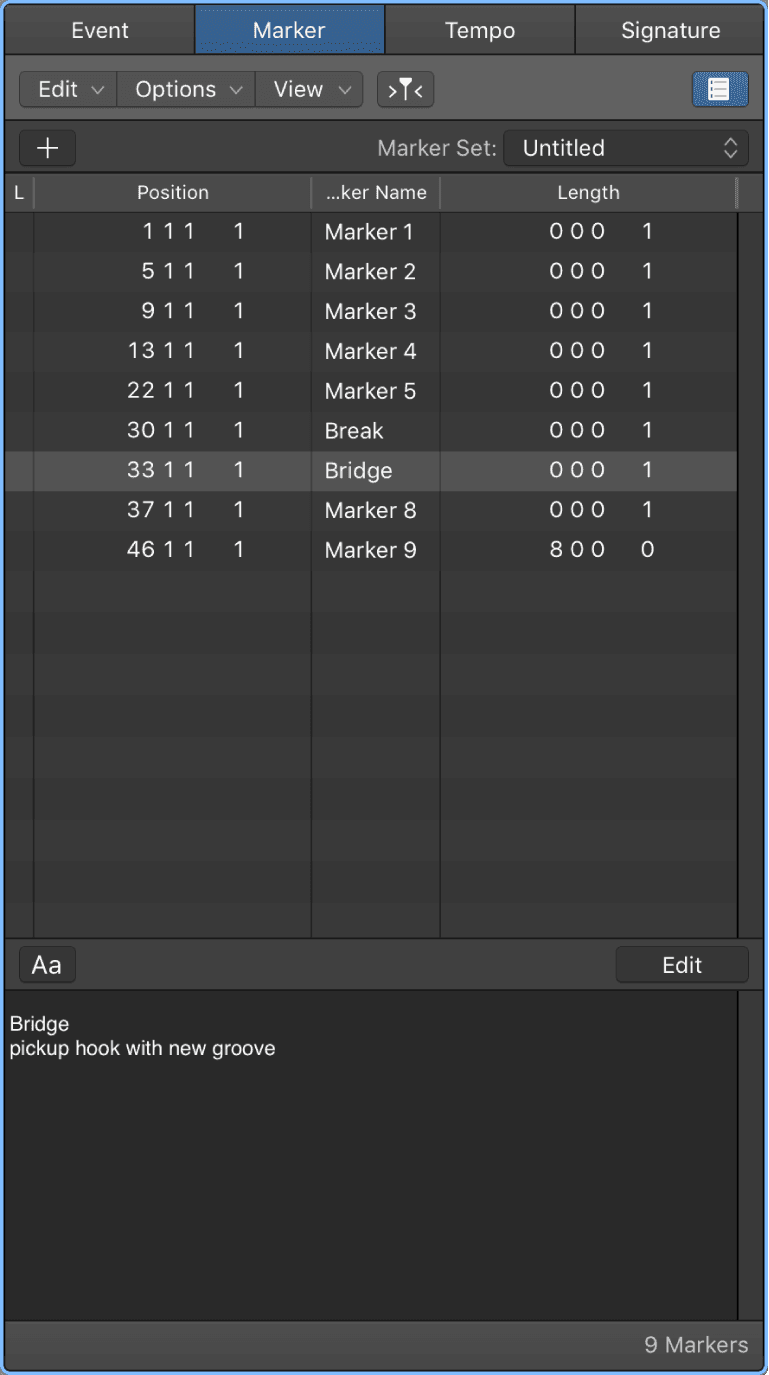
- Marker List: Displays marker names, bar position, and length information in a scrollable, editable list.
- Marker Text area and Marker Text window: Display marker text. You can type and edit comments or other text that is saved with the marker.
- For supported USB MIDI controllers, button controls on the device may be automatically assigned to marker key commands.
To open the Marker List in the main window, click the List Editors button in the control bar, then click the Marker button.
To open the Marker List as a separate window, do one of the following:
- Choose Navigate > Open Marker List.
- Drag the Marker List out of the main window.
- To open the Marker Text window, do one of the following:
- Choose Navigate > Open Marker Text.
- Option-double-click any marker in the Marker track with the Pointer tool.
- The Marker Text window is also available at the bottom of the Marker List, where it’s called the Marker Text area.
Tip: Many marker-related commands can be accessed by Control-clicking in the Marker track or Marker List, when the Right Mouse Button: Opens Shortcut Menu pop-up menu option is chosen in the Logic Pro > Preferences > General > Editing pane.
Signature Track
Time and key signatures are global events that affect all tracks in a project. When you create a new project, you can set the time and key signature in the Project Chooser. You can view time and key signatures in the Signature track, the Signature List, and the Score Editor, and add and edit signature changes in a variety of ways.
The initial time signature and key signature are project properties, as we previously discussed.
By default, the global Arrangement, Marker, Signature, and Tempo tracks are visible when you show the global tracks in the Tracks area (or an editor). If the Signature track is not visible, Control-click anywhere in the global tracks header area, then select Signature in the dialog that appears.
Note: The Signature track must be visible—and must not be protected—in order to select and copy signatures.
Beat Mapping
Beat mapping lets you map notes that don’t follow a strict tempo with beats in the ruler. When you play the project, the project tempo adjusts so that the beat-mapped notes are aligned with beats in the ruler. Say you had a drummer who recorded live and you wanted to adjust the grid based on their tempo and performance, that you could snap Software Instruments to- Beat Mapping could be of help here.
Beat mapping has the following uses:
- The metronome click reflects the beat-mapped tempo when you make subsequent recordings.
- You can apply Quantize functions to newly recorded regions.
- Loops adjust their timing to the beat-mapped tempo.
- The timing of MIDI regions recorded to the beat-mapped tempo appears in a musically meaningful way in the Score Editor.
- MIDI regions subsequently created using step input follow the beat-mapped tempo, resulting in a more natural, less mechanical rhythmic feel.
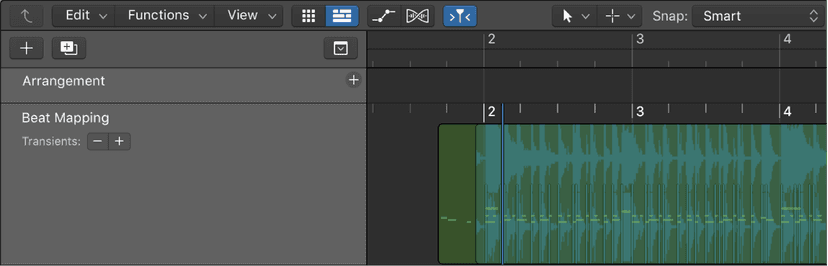
- Beat mapping involves two steps: first, you graphically connect notes to ruler positions in the Beat Mapping track. A tempo change event is inserted at each of these ruler positions, so that the notes align with musically meaningful time positions in the ruler, although their absolute time position is unchanged. A beat-mapped project contains the same tempo variations as the original recording.
Because beat mapping can create changes in the Tempo track, altering existing tempo changes or creating new tempo changes, you should avoid making changes in the Tempo track after using beat mapping functions. Doing so will defeat the timing derived from the beat mapping functions.
In the upper part of the Beat Mapping track, a ruler shows the same time divisions (bars, beats, and subdivisions) as those that appear in the LCD (and also depend on the current zoom level).
The following sections describe beat mapping in the Tracks area. Beat mapping is also available in the Piano Roll Editor, Score Editor, and Step Editor. When working in these editors, you can see the corresponding (beat-mapped) notes as you work, which can speed your workflow.
Beat Mapping MIDI
You can beat map MIDI regions to adjust the project tempo so that freely recorded notes in the regions align with beats in the ruler.
- Select the regions that you want to use for beat mapping. A representation of the selected regions appears in the Beat Mapping track.Tip: You may want to zoom in to work more precisely.
- In the Beat Mapping track, click the first (leftmost) ruler position that you want to associate with a MIDI note.A vertical line appears at the clicked ruler position.
- Drag the bottom part of the line so it aligns with the beginning of the note you want to map to the ruler position.The line adjusts to match the beginning of the note. If the Tempo track is displayed, a Tempo change appears at the ruler position.
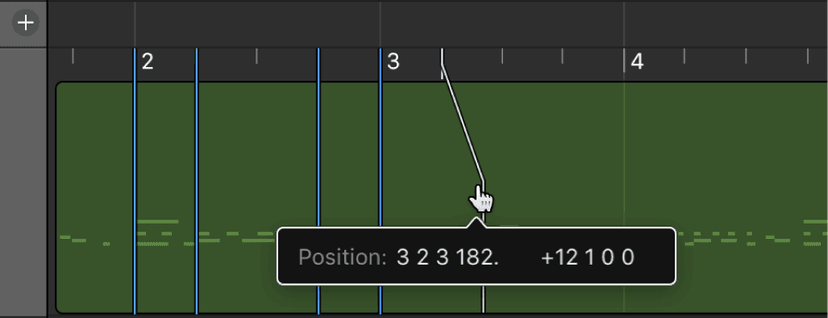
Logic Pro automatically inserts a tempo change, which appears in the Tempo track.
- Moving from left to right, beat map the subsequent notes in the selected regions, repeating the same steps.
- To connect a ruler position to a position in the region where no note exists, press and hold Control while drawing the connecting line. This allows the line to snap to any subdivision, even where there is no note event.
- To erase a beat mapping, double-click it with the Eraser tool, or select it and press the Delete key.
- To erase all beat mappings, click anywhere in the header of the Beat Mapping track (except on the controls) to select all data in the track, then press the Delete key.Tip: When using the Delete key, be careful not to accidentally delete other selected events or regions.
Beat mapping Audio regions
Beat mapping audio regions works similarly to beat mapping MIDI regions. If the audio regions don’t contain tempo information, they must be analyzed to find transients (short amplitude peaks, usually at rhythmically prominent positions), which can be mapped to a ruler position, before you can use them for beat mapping.
Transients appear as blue vertical lines in the lower part of the Beat Mapping track, aligned to peaks in the audio waveform. If no transients are visible on the selected audio regions when you open the Beat Mapping track, analyze the regions before applying beat mapping.
Detect transients in audio regions
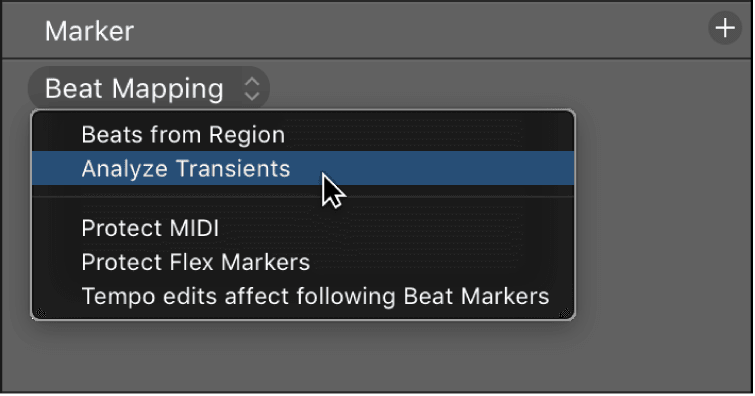
- Select the regions to analyze, then click the title “Beat Mapping” in the Beat Mapping track and choose Analyze Transients from the shortcut menu.
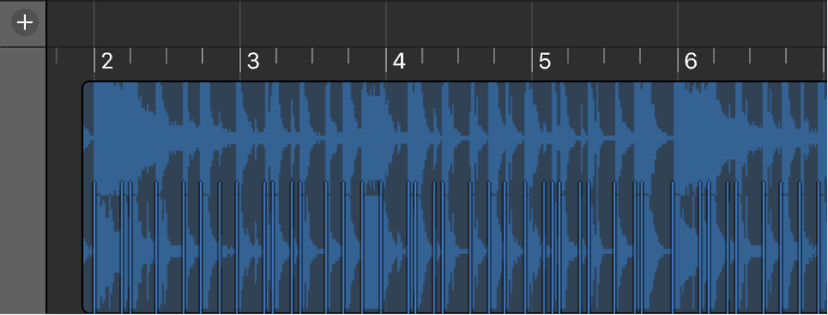
- After the regions are analyzed, the transients appear as blue vertical lines in the lower part of the Beat Mapping track.
Tip: It may be difficult to identify transients if the waveform overview is too small. If transients are hard to see, click the Waveform Zoom button in the Tracks area menu bar to visually resize the waveform in the Beat Mapping track.
The remaining steps for beat mapping audio regions are the same as for MIDI regions.
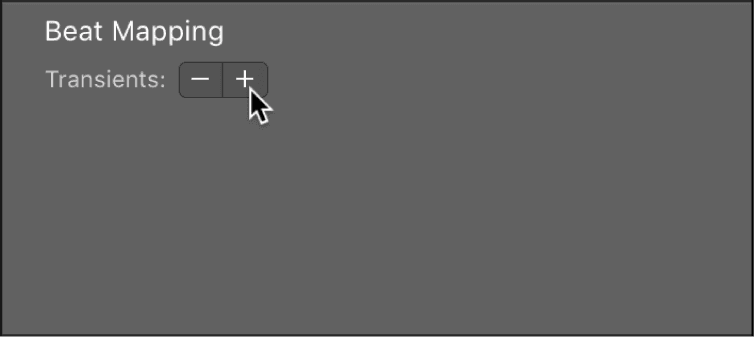
There are a number of ways to improve the beat mapping accuracy of audio regions. When you choose Analyze Transients, those transients above a certain threshold are displayed. You can adjust the threshold using the Minus and Plus (–/+) buttons in the Beat Mapping track.
Increasing the number of transients can be useful when beat mapping regions with less distinct accents—such as soft drums in a loud mix. However, a high setting can result in extraneous transients, with no real meaning for the rhythmic structure, being displayed. In general, it’s better to begin with a lower setting, and move to a higher setting only if transients are missing for obvious rhythmic elements in the music.
You can also make beat mapping easier by moving one or multiple selected audio regions, so that the first transient marker in any of the regions is located on the nearest whole beat position.
Sometimes, MIDI recordings may contain note events falling on musically meaningful positions, which should not be affected by beat mapping applied to audio recordings. In this case, you can choose the Protect MIDI option to keep those MIDI events at their current ruler positions when beat mapping audio regions.
Audio recordings may contain flex markers falling on musically meaningful positions, which should not be affected by beat mapping applied to MIDI recordings. In this case, you can choose the Protect Flex option to keep those markers at their current ruler positions when beat mapping MIDI regions.
Sharing/Bouncing your Music
Logic Pro provides a variety of options you can use to distribute your projects and songs. You can:
- Bounce a project to an audio file - creates an audio file in various formats
- Burn a project to a CD or DVD - burn straight to CD/DVD
- Share songs to the Music app - The Music App on your Mac will include the file in it's library
- Share a project to the Media Browser - The song is exported to your Media Browser
- Share a song using AirDrop - Sends the bounce to another Apple device using Airdrop
- Share a song using MailDrop - lets you quickly send songs to anyone via Mail
- Share a song to your SoundCloud account - If you have a SoundCloud account, you can share a song to SoundCloud directly from Logic Pro
- Share a project to GarageBand for iOS - You can share a special GarageBand for iOS-compatible version of your Logic Pro project to iCloud
- Export a project as an AAF file- AAF (Advanced Authoring Format) is used by other music production applications such as Pro Tools
- Export a project as an XML file - The Final Cut Pro XML format is used to import and export audio data between Final Cut Pro and Logic Pro.
- Export a project as a MusicXML file - MusicXML is an XML-based music notation file format, supported by many notation and music OCR applications and some music production applications.
You can also copy your projects to a hard drive or other storage device, or upload them to the Internet in order to share them with other Logic Pro users. There are two things to be aware of when sharing projects:
- For a project to open and play on another computer, all the same assets must be available (either in the project itself, or on the computer). Before copying your projects to another hard drive or uploading them to the Internet, be sure to include all assets used in the project. (To save all assets into a project, select all the checkboxes in Project Settings > Assets.)
- By default, Logic Pro saves projects as a special kind of file called a package, which non-Apple formatted hard drives and Internet services do not support. To insure that your project opens properly on another computer, you need to compress the Logic Pro project package before copying or uploading. To compress a project package, select it in the Finder and choose File > Compress or command-click the file and choose “Compress.” If you are using third-party compression software, please refer to its user guide for instructions.
Note: When you share a project to GarageBand for iOS, you can also share the project as a ringtone to your iPhone or iPad.
Considering the day and age we're living in, you're most likely to bounce your project to an audio file- so let's take a closer look at that:
Bounce a project to an audio file in Logic Pro
You can render, 'or bounce', a project to a single audio file or to multiple audio files. A project can be bounced to several different file formats simultaneously, and a surround project can be bounced to a set of surround audio files.
Projects can be bounced either in real time or offline (which is typically faster). All parameters, effects, and automation on the unmuted tracks in the project are recorded as part of the bounce file.
The format (stereo, mono, or surround) of the resulting bounce file (or files) depends on the format of the output channel strip. Output 1-2 is the default output channel strip used for bounces, and produces a stereo audio file. When the output channel strip is set to mono, a mono audio file is generated.
Bounce files can be reused in Logic Pro, saving processing resources by replacing or bypassing multiple regions, instruments, and effects. Bounces can also be used with other music applications and devices, sent to mastering facilities, posted on the Internet, sent to streaming and retail services, added to a music playlist, or uploaded to a mobile device.
Bounce the current project to an audio file
- In the Tracks area or the Mixer, make sure that the tracks you want to include in the bounce are routed to the main output (Output 1-2) and are not muted.If your project has multiple output channel strips, you can bounce only the tracks routed to a specific output channel strip using the Bnce button on that channel strip.
- Choose File > Bounce > Project or Section.
- In the Bounce dialog, select one or more destination formats in the Destination area.
- When you select a destination format, bounce options for that format appear to the right of the Destination area. For each selected destination format, choose bounce options.
- To limit the bounce to only part of the project, adjust the Start and End value sliders. You can click the up and down arrows, or click one of the numerals and enter a new value.NOTE: If Cycle mode is on when you choose File > Bounce, only the part of the project enclosed by the cycle area is bounced. You can adjust the Start and End value sliders to change what part of the project is bounced.Tip: To avoid having reverb and other effect tails cut off at the end of the project, set the end position of the bounce a little bit past the end of the last region.
- Set the bounce mode by selecting one of the two Mode buttons:
- Realtime: Performs the bounce in real time. Use this setting when you want to bounce audio and software instrument tracks, or external MIDI sound sources that are routed to the Mixer via aux channels.
- Offline: Bouncing offline can be faster than real time for more complex projects, and can perform bounces not possible in real time (because they might exceed the processing power of your computer).Only internalsources (audio or software instrument tracks) can be bounced offline; not MIDI tracks or audio channel inputs. Offline bouncing is available only for output channels of devices using native (Core Audio) audio drivers; not for DSP-based audio hardware (which can be bounced only in real time.)
- For additional control over effect tails, select either of the following Mode options:Bounce 2nd Cycle Pass: The bounce process takes two repetitions of the cycle range into account, with the creation of the bounce file starting at the second repetition. This is useful if you want effect tails (from the first cycle pass) to be added to the start of the bounce file.Include Audio Tail: The bounce file is extended as far as necessary to include any instrument release and effect tail.Note: Some plug-ins, including plug-ins used for mastering and the test oscillator plug-in, can add noise to the signal. Include Audio Tail should not be selected when using these plug-ins, as the resulting bounce file would be too long.
- Choose a normalization setting from the Normalize pop-up menu:Off: No normalization is applied.Overload Protection Only: Downward normalization takes place only for overloads (levels above 0 dB, which would lead to clipping), but no normalization takes place for lower levels.On: The project (incoming audio) is scanned for the highest amplitude peak, then the level is increased so that the peak is at the maximum possible level (without clipping).
- To add PCM, MP3, or M4A bounce files to the Project Audio Browser, select Add to Project.
- Click Bounce.
Setting the bounce filename and location
By default, the name of the bounce file matches the selected output channel strip (Output 1-2, if the project was bounced using the File > Bounce command). Bounce files are saved by default to the ~/Music/Logic/Bounces folder, but you can specify a new location. The new location is used for subsequent bounces.
When you bounce a project, you can change the name and choose a different location to save the bounce file (or files).
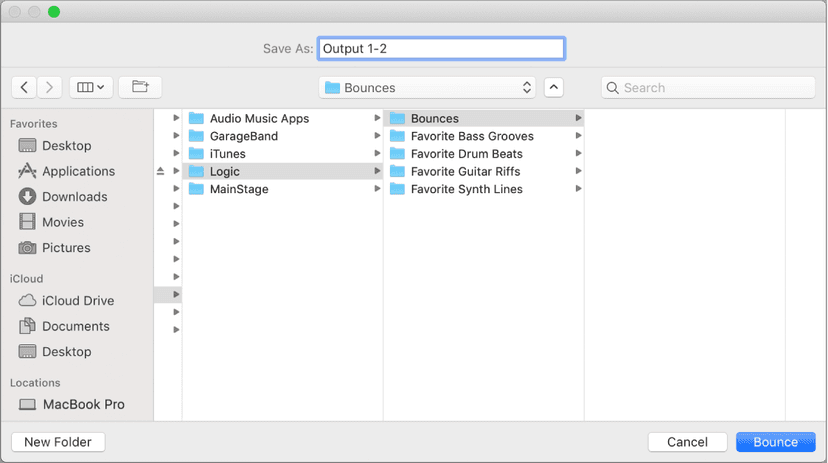

- In Logic Pro, to rename the bounce file, enter a new name in the Save As field.
- Browse to the location where you want to save the bounce file. You can click the New Folder button in the lower-left corner of the Bounce window to create a new folder at any location.
- Click Bounce.
When you bounce to multiple destination files, all the resulting files are saved in the chosen folder. All files have the same filename, but with the appropriate file extensions (.pngff, .mp3, .m4a, and so on).
Of course, you MAY need the other options from time to time, or once in a blue moon, but Bouncing to an Audio file is most certainly the most common way, and I don't think I've EVER used any of the others!
Do this now
- Mark an eight-bar chorus with the locators.
- Copy it to the end of the song, then cut a four-bar section out of the middle and watch everything move up.
- Bounce the result.
Arranging is mostly cut, repeat and move. Doing it with locators rather than the mouse is what makes it quick.