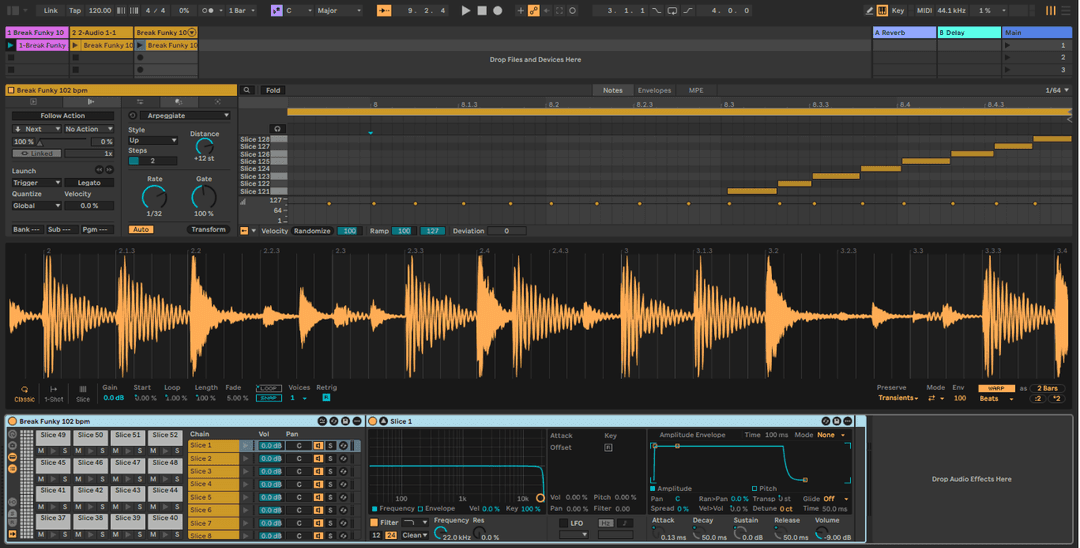
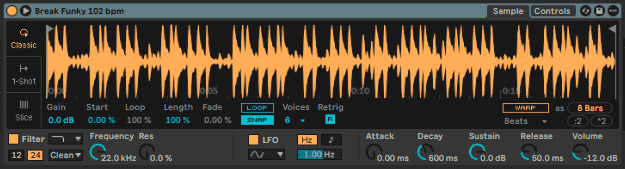
Simpler is an instrument that integrates the basic elements of a sampler capable of warping and slicing loops with a set of classic synthesizer parameters. A Simpler voice plays a user-detuned sample section, which is in turn processed by envelope, filter, LFO, volume and pitch components.
Presets created in Simpler can be converted for use in Sampler, and vice-versa. In this way, presets created in Simpler can be further edited with Sampler’s extended functionality. Sampler lets us load and manipulate multiple samples and is also capable of granular synthesis, but unlike Simpler it has no warp and slice modes.
Sample View
The Sample View displays the sample waveform. Samples can be dragged into Simpler either directly from the Browser, or from the Session or Arrangement View in the form of clips.
You can load audio clips into a simpler and play them in warp mode.
Any adjustments that have been made to a clip’s Transient or Warp Markers and other warping properties will be retained when dragging a clip into Simpler.
In the latter case, Simpler will utilize only the section of the sample demarcated by the clip’s start/end or loop markers. Samples can be replaced by dragging in a new sample, or by activating the integrated Hot-Swap button.
Note: When playing instruments from Ableton’s Instrument Collection, Simpler runs in Multisample Mode. The Sample View has no function in this mode.
Sample and Control View
Click on > arrow to open Sample view in separate large window.
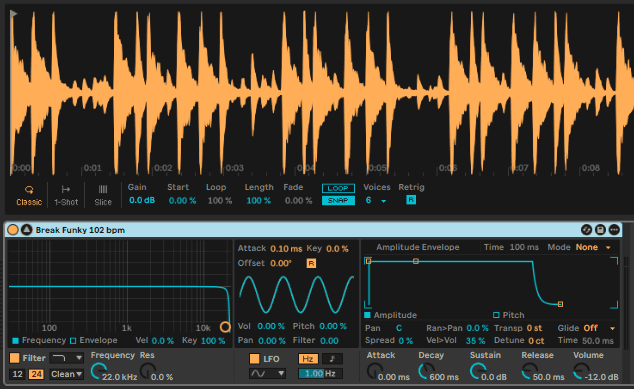
This also will reveal Controls
Zoom
Quite often, one starts with a longer region of a sample and ends up using only a small part of it. Simpler’s Sample view can be zoomed and panned just as in other parts of Live drag vertically to zoom, and drag horizontally to pan different areas of the sample into view.
Simpler has 3 distinctive playback modes:
Classic:
With Warp off you can create Double/Half Time with Octaves
Simpler plays a specific region or loop of the sample, as determined by a group of sample controls.
Start out by defining the absolute Sample Playback Region
using the start/end Flags > <
The Start and Length controls work together to specify where Simpler begins and ends its sweep of the sample. As the name implies, Start defines where sample playback starts. The sample will play for the length defined by the Length parameter. Both parameters are defined as a percentage of the whole region as defined by the flags, so setting start to 25 percent and length to 50 percent, for example, will start playback 1/4 of the way through the sample and stop playback at the 3/4 mark (using 50 percent of the sample).
Creating Loops
Samples are played by Simpler as one time or as loops, depending on whether or not the Loop switch is active. When looping is active, the Loop control dictates the length of the loop, starting from the end of the playing sample. Loop is expressed as a percentage of Length
e.g 50 will play half of the Length. Simpler will play the first instance of a looped sample beginning with the Start point, then continue playing only the loop region.
When the sample’s start or end points are moved, Simpler will try to preserve the loop length for as long as possible by automatically adjusting the Start, Loop and Length settings.
To make seamless loops aim at adjusting the start and end to coincide with zero crossings.
It is possible for glitches or pops to occur between a looped sample’s start and end points due to the discontinuity in waveform amplitude (i.e., the sample’s loudness). The Snap switch will help mitigate these by forcing Simpler’s loop markers to snap to zero-crossing points in the sample (points where the amplitude is zero). Note: Snapping is based on the left channel of stereo samples. It is therefore still possible, even with Snap activated, to encounter glitches
with stereo samples. The transition from loop end to loop start can then be smoothed with the Fade control, which crossfades the two points. This method is especially useful when working with long, textural samples. By default, Simpler uses constant-power fades.
Envelopes
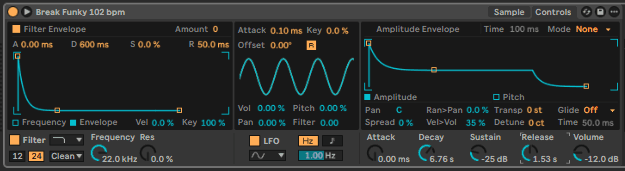
Simpler contains three classic ADSR envelopes, as seen in most synthesizers, for shaping the dynamic response of the sample. Volume, filter frequency, and pitch modulation are all modifiable by toggling their respective buttons in the envelope section. Attack controls the time in milliseconds that it takes for the envelope to reach its peak value after a note is played. Decay controls the amount of time it takes for the envelope to drop down to the Sustain level, which is held until the note is released. Release time is the amount of time after the end of the note that it takes for the envelope to drop from the Sustain level back down to zero.
The influence of envelopes on pitch and filter cutoff can be decided using the envelope amount (Env) controls in each of these sections.
Filter
The Filter section offers classic 12 dB or 24 dB lowpass, bandpass and high-pass filters, notch as well as a morph filter, each of which can impart different sonic characteristics onto the sample by removing certain frequencies from the waveform.
We have 5 different circuit types some of them emulating well testing vintage filters used in famous classic synths. They resonate in different ways and some have a Drive control to add subtle saturation,
distortion or dirt.
The most important parameters are the typical synth controls Frequency and Resonance. Frequency determines where in the harmonic spectrum the filter is applied; Resonance boosts and emphasizes frequencies near that point.
The best way to understand the effects of these controls is simply to play with them!
The Frequency parameter can be modulated by an LFO, note velocity and an envelope _ each of which have an amount control in the Filter section. The Key (tracking) control allows for shifting the filter’s frequency according to note pitch.
LFO
The LFO (low-frequency oscillator) section offers sine, square, triangle, sawtooth down, sawtooth up and random waveforms. The LFO run freely at frequencies between 0.01 and 30 Hz, or sync to divisions of the Set’s tempo. LFOs are applied individually to each voice, or played note, in Simpler.
The Key parameter scales each LFO’s Rate in proportion to the pitch of incoming notes. A high Key setting assigns higher notes a higher LFO rate. If Key is set to zero, all voices’ LFOs
have the same rate and may just differ in their phase.
The LFO will modulate the filter, pitch, panorama and volume according to the setting of the LFO amount controls in each of these sections. The time required for the LFO to reach full intensity is determined by the Attack control.
Glide and Spread
Simpler includes a glide function. When this function is activated, new notes will start from the pitch of the last note played and then slide gradually to their own pitch. Two glide modes are available: Glide, which works monophonically, and Portamento, which works polyphonically. Glide is also adjusted with the Glide Time control.
Simpler also offers a special Spread parameter that creates a rich stereo chorus by using two voices per note and panning one to the left and one to the right. The two voices are detuned, and the amount of detuning can be adjusted with the Spread control.
Tip: Whether or not spread is applied to a particular note depends upon the setting of the Spread parameter during the note-on event. To achieve special effects, you could, for instance, create a sequence where Spread is zero most of the time and turned on only for some notes. These notes will then play in stereo, while the others will play mono.
Pitch, Pan, Volume and Voices
Simpler plays back a sample at its original pitch if the incoming MIDI note is C3, however the Transpose control allows transposing this by +/- 48 semitones. Pitch can also be modulated by an LFO or pitch envelope using the amount controls in this section. The pitch envelope is especially helpful in creating percussive sounds. Simpler reacts to MIDI Pitch Bend messages with a sensitivity of +/- 5 semitones. You can also modulate the Transpose parameter with clip envelopes and external controllers.
The Voices parameter sets the maximum number of voices that Simpler can play simultaneously. If more voices are needed than have been allocated by the Voices chooser, voice stealing will take place, in which the oldest voice(s) will be dropped in favor of those that are new. For example, if your Voices parameter is set to 8, and ten voices are all vying to be played, the two oldest voices will be dropped. (Simpler does try to make voice stealing as subtle as possible.) A small LED near the Voices control flashes when a voice has been stolen.
Panorama is defined by the Pan control, but can be further swayed by randomness or modulated by the LFO.
Finally, the output volume of Simpler is controlled by the Volume control, which can also be dependent upon note velocity, as adjusted by the Velocity control. Tremolo effects can be achieved by allowing the LFO to modulate the Volume parameter.
Using Warp Modes:
:2*2 will divide or multiply BPM. Wrapping in Simpler does not provide stretching with Markers like Audio Clip warping, however we find the same Warp modes here.
Warping allows for synced polyphonic playing of rhythmic material. You can double melodies with intervals or create chords. Try playing multiple note to harmonize a vocal part: Packs/Beat Tools: Vocal Chop Female UhYuh Low
One Shot:
Trigger plays entire flagged sample region to end and Gate plays as long as key is pressed.
Slicing:
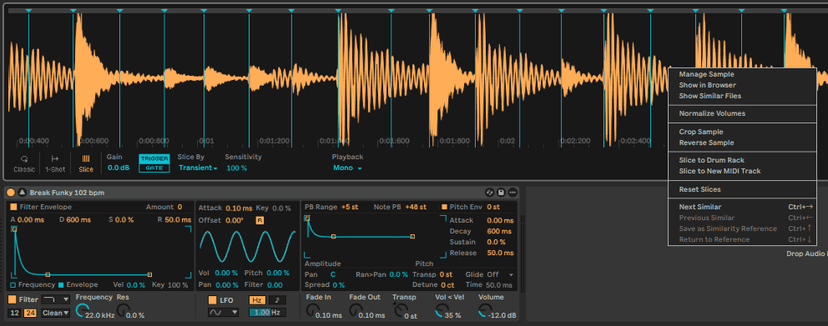
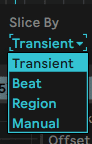
Use Beat, Region or Transient while adjusting Sensitivity to determine slices. For Manual or to Edit, double click to remove/add marker.
- Playback modes in mono, poly and thru (play to end)
- We can also load warped audio clips into a simpler, using the existing Warp markers.
- Slices can now be played on the keyboard or pads starting from C1.
- Right clicking on Sample view will give you 2 options to slice to Drum Rack.
- Use the 2nd option to create a Midi Clip, you can then also drag it to the Simpler track for Midi playback!
- With ‘Slice to Drum Rack’ no Midi clip will be created, however a Rack of Simplers is instantly available.
Slicing from Audio Clip
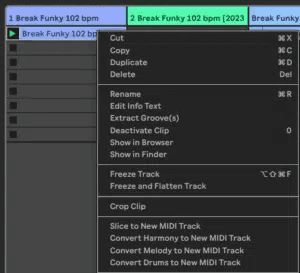
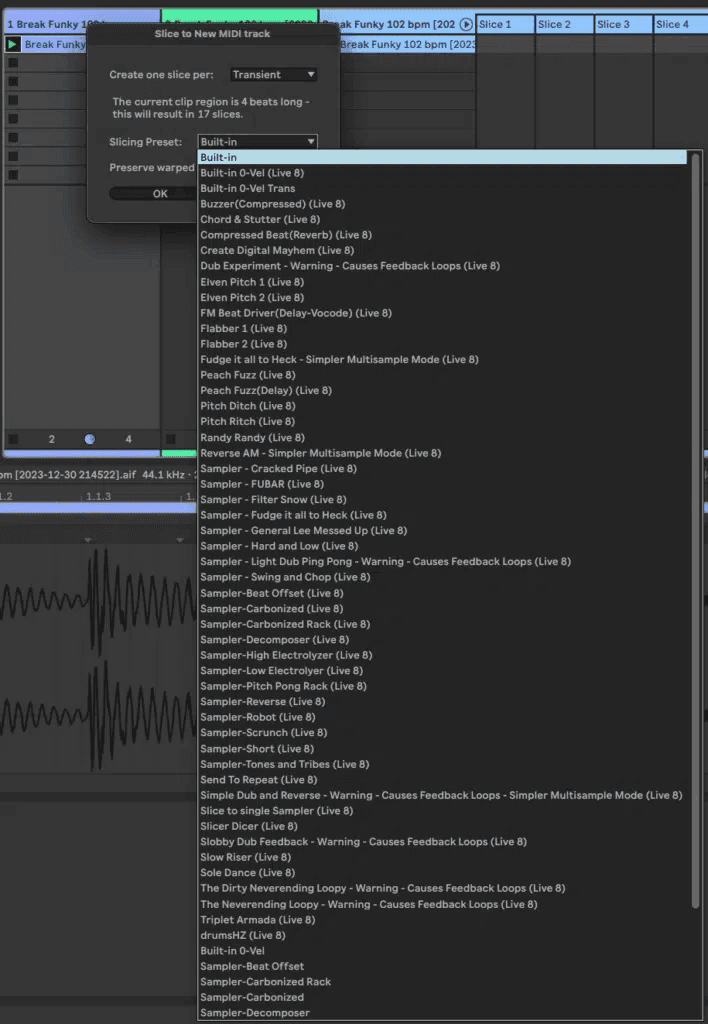
Alternately we can use the Slice to Midi command by right clicking on an Audio Clip and this will give us some interesting slicing and Macro control options.
Using the Transient or Warp Marker options we can get more precise, stretched or quantized results Moreover warped clips can be dragged to Simpler where the Markers will then use the same modified settings.
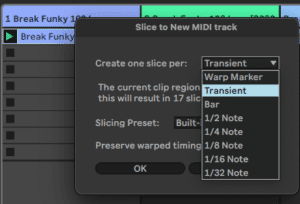
The Slicing presets offer a wide range of Macro mappings using Midi and other grouped effects. Using these options will create some complex Rack presets.
Beat Production with Ableton’s Drum Rack
This is what we get after Slicing to Midi from within Simpler. By rearranging the midi notes we can easily create a variation or totally new beat!
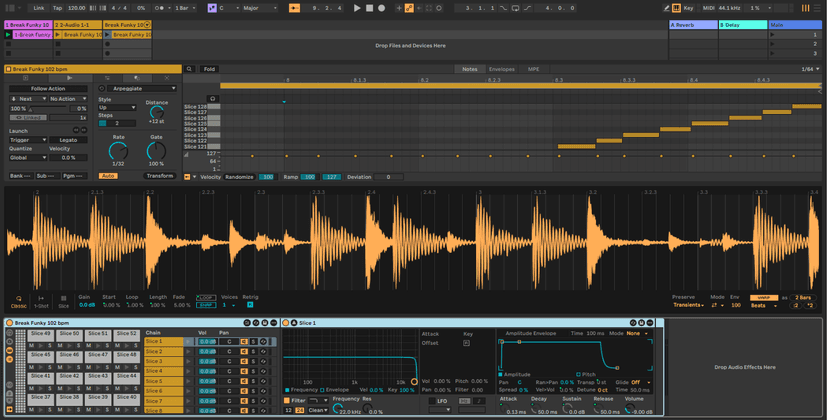
Drum rack and midi file with individual channels displayed in the mixer
A Drum Rack is a a rack, with functionality focused on drums and percussion. Like other Rack types (Instrument and Effect), Drum Racks are shells for building devices from multiple plug-ins. A Rack comprises one or more parallel Chains, each of which is a sound source and signal path. This concept is ideal for building drum machines, because each drum sound can have its own generator or playback device, with its own signal path, filters, effects and so on. All these components are hosted within a single device — the Drum Rack — so that you can treat it as one instrument on one MIDI track.
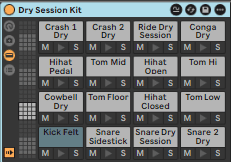
The most obvious difference between Drum Racks and other Racks is the trigger pad section. In this example, each pad plays a single sample, and is triggered by a single MIDI note from a keyboard or pad controller.
The individual channels of a Drum Rack can be controlled in the main Session View mixer. The screen shows how a Drum Rack track can expand to display all the separate Chains in the composite device. From here you can set relative levels and pans for individual drum sounds. Selecting any of the channels in the mixer immediately displays the devices in that chain at the bottom of the screen.
Patterns can be recorded into Clips on the MIDI track containing the Drum Rack patch. However, at a later point you can decide to strip a sound out of the Drum Rack and treat it as an individual track. To extract a sound, simply click and drag its channel to an empty space in the mixer. A new MIDI track will be created containing the sound’s device chain. Any MIDI Clips that were on the Drum Rack track will be duplicated on the new track, with just the notes for that sound.
Sound Sources:
Drum Rack pads don't just have to be sample-based. In this screen, the Operator FM synth is being used for the snare sound.!
Creating A Drum Rack Kit From Scratch
it is essential to also learn how to create your own kits by loading samples and hits to get the most out of Live.
Load the (empty) Drum Rack from Drums. Here you can find many great premade Drum Rack patches, many of them come already with multiple effects embedded (adg stands for Ableton device group).
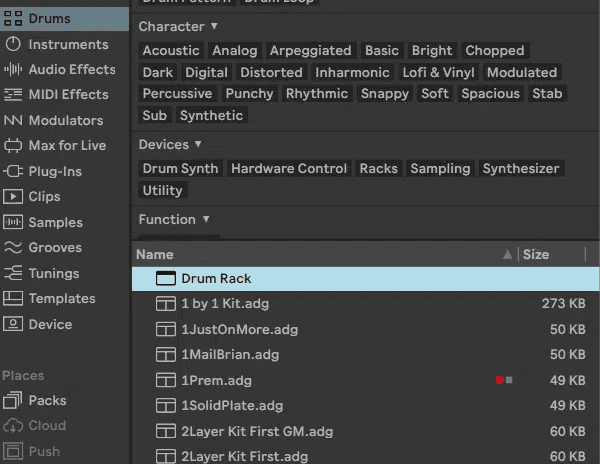
Next, add some sounds from Drum using the Browser’s Filter the same way we’ve done already for Impulse!
Alternately you can also load from Samples directly. You can also load several sounds on the same pad by pressing cmd while dragging. In this example i’ve opened a folder of TR606 samples from my library, and dragged them to pads in the Rack. When you move the cursor over the pads, suggested sound types are displayed in the status bar, based on the General MIDI standard drum map.
Whenever you drop a sample onto a Drum Rack pad, Live automatically loads the sound into a Simpler. However, the default Simpler settings are not well suited to most drum applications. As described elsewhere in the article, you will probably want to set a longer Release time so that samples are played in their entirety from any MIDI trigger. You will also usually want to add velocity response, and set the voice assignment to monophonic.
Sample Similarity Swapping
In addition to searching for similar sounds, it is also possible to swap samples based on their similarity in the Simpler and Drum Rack devices using Sample Similarity Swapping.
In Simpler, you can click the Swap to Previous Similar Sample or Swap to Next Similar Sample buttons at the bottom right corner of the Sample Display next to the Hot-Swap button to load and cycle through similar sounds.
You can use the Return to Reference Ctrl-click context menu option to go back to the original sample, or the Save as Similarity Reference option to set the currently loaded sample as the new reference sound.
In Drum Racks, the Show/Hide Sample Swap Buttons toggle at the right of the device’s title bar can be switched on to display similarity swapping options for both the entire Rack and individual pads:
- Swap All Pads to Previous Similar Sample swaps all pads in the Rack to the previous similar sample.
- Swap All Pads to Next Similar Sample swaps all pads in the Rack to the next similar sample.
- Swap to Previous Similar Sample swaps an individual pad to the previous similar sample.
- Swap to Next Similar Sample swaps an individual pad the next similar sample.
- Lock Pad for Similar Sample Swapping locks an individual pad so that the sample is not updated when swapping out samples in the entire Rack.
As in Simpler, you can go back to the original sample using the Return to Reference Ctrl-click context menu option, or set the currently loaded sample as the new reference sound using the Save as Similarity Reference option.
Anatomy of Drum Racks
Racks are complex devices but a core element of Ableton’s functionality and it’s important that we understand them fully. Drum Racks are a center piece of Ableton Live and very useful for electronic music makers.

Use the tabs on the left to show/hide the various controls of the Drum Rack, which is basically a fully contained mixer in Rack format. The idea here was to save us some screen real estate because drums alone can consist of many sounds and mixing channels already by themselves, therefore using up the entire display before we can even add some musical instruments.
From top down we have:
- Macro Controls: will let us control any sound parameters inside the rack, either one at a time or many with one knob.
- Adding/Subtracting (we can have up to 16)
- Macro Control variations. We can save different macro settings as presets here and even experiment with targeted randomization to create settings!
- Devices (mostly Simplers, but could be any other instrument or plugin)
- Chain list: this reveals the mixing channels for the individual sounds
- The Midi Receive and Play choosers, the Choke group and the Audio to selector. Each sound will only receive one note at a time. No pitching up/down of drum sounds on the fly!
- S/R will enable the Send/Return effects. Once we add an effect a send will pop up for each chain.
- > Will show the chain and instrument of the note played
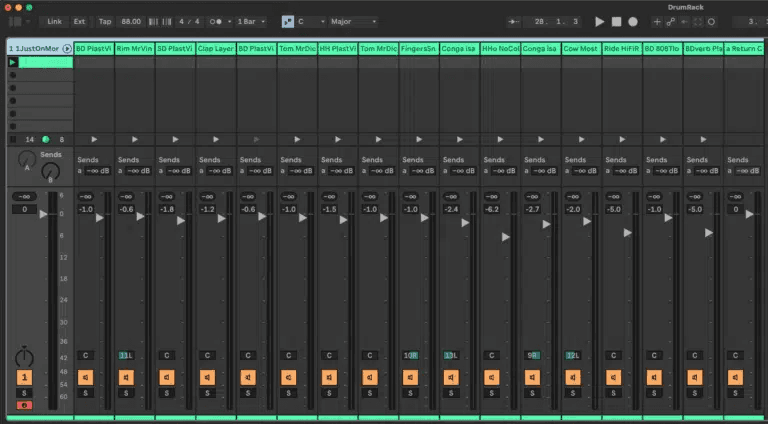
In the Mixer we can open the chains as regular mixing channels by clicking on the arrow on the midi track.
Adding Effects
Once you’ve got your sounds in place, you can add some effects. You can add separate effects to each sound, add global effects to the output of the Rack, and create Return channels within the Rack. To add an effect to a single sound, simply drag it from the Browser to a pad, or to a channel in the extended mixer view. The effect will be added to the end of the Device Chain. You can also view a Chain in the Rack, and place an effect more precisely into the signal flow.
To add effects across all the sounds, you need to place them outside of the Rack on the right-hand side, as in the screen below. They can then be grouped with the Drum Rack to make a single device. However, this means you have a Rack within a Rack, which is a bit untidy when it comes to making Macros.
Multiple chains can be grouped within the Drum Rack (cmd G), which can be used to add the same effects to all of them.
Device groups can be saved as.adg files to the User Library using the disk icon or by drag dropping. to the User Library in the Browser.
Return channels are only available in Drum Racks, and make it easy to share effects like delays and reverbs between separate Chains. To display the Returns section, click the small ‘R’ button in the Rack’s view-selector bar. Returns are Chains that appear in a separate section of the Chains list (as in the screen at the bottom). To add an effect to a Return Chain, drop it from the Browser. By pressing ‘S’ in the view-selector, you’ll make Send level controls appear in each Chain. Each Chain also has an ‘Audio To’ field. In the Return chains, the ‘Audio To’ field lets you choose whether the output of the Return goes to the output of the Drum Rack, or is fed directly to one of the main Return Tracks in the mixer. The pad Chains also have ‘Audio To’ controls, but they are only active in multi-level Racks (where one Rack is nested inside another). These allow you to route the audio from a Chain to Return chains in higher levels of the Rack. You can use this as a way of grouping several pads directly through a single effect.
You can also create a router Return Chain with ctrl/click in the drop area. This will allow us to send signals to the Return effects of the main mixer.
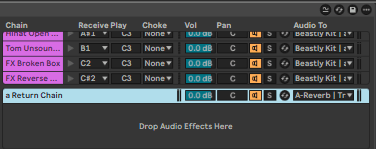
Macros
Macro controls allow you to adjust key parameters within your new drum machine from a single panel at the top level of the Rack (again, like the screen at the bottom). The simplest way of assigning a parameter to a Macro is to right-click the parameter and choose one of the eight Macros to map to. To change the range of the control, enter Map mode, and set the min and max values in the Browser area. One thing to remember is that each layer of any Rack has its own Macros, and they can only map to parameters within their own level. To save a lot of time getting around this, here’s a final tip that can save loads of time. Make sure that you map all your Macros for the main Drum Rack before you combine the Rack with any global effects. Now, select all the Chains and choose Edit / Group. All your Chains will be collapsed into a new Drum Rack, with all the Macros automatically tied to the top-level panel. You can now drop your global effects into the top-level Rack.
Ableton Live has a largely undocumented feature that enables you to save default actions and settings for a number of different operations and devices. In Live’s file Browser, navigate to Users / <username> / Library / Application Support / Ableton / Defaults (Mac), or C:\Documents and Settings \ <username> \ My Documents \ Ableton \ Library \ Defaults (Windows). You will see a number of folders for Live’s instruments and effects, and also for Dropping Samples and Slicing. Open the Dropping Samples folder, and then the subfolder ‘On Drum Rack’. You can save a default Simpler patch here with your preferred settings, and Live will apply these to any samples dropped in the future. The easiest way to save your default patch is drag a Simpler that you’ve already set up in a Drum Rack to the folder in the Browser.
Do this now
- Drop a drum break into Simpler and switch to Slice mode.
- Play the slices from a controller and record a new pattern.
- Convert the slices to a Drum Rack and process one pad on its own.
Slicing to a Drum Rack is how you get a break you can actually mix.