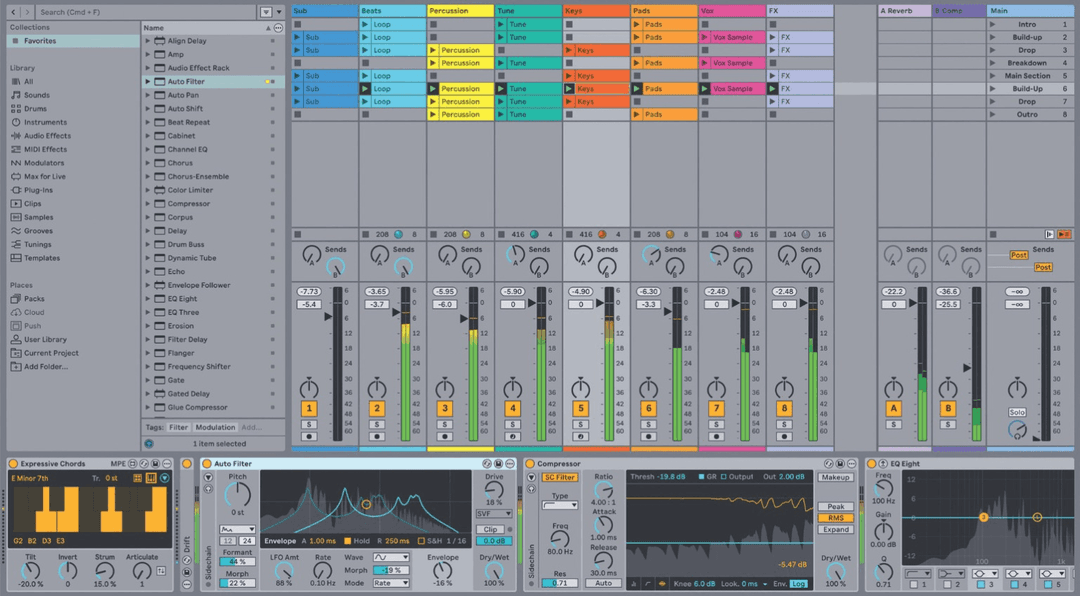
What sets Ableton apart from other DAWs
Ableton is unique. Unlike other software based sequencer programs, Live is designed around the notion of being as much a real-time instrument better suited for live performances and equally as a tool for composing and arranging.
Many of Ableton Live’s unique features stem from being developed for easy use in live performance. The interface is more streamlined than most other audio sequencers and clearly designed for use on a single screen.
Some of the interface is hidden and shown based on easy access buttons, which may be clicked to show or hide a certain segment (e.g. to hide the instrument / effect list, midi, waveforms or mixing controls).
It is built around looping, and around the idea that a track can be built the way a performance happens rather than drawn on a timeline. Loops, samples and tracks combine freely, with tempo and key matched for you. Ableton Live lets you experiment, launching clips — each one a musical idea — in new combinations.
Session and Arrangement View
Live is composed of two ‘views’ – the arrangement view and the session view. The session view is primarily used to organise and trigger sets of MIDI and audio called clips. These clips can be arranged into scenes which can then be triggered as a unit. For instance a drum, bass and guitar track might comprise a single scene. When moving on to the next scene, which may feature a synth bassline, the artist will trigger the scene, activating the clips for that scene.
There are 2 main views in Ableton Live. One is the Arrangement View, which is pretty much like the arrangement section in Logic Pro or Cubase, as it has rows representing MIDI and audio tracks as well as a grid representing time in measures (top) and minutes (bottom). It is ideal when you want to see a clear representation of your music within a time reference. Also it’s perfect for editing automated parameters such as track volume and pan with accuracy.
Composing with Audio Loops
The Session View (below) is great for working with loop-based musical ideas. It gives us direct access to track parameters as each column represents a MIDI or audio track organized in a mixer.
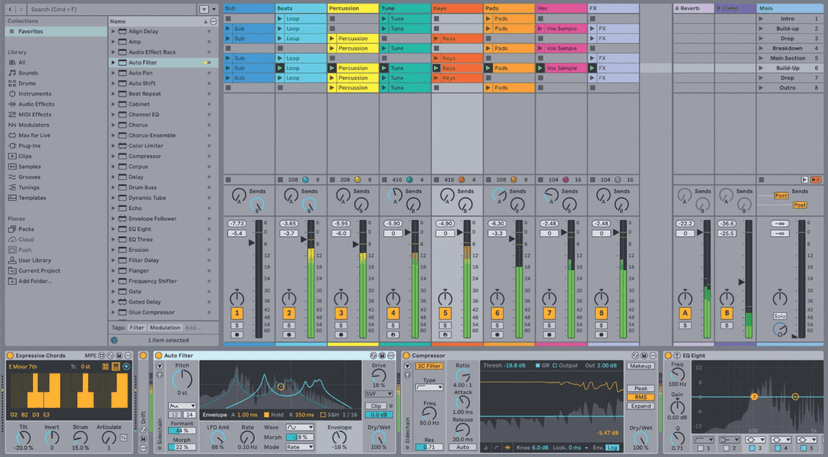
With electronic music, the core of a musical idea can often be captured in a loop and by using subtractive arrangement techniques and adding some variations we can create a track that evolves over time by exploring the various combinations of the musical building blocks,
In the image above those building blocks are the coloured clips on six vertical tracks, and on the right is a playlist of scenes that launches several clips at once across a row. The example breaks a simple loop into six audio clips, with alternate parts on the same tracks. Combining them into scenes gives you the sections of an arrangement. You can go much further — many more clips per track, several variations each of drums, bass and synths, combined into a playlist of scenes that builds a progression.
Scenes are not only useful to combine clips for simultaneous launch but also a great tool to explore a potential song order in an improvisational, non linear way as part of a performance before committing it as the starting point of a final arrangement.
In Ableton Live, we now have the option to see the clip content (audio waveform or midi notes), the instruments or effects used on a track and mixing along with the mixing controls at the same time.
With the selectors at the bottom right we can add or remove the clip and device views or use key shortcuts to add/remove the mixer controls.

The tracks in Session and Arrangement View are the same tracks — and only one clip can play at a time on any one of them.
Audio and Midi Clips
We have Audio and Midi clips that will play from either Audio or Midi Tracks.
Audio Clips and Samples
An audio clip contains a reference to a sample or a compressed sample (such as an MP3). The clip tells Live where on the computer’s drives to find the sample, what part of the sample to play and how to play it.
The file type suffix is.alc for both types of clips but their thumbnails look different
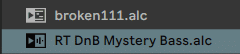
Midi clips play sounds with the help of Midi Instruments.
Option/cmd b opens the Browser. From there you can drag and drop clips on a track or the empty location in session. Prior to dragging in a sample, one can audition or preview it directly in the Browser; the blue switch below the Browser with the headphone icon activates pre listening.
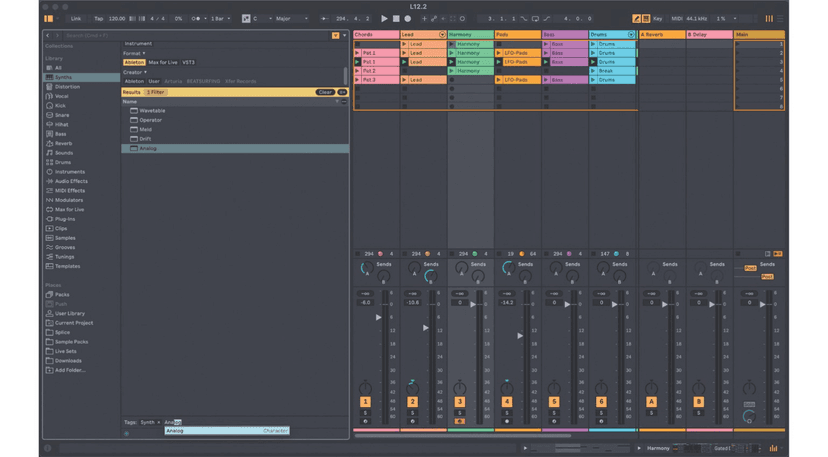
Import Audio/Midi:
Alternately we can also import audio or midi files directly from the desktop using the commands
from the Create menu.
Live offers many options for playing samples in exciting new ways, allowing you to create an abundance of new sounds without actually changing the original sample. All the changes are computed in real time, while the sample is played. The respective settings are made in the Clip View, which appears on screen when a clip is double-clicked. (opt/cmd L)
Effects and Midi instruments are seated in the Track View. To go back to the Track View double click on the track’s header.
MIDI Clips and MIDI Files
A MIDI clip contains musical material in the form of MIDI notes and can also contain controller data. When MIDI is imported from a MIDI file, the data gets incorporated into the Live Set, and the original file is not referenced thereafter.
Navigation Shortcuts
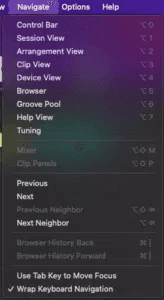
Most of Live’s menus, views and controls can be navigated using the computer keyboard.
The Navigate menu contains commands for moving keyboard focus to different areas of the UI, as well as the option to toggle the Use Tab to Move Focus functionality on or off.
When on, the Tab key can be used to switch between different controls in a selected view. The following shortcuts related to this behavior are:
- Tab moves to the next control.
- Shift + Tab moves to the previous control.
- Cmd + Tab (Windows) / Opt + Tab (Mac) moves to the next control in the same row.
- Cmd + Shift + Tab (Windows) / Opt + Shift + Tab (Mac) moves to the previous control in the same row.
When Use Tab to Move Focus is off, pressing the Tab key will switch between Session and Arrangement View,.
The Use Tab to Move Focus option can also be enabled in Live’s Display & Input Settings, which also include the additional Navigation and Keyboard options:
• Wrap Tab Navigation – When this option is enabled, navigating with Tab will not stop at the last control in a focused view, but will navigate back to the first control. If the first control is selected, using Shift + Tab will navigate to the last control.
Tracks and Scenes
Since each vertical column, or track, can play only one clip at a time, It makes sense to put a set of clips that are supposed to be played alternatively in the same columns: parts of a song, variations of a drum loop, etc.
E.g. create a Live Set consisting of multiple tracks, whereby each track contains only variations of certain musical building blocks: Drums/Bass/Pads/Synths/Percussion etc
For convenient access to more clips at once, you can resize Session View tracks by clicking and dragging at the edges of their title bars. Tracks can be narrowed this way so that only Clip
Playing clips and scenes in the Session View
Using clips in the session is a powerful way to start building a new song. It makes it easy to jam ideas over loops, or re-organise a song structure on the fly. Another standout advantage is that you can record your live jam as you launch and stop different clips,

Clicking on the (green) arrow will launch a clip and clicking the squares will stop it!
Clips that are placed on the same horizontal axis can be launched as scenes using the Scene Launch button in the Master track.

The bpm can be saved into the Scene by clicking on scene name field. This allows us to create and store tempo changes in Session view. Global tempo will then follow the Scene tempo.
Stop/deselect all clips by hitting the stop square of the Master. To stop/deselect playing clips on individual tracks use the corresponding stop square.
Using the Space bar will pause playback while keeping the clips selected.
If the clips that are playing are not on the same axis you can capture them as a Scene using the Capture and Insert Scene command listed under Create on the top menu bar (shift/cmd/i)
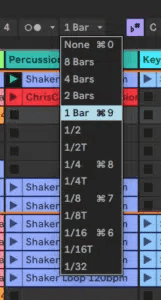
Clips and Scenes start and stop in accordance with the Global Quantization settings unless otherwise specified.
Audio Clip View
The clip view accommodates audio and MIDI clips in the session view display.
Double click on clip to open!
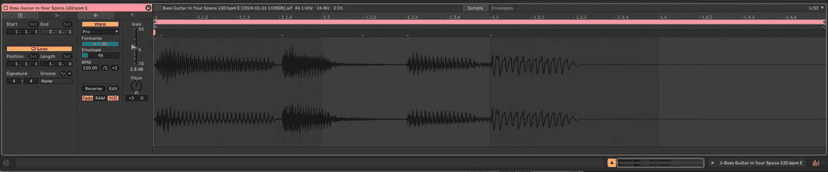
In the Detail View we can adjust the Loop Length and Playback Start and fine tune the Warp settings. We can also change the loop length/start and play start with the little arrow markers
Loop Start and End
The start and end times designate where the Clip begins playback when it is launched in the session (or arrangement) view. The end point is only relevant when the loop button is deactivated. The accommodating Set buttons can be clicked to set the start or end time while the clip is playing.
The Loop button enables looping for the selected clip.
Position and length
These parameters set the overall positioning and length of the loop.
Groove settings
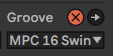
This is where you can assign grooves from the groove pool. More about Grooves later!
Use these switches to select the different Sample Box Views
Audio file sample properties
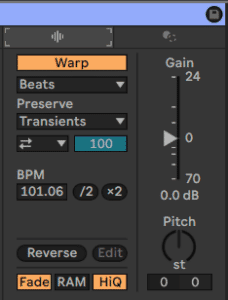
Edit
This button opens up a third party sample editor to edit the current clip.
Rev
This button will reverse the audio clip.
Fade
The fade feature applies a 0-4 millisecond fade to the beginning and end of the audio clip. This is intended to hide any pops or clicks at the beginning or end of the clip.
RAM
This loads the clips audio file into RAM to reduce the load on the hard disk.
High quality mode
This changes the sonic quality of audio clips when you pitch shift them. This should always be set to on unless your computer is having processing issues.
Save
This is used to save the current settings of the clip. Doing this means every time you use the clip the saved settings will accommodate it.
Transpose
This is used to pitch shift a clips playback by semitones.
Detune
The detune feature is a way to fine tune a file in cents (subdivisions of semitone).
Gain slider
This changes the volume of the clip. This will change the display size of the waveform.
Warp
When this is activated a time stretching algorithm is applied to the clips audio file allowing you to create warped files and loops.
Seq BPM
This is the BPM that Ableton Live interprets the clip based on its length, warp marker placement and other settings. This value can be doubled or divided quickly by clicking the two buttons directly below it.

Besides using Global quantization each clip can also have its own Launch Settings!
The Launch Box contains parameters that are used to customize the behaviour of session clips when launched.
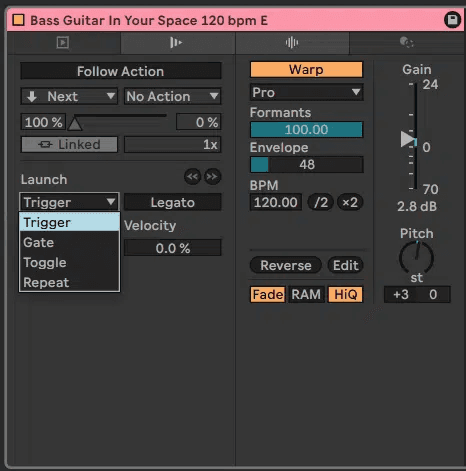
Trigger
This is the general default mode for launching clips. The down position simply plays the clip all the way through.
Gate
This mode will play the clip when the play button is clicked and held, and will stop the clip when the mouse is released.
Toggle
This mode requires a single click to start play and a single click to stop play.
Repeat
This mode will play a clip repeatedly and will ignore additional clicks (to stop it).
Legato mode
Legato mode allows clips on the same track to smoothly transition from one to the other.
When Legato mode is on and you launch one clip (we will call this clip “A”) and then launch another clip mid-cycle on the same track ( Clip “B”) the second clip will start where the last one left off, as opposed to starting from the beginning
Clip Launch Quantization
quantizes the clip launch. When the clip is launched it will play at the allotted quantization value set in this field. When it is set to global the clip will adhere to the global quantization.
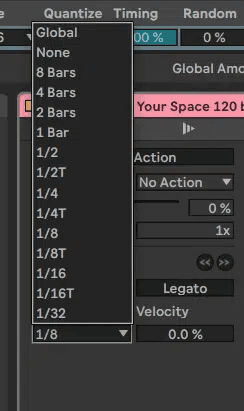
Velocity amount
This sets the velocity sensitivity amount of clips launched via a MIDI controller. The higher the setting, the more sensitive the clip will be
Use the dbl arrows to jump fwd or backwards in a playing clip according to the global or clip quantization
Follow Actions
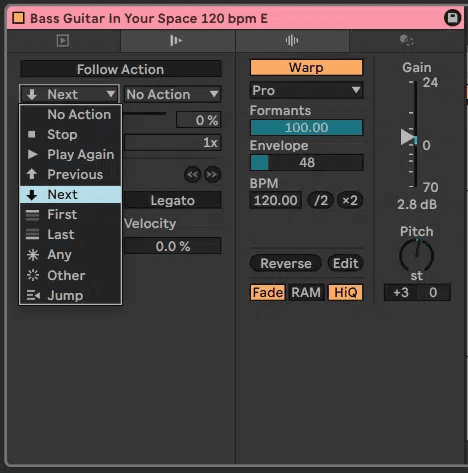
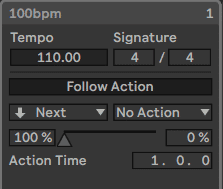
A Follow Action decides what happens after a clip is launched — which clip on the same track goes next. Use it to run clips in a set order, or at random.
a predefined succession or randomly.
Select multiple adjacent clips (audio or midi) and open the Clip view. Open the Launch section and select a Follow Action from the pull down menu Set the Follow Action Time in Bars, Beats or multiples of 1/16th
There are two Follow Actions available for each Clip and you can define a probability of each one occurring.
Try ‘Other’ with a varying short Action Times also using Legato! (Alternately each Clip could have its own settings as well).
Record the Actions to Arrange and Consolidate your favorite results to new clips (cmd J)
Drag the clips over to Session View while pressing Tab. Make sure to turn on their Loops in the clip view for playback.
Recording Clips and Scenes to the Arrangement View
By clicking the (Red) Global Record button we can capture our Session performance in the Arrange View as part of a linear timeline i.e. song or track

Hitting TAB will get you to the Arrangement View. Now press the red Return to Arrange button first so the recorded clips will playback from there
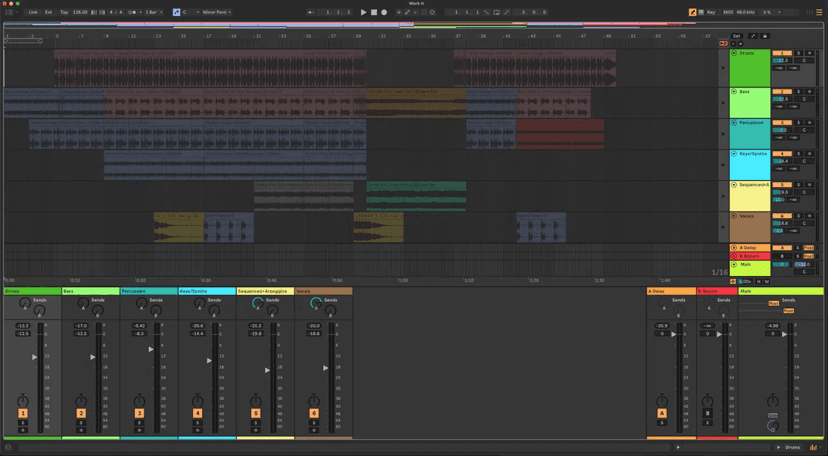
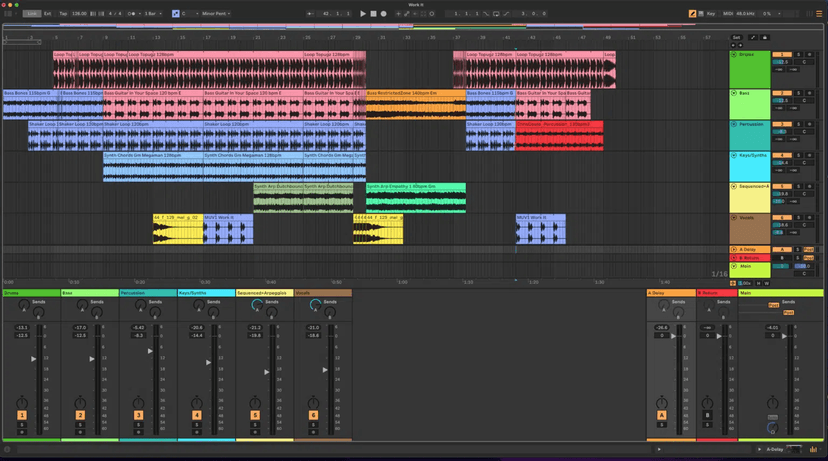
This will deselect the clips in Session View. If you now launch a Clip from there, playback on that track will stop and the tracks will be greyed out again. You can use this feature when performing, by changing beats or musical parts on the fly in an existing arrangement,
Hitting the Arrow of that track will resume Arrangement playback. In addition to using TAB you can also click on the selectors in the top right corner to toggle between the two views.

Adding Audio Effects
Spatial effects would be my primary choice to add movement or space to some of the Tracks’
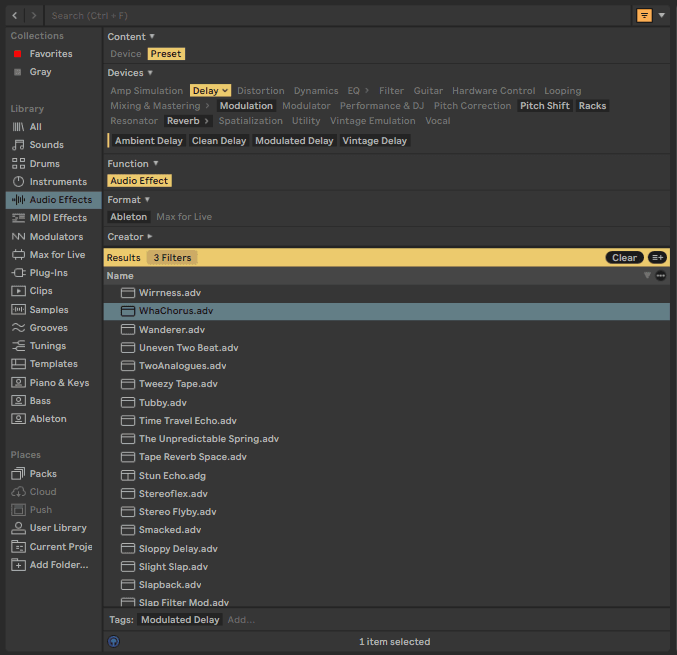
Select Audio Effects In the Browser and enable the Filter: Check Preset and Delay and load a preset from the Delay or Echo folders.
Creating Send/Return Effects
Opt/Cmd R will make the Return section visible.. drag the Delay on the first Return Track on the right side.
Then add a Reverb. Checking Reverb under Devices will make two reverb folders visible. Load from either one on Return 2.
Use Send 1 and 2 to send a certain amount of the track’s audio to these Returns.
Warping Audio Clips
Live's ability to play any sample in sync with a chosen tempo is a unique and important feature. In addition, you can change the rhythmic flow of a piece, changing its feel, or even move notes to other meter positions. Most short even metered audio loops will already be tempo matched automatically after import.
A clip’s warping properties are set in the Sample box, which is a sub-section of the Clip’s Detail View. The most significant control here is the Warp switch, which toggles a clip’s warping on or off. The Warp section of Live's Settings will determine the default warp settings for new clips, but they can always be overridden here on a per-clip basis. When the Warp switch is off, Live plays the sample at its original, normal tempo, irrespective of the current Live Set’s tempo. This is useful for samples that have no inherent rhythmic structure: percussion hits, atmospheres, sound effects, spoken word and the like. Turn the Warp switch on to play rhythmically structured samples (such as sample loops, music recordings, complete music pieces, etc.) in sync with the current song tempo.
Ableton Live’s Time Warp feature can be used to correct or adjust beat positions in each sample. For example, a drum beat that fell 370 ms after the centre of a measure may be slid over so that will be played back precisely at the midpoint. These warp markers when set to a specific point in the sample, also provide arbitrary points in the sample that can be marked to positions in the measure
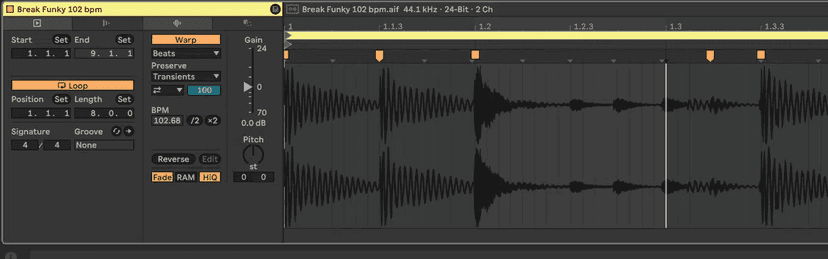
Click on a Transient (little grey down arrow) to enable/turn yellow a Warp Marker.
Moving Warp marker left or right will compress or stretch time btw markers.
Markers snap to the Grid (vertical lines). The Grid represents precise quantized note/time values e.g. 1/16, 1/8 etc. Use cmd 1 and 2 to change grid width.
Change loop length numerically or by clicking the loop brace on top (under ruler) and using cmd 1 and 2 to double or cut length in half.
Timestretching and Quantizing, Transients, Markers
One of the features included in Ableton Live is the ability to “quantize” audio. This means if you record a guitar riff that’s slightly out of time, you can fix it up and get everything in sync – just like magic!
Well, not quite… there’s a bit of work involved, but thanks to Live’s transient detection and warping engine, it’s not too much of a mission. If your audio is badly out of time, you’ll have to go through it and manually snap each transient into place – time consuming, but well worth it.
Even if your audio stays pretty well in time, quantizing it can give it that extra edge by making it perfectly in time – this is especially true in the case of drums or another percussion instrument, where timing is everything. Alternately you can achieve instant Quantization for all Transients using cmd/U or with non-destructive Quantization in the Groove Pool.
If a single event in a percussive audio loop comes late, just pin a Warp Marker to it and drag the marker to the correct beat position. Placing the cursor on a Transient creates a greyed out Pseudo Warp Marker. Double-clicking or dragging a Transient’s Pseudo Warp Marker creates an actual Warp Marker. Therefore you may want to pin the adjacent events as well, to avoid affecting neighboring regions in the sample: Holding the [CTRL](PC) / [CMD](Mac) modifier while creating a Warp Marker on a transient also creates Warp Markers at the adjacent transients as shown in image above.
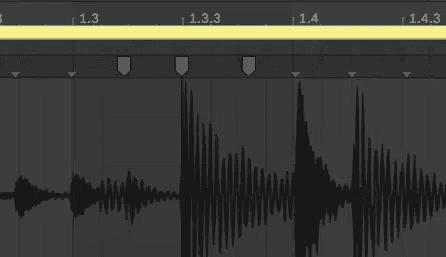
Once a Warp Marker has been created, holding [Shift] while dragging the Warp Marker will move the waveform beneath the marker, rather than the marker itself.
Importing new Loops
Use ‘Auto’ in Settings/Warp/Loop/Warp Short Samples!
When you import an unwarped sample that represents a well-cut musical loop of 1,2,4 or 8 bars in length, Live usually makes the correct assumptions to play the loop in sync with the chosen tempo. It creates two Warp Markers, one at the sample’s beginning and one at the end.
Half/double time:
Sometimes Live’s guess of the original tempo is wrong by half or double. If so, correct this by clicking on the buttons labeled *2 and:2, respectively
Setting downbeat to 1:
It might happen that Auto-Warp guesses the tempo correctly but gets the downbeat wrong. To remedy this, you can do one of the following:
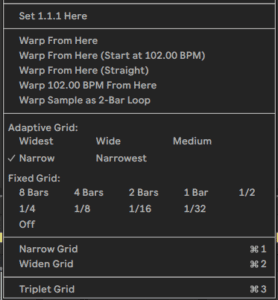
Zoom in and create a Warp Marker on the downbeat and drag it to 1.1.1 or use the context menu (ctrl/right click) to set it to 1.
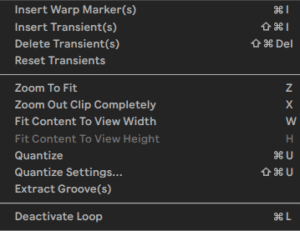
Useful Shortcuts From Context Menu:
Adjusting for Good Stretching Quality – Warp Modes
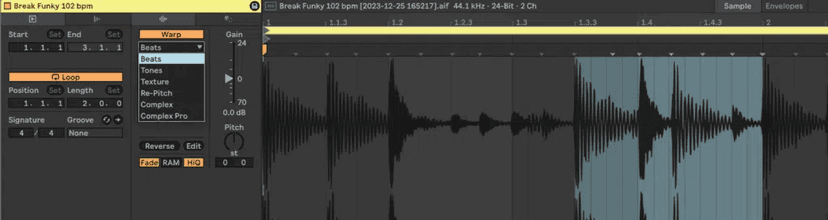
Live offers a number of time-stretching modes to accommodate all sorts of audio material. Each clip’s time-stretching mode and associated parameters are set in the Clip View’s Sample Box.
The warp modes are different varieties of granular re-synthesis techniques. Granular resynthesis achieves time compression and expansion by cutting the sample into tiny grains and repeating and omitting them over to stretch or compress time without affecting the pitch.
Since this is not a lossless process when making bigger changes and some artifacts might occur it is important to use the optimal warp mode for the material at hand.
On the other hand creating artifacts might also be a welcome technique for creating glitchy and dirty lo-fi sounds. More about that in the synthesis classes!
Which mode is right depends entirely on what you want the sound to do, so try all of them and move their controls.
Beats Mode:
works best for material where rhythm is dominant. The granulation process is optimized to preserve transients in the audio material. Use the Preserve control to preserve divisions in the sample as boundaries when warping.
For some interesting rhythmic artifacts, choose large note values in conjunction with pitch transposition.
Transient Loop Modes:
The Transient Envelope slider applies a volume fade to each segment of audio. At 100, there is no fade. At 0, each segment decays very quickly
Tones Mode:
serves well for stretching material with a more or less clear pitch structure, such as vocals, monophonic instruments and basslines. For signals with a clear sense of pitch contour, a small grain size works best. Larger grain sizes help avoid artifacts that can occur when the pitch contour is unclear
Texture Mode:
works well for polyphonic parts or sound textures with an ambiguous pitch contour. Fluctuation introduces randomness into the process. Larger values give more randomness
In Re-Pitch Mode, Live doesn’t really time-stretch or compress the music
Complex Mode:
for composite signals that combine the characteristics covered by other Warp Modes; it works well for warping entire songs, which usually contain beats, tones and textures.
Complex Pro same as Complex but better quality!
Formants: At 100%, the original formants will be preserved, which allows for large changes in transposition while maintaining the sample’s original tonal quality.
Envelope: For very high-pitched samples, you may have better results with lower Envelope values. Likewise, low-pitched material may sound better with higher values.
Envelope Modulation
Beyond using the global Gain and Pitch controls, we can use envelopes with Gain or Pitch for individual notes to make a set of imported clips work together in a sample/loop based composition. E.g.you could totally rewrite a bass or melodic loop.
Most of the parameters in Live are controllable by envelopes, which may be freedrawn either on clips or in the arrangement itself. Basically these equal what would be a knob or dial on an effect in a traditional audio mixer or processing rack and can actually be mapped for use with knobs on a MIDI controller. These then will be used in every performance of that clip or with the arrangement so that they vary at different points in the play-back of a project.
Envelopes can also be implemented in Ableton Live to adjust parameters off midi instruments and effects, e.g. the root note of a resonator or the reverb time or echo amount for a delay!
Drawing Modulation Envelopes
We can use Modulation Envelopes to modulate many of a clip’s parameters and in this way also do non-destructive editing of audio clips.
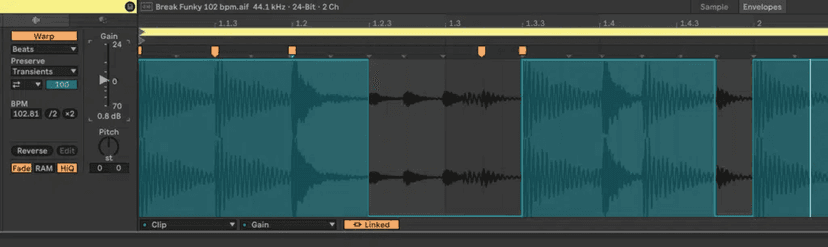
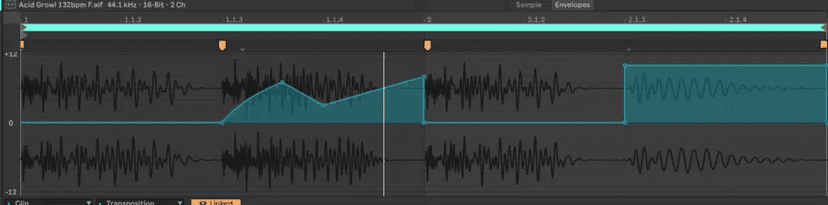
Click on Envelopes to open Envelope editor. The example below show a Clip Gain envelope. Select Clip and Gain from the selectors at the bottom.
Use the pencil tool (B)to mute some parts of a loop ( e.g. the hats) by using different grid settings (cmd1and 2).
Alternately try transposing some selected notes of a bass line or melody using Clip/Transpose. Each horizontal line represents a semitone.
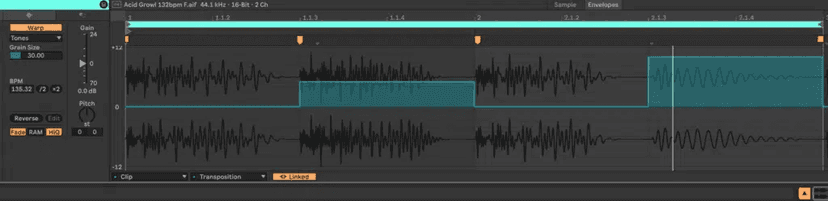
Without the Pencil on you can click on the envelope to create breakpoints for fades and pitch slides.
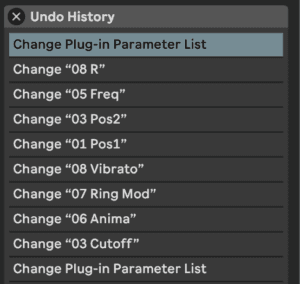
Undo History
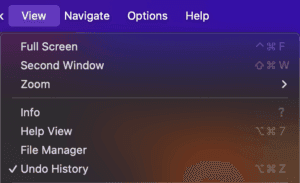
You can use the new Undo History to display a list of the available undo and redo steps, giving you the possibility to undo earlier changes without undoing the changes that came after by clicking on an entry in the list, or by selecting an entry with the arrow keys and pressing Enter.
Open the Undo History from the View Menu or by using option/cmd z
Browser
Full-Height Browser
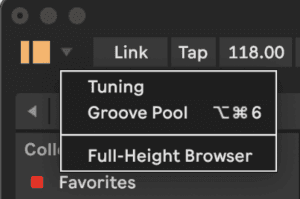
Switch from the standard-height browser to a full-height view of the browser, stretching all the way down to the Status Bar. The “Full-Height Browser” option is available in the drop-down menu next to the Show/Hide Browser toggle, as well as in the View menu.
Auto Tagging User Content
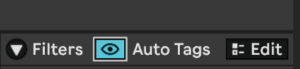
Any samples under 60 seconds are now analyzed and automatically assigned a tag which best matches their sound
Auto tags can be shown and hidden in the browser using a new Include Auto Tags toggle, and can be removed or changed to user tags in the Tags Editor. Files which have been auto-tagged use blue checkmarks in the Tag Editor, while user tags use yellow checkmarks.
Auto Tagging Plugins
Filters and Tags Editor
Sidebar
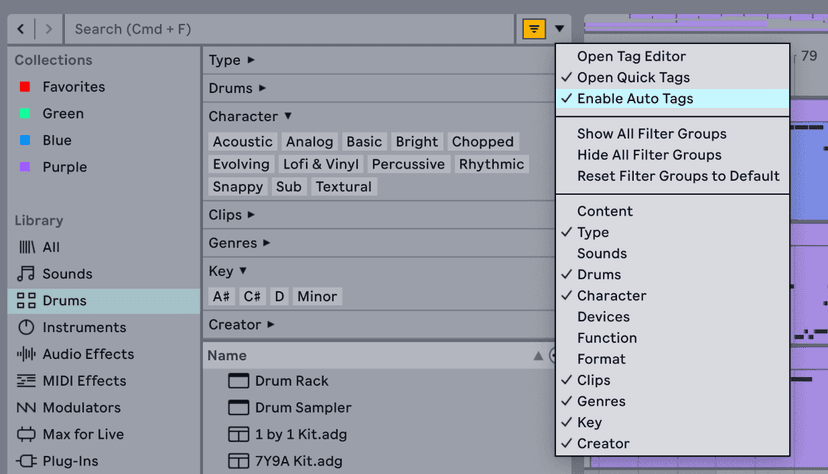
The browser's Filter View has been redesigned to better accommodate the recently added filtering and tagging features:
Browser Content Columns
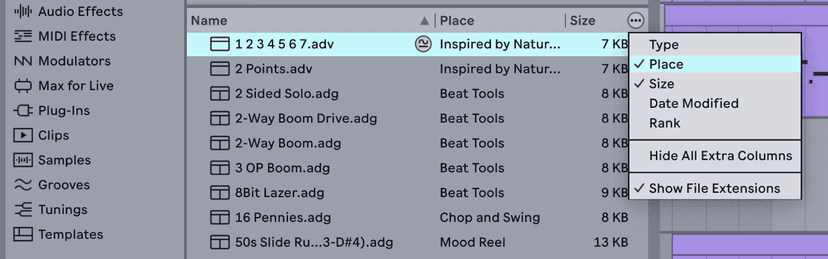
The Content Options menu in the content pane adds some new display options:
- You can customize which content columns are displayed, as well as reorder them in the content pane by dragging.
- The content list can be sorted by clicking on the column header.
- The new Show File Extensions option lets you show or hide all file extensions.
Quick Tags
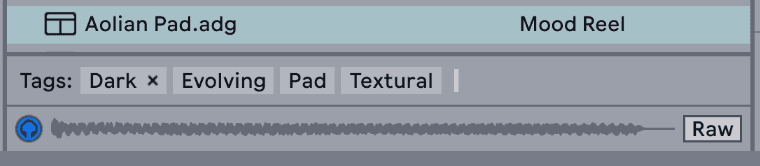
The new Quick Tags panel, located above the Preview tab, lets you view assigned tags, as well as add or remove tags for selected browser items.
- User-created tags and auto tags include an X icon, which you can click to remove the tag from the selected item. Note that factory tags cannot be removed or edited.
- When multiple items are selected, any tags which are not assigned to all of the selected items are displayed with an asterisk.
- Double-clicking a tag in the Quick Tags panel opens the corresponding tag in the Tag Editor.
- Use the shortcut CtrlE (Win) / CmdE (Mac) when the browser is in focus to go directly to the Add… field of the Quick Tags panel.
- The Quick Tags panel is displayed by default but can be hidden via the Show Quick Tags option in the Filter View Menu.
Custom Icons
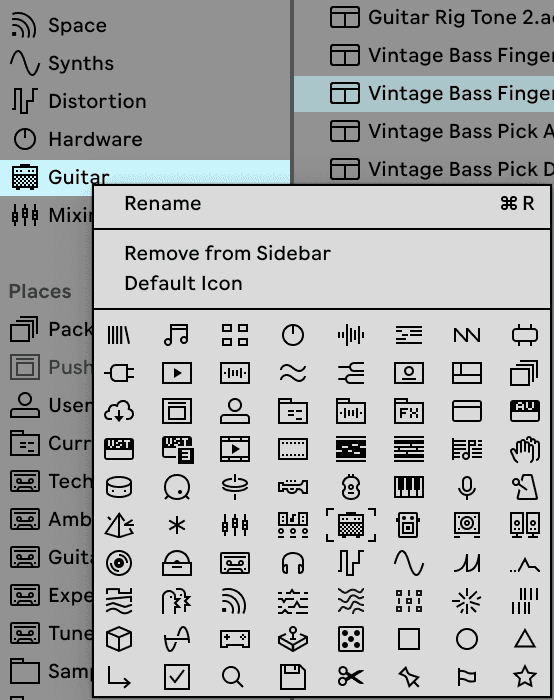
It is now possible to assign custom icons to any label in Library, as well as any user folder in Places:
- Right-click on a label to choose a new icon from the predefined list of custom icons.
- Reset to the default icon by choosing “Default Icon.”
Note that it is not possible to update the icons for the Packs, Cloud, Push, User Library, and Current Project labels.
Device Header Improvements
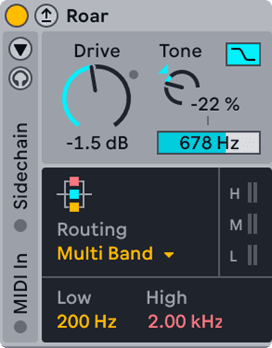
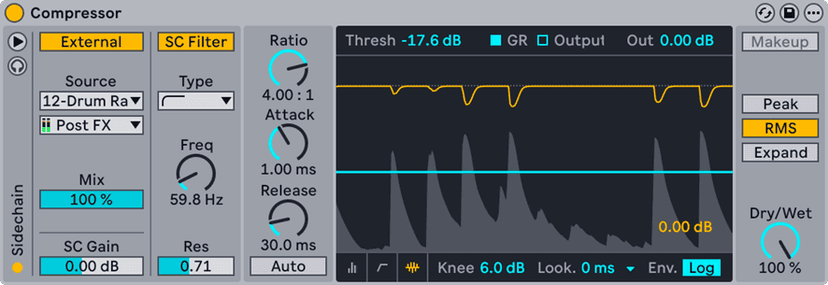
- The sidechain toggle has been moved to the left side of the device and now includes its own header for increased visibility. This change affects the Auto Filter, Compressor, Corpus, Gate, Glue Compressor, Multiband Dynamics, and Shifter devices. Additionally, the Sidechain Filter in Compressor is now accessible in its own panel.
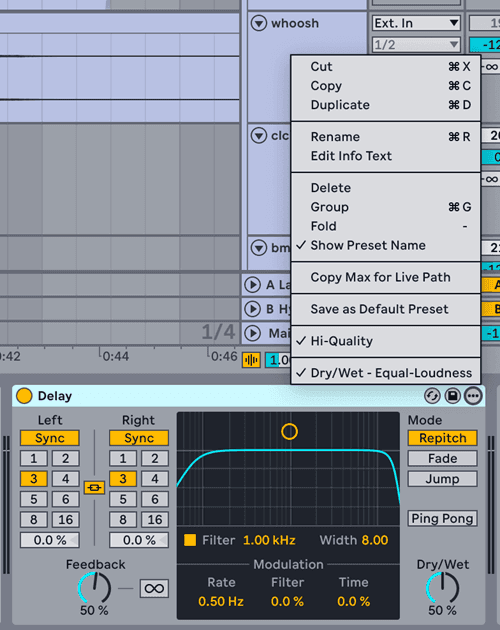
Do this now
- Build a Session View grid of four scenes from loops you already own.
- Launch them in a different order and record the performance into the Arrangement.
- Press Tab and edit what you captured.
Session for finding the arrangement, Arrangement for fixing it. That loop is the whole workflow.