C9 Mixing Basics, Grouping, Routing...
Organization, Reference, and Signal Flow
Learning to mix is also an art that takes time and practice. Mixing is all about listening. The best way to get better at is is to listen. A lot.
It’s therefore important that you get to know your speakers or headphones first by listening to some reference tracks that you already know well and have heard on different sound systems.
Additionally, every mix depends upon some degree of organization. Unless you are mixing a single track (which wouldn’t really be mixing, would it?), you are going to need to develop strategies for managing an assortment of signals, getting them intact, from ‘point A’ to ‘point B’ (and sometimes ‘points C, D, and E’) with all of their accumulated baggage (effects, etc.).
Managing Levels and Frequencies
Mixing is such a complex task. Doing it well requires an understanding of every aspect of the compositional production process. But at its core, mixing means combining multiple elements together.
There is a limit to how much you can cram into your session before it is on the verge of overloading. And to make things even harder, sometimes ingredients just don’t get along so well.
Good mixing won’t rescue a bad composition. Good mixing is made greatly easier with good planning and good sounds i.e the right sounds for the part.
But even under the best of circumstances, you are almost certainly going to need to manage levels, maintaining ‘headroom’ so that there is ample space to contain all your ingredients. This can be made easier by using equalizersto clear the way so that instruments that share frequencies don’t step on each other’s toes. What follows are some techniques to help you do that.
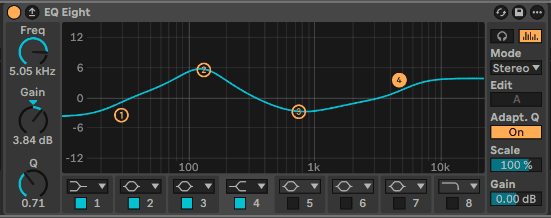
The main dimensions of a mix to tackle are levels, spectral balance, dynamics, stereo field and depth (front/back placement)
Primary Mixing Effects
Generally more used as signal processing effects than more transformative creative effects.
We use these tools to optimize existing sounds and use them in the most effective way with other parts in the entire composition.
The most essential tools are:
Levels: Mixer Faders, Instruments volumes and Utility gains
Stereo vs mono: Utility
Panning: Pans in the Mixer and modulation effects
Spectral balancing: Use EQ8 for making parts work well together by creating space or emphasis where needed.
Dynamics: Compressor to control dynamic range and Limiter to contain peaks and increase loudness.
Create Depth with spacial effects: reverbs and delays
Gain-staging and Metering
Grouping Tracks and Routing
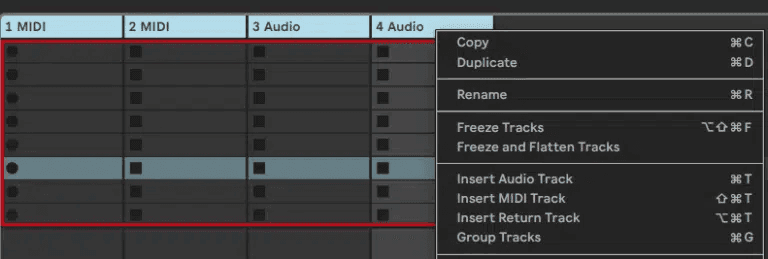
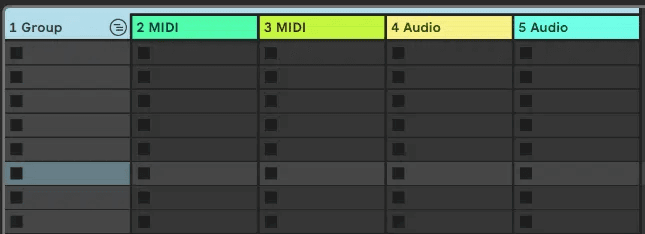
To group tracks, select multiple tracks first (click one, then shift-click the last one), right-click (ctrl-click on Mac), and choose Group Tracks. The result – what’s basically a submix:
You can save space by collapsing tracks in your view, clicking the triangle at the top of the Group
You can add insert effects to the whole Group, and signal will be routed through that entire chain (making them like a quick send)
You can control the whole “submix” Group at once using the Group’s mixer parameters.
You’ll see when you create a Group that the Group track has actual clip slots – unlike the Returns, which have none. (Check out “A Return” and “B Return,” created by default, to see what I mean.) You’ll also see a coloured pattern for each clip slot that is adjacent to grouped tracks with clips in them:
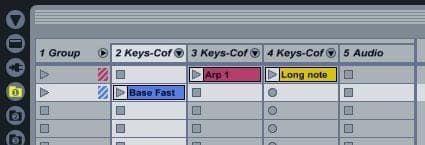

You can use that slot (seen here on the left) to trigger groups of clips. So, if you’ve grouped four tracks, and the first three of clips, triggering the clip in the Group track will trigger all of those clips at once.
It works just as Scenes do, but with a couple of twists. Unlike Scenes, you won’t triggereverything else in your Session – you have some control over what gets triggered. Also, you’ll see if you click one of the slots for the Group, you get a Clip View for editing.
Track Grouping
You can group multiple track by selecting them on their header and using the group command (cmd G) from the context menu.
This is great to create sub mixes to give certain tracks the same treatment e.g. a group of vocal or drum tracks.
You can even created nested groups e.g the backup vocals grouped inside the main vocal group.
I/O Routing
Use opt/cmd i/o to open input/output section. Here we can do all our routings for the mixer. We can route multiple tracks to any other track to create sub-mixes. Make sure to set the destination track to input.
Track routing is an important aspect of any audio related software. It lets you specify where you want the output from each track to go, meaning that you can do things like apply one audio effect to a whole bunch of tracks with ease. Track routing is also a great way of organizing your tracks – this is especially handy when you’ve got a lot on the go! Here’s how to get started with track routing in Live.
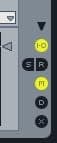
First, make sure you’re in the session/mixing view. Also make sure that the I/O switch is turned on (bottom right of the screen, see the image below).
Each track should have controls looking something like the following:
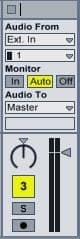
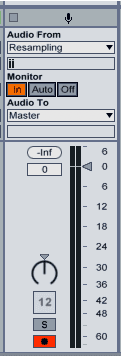
Notice the section at the bottom of the track controls labelled ‘Audio To’ – this lets you control where the audio output from this track is sent. When you select this section, you’ll be presented with a couple of options:
- Master – this is the default, it sends straight to the master track.
- Ext. Out – send audio straight to any output on your computer.
- Sends Only – the track is effectively muted, but if you’ve got any sends then these
- will still work.
- Another Audio Track – if you’ve got another audio track, you can send the audio to it.
A common use of routing is applying effects to multiple tracks at the same time. Say you want to add an effect to 5 out of 15 tracks – adding the same effect 5 times to each different track probably isn’t the best option. A better option might be to use track routing:
- Create a new audio track, and label it something like ‘effect’. Drop the desired effect on this track.
- Set the ‘Monitor’ option on this track to ‘In’. Don’t forget this, it’s a commonly missed step!
- On all of the tracks that you want to add this effect to, use the ‘Audio To’ setting to send to the new effects track, rather than the master track.
- All of these tracks should now pass through the effects track before being sent to the master track, as desired.
This technique is really useful when you’ve got a lot of tracks to work with. It means you can separate sections out before mixing, for example, send all of the drum + rhythm tracks to one audio/effects track. Then, you’d be able to add effects or adjust the volume of the entire drums/rhythm section with ease!
This is also a great way to create stems for mixing and mastering ( and djing) How To Use Send/Return Tracks
Send/return tracks provide a great and precise way of adding a single effect to multiple tracks. Unlike using track routing to do the same job, this method allows you to control how much of the effect is applied to each track – sends/returns can be a very powerful tool if you know how to use them. Here’s how to use send/return tracks in Ableton Live.
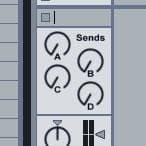
Sends and Return Tracks
Sometimes it is preferable to send a signal to more than one place at a time, allowing us to combine two different versions of the same sound — such as a wet/dry mix.
Any track in Live allows you to send audio to a return track (or tracks!). Creating a ‘send’ from a track does not effect the audio output of the track in any way, the send is on top of any audio present. A send gets sent to a return track (think of this as an effects track), and you
can specify the amount/volume of each track that you want to send.
Say for example, you wanted some sort of reverb applied throughout your mix, but you don’t want every track/instrument to have the same amount of reverb. You could set up a return (i.e. effects) track with a reverb effect, and send a small amount from each track to the reverb track. You can control how much is sent from each individual track, meaning that some tracks can easily have lots of reverb while others have none.
How To Create A Send + Return Track
By default, Live should create two return tracks in every set – if you want more than two, just use the menu option Create > Insert Return Track to add more. To be able to see sends and return tracks, you’ll need to be in the session view. Also, make sure that the send/return switches are on as below (the switches are to the bottom right of the screen).
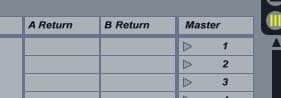
Now, you should notice that next to the master track, you can see your return tracks:
These tracks are where you’ll add any effects – for the purpose of this tutorial, let’s just say that we’ve added a reverb effect to return track A. Now, we just need to send audio to this return track, and if you look at the track controls, this step is pretty intuitive.

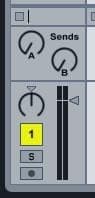
Adjust the ‘send’ dial for send A to the desired amount. This amount of the track will then be sent through the return track (in this case, a reverb effect) before going to the master track. Keep in mind that this is on top of the original audio. If you’re adding a reverb effect as mentioned, it means that you’ll want the reverb to be 100% wet (i.e the reverb effect outputs 100% reverb, it doesn’t let any of the original track pass through). If you don’t do this, you’ll be inadvertently increasing the volume of a track as you increase the amount sent to the reverb track – in most cases this would just mess up your mix every time you adjusted the amount of send.
Sends are very flexible – you can have more than one send from a track, or if you want you can even send from a return track. You can adjust the volume of a return track, letting you increase/decrease the amount of an effect present in the entire mix very easily.
Why Use Sends?
Why not just apply an effect to each track individually? If you’re working with a larger mix (10+ instruments) things can very quickly start getting out of hand. Say you want to decrease the amount of reverb in an entire track – you’re going to have to have to turn down the reverb on each track separately. With sends, one adjustment of a return track’s volume will adjust this with ease.
Why not use track routing instead? Although you can achieve a similar purpose, you can’t adjust the amount effect on each track individually. Sends provide much greater control and flexibility than track routing does.
Managing Dynamics and Intro to Mastering
If you think back to our discussion of dynamics processors ( #link), you will recall you were given a stern warning with respect to their use — or misuse. It is our hope that in the interim, you have acquired a healthy respect for the importance of musically intact dynamics and ample headroom. Assuming the above, you are ready to explore the process of using dynamics processors to shape the envelope of the instruments in your mix, to allow them to manage levels, and to limit the fast peaks that may be preventing you from bringing your mix up to commercially competitive levels. Be aware that this discussion teeters on the verge of a complex discipline known as mastering.
Mastering is a specialized field and it constitutes way more than just getting your song to be louder. A few of the many considerations that a mastering engineer faces are: making sure a mix translates from place to place, correcting problems that may have been imperceptible in the mix, applying subtle re-balancing of frequencies, sequencing songs and the spacing between them, adding fades, and much more. Obviously, we will only be scratching the surface of this vast (and interesting) topic.
Indeed this discussion focuses almost exclusively on the use of dynamics processing for either control, color, or in the pursuit of creating loud, punchy, competitive masters. And oh yeah; one more thing. We are still squeamish about your use of compression, and therefor we may also suggest a few ways to avoid using it. So before you go squashing the living daylights out of your mix, consider the following: (automation, clip gain)
Start With A Good Mix
Mixing is a very subjective topic, I will go over some basics here, but a more detailed course is available from the Garnish School of Sound (how to EQ, add Compression, etc).
It is crucial your levels are set properly before the Mastering stage begins. To do so will require both your ears and eyes.
Setting Up For Precise Metering In Ableton Live
First, start off by expanding your tracks in Ableton. To do this, enter Session View and hold your mouse right above the meter of a channel. Your mouse will turn into an icon with a double-sided arrow. Click and drag upwards about two “snaps” until you can see small lines and two new white meters.
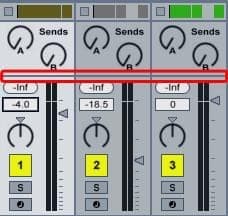
Click and drag here to expand Ableton’s Levelling Meters.
Next, you’re going to expand your meters horizontally. This will show the dB of your levels. Expand horizontally by holding your mouse cursor to the top right of the channel (where the track title bar is).
Your cursor will change to a bracket. Click and drag one “snap” to the right (for Audio and MIDI tracks) or left (for Master and Send tracks).
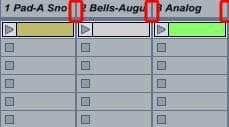
Click and drag here to expand Ableton’s channels horizontally.
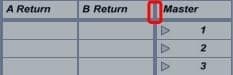
Make sure you expand your Master Channel as well.
Your instrument tracks and master track should now display like this:
The three most important areas when it comes to metering visually in Ableton Live. Lets go over these three parts and why they are important.
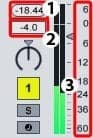
Peak Level
Use this as a visual indicator for the peak dB of a particular track in Ableton. If it reaches past 0, you will experience digital clipping.
Numeric Track Volume
A numeric indicator for a particular track’s overall volume. Click once and type in a value (e.g. -4) and you can set levels with precision.
Linear Track Volume
A great visual indicator for your levels. Use the green signal to get a quick look at the overall levels. Expanding your tracks is important for two reasons:
They allow for setting your levels to precise values, and they let you to monitor your Master track. This is important for keeping your overall levels at the sweet spot (-6dB to -3dB).
Setting The Levels
From this point on, I will be speaking from the perspective of the one bar loop I am mixing. Feel free to apply any of these techniques to your own tracks. I’ll start off by bringing all of my faders down to -inf (I do this by clicking the Numeric Track Volume and just typing -100).
Next, I’m going to bring the most important elements (Bass and Drums) up to zero by clicking on my Numeric Track Volume, pressing 0 on my keyboard and hitting enter.
Here is how it sounds so far:
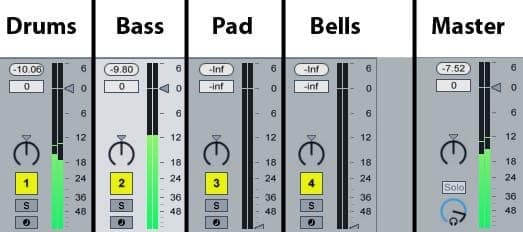
My drum and bass tracks are set to 0dB. Both are peaking at about -10dB. Most engineers say that a well recorded track should peak around -12dB to -6dB. This leaves me with enough overhead for multiple tracks, while still retaining the full sound.
My drum and bass tracks are both peaking around -10dB. As it stands, they don’t need much adjusting for the moment. I could turn up the output levels (or re record the tracks hotter for external audio) but I think this will work for now.
As you can see on the master channel, both levels together are peaking at about -7.5dB. Remember, my goal is to have the master channel peaking between -6db and -3dB.
Now I’m going to bring the Pad and Bells track to 0.
Having all tracks set to 0 teeters on the edge of clipping. All right, so now I am are dangerously close to clipping on my master track (peaks at about -0.25dB). Time to start bringing some levels down.
First I will start with the Bells track. I want these to be in the background as texture. I’ll lower them to about -20dB. Once again, I do this by clicking in the Numeric Track Volume and entering -20 on my keyboard. This sounds pretty good, but now the Pad is overpowering the track. I’ll bring it down to about -5dB and we’ll see how that sounds. Much better. And now I have reached my way back to that sweet -7.5dB spot on my Master Fader.
Here is the “mixed” version far. The Bells and Pad are brought down:
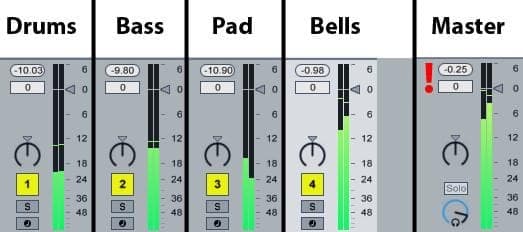
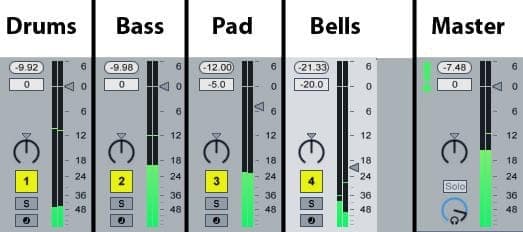
Lowering the Bells and Pad Tracks helped balance the mix and buy me precious overhead in the Master Track. I can finely adjust the levels even further if I wanted to, but for now, we’ll leave them as they are.
Freezing and Flattening
is a quick way to record/consolidate multiple tracks into a clip for performance or library purposes. With this Audio input setting everything that is audible in the mix will get recorded in one simple audio clip or track. No output routing of individual tracks required!
The Freeze function from the edit menu was originally mainly designed to turn clips playing cpu heavy virtual instruments and effects temporarily into 32 bit audio files (running in the background) in order to free up the cpu for other tasks …like mixing for instance.
Once a track is frozen it can always go back to its virtual state for further tweaking or also Flattened into an audio file. This can be used as another quick way to sample all midi/audio clips along with insert effects for further processing or performance.
Note that all clips on the track, both in Session and Arrange will be frozen or flattened in the process!

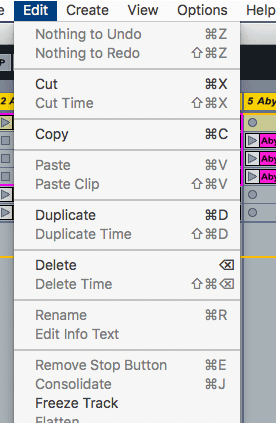
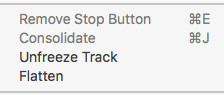
Unfreeze, Flatten
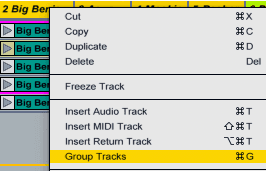
Cmd G for grouping
Recording, Buffer and Latency
For Grouping of multiple tracks we can also use the command from the context menu (ctrl click on the header of a track)

Use your headphones to avoid feedback when speakers are on!
By reducing the Buffer size we can minimize the delay that occurs when the input signal gets played back via the computer. This delay is referred to as Latency.
There will always be a higher CPU load introduced with lower buffer sizes and therefore you might want to increase it later on again for mixing.
Mastering And Finalizing The Mix
Limiter
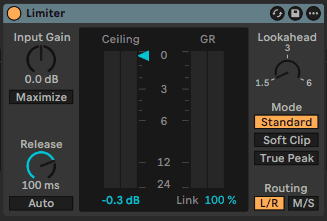
Gain Reduction
This meter shows the amount of gain reduction being applied to the signal.
Maximize
can be used to reduce the dynamic range and loudness with a single control, Threshold, which replaces the Ceiling meter when the Maximize toggle is enabled.
Use the toggle to switch Maximize on or off.
When on, lowering the Threshold will reduce the dynamic range and increase the loudness of the signal. This is achieved by amplifying the limiter stage output by the inverse of the Threshold value.
Release Time
Sets how long it takes for limiting to stop after the signal drops below the ceiling.
This is disabled when Auto is on!
creates a smoother release, which is especially noticeable when using longer release times.
Auto-Release
Use the toggle to enable or deactivate auto-release. When enabled, Limiter will automatically adjust the release time based on the characteristics of the input.
Additionally, the Release control will be deactivated.
Ceiling
Sets the maximum output level. If the input level is lower than the ceiling, Limiter is effectively bypassed.
Lookahead Time
Sets the lookahead time in milliseconds, determining how quickly Limiter responds to peaks. Shorter lookahead times result in more compression but can also increase distortion.
Ceiling Mode
Use the toggles to select the ceiling mode.
Standard is the default mode. Soft Clip introduces soft clipping when signals approach the ceiling level, while True Peak prevents inter-sample peaks.
Soft Clip and True Peak
In addition to the Standard mode, Limiter now offers a Soft Clip and True Peak mode. Soft Clip introduces gentle clipping when the signal approaches the ceiling level, while True Peak mode prevents inter-sample peaks.
Routing Mode
Use the toggles to select the routing mode.
In L/R mode, the left and right signals are compressed independently. In M/S (mid/side) routing channel configuration, the signal is encoded to mid/side before the limiting stage and then decoded to stereo at the output. This can be useful for preserving the dynamics of stereo signals.
Link
When using either the L/R or M/S routings, this continuous parameter can be used to blend the effect of the gain reduction across the two channels.
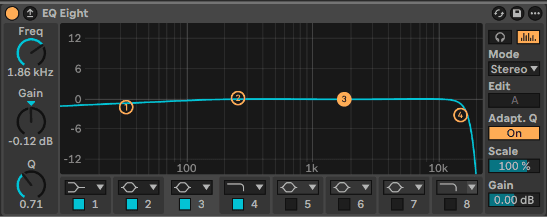
The first tool I will use in the Mastering Stage will be Ableton’s EQ Eight. I am dropping this onto my Master Track. I will tighten up the low end by setting a low cut filter on band 1. I’m setting the Frequency to 30hz. Next, on band 2 I will bump a little in the 250hz range with a Q of 1.4 for some very subtle punch.
Finally, on band 4, I am using a high pass filter to eliminate some frequencies above 18kHz. Usually anything above 15kHz can’t be heard by the human ear, so to be safe I am killing a small amount at the very very top.
Here is the mix post EQ. Not a huge difference, but the slight bump at 250hz will give it some weight on smaller speakers:
A very subtle EQ curve is used when mastering the overall mix. Now I am going to set the overall volume of the track with Live’s Limiter, this way I don’t have to turn my car stereo on max just to hear the song. In order to compete with most Mastered songs, I want my levels to be peaking in the -0.5dB to -0.2dB area.
Next I am going to drag Live’s Limiter onto the Master track.
My first step is to set the Ceiling setting to -0.2. I’m doing this in the same way I’ve adjusted the faders on the instrument tracks. I will click the number once and enter -0.2 on my keyboard. This means that my master track will not peak past -0.2dB.
Next, I am adding some gain through the Limiter (approx. 7.25dB in this case). The Master Levels are peaking at about -0.93dB.
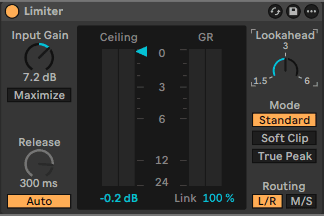
Using the Limiter as a safe way to raise the overall levels. Make sure you listen to your mix on as many sources as possible! (Car Stereo, Home Stereo, iPod headphones, etc!).
This takes a lot of practice (and patience). But with this guide as a starting point, hopefully you’re on your way to better overall mixes!
How To Improve Bass In Music
Bass can be a very complicated part of your mix. Actually, we’d even go and say that the majority of home-producers or home-recorded work, don’t have a good low-end, which is really the basis (get it, bass-is?) for any mix. In this article, we look at how to improve bass in music.
Whether you are in a home or professional-grade studio, you’re going to come across certain issues such as noise in the room, or just plain ole’ bad acoustics. We always try and advise that home producers check out some good bass catchers as well as tiling for recording, as a lot of music with bass can and should be handled in your mix.
The bass, even if it’s tough, is also a main part of your sound. Imagine how necessary it is to have bass in rap, the rhythmic need for it in rock music and of course, EDM’s signature bass drop. Be sure that you are giving yourself time to really understand the bass components found in your mix. It’s also the main layer that gives placement to your other sounds.
It’s a pyramid! This is needed for a solid foundation. The lows give you a great layer that carries you the rest of the way. It might sound cheesy but your bass really is the base for your mix!
When a track lacks a low end it can sound:
Weak
Dead lows, really don’t do much for your record’s strength. If you don’t have a good bass mix, your record is just going to feel.. Lacking.
In Your Face
If you don’t have a low end, everything else is going to be pushed forward. So, that means it’s going to be loud, aggressive and even repetitive.
Flat
Your lows are intended to add a bit of warmth to your music. That being said, if it doesn’t have lows, your tracks are just going to come out missing that “boost” of life, really. It sounds silly, but if you don’t have the proper bass, your mix sounds cold.
Your gut instinct is going to be to mess with the lows and the faders, but that might not be the root of your problem.
Here’s how to improve bass in music by toggling your DAW to ensure your bass is playing nicely with the rest of your mix and giving it the proper foundation.
- Ensure that your low-end is mono, and then pan your low-end towards the center.
- Always mix the lows first! This is why it’s your platform! Turn down your other channels except lows.
- Now using your lows as a reference point, begin to bring back the other components in your mix.
- Now you will need to use compression to piece your bottom end together. When your mix is where you want it to be, all your other key parts will become enhanced.
From this point, set your loop, and edit as you deem fit.
These are just a few ways how to improve bass in music and ensure it is serving as the proper pyramid for the rest of your sound. Be sure to take the time to simply listen to the bass in your favorite tracks, and radio, to really understand how vital it is to your work.
Sidechaining in Live
Some of the effects in Live have a hidden ability: sidechaining. Compression is sometimes used with a sidechain, although you can apply the same technique to other effects too – gate and auto filter effects also have a sidechain option.
What Is Sidechaining?
When you’ve got an effect like a gate or compressor, notice how these types of effects work in general. First, the effect takes an input sound/channel. Here’s the key part: several factors of the input sound (eg volume) determine what the effect is going to sound like. Lastly, the determined effect is actually applied to the sound.
But, what would happen if the input sound was different to the actual sound the effect is being applied to? This is exactly what sidechaining is, and it can be used to create some interesting and useful effects.
If you didn’t follow all of that, it’s ok – experiment a bit later and you’ll pick what sidechaining does soon enough.
Sidechains In Ableton Live
Drag and drop a device that supports sidechaining onto a new track (compressor, gate, and autofilter all support sidechains). Now, notice that in the top left hand corner of the plugin, there’s a little triangle – click on this to open up the sidechaining options.
You’ll now see a big sidechain button up the top – this turns sidechaining on/off. Just beneath it are two selection boxes: use the first to select the sidechain source (the channel that will determine what effect is applied) and use the second to select when the audio from that channel is actually sent to the sidechain.
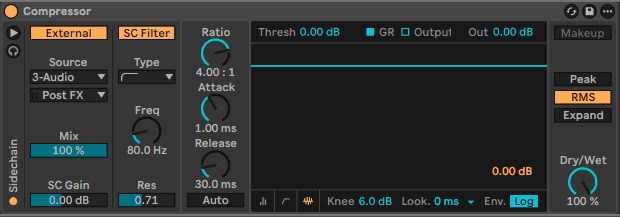
Gain – this increases the volume of the input audio from the sidechain channel. Note that thisdoesn’t actually increase the volume of that channel, it just changes how loud that channel will appear to be when it is used as an input source for the effect.
Wet/Dry – this is a very cool feature which lets you have a partially sidechained effect. Inother words, both the sidechain source and the actual track’s audio will be mixed together, and then used as an input source for the effect.
How To Set Up A Simple Sidechain
To set up a simple sidechain effect, you’ll need two tracks with audio on them. A good combination to hear a sidechain in action is the combination of a kick drum track with a matching music track.
Add a compressor to the music track, and set up a sidechain so that the kick drum is being used as an input source for the compression.
Adjust the compressor as needed, and with a bit of adjustment you should be able to notice a commonly used effect: whenever the kick drum is heard, the music will fade out slightly. A lot of dance/electronic music uses exactly the same effect made by using a sidechained compressor.
Exporting Audio (File menu)
Generally i use 44.1 kHz and 24 bit as a standard format for most purposes incl. mastering. (Mastering for iTunes)
Dithering adds a small amount of noise to rendered audio, but minimizes artifacts when reducing the bit depth.
By default, Triangular is selected, which is the “safest“ mode to use if there is any possibility of doing additional processing on your file.
Rectangular mode introduces an even smaller amount of dither noise, but at the expense of additional quantization error.
The three Pow-r modes offer successively higher amounts of dithering, but with the noise pushed above the audible range.
Note that dithering is a procedure that should only be applied once to any given audio file. If you plan to do further processing on your rendered file, it’s best to render to 32-bit to avoid the need for dithering at this stage. In particular, the Pow-r modes should never be used for any material that will be sent on to a further mastering stage — these are for final output only.
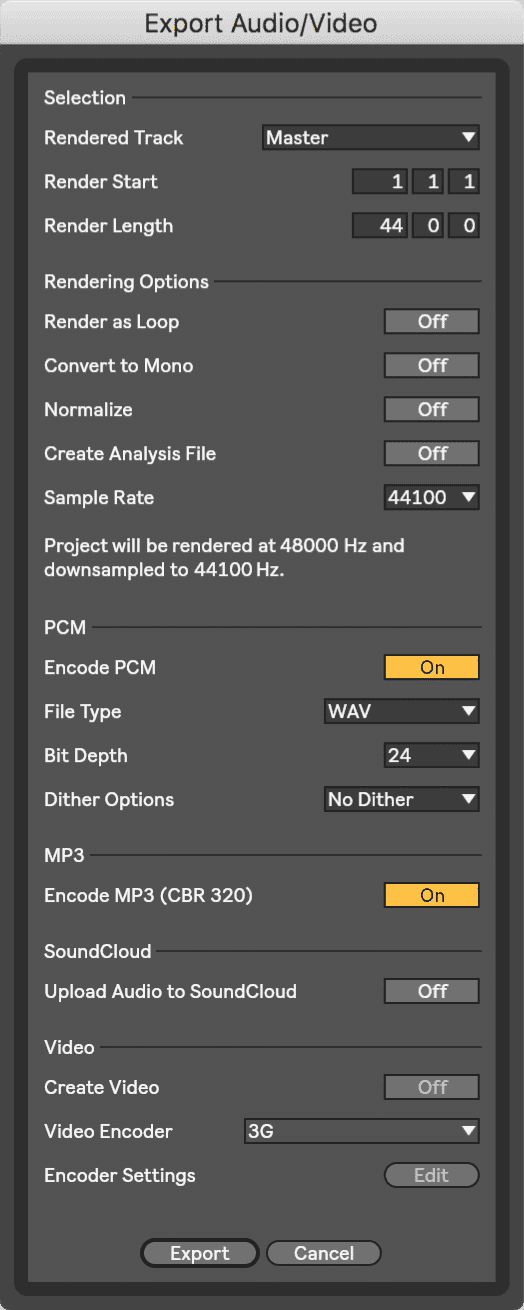
Bouncing a track to audio
When a track is finished — or when its plug-ins are eating your CPU — bounce it. Live renders the track to a new audio clip and you carry on with something that costs nothing to play back.
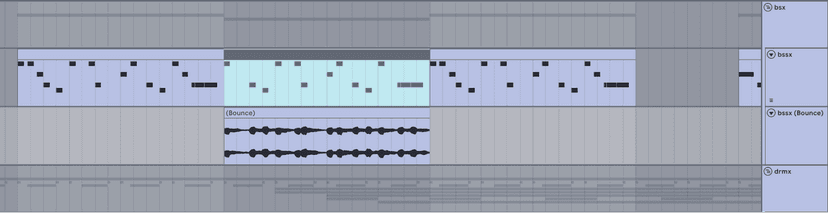
There are two commands, and the difference is what happens to the original:
Bounce Track in Place renders the whole track and replaces it, devices and all. Bounce to New Track renders it onto a new track and leaves the original where it is, muted — the safer one, and the one to use while you are still deciding.
- The Bounce Track in Place command is available in the track title bar and clip context menus. The Bounce to New Track command is available in the clip context menu, as well as via the shortcut CtrlAltShiftJ (Win) / CmdOptionShiftJ (Mac).
- When bouncing to a new track, the rendered audio clips are added to a separate track beneath the source track. After bouncing, the source clips are muted so that there is no doubled output.
- The Freeze and Flatten Track command and the Flatten command for frozen tracks have been renamed to Bounce Track in Place.
- Bounced files are stored in a new Samples/Processed/Bounce folder within the Project folder.
Bounce a group track and you get the group's summed output, processing included. Bounce the drums once you are happy with them and the rest of the mix gets easier.
Do this now
- Group your drums, and put one compressor on the group rather than on each drum.
- Set up one reverb on a return and feed four tracks to it with sends.
- Switch one send to pre-fader and hear what changes.
One reverb on a return serving twelve tracks is a twelfth of the CPU and a better mix.