Audio Effects
Autofilter
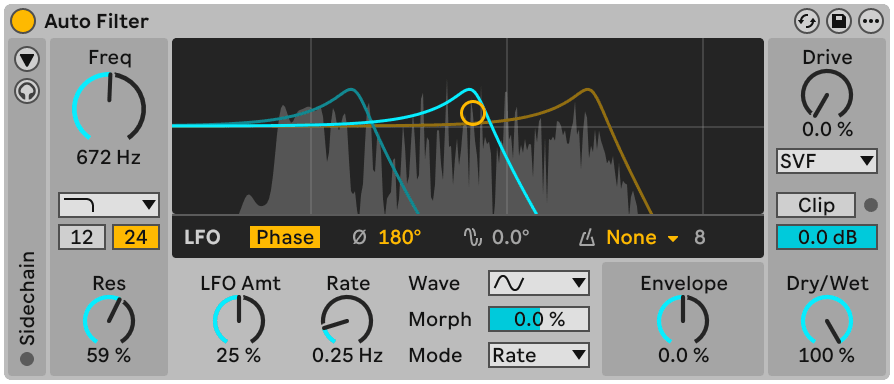
This audio effect is one of our primary go-to tools when it comes to the creative filtering of any type of audio signal.
It works the same as the filters we find in Simpler or some of the synthesizers and it’s designed to create desirable artifacts along with using resonance.
The Auto Filter effect provides classic analog filtering. It can be modulated by an LFO to create moving filter effects. The envelope follower can track
either the filtered signal or an external sidechain source.
Auto Filter offers a variety of filter types including lowpass, highpass, bandpass, notch, and a special Morph filter.
Auto Filter's output stage
Auto Filter has been redesigned, both in terms of the UI and sound.
The new device layout emphasizes key parameters and features improved visualizations. Filter frequency modulation is now displayed separately for the left and right channels. Additionally, a real-time signal spectrum for the output has been added to visualize how the parameters affect the output.
New Filter Types
Several new creative filter types have been added:
- The DJ filter controls both a low-pass and a high-pass filter with a single parameter, similar to certain DJ mixers. Values above zero filter out low frequencies and emphasize high frequencies, while values below zero filter out high frequencies and emphasize low frequencies.
- The Comb filter produces flanging effects, especially when modulated.
- The Vowel filter shapes the sound to resemble the human voice by emphasizing formants.
- The Morph filter now features four different slopes. Furthermore, it is now possible to morph between low-pass and high-pass filtering, with band-pass in between.
- A Resampling filter and a Notch + LP filter complete the new additions.
Updated Filter Circuits
The available filter circuits have changed:
- SVF functions as a linear/clean filter, but can also introduce distortion if Drive is set above zero.
- DFM is a new filter circuit that internally feeds back more of its distortion, resulting in a broad range of tones from subtle filter sweeps to warm drive.
- MS2 uses a Sallen-Key design and soft clipping to limit resonance. It is modeled on the filters used in a famous semi-modular Japanese monosynth.
- PRD uses a ladder design and has no explicit resonance limiting. It is modeled on the filters used in a legacy dual-oscillator monosynth from the United States.
Modulation Improvements
- The list of available LFO shapes has been extended to include: Wander, Ramp Up, and Ramp Down.
- LFO Morph transforms and tilts the LFO shape in various ways.
- The S&H shape now has a dedicated smoothing parameter.
- LFO quantization can be applied in one of two modes:
- In Steps mode, the LFO modulation only updates at specific intervals, which are defined by the current LFO speed divided by the selected number of steps.
- In S&H mode, the LFO only updates based on the selected S&H beat time.
- In the Envelope Follower, the Envelope Attack Hold parameter ensures the envelope completes its full attack phase, even if the input signal consists only of short transients.
- The sidechain signal can be summed to mono via the Mono Sidechain option in the device title bar’s context menu.
- An EQ has been added to the sidechain section.
Improved Signal Flow
- A dedicated Output control allows you to compensate for increases in loudness, which is useful when using high Drive values.
- Enabling the Clip toggle applies soft clipping to ensure the output signal does not exceed 0 dB, which is especially useful when using high resonance and Drive values.
- The Dry/Wet control lets you balance the dry and processed signals.
Drumbuss
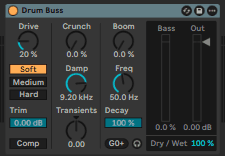
For many producers this will be the favorite as it has the ability to instantly make drums sound big and fat, dirty or deep.
A clever combination of controls allows for the creation of a wide variety of very specific drum sounds in no time with different waveshaping drive modes, a transient shaper and the incredible boom section that boosts the sub bass while controlling its decay and tuning.
Tuning drums can really help your mixes and here we even have a note display to get those lowest frequencies in the right key!
Spacial Effects
Hybrid Reverb
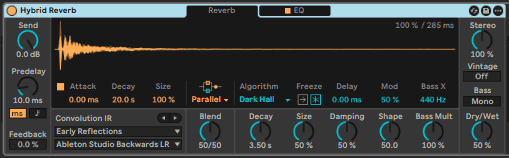
Reverb is one of the most widely used time based effects in audio, and one of the most fascinating. Depending on how you use it, it can help or hinder your mix. Luckily, many parameters on reverb plugins are the same or similar, and can be explained across platforms. Understanding reverb is important, and this article will explain key reverb parameters in order to add space, dimension, smoothness and professional quality, as well as tips to avoid muddiness and over-saturation.
TYPES OF REVERB
Reverb gives the impression that the recorded instrument is in a room. There are usually many presets to simulate different rooms.
Room: Reproduces a real physical space, usually a smaller room with.2-1 second reverberation time.
Hall: Indicates a concert hall, a lively sounding space with reverb from 1.2 seconds to 3+.
Chamber: Chamber is usually smaller than the hall but larger than a room, with decay of.4 to 1.2 seconds. The shorter times are meant to enhance clarity between a small group of instruments.
Spring: An emulation of reverb created by the vibration of a metal spring. Many guitar amps utilize this mechanism for a metallic sounding reverb.
Plate: Plate reverb is an artificial reverb that simulates an actual metal plate that vibrates from an electromechanical transducer. A pickup captures the vibrations and outputs an audio signal.
COMMON TERMS
Early Reflections are the first reflections that hit walls, ceilings and floors. These reflections occur from around 1 to 30 milliseconds.
Pre-Delay is the amount of time before these reflections occur.
Decay is the continuation of the reverb as the sound waves bounce against the surfaces. This can last from 30 milliseconds to however long the parameters are set. The tail will extend to
PARAMETERS
Room Size: The general criteria for room size are the larger the room, the longer the reverb times.
Decay Time: The amount of time before the reflections dissipate completely.
Damping: Damping attenuates high frequencies, simulating softer surfaces like wood instead of marble. This parameter gives a warmer sounding reverb.
Diffusion: The increase of diffusion makes the sound thicker, pushing reflections together. The reduction of diffusion makes the sound almost more like individual echoes.
Pre-Delay: Before the sound hits any surface, there is a time lag. This is called pre-delay. The larger the lag, the larger the space will seem.
Density: The density of the reflections in the reverb tail can be controlled. Usually the denser the reverb the more natural and better it sounds, but it all depends on the context and sound you’re going for.
GENERAL GUIDELINES FOR UNDERSTANDING REVERB
Though it depends on your project, using one reverb with your instruments across the board is a great way to tie together your mix. You can do this by creating an auxiliary track with your favorite reverb and bussing the instruments you’d want in a space to this track. However, our brains have the capacity to hear different instruments in various spaces at the same time without forming a disconnect between any of the instruments. Sometimes an engineer will place the snare in a small room, the guitar in an ambient space, and the vocals in a church.
Beware the temptation to use too much reverb. Excessive and poorly used reverb muddies up mixes and distorts clarity. The direct sound of an instrument is very important for establishing directionality and accuracy, as well as articulation in dynamic detail. Unless you are going for a specific effect, keep your decay times reasonable in order to preserve a good performance. Avoid using reverb on bass heavy instruments, as this will accentuate low frequencies and obscure the mid-range. This includes the bass guitar and bass drum. Great instruments to use reverb on include vocals, guitar, snare, and toms. Piano and keyboards should be evaluated on a case by case basis, as pianos almost have reverb built into them with the vibration of the strings.
Less tends to be more with reverb. On the other hand, extreme reverb has also been used to cover up mistakes or mask poor production, which is never recommended. A good use of reverb is to make it enhance the mix, but appear generally imperceptible or unnoticeable, unless there for effect. This understanding reverb article mostly describes natural reverb, but possibilities are just about endless for creative expression within a song. Experiment to what sounds good to your ears; blend reverbs, use unorthodox settings such as shorter/longer decay times, custom EQ different rooms on the standard settings, or pan different reverbs in different areas of the mix. Audio is malleable, and experimentation could yield some exciting results.
Echo
Rhythmic Delays and Spacial Modulation Effects
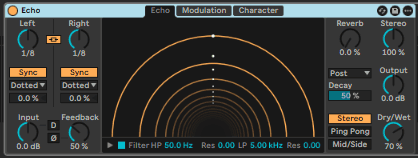
It is a spacial effect that is combining many different echo and delay effects along with modulation and reverb. Delays can run free or synced in stereo, ping pong or mid/side mode.
There is a HP and LP filter with resonance.
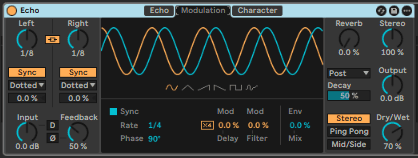
It’s possible to modulate delay times and filter frequencies and also mix in an envelope follower as modulation source. one of my faves here is the integrated Reverb that can be placed before or after the delay and even inside the feedback loop. I wish we could also place the filter in the feedback loop but then there are workarounds to achieve similar effects with the filter modulation.
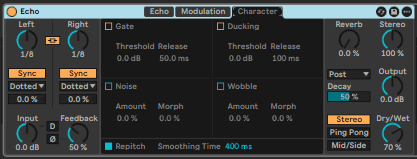
Last but not least we have some rather original controls in the Character section.
Gate exempts lower signals from being sent into echo’s effects, a very interesting option to keep parts drier depending on dynamics.
Useful also the Ducking, it reduces the wet signal while the input signal is still present.
Noise and Wobble help to simulate vintage tape effects.
Modulation
This type of classic effects is useful to create movement and stereo width while adding a smooth or metallic sheen to the sound,
Phaser, Flanger, Doubler
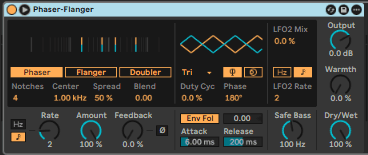
This is as a modulation effect based on varying short delays with an LFO.
- Use a 100% wet setting for starters and drag the ball to explore different delay and feedback settings. The LFO and Envelope work in exactly the same way as in Autofilter, except here it modulates the delay time.
- You can use this on anything that has some higher overtones: drums musical parts vocals and entire tracks as a typical DJ effect.
Saturator
Main Features
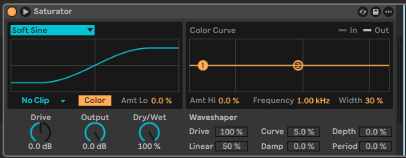
A real time visualization displays the signal level over the curve.
A Bass Enhancer shaper curve, perfect for processing low-end signals such as 808 kick drums and synth bass lines.
The curve comes with a Threshold parameter, which makes it possible to seamlessly morph between soft and hard clipping.
An additional clipping mode for the second stage: alongside Soft, you can opt for a Hard Clipping stage.
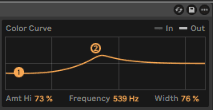
In the expanded view, the pre-shaper EQ curve is displayed alongside input and output spectra, for superior control over the Color parameters.
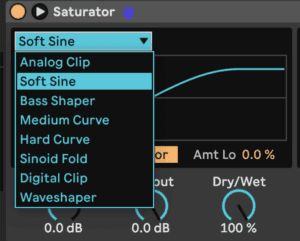
Curves
Shaper Curve
Displays the input signal in relation to the curve. Saturation occurs when the input signal reaches the non-linear sections of the curve.
The Bass Shaper is ideal for processing deep low end sounds such as 808 kick drums and synth basses. Use Threshold to morph between soft and hard clipping.
Only signals above the set threshold will be saturated!
The Soft Clip Output drop-down menu now includes a Hard Clip option, in addition to the standard No Clip and Soft Clip entries.
When the Color Curve display is expanded, the pre-shaper EQ curve is displayed alongside the input and output spectra, making it easy to evaluate adjustments to the Color parameters.
Waveshaper
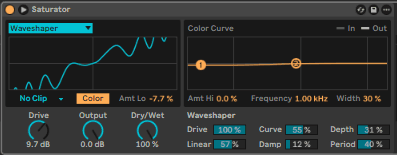
Waveshaper Drive
Determines how much the additional
Waveshaper controls affect the input signal.
At 0.0%, the controls have no influence on the curve. When set to 100%, the controls fully shape the curve.
Curve
Adds mainly third-order harmonics to the input signal.?
Depth
Superimposes a sine wave onto the Waveshaper curve and sets its amplitude.
The higher the percentage, the more audible the sine wave becomes.
Linearity
Alters the linear portion of the Waveshaper curve, which is also affected by the Curve and Depth parameters.
Damping
Flattens signals near the center of the waveform. Higher values can create a fast noise gating effect.
Period
Determines the number of ripples in the sine wave created by the Depth parameter.
Higher values result in more frequent oscillations, while lower values produce a simpler waveform.
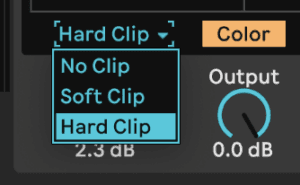
Select a post clipping stage. When Soft or Hard is selected, Saturator’s output will never exceed the level set by the Output control. This is particularly useful for controlling any additional boost created by negative Color values.
Redux
Digital distortion/degradation, digital artifacts and bit crushing.
Nostalgic for the sound of 80ties digital samplers, for low-resolution sound quality of the SP12, or a Commodore-64 computer? Redux returns us to the Dark Ages of digital by reducing a signal’s sample rate and bit resolution.
Saturation and Distortion
Pedal
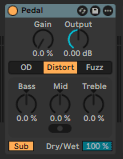
The name suggests that it was meant to be a guitar effect but i love the sound of this simple overdrive effect and i will mainly use it on synths that to add warmth and musical distortion.
When drumbuss will be my goto signal processing tool for drums, percussion and more rhythmic material, i’m planning to use Pedal for my bass and lead sounds to add higher harmonics or fuzzy distortion. Going from OD over Distort to Fuzz we can seamlessly create many shades of overtones, from clean to to heavily distorted with Fuzz. Gain amount being the driving force, the tone controls are particularly effective in this context and the added sub always does the job wonderfully. Take a simple sine wave as input and Pedal could just make about anything out of it.
Redux
Digital distortion/degradation, digital artifacts and bit crushing.
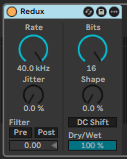
Nostalgic for the sound of 80ties digital samplers, for low-resolution sound quality of the SP12, or a Commodore-64 computer? Redux returns us to the Dark Ages of digital by reducing a signal’s sample rate and bit resolution.
Roar is a new addition in Ableton Live!
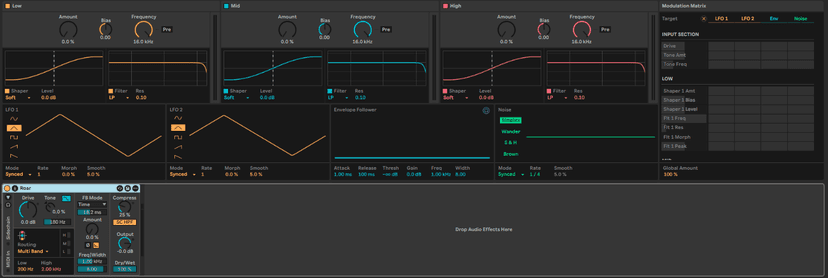
This is the ultimate multi band Saturation and Distortion unit. It can transform your sounds in drastic ways and can even be used on the whole mix to control lo/mid/hi harmonics in subtle way and add warmth or dirt.
Roar can comfortably move from subtle and precise, mastering grade warmth to wild and unpredictable sound mangling.
Input signals can be routed into one of five different processing modes: Single, Serial, Parallel, Multiband, Mid/Side, and Feedback
Roar offers a selection of saturation shaper curves, varying from subtle to distorted, that can be shaped further using Amount and Bias controls. The filter frequency can be adjusted and applied before or after the shaper.
There are two LFOs, an Envelope Follower, and a Noise generator for complex modulation possibilities, as well as an expansive Modulation Matrix for easy mappings for most of the device’s parameters.
Feedback can be added to the output, as well as built-in compression with a sidechain high-pass filter.
We will cover Roar in more detail in the Sound Design classes!
Roar's Delay routing
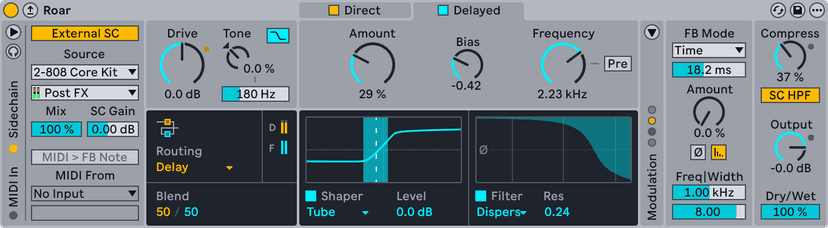
- Added a new Delay routing mode. In this mode, the second stage processes the delayed signal from Stage 1. Unlike the Feedback routing mode, the delayed signal is sent to the second stage without being scaled by the feedback gain. This creates single (distorted) repetitions or slapbacks. The output of Stage 2 is fed back into itself and scaled with the feedback gain, enabling multiple repetitions and long signal tails. The Blend control can be used to mix between the output of Stage 1 and Stage 2.
- Added a new Dispersion filter type. This filter distorts the signal's phase in a frequency-dependent manner. This can lead to interesting metallic, spring-like artifacts, especially when modulated.
- Added an external sidechain that can be used to feed the envelope follower modulation source with signals from other chains or tracks.
- Added a MIDI sidechain that can be used to control the pitch of the feedback in Note mode.
- An Envelope Hold toggle is now available in the Envelope section. It ensures that the envelope completes its entire attack phase before entering the release phase.
- Modulation signals are now visualized using LEDs in the Modulation column. This helps identify how modulation sources are set up and whether they are active in any modulation routing—without needing to dive into the Modulation Matrix.
Audio Effects Rack

Effects can be routed in series or parallel and folded (Echo) if screen space is limited.
In Series

Parallel Routing

Chain Selector

Using the Chain we can then dial in different effects and even crossfade between them. The Chain selector can then be mapped to macro and automated or modulated in Session and Arrangement View,
With many effects pre loaded effects in parallel this can facilitate some riveting evolving sound design possibilities
Note that in this example the Hybrid Reverb is placed outside the Rack, so it will affect both chains!
Macro Mapping and Creating Macro Variations
With the + button the side we can add up to 16 macros. Right clicking on any device parameter will open the list of macros you can use.
The camera/snapshot icon open up a section where can store different macro settings Use the Random button to randomizes the settings!

Selecting Map allows you to assign any of the knobs to the devices inside the rack.
MIDI Effects
Pitch

These tools are not as important as the previous ones but they can be quite useful. The Pitch device is a transposition tool that changes the incoming note pitch by +/- 128 semitones. In some situations it can be handy when you would like to change an octave between the two instruments quickly. With this effect you don’t have to change or rewrite the MIDI notes. There are other methods of usage like transporting your entire track to a different key, or blocking incoming MIDI messages depending on the range of the pitch. This can be really handy when you split your keyboard to play different instruments on different ranges of the piano roll.
The note length is kind of an amplitude envelope reshaper. With this you can determine the length of the notes. It can be quite useful in some situations. For example if you are playing 1/16th notes, it sometimes happens that you are holding the notes a bit longer than it is necessary. With this tool no matter how long the notes are held it always sounds like a sixteenth.
MIDI effects, like audio effect plug-ins, are used to add rhythmic and harmonic spice to exiting tracks as well as to help morph the notes you play on your MIDI controller into new and exciting ideas. They can also be used to restrain notes and rhythms within the bounds of chords, keys, and scales that may lie outside of ones understanding of music theory. MIDI effects can create life and variation (or stability) in any MIDI based track, be it in real-time or after having been recorded. Here are some of our favorites and how we use them.
Chord
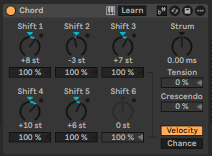
This device helps you to create chords while holding only one note at a time. As you can see there are six slots available. This effect assembles a chord, as the name implies, from each incoming note and up to six others of user-defined pitch. The Shift 1-6 knobs allow selecting the pitch of the notes that contribute to the chord from a range of +/- 36 semitones relative to the original.
But before we start tweaking this feature, it is essential to know how to form a simple major chord. I’m not going to dig deep in the science for music anatomy – just a small overview about the chords.
If you want to form a chord first you have to choose a scale – in our case C major. The C major scale is called a major scale because it follows a particular pattern of intervals. What is an interval? It is the gap between two notes. Any kind of music you write will use intervals. Every major or minor scale has 7 notes and each note represented by a number. Example in C Major the first note is C, so the number is 1. D is the second so the number 2 etc.
If you want to form a major chord you have to use the first the third and fifth degree of the scale. These intervals will give you the major chord. In C major for example, the C major will built from C-E-G because the intervals are 1-3-5 on the scale. Using this principle we can form a simple major chord with the chord MIDI device.
Important note: The Chord device based on the chromatic scale not on scale patterns. This means that if you have already set the shift knobs to 1-3-5 it will sound awful because the chord device only uses semitones. Every octave contains 12 semitone but the major scales build up from seven semitones. Each scales type has a predetermined pattern.
So we have to count the semitones until we reach the scale third and fifth degree. If you counted correctly the settings are the following: Shift 1 to +4 semitones and Shift 2 to +7 semitones yields a major chord in which the incoming note is the root. Now this isn’t a set in stone rule, it’s just a good guideline to start off with.
So now if you hit example a C note it will sound like C major chord. And after you became familiar with the device you can create more complex chords like major 7 chords or diminished chords by using your music knowledge. With this feature you can easily pick up any kind of chords during the production.
Arpeggiator
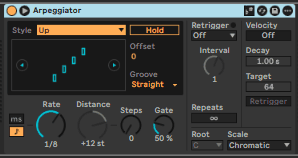
Ableton gives us an excellent arpeggiator. What does it do? Live’s Arpeggiator effect takes the individual MIDI notes from a held chord (or single note), and plays them as a rhythmical pattern. Arpeggiators are a classic element in Eighties synth music. The name originates with the musical concept of the arpeggio, in which the notes comprising a chord are played as a series rather than in unison. Arpeggio is derived from the Italian word arpeggiare, which refers to playing notes on a harp.
I won’t explain this device too deeply because it’s beyond the scope of this tutorial. If you are interested in how this device arpeggiates each chord you can read the Live manual, where you will find excellent illustrations. I wrote this brief explanation because we are going to use the Arpeggiator in the next steps.
Scale
While the new Global Scale Mode is great for recording and generating new melodic parts and chord progressions from scratch, the Scale midi effect can be useful to scale correct existing midi on playback.
When playing live however there is no easy “in Scale” mode that prevents you from playing the same note twice unless you use a midi controller (e.g. Push or Maschine)
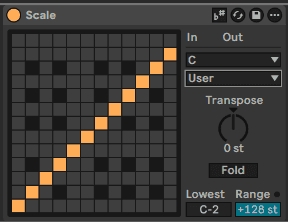
With Scale on Notes will be mapped according to the selected global Scale.
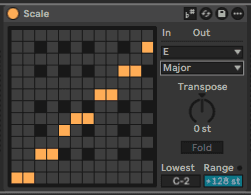
This device can be really handy if you are using at the right context. What does this effect do? Scale alters incoming note pitch based on a scale mapping. Each incoming note is given an outgoing equivalent on the X-Y scale map of the effect: All incoming Cs, for example, might be converted to outgoing Ds.
Why is this handy? When you are playing notes, for example writing a lead track, you sometimes happen to hit the wrong note which is not part of the scale. In this case it will sound enharmonically according to the rest of your progression. To prevent this issue use this device. It will transpose that wrong note, flatten or sharpen it to the nearest correct note based on the scale. So your work remains in harmony.
Of course it can be wrong also but you can reduce or eliminate the small misses which occur during the performance. And trust me it will happen if you have to be fast on your keyboard.
Ableton gives us various presets of scale patterns like the minor, harmonic minor, melodic minor and major scales. So you don’t have to program it by yourself. Just always to be sure to turn the base knob to the right key and using the right presets. This following example is in the C minor key because it is transposed by the scale effect.
In this tutorial we’ll take a look at how Scale works and map out some of our own scales.
Like Audio Effects, Midi Effects can also be grouped and routed both in series or parallel, where they can also be “dialed in” with the Chain Selector.
The Basics Of Scale

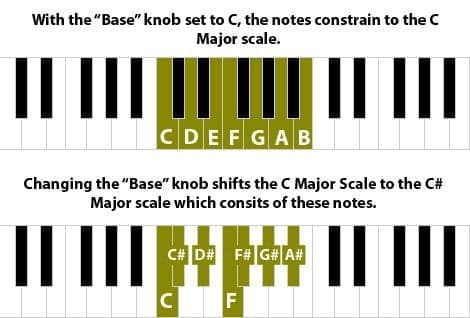
A full octave of notes runs 12 keys (both white and black) on a keyboard. Here is what one octave looks like on a keyboard:
In this octave there is the potential for a scale. A scale is a sequence of notes within the octave that fits a musical key.

Below is an example of a C Major Scale:
If a song is in the key of C Major, you could play any of those notes, and it would make “musical sense” within the song. Any of the black keys (sharp/flat notes) would not fit within a C Major scale. This is where Ableton’s Scale comes in. With Scale, you can make it so that the black keys (sharps/flats) are forced to play the same notes as the white keys. For example; an A# note on your keyboard would be shifted with Scale to play an A note
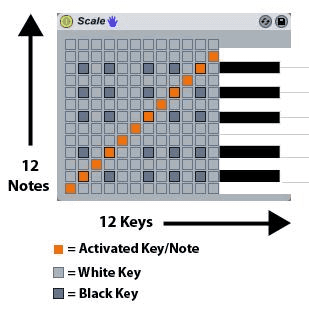
Sure there are doubles of some notes (the A# key plays an A note, as well as the A key), but this means it’s impossible to play the “wrong notes” in any particular scale.
Ableton’s Scale In Action
Scale is great for matching notes to scales in playback, when playing live however there is no easy “in Scale” mode that prevents you from playing the same note twice!
As a simple exercise, we’re going to force all twelve of our keys to play only C notes.
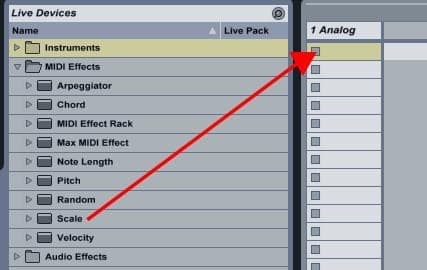
- Drop a soft synth (Analog or Operator is fine) onto an empty MIDI track.
- Under the MIDI Effects folder in Ableton’s File and Device Browser, drop “Scale” onto the same MIDI track.
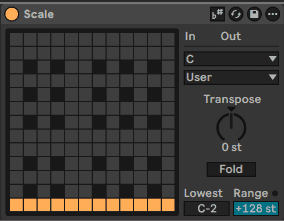
- Your copy of Scale should now look like this:
- Click to activate each square on the bottom row of Scale.
- Play some notes on your keyboard. Notice no matter what key you hit, you’re always getting a C note.
- The only difference is when you reach the end of 12 keys, it changes an octave higher or lower.
Using Scale’s “Base” Knob
Even though we have a simple “All C Notes” scale programmed, let’s change the base of the scale with the “Base” knob.
In Scale, locate the knob labeled “Base”. Shift the knob up once to C#.
Play some notes on your keyboard.
You should only hear C# notes being played. What’s happening is that Scale has shifted the “Base” of our notes to C#.
Shifting The Key Of A C Major Scale
Lets program a C Major scale (I know there is a preset for this, but learn by doing!):
- Change back our base scale to C on the “Base” knob.
- Reset back to the “All C Notes” scale by click on the lowest notes horizontally. Your scale should look like this:
- Leave the first two horizontal boxes (C and C#) at a “C” note.
- Bring the next two horizontal boxes (D and D#) 2 steps up to a “D” Bring the next horizontal box (E) 4 steps up to an “E”
- Bring the next two horizontal boxes (F and F#) 5 steps up to an “F”
- Bring the next two horizontal boxes up (G and G#) 7 steps up to a “G” Bring the next two horizontal boxes up (A and A#) 9 steps up to an “A” Finally, bring the last horizontal box (B) 11 steps up to a B.
- Your final C Major scale should look like this:
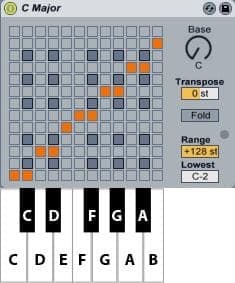
At this point, all you have to do is turn the “Base” knob to any desired key, and your scale will conform to that key
Here is what the key shift looks like:
Transpose
Use this option to transpose your performance up a certain number of steps. Similar to the “Base” knob, however, this option does not change the root of the scale.
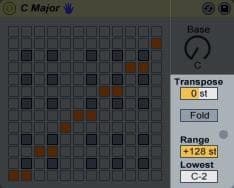
Fold
If a note is six semitones away from the original, this button will shift it down an octave. Say you have a C1 and next to it you have a G#2, enabling fold will shift the G#2 to a G#1.
Range and Lowest
These options allow you to set the range of keys that are affected by Ableton’s Scale. With the Lowest note selected, and a certain range set, you could theoretically map a scale to only a set amount of keys.
Midi Effects Rack


Max4Live
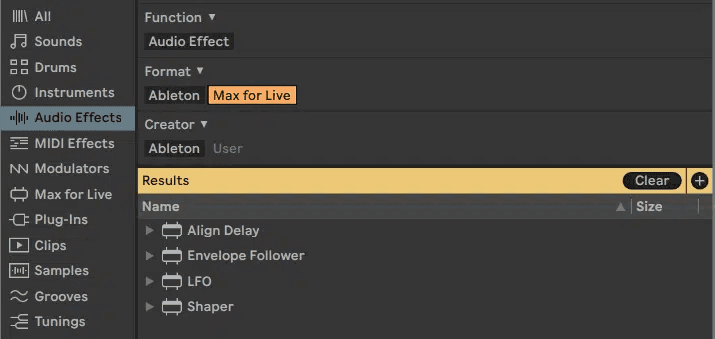
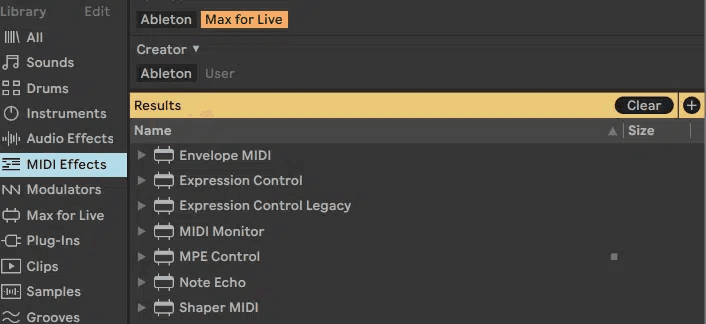
M4L is using a programming environment that is typically used to create synthesizers, audio and MIDI effects. It’s also a bridge that allows Max/MSP to also control aspects of Ableton Live
In addition to Live’s effects you can also use the various M4L effects. Some of these M4L devices create very substantial additions to Live’s functionality.
We’ll be looking at some of the most interesting devices during the Sound Design classes.
Do this now
- Build a chain on a drum loop: Auto Filter, Saturator, Drum Buss.
- Group it into an Audio Effect Rack and map one macro to three parameters at once.
- Save it as a preset and use it on a different loop.
A rack you built and named beats a preset you found, every time.