Filter, Drive and Shaper, Using FM/AM OSC, Pitch envelope
The Filter in Ableton’s Sampler is a powerful tool for shaping the sound of your samples. It allows you to apply a variety of filters to your samples. In addition to the low pass, high pass, band pass and notch filters and there is also a morph filter.
To use the filter in Sampler, first load a sample into the device. Then, click on the Filter/Global tab in the title bar.
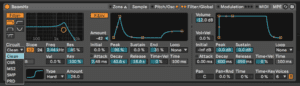
- Filter Circuit:
- Choose the type of filter circuit you want to use from the drop-down menu. Each circuit type has its own unique character and frequency and resonance response. They are the same vintage circuits already in Wavetable, Operator and Simpler.
- Besides Clean we have the following vintage modeled filters:
The OSR circuit option is a state-variable type with resonance limited by a unique hard-clipping diode. This is modeled on the filters used in a somewhat rare British monosynth, and is available for all filter types.
The MS2 circuit option uses a Sallen-Key design and soft clipping to limit resonance. It is modeled on the filters used in a famous semi-modular Japanese monosynth and is available for the low-pass and high-pass filters.
The SMP circuit is a custom design not based on any particular hardware. It shares characteristics of both the MS2 and PRD circuits and is available for the low-pass and high-pass filters.
The PRD circuit uses a ladder design and has no explicit resonance limiting. It is modeled on the filters used in a legacy dual-oscillator monosynth from the United States and is available for the low-pass and high-pass filters. - Cutoff Frequency: This controls the frequency at which the filter begins to attenuate the signal.
- Resonance: This controls the amount of emphasis at the cutoff frequency, creating a “peak” in the frequency response curve.
- Envelope Amount: This controls the amount of filter envelope modulation applied to the filter cutoff frequency.
- Velocity Amount: This controls the amount of filter velocity modulation applied to the filter cutoff frequency.
- Key Amount: This controls the amount of filter key tracking applied to the filter cutoff frequency.
By adjusting these controls, you can shape the sound of your sample in a variety of ways, from adding warmth and depth to removing unwanted frequencies. Experiment with different filter types and settings to achieve the desired sound.
Drive applies additional gain to the signal before it enters the filter. It adds harmonics to the sound, making it sound warmer and more saturated. At higher values it can creates distortion.
It’s worth noting that the Drive parameter can be very powerful and can easily distort the sound beyond recognition. It’s important to use it sparingly and to adjust it to taste.
The Shaper is a distortion effect that can also add harmonic content and warmth to your samples. There are several Types that apply different types of distortion:
- Soft: Adds warmth and saturation, similar to the sound of a tube amplifier.
- Hard: Adds a hard, clipping distortion.
- Sine: Adds a harsh, digital distortion.
- 4Bit: Adds a subtle, smooth distortion.
Shaper’s overall intensity can be controlled with the Amount slider. In addition, the signal flow direction can be adjusted with the button above the waveshaper area: with the triangle pointing up, the signal passes from the shaper to the filter; with the triangle pointing down, it passes from the filter to the shaper.
The Shaper can be a useful tool for adding character to your samples, especially if you’re working with sounds that need to cut through a mix or stand out in some way. Just be careful not to overdo it, as too much distortion can quickly become overwhelming or unpleasant to listen to.
The Filter Envelope control the cutoff frequency over time for evolving subtractive synthesis.
Pitch/Osc
Here we find a pitch envelope along with an envelope of a modulation oscillator that allows us to to apply frequency and amplitude modulation to samples which is great to create metallic and harsh inharmonic timbres or just additional harder, higher harmonics.
The Pitch Envelope
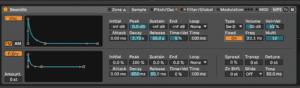
It allows you to modulate the pitch of a sample over time. This can be used to create a variety of effects, such as pitch rises, falls, and bends.
To use the filter in Sampler, first load a sample into the device. Then, click on the Filter/Global tab in the title bar. Here you will find a variety of filter controls:
To use the Pitch Envelope in Sampler, follow these steps:
Click on the Pitch Envelope button to enable the Pitch Envelope view.
- Adjust the Attack, Decay, Sustain, and Release parameters to set the shape and timing of the pitch envelope. The Attack determines how quickly the pitch rises at the start of the envelope, the Decay determines how quickly it falls, the Sustain determines the level of the pitch after the attack and decay, and the Release determines how quickly the pitch falls at the end of the envelope.
- Use the Amount parameter to set the amount of pitch modulation applied by the envelope. A positive amount will cause the pitch to rise, while a negative amount will cause it to fall.
With these controls, you can create a wide variety of pitch modulation effects in Sampler.
The Modulation Oscillator envelope controls the modulation amount over time.
Under Type you can choose from a list of modulating waveforms, then adjust the modulation amount (modulated by the envelope) with Volume.
Fixed and Coarse set the tuning (Ratio) of the modulation oscillator. Fixed is set in Hertz and Coarse follows the note played at a harmonic Ratio. This works very much like the FM synthesis we’ve used in Operator and Wavetable.
In AM mode, the modulation oscillator will modulate the amplitude of samples. Subsonic modulator frequencies result in slow or rapid variation in the volume level; audible modulator frequencies result in composite waveforms.
Below the modulation section we find controls for Spread (wider stereo image) as well as the global Transposition and a Glide controls.
Do this now
- Load a sustained sample into Sampler and put the filter in a self-oscillating setting.
- Add drive before the filter, then move it after and hear the difference.
- Use the Shaper to add harmonics the sample never had.
Drive before a filter is dirt you then shape. Drive after is dirt on top. They are not the same.