Mapping works the same on every device here. Activate the Map switch, then click any parameter in Live to assign it as the target. Each modulator can drive one destination, so use several instances when you want several things moving.
M4L Modulators: Audio and Midi
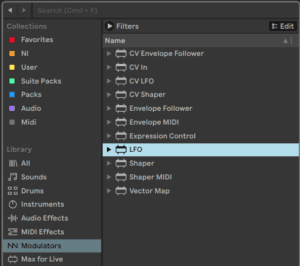
With these M4L Modulators we can control just about any parameter of Live’s instruments, effects, as well as the controls of the Mixer!

Audio Effects
LFO
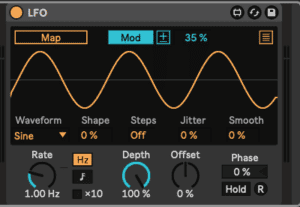
LFO is a parameter modulation LFO for Live-specific parameters and third party plug-in parameters.
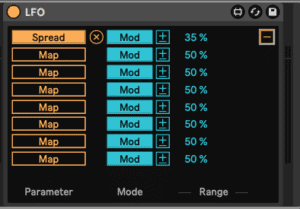
Activate the Map switch and click on a parameter in Live to assign it as a mapping target. You can access up to eight assignable Map slots by clicking on the Multimap button at the top-right of the display. To unassign a parameter, click on the Unmap button to the right of its Map switch. The Min and Max sliders let you scale the resulting output range after the modulation is applied.
You can choose from one of seven different modulation waveforms: sine, sawtooth up, sawtooth down, triangle, rectangle random and binary noise.
The Jitter slider adds randomness to the waveform, while the Smooth control smooths value changes.
The Rate control specifies the LFO speed. The switches to the right of the Rate control toggle between frequency in Hertz and tempo-synced beat divisions.
Depth sets the overall intensity of the LFO. Offset changes the starting point, or initial phase of an LFO, so that it begins at a different point in its cycle.
The phase of the LFO can be shifted using the Phase control. To hold the current output value, activate the Hold switch.
Click the R (Retrigger) button to re-trigger the phase of the LFO.
We can also target multiple destinations with one LFO when open the Map in the top right corner. Here we can switch between Uni- and Bipolar modulation and individually adjust modulation amounts.
Shaper
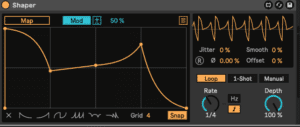
Shaper is a multi-breakpoint envelope which generates modulation data for musical expression.
You can create breakpoints by clicking anywhere in the display. You can also delete a breakpoint by Shift-clicking on it. Hold down the Opt key while dragging to create curved segments.
To clear the display, press the X button in the bottom left corner of the device. To the right of the X button, you can choose from one of six breakpoint presets.
You can adjust the size of the grid via the Grid slider. When Snap is enabled, all breakpoints that you create or reposition will snap to grid lines.
The smaller display on the top right provides an oscilloscope-style view of the output signal. The Jitter slider adds randomness to the waveform, while the Smooth control smooths value changes.
Depth sets the overall intensity of the LFO. The phase of the LFO can be shifted using the Phase control.
Click the R (Retrigger) button to re-trigger the phase of the LFO.
Note that re-trigger is not available if the Rate control is set to Sync mode.
Offset changes the starting point, or initial phase of an LFO, so that it begins at a different point in its cycle.
Envelope Follower
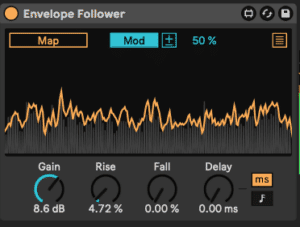
An Envelope Follower uses the amplitude of an incoming signal to create a modulation signal. A compressor use the incoming signal to lower the volume of a portion of the signal.
Envelope Follower uses a well-known technique which involves capturing a signal, smoothing and reshaping its amplitude course in order to obtain a more or less continuous curve, and finally mapping the curve to one or more control parameters.
The “auto-wah” effect is perhaps the most well-known application of the envelope following technique. We have an envelope follower inside the Autofilter to achieve that effect.
You can use the Gain knob to set the gain applied to the incoming signal.
The Rise parameter smooths the attack of the envelope, while the Fall control smooths the release of the envelope.
The Delay control sets the delay time of the envelope. The switches to the right of the Delay control toggle the delay mode between time-based and tempo-synced beat divisions.
Midi Effects
Shaper and Envelope Follower also exist as midi effects!
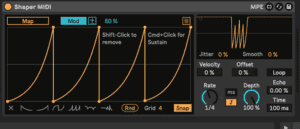
Shaper MIDI uses multi-breakpoint envelopes to generate mappable modulation data. Shaper MIDI can also be triggered dynamically using MIDI notes/velocity.
As soon as you play a midi note the Shaper gets triggered once. However if you enable Loop the shape will be repeated.
You can create a breakpoint by clicking anywhere in the display or choose from one of six breakpoint presets and one random breakpoint generator. The smaller display on the top right provides an oscilloscope-style view of the output signal. The Jitter slider adds randomness to the waveform, while the Smooth control smooths value changes.
These additional controls allow for further modulation of the envelope waveform:
- Rate specifies the envelope modulation speed.
- Depth sets the overall intensity of the envelope modulation.
- Offset takes over the value of the mapped parameter so that the envelope can modulate that value.
- Echo adjusts the amount of the envelope echo, while the Time control sets the echo time in milliseconds.
Activating the Loop switch will loop the modulation envelope as long as a MIDI note is held.
Envelope Midi
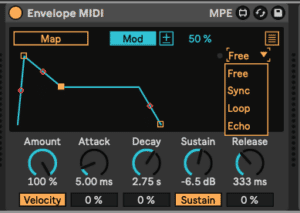
Envelope MIDI is an ADSR device that you can use to control any parameter in Live.
The Loop Mode drop-down menu lets you choose from one of four loop modes:
- Free: the trigger rate is unaffected.
- Sync: the trigger rate is defined by the song tempo. When Sync mode is active, you can set the trigger rate via the Sync Rate drop-down menu.
- Loop: the trigger rate is defined by the envelope time.
- Echo: this creates repetitions of the original envelope. When Echo is active, you can adjust the Envelope Echo Time and amount of Envelope Echo Feedback.
The Time slider sets the global envelope time.
When the Velocity switch is enabled, the envelope is modulated by note velocity. The Amount control determines the intensity of the modulation.
The Attack control sets the attack time of the envelope. The Attack Slope slider adjusts the shape of the Attack envelope segment.
The Decay control sets the decay time of the envelope. The Decay Slope slider adjusts the shape of the Decay envelope segment.
The Sustain control sets the level reached at the end of the Decay stage. The Sustain Mode switch toggles the Sustain function on or off.
The Release control sets the release time of the envelope. The Release Slope slider adjusts the shape of the Release envelope segment.
You can adjust the Attack, Decay, Sustain and Release parameters using the controls or by clicking and dragging in the envelope display.
Do this now
- Put an Envelope Follower on your kick and map it to a filter on a pad.
- Set the amount negative so the pad opens between kicks rather than with them.
- Add an LFO device modulating that envelope follower's own amount.
Sidechaining without a compressor, and far more flexible than one.