Ableton’s FM synth: Operator Overview
Ableton’s Operator is a software synthesizer that uses frequency modulation (FM) synthesis to create a wide range of sounds. FM synthesis involves using one “oscillator”, called the modulator, to modulate the frequency of another “oscillator”, called the carrier. These building blocks are referred to as Operators in FM synth and only Ableton (confusingly) uses Operator also as the name its own FM synth.
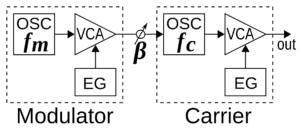
FM synthesis creates complex and evolving harmonic spectra, in combination with separate volume envelopes for each operator. The instrument features four operators, each with its own set of controls for adjusting the frequency, waveform and envelope for controlling the modulation amounts (levels), also referred to as Index, over time. The operators can be arranged in different configurations called Algorithms allowing for a variety of modulation routings and sound design possibilities.

In addition to this, Operator includes a filter for subtractive synthesis, an LFO and a pitch envelope which can be used to further shape and enhance your sounds. It also features a modulation matrix, which allows us to route various modulators to control different parameters of the synthesizer, such as the frequency, amplitude, and filter cutoff. This provides a powerful and flexible modulation system that allows for deep sound design possibilities.
Operator (oscillator) Functions
While the Operators are generally the basic building blocks of any FM synth, Ableton confusingly went ahead and called the entire instrument "Operator".
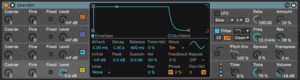
Each Operator has the same controls for tuning and amplitude
Coarse is used to refer to the coarse tuning of an oscillator. The Coarse control allows you to adjust the frequency of the oscillator as integer multiples of the note(frequency) played, which can be useful for creating melodic or harmonic content.
This control can be adjusted by dragging the Coarse knob in the FM Operator’s By modulating the Coarse parameter with the pitch envelope, you can create frequency changes over time.
The Fine controls allow for detunings away from exact note values which is great for creating clangorous, inharmonic sounds or tremolo effects when using small deviations only.
When using Fixed mode, the modulator oscillator will always modulate the carrier oscillator at a fixed frequency, regardless of the note or pitch being played. This can be useful for creating static or drone-like sounds, or for creating specific harmonic relationships between the carrier and modulator frequencies.
To enable Fixed mode in the FM Operator, you can click the “Fixed” button located in the modulation matrix. When Fixed mode is enabled, the modulation index parameter (level) will control the strength of the modulation, or how much the fixed modulator frequency affects the carrier frequency.
Built In Waveforms
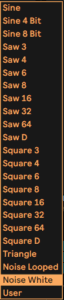
The oscillators come with a built-in collection of basic waveform types — sine, sawtooth, square, triangle and noise — which are selected from the Wave chooser in the individual oscillator displays. The first of these waveforms is a pure, mathematical sine wave, which is usually the first choice for many FM timbres. We also added “Sine 4 Bit“ and “Sine 8 Bit“ to provide the retro sound adored by C64 fans, and “Saw D“ and “Square D“ digital waveforms, which are especially good for digital bass sounds. The square, triangle and sawtooth waveforms are resynthesized approximations of the ideal shape. The numbers included in the displayed name (e.g., “Square 6“) define how many harmonics are used for the resynthesis. Lower numbers sound mellower and are less likely to create aliasing when used on high pitches. There are also two built-in noise waveforms. The first, “Noise Looped,“ is a looping sample of noise. For truly random noise, choose “Noise White.“
User Waveforms
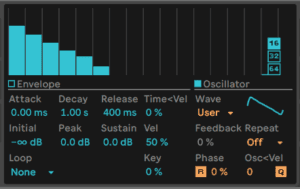
The “User“ entry in the Wave chooser allows you to create your own waveforms by drawing the amplitudes of the oscillator’s harmonics. You can also select one of the built-in waveforms and then edit it in the same way. The small display next to the Wave chooser gives a realtime overview of your waveform.
When your mouse is over the Oscillator display area, the cursor will change to a pencil. Drawing in the display area then raises or lowers the amplitudes of the harmonics. As you adjust the amplitudes, the Status Bar will show the number of the harmonic you’re adjusting as well as its amplitude. Holding [Shift] and dragging will constrain horizontal mouse movement, allowing you to adjust the amplitude of only one harmonic at a time.
You can switch between editing the first 16, 32 or 64 harmonics via the switches to the right of the display. Higher harmonics can be generated by repeating the drawn partials with a gradual fadeout, based on the settings in the Repeat chooser. Low Repeat values result in a brighter sound, while higher values result in more high-end roll-off and a more prominent fundamental. With Repeat off, partials above the 16th, 32nd or 64th harmonic are truncated.
The [right-click](Win) / [CTRL-click](Mac) context menu on the harmonics display offers options for editing only the even or odd harmonics. This is set to “All“ by default. The context menu also offers an option to toggle Normalize on or off. When enabled, the oscillator’s overall output level is maintained as you draw additional harmonics. When disabled, additional harmonics add additional level. Note that the volume can become extremely loud if Normalize is off.
You can export your waveform in.ams format to the Samples/Waveforms folder in your User Library via an option in the [right-click](Win) / [CTRL-click](Mac) context menu. Ams files can be imported back into Operator by dragging them from the browser onto one of the oscillator’s display areas. Ams files can also be loaded into Simpler or Sampler.
Hint: Both the built-in and user waveforms can be copied and pasted from one oscillator to another using the [right-click](Win) / [CTRL-click](Mac) context menu.
Level Envelopes
Operator has seven envelopes: one for each oscillator, a filter envelope, a pitch envelope and an envelope for the LFO. All envelopes feature some special looping modes. Additionally, the filter and pitch envelopes have adjustable slopes.
Level envelope controls the amplitude or volume of a sound over time (ADSR), while a pitch envelope controls the frequency or pitch of a sound over time.
In FM synthesis, level envelopes are commonly used to shape the overall timbre of a sound, controlling how it evolves and changes over time, while pitch envelopes are used to add movement and variation to the frequency of a sound.
For example, a level envelope might be used to create a plucked sound with a short attack and decay, while the pitch envelope might be used to add vibrato or pitch modulation to the sound.
Both level and pitch envelopes can be used to create a wide range of sounds in FM synthesis, and they are often used in combination with one another to create complex and evolving timbres.
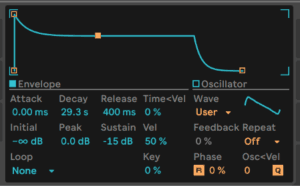
Each oscillator’s volume envelope is defined by six parameters: three rates and three levels. A rate is the time it takes to go from one level to the next. For instance, a typical pad sound starts with the initial level “-inf dB“ (which is silence), moves with an attack rate to its peak level, moves from there to the sustain level with a decay rate, and then finally, after note-off occurs, back to “-inf dB“ at the release rate. Operator’s display provides a good overview of the actual shape of any particular envelope and lets you directly adjust the curve by clicking on a breakpoint and dragging. The breakpoints retain their selection after clicking, allowing them to be adjusted with the keyboard’s cursor keys, if desired. Envelope shapes can be copied and pasted from one oscillator to another in Operator using the [right-click](Win) / [CTRL-click](Mac) context menu.
.With FM synthesis, it is possible to create endless, permuting sounds; the key to doing this is looping envelopes. Loop Mode can be activated in the lower left corner of the display. If an envelope in Operator is in Loop Mode and reaches sustain level while the note is still being held, it will be retriggered. The rate for this movement is defined by the Loop Time parameter. (Note that envelopes in Loop Mode can loop very quickly and can therefore be used to achieve effects that one would not normally expect from an envelope generator.)While Loop Mode is good for textures and experimental sounds, Operator also includes Beat and Sync Modes, which provide a simple way of creating rhythmical sounds. If set to Beat Mode, an envelope will restart after the beat time selected from the Repeat chooser. In Beat Mode, the repeat time is defined in fractions of song time, but notes are not quantized. If you play a note a bit out of sync, it will repeat perfectly but stay out of sync. In Sync Mode however, the first repetition is quantized to the nearest 16th note and, as a result, all following repetitions are synced to the song tempo. Note that Sync Mode only works if the song is playing, and otherwise it will behave like Beat Mode. Note: To avoid the audible clicks caused by restarting from its initial level, a looped envelope will restart from its actual level and move with the set attack rate to peak level.
There is also a mode called Trigger that is ideal for working with percussive sounds. In this mode, note off is ignored. This means that the length of time a key is held has no effect on the length of the sound.
The rates of all the envelopes in Operator can be scaled in unison by the Time control in the global section of the shell. Note that beat-time values in Beat and Sync Modes are not influenced by the global Time parameter. Envelope rates can be further modified by note pitch, as dictated by the Time < Key parameter in the global section’s display. The rate of an individual envelope can also be modified by velocity using the Time < Vel parameter. These modulations in conjunction with the loop feature can be used to create very, very complex things…
Global Section:Time and Tone
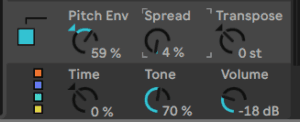
Below the Pitch section we find controls for global Time and Tone. They act very much like macro controls for anything that has to do with timing or tone.
Time would act as multiplier/scaler for envelopes i.e as a global control for all envelope rates, while Tone affects the creation of higher harmonics i.e the modulation index.
Midi Control, Polyphony and Pan
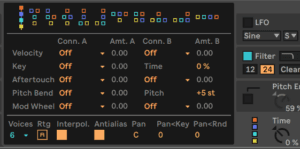
The drop down menus offer the same destinations that we see in the LFO and Pitch Modulation lesson next…
Do this now
- Load Operator and turn off oscillators C and D.
- Build one sound using only A and B and their envelopes.
- Then draw your own waveform in the User slot and export it as an .ams file.
Two operators will get you most FM sounds. Four is for when you know why you need four.